實現的原理比較直接,定義一個MessageHandler記錄WebAPI的請求記錄,然後將這些請求日誌推送到客戶端,客戶端就是一個查看日誌的頁面,實時將請求日誌展示在頁面中。 這個例子的目的是演示如何在PersistentConnection類外部給Clients推送消息 實現過程 一、服務端 服務 ...
實現的原理比較直接,定義一個MessageHandler記錄WebAPI的請求記錄,然後將這些請求日誌推送到客戶端,客戶端就是一個查看日誌的頁面,實時將請求日誌展示在頁面中。
這個例子的目的是演示如何在PersistentConnection類外部給Clients推送消息
實現過程
一、服務端
服務端同時具備SignalR和WebAPI的功能,通過定義一個記錄日誌的MessageHandler實現對WebAPI請求的攔截,並生成請求記錄,然後推送到客戶端
step 1
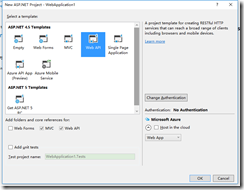
創建一個具備WebAPI功能的站點,為了簡化起見,設置Authentication為No Authentication
step 2
創建一個DelegatingHandler,用於記錄WebAPI日誌,代碼如下
下麵代碼沒有涉及到SignalR的功能,日誌展示是通過ILoggingDisplay介面傳入

public class LoggingHandler : DelegatingHandler
    {
        private static readonly string _loggingInfoKey = "loggingInfo";

        private ILoggingDisplay _loggingDisplay;

        public LoggingHandler(ILoggingDisplay loggingDisplay)
        {
            _loggingDisplay = loggingDisplay;
        }

        public LoggingHandler(HttpMessageHandler innerHandler, ILoggingDisplay loggingDisplay)
            : base(innerHandler)
        {
            _loggingDisplay = loggingDisplay;
        }

        protected override Task<HttpResponseMessage> SendAsync(HttpRequestMessage request, CancellationToken cancellationToken)
        {
            LogRequestLoggingInfo(request);
            return base.SendAsync(request, cancellationToken).ContinueWith(task =>
            {
                var response = task.Result;
                LogResponseLoggingInfo(response);
                return response;
            });
        }

        private void LogRequestLoggingInfo(HttpRequestMessage request)
        {
            var info = new ApiLoggingInfo();
            info.HttpMethod = request.Method.Method;
            info.UriAccessed = request.RequestUri.AbsoluteUri;
            info.IpAddress = HttpContext.Current != null ? HttpContext.Current.Request.UserHostAddress : "0.0.0.0";
            info.StartTime = DateTime.Now;
            ExtractMessageHeadersIntoLoggingInfo(info, request.Headers.ToList());
            request.Properties.Add(_loggingInfoKey, info);
        }

        private void LogResponseLoggingInfo(HttpResponseMessage response)
        {
            object loggingInfoObject = null;
            if (!response.RequestMessage.Properties.TryGetValue(_loggingInfoKey, out loggingInfoObject))
            {
                return;
            }
            var info = loggingInfoObject as ApiLoggingInfo;
            if (info == null)
            {
                return;
            }
            info.HttpMethod = response.RequestMessage.Method.ToString();
            info.ResponseStatusCode = response.StatusCode;
            info.ResponseStatusMessage = response.ReasonPhrase;
            info.UriAccessed = response.RequestMessage.RequestUri.AbsoluteUri;
            info.IpAddress = HttpContext.Current != null ? HttpContext.Current.Request.UserHostAddress : "0.0.0.0";
            info.EndTime = DateTime.Now;
            info.TotalTime = (info.EndTime - info.StartTime).TotalMilliseconds;
            _loggingDisplay.Display(info);
        }

        private void ExtractMessageHeadersIntoLoggingInfo(ApiLoggingInfo info, List<KeyValuePair<string, IEnumerable<string>>> headers)
        {
            headers.ForEach(h =>
            {
                var headerValues = new StringBuilder();

                if (h.Value != null)
                {
                    foreach (var hv in h.Value)
                    {
                        if (headerValues.Length > 0)
                        {
                            headerValues.Append(", ");
                        }
                        headerValues.Append(hv);
                    }
                }
                info.Headers.Add(string.Format("{0}: {1}", h.Key, headerValues.ToString()));
            });
        }
    }
LoggingHandler
step 3
引入SignalR相關packages
Install-Package Microsoft.AspNet.SignalR
新建一個PersistentConnection,代碼為空即可(因為不涉及到客戶端調用,推送也是在類的外部執行)
public class RequestMonitor : PersistentConnection
{
}
添加一個Startup類
public void Configuration(IAppBuilder app)
{
app.MapSignalR<RequestMonitor>("/monitor");
}
step 4
創建一個類實現ILoggingDisplay介面,用SignalR推送的方式實現這個介面
代碼比較關鍵的部分就是通過GlobalHost.ConnectionManager獲取當前應用程式的connectionContext,得到這個context就可以類似在PersistentConnection內部給clients推送消息

public class SignalRLoggingDisplay : ILoggingDisplay
    {
        /// <summary>
        /// PersistentConnection上下文
        /// </summary>
        private static IPersistentConnectionContext connectionContext = GlobalHost.ConnectionManager.GetConnectionContext<RequestMonitor>();

        public void Display(ApiLoggingInfo loggingInfo)
        {
            var message = new StringBuilder();
             message.AppendFormat("StartTime:{0},Method:{1},Url:{2},ReponseStatus:{3},TotalTime:{4}"
                , loggingInfo.StartTime, loggingInfo.HttpMethod, loggingInfo.UriAccessed, loggingInfo.ResponseStatusCode, loggingInfo.TotalTime);
            message.AppendLine();
            message.AppendFormat("Headers:{0},Body:{1}", string.Join(",", loggingInfo.Headers), loggingInfo.BodyContent);
            connectionContext.Connection.Broadcast(message.ToString());
        }
SignalRLoggingDisplay
step 5
在WebApiConfig的Register方法中添加自定義的handler

public static void Register(HttpConfiguration config)
       {
           config.MapHttpAttributeRoutes();

           config.Routes.MapHttpRoute(
               name: "DefaultApi",
               routeTemplate: "api/{controller}/{id}",
               defaults: new { id = RouteParameter.Optional }
           );

           config.MessageHandlers.Add(new LoggingHandler(new SignalRLoggingDisplay()));
       }
RegisterHandler
到此完成服務端的功能實現
二、客戶端
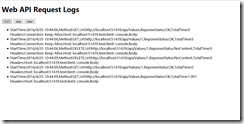
客戶端只需要一個監控頁面,html頁面足矣,其主要功能是提供開始監控、停止監控功能,其他都是接收服務端的推送並展示功能代碼。

<!DOCTYPE html>
<html>
<head>
    <title>Web API頁面實時請求監控</title>
    <meta charset="utf-8" />
</head>
<body>
    <h1>Web API Request Logs</h1>
    <div>
        <input type="button" value="start" id="btnStart"/>
        <input type="button" value="stop" id="btnStop"/>
        <input type="button" value="clear" id="btnClear"/>
    </div>
    <ul id="requests"></ul>
    <script src="/Scripts/jquery-1.10.2.min.js"></script>
    <script src="/Scripts/jquery.signalR-2.2.0.min.js"></script>
    <script>
        $(function () {
            var requests = $("#requests");
            var startButton = $("#btnStart");
            var stopButton = $("#btnStop");
            var connection = null;

            enable(stopButton, false);
            enable(startButton, true);

            startButton.click(function () {
                startConnection();
                enable(stopButton, true);
                enable(startButton, false);
            });

            $("#btnClear").click(function () {
                $("#requests").children().remove();
            });

            stopButton.click(function () {
                stopConnection();
                enable(stopButton, false);
                enable(startButton, true);
            });

            function startConnection() {
                stopConnection();
                connection = $.connection("/monitor");
                connection.start()
                    .fail(function () {
                        console.log("connect failed");
                    });
                connection.received(function (data) {
                    data = data.replace(/\r\n/g, "<br/>")
                    data = data.replace(/\n/g, "<br/>");
                    requests.append("<li>" + data + "</li>");
                });
            }

            function stopConnection() {
                if (connection != null){
                    connection.stop();
                }
            }

            function enable(button, enabled) {
                if (enabled) {
                    button.removeAttr("disabled");
                }
                else {
                    button.attr("disabled", "disabled");
                }
            }
        });
    </script>
</body>
</html>
Monitor
示例代碼下載


