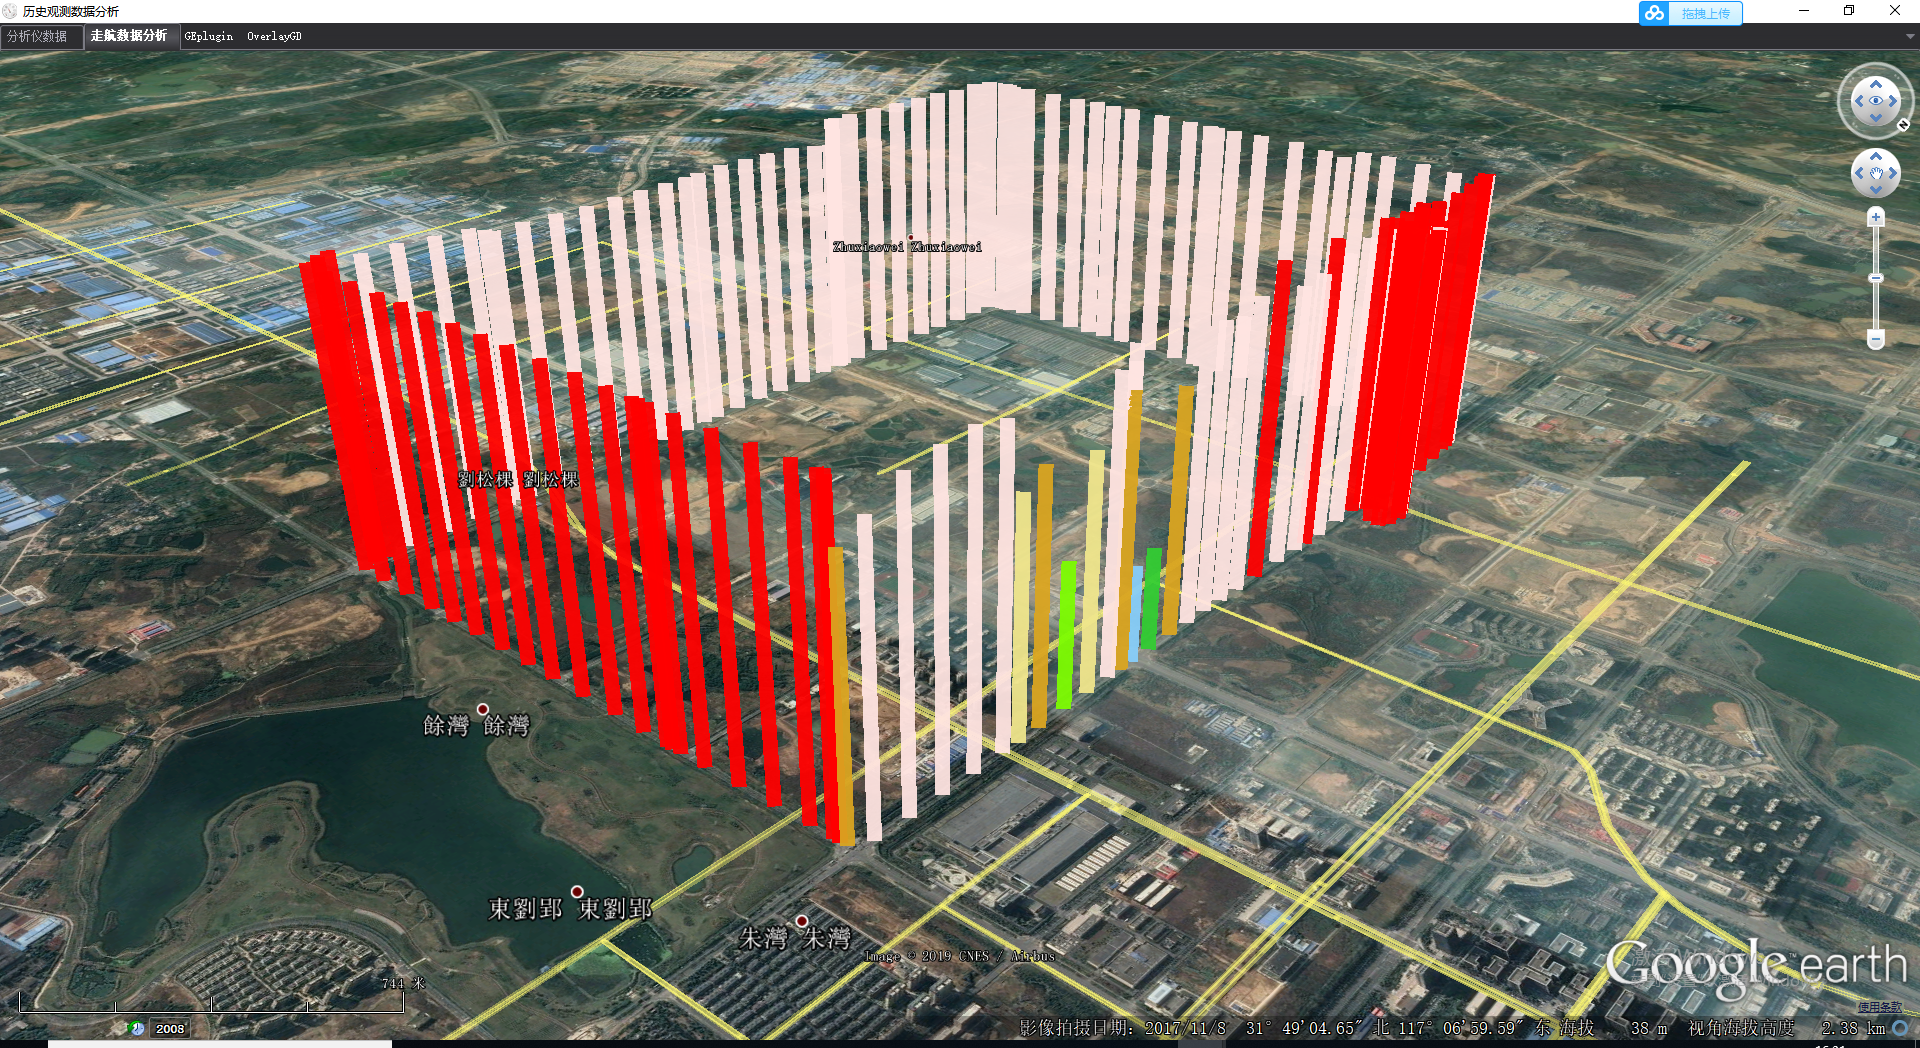
網路上資源很多不全面,自己在開發的時候走了不少彎路,在這裡整理了最全面的google全套開發,COM交互,web端交互。封裝好了各種模塊功能。 直接就可以調用。 第一種方式:調用COMAPI實現調用google地球 1、安裝googleearth客戶端。傳送門:https://pan.baidu.c ...
網路上資源很多不全面,自己在開發的時候走了不少彎路,在這裡整理了最全面的google全套開發,COM交互,web端交互。封裝好了各種模塊功能。 直接就可以調用。
第一種方式:調用COMAPI實現調用google地球
1、安裝googleearth客戶端。傳送門:https://pan.baidu.com/s/1xi3fwCIy3Jt6t5XbypqpCg 提取碼:0l7u
2、添加引用using EARTHLib;如果找不到此dll,到googleearth的安裝目錄下尋找後添加到引用即可。
3、添加預定義的方法到項目中,後續獲取視窗句柄,以及設置視窗的時候會調用其中的一些方法。
    class NativeMethods
    {
         [DllImport("user32.dll", CharSet = CharSet.Auto, SetLastError = true)]
         public static extern bool SetWindowPos(IntPtr hWnd, IntPtr hWndInsertAfter, int x, int y, int cx, int cy, UInt32 uflags);

         [DllImport("user32.dll", CharSet = CharSet.Auto)]
         public static extern IntPtr PostMessage(int hWnd, int msg, int wParam, int lParam);

         #region 預定義

         public static readonly IntPtr HWND_BOTTOM = new IntPtr(1);
         public static readonly IntPtr HWND_NOTOPMOST = new IntPtr(-2);
         public static readonly IntPtr HWND_TOP = new IntPtr(0);
         public static readonly IntPtr HWND_TOPMOST = new IntPtr(-1);

         public static readonly UInt32 SWP_NOSIZE = 1;
         public static readonly UInt32 SWP_NOMOVE = 2;
         public static readonly UInt32 SWP_NOZORDER = 4;
         public static readonly UInt32 SWP_NOREDRAW = 8;
         public static readonly UInt32 SWP_NOACTIVATE = 16;
         public static readonly UInt32 SWP_FRAMECHANGED = 32;
         public static readonly UInt32 SWP_SHOWWINDOW = 64;
         public static readonly UInt32 SWP_HIDEWINDOW = 128;
         public static readonly UInt32 SWP_NOCOPYBITS = 256;
         public static readonly UInt32 SWP_NOOWNERZORDER = 512;
         public static readonly UInt32 SWP_NOSENDCHANGING = 1024;

         #endregion

         public delegate int EnumWindowsProc(IntPtr hwnd, int lParam);

         [DllImport("user32", CharSet = CharSet.Auto)]
         public extern static IntPtr GetParent(IntPtr hWnd);

         [DllImport("user32", CharSet = CharSet.Auto)]
         public extern static bool MoveWindow(IntPtr hWnd, int X, int Y, int nWidth, int nHeight, bool bRepaint);

         [DllImport("user32", CharSet = CharSet.Auto)]
         public extern static IntPtr SetParent(IntPtr hWndChild, IntPtr hWndNewParent);

         [DllImport("user32.dll", ExactSpelling = true, CharSet = CharSet.Auto)]
         public static extern IntPtr GetWindow(IntPtr hWnd, int uCmd);

         public static int GW_CHILD = 5;
         public static int GW_HWNDNEXT = 2;
     }
4、定義變數
        private bool isGEStart = false;//GE是否開啟
        private ApplicationGEClass geApp;
        /// <summary>
        /// 用來關閉GoogleEarth的消息定義
        /// </summary>
        static readonly Int32 WM_QUIT = 0x0012;

        private IntPtr GEHWnd = (IntPtr)5;
        private IntPtr GEHrender = (IntPtr)5;
        private IntPtr GEParentHrender = (IntPtr)5;
5、做完上面的工作後,開始初始化谷歌地球。將下列代碼放入自己定義的方法中即可。
try
            {
                if (!this.DesignMode)
                {
                    geApp = new ApplicationGEClass();

                    GEHWnd = (IntPtr)geApp.GetMainHwnd();
                    //隱藏GoogleEarth主視窗
                    NativeMethods.SetWindowPos(GEHWnd, NativeMethods.HWND_BOTTOM, 0, 0, 0, 0, NativeMethods.SWP_NOSIZE + NativeMethods.SWP_HIDEWINDOW);

                    GEHrender = (IntPtr)geApp.GetRenderHwnd();
                    GEParentHrender = (IntPtr)NativeMethods.GetParent(GEHrender);
                    //將渲染視窗嵌入到主窗體
                    NativeMethods.MoveWindow(GEHrender, 0, 0, this.panelEx_google.Size.Width, this.panelEx_google.Size.Height, true);
                    NativeMethods.SetParent(GEHrender, this.panelEx_google.Handle);
                    isGEStart = true;

                }
            }
            catch (Exception ex)
            {

                isGEStart = false;
                Thread.Sleep(1000);
            }
6、以上代碼可載入谷歌地球,並且釋放資源,程式運行如圖:

第一種方式實質上是啟動GoogleEarth客戶端,並獲取視窗句柄,再將視窗顯示的自己定義的控制項下麵,此種方法也可以實現需求,但是經過測試,此方法存在兩大弊端。第一,在啟動谷歌地球的時候將占用大量的CPU資源。第二、在釋放谷歌地球的時候時候,可能會釋放失敗,無法關閉googleearth此時也將占用大量的CPU。基於以上弊端所以採用第二種方式。webroswer調用js。
2、重點:乾貨。
c#使用GEPlugin插件,webroswer與js交互,實現web端的googleearth體驗。並且載入kml,載入三維模型dae,載入路徑,電子圍欄。各種功能已封裝。調用即可使用。
1、下載GEPlugin 傳送門:
鏈接:https://pan.baidu.com/s/1e_elo_x0KlhfFgNzbboa6w
提取碼:687b
2、使用GEPlugin相對於COMAPI要較為複雜。但是性能最優。下載封裝好的文件,單獨的exe,放在程式項目文件中,啟動這個文件,在程式中調用一個方法即可載入google地球到webroswer。因為這個文件有公司logo。所以不便發佈於此,有想要的可以私信我。單獨發送。謹記:此文件只供學習使用,交流心得,不得用於任何商業行為。
3、下麵開始正式的編碼。如果下載了exe的文件,並且打開後,執行此段代碼,谷歌地球將被載入完成。獲取的硬碟id以及cpu序列號,將此數據傳遞到封裝好的服務中。防止別的瀏覽器直接輸入網址瀏覽。安全校驗使用。
並且將你的form設置成對COM可見
[ComVisible(true)]
    public partial class AnalysisForm : Form
private CassiniDev.Server _server1;
private bool IsWebServerStarted = false;
public string WEBSERVER_PATH;
private void NavigateAnaForm_Shown()
        {
            string PLUGIN_URL_LOCAL;
            string PLUGIN_URL_RELOAD;
            //GoogleEarth延時載入的線程
            //在程式啟動時使用單獨的線程來載入WebBroswer控制項中的GE地圖,以免出現主界面載入時卡頓的現象
            Thread geLazyLoadingThread = new System.Threading.Thread(new System.Threading.ThreadStart(delegate ()
            {
                //Thread.Sleep(50);

                //記錄系統中現有的GEPlugIn線程
                Process[] listExistedGePlugInProcess = Process.GetProcessesByName("geplugin");

                this.BeginInvoke(
                    new Action(() =>
                    {
                        PLUGIN_URL_LOCAL = "http://127.0.0.1:9809/map.asp?px1=" + GetCpuID() + "&PX2=" + GetDiskID();
                        PLUGIN_URL_RELOAD = "http://127.0.0.1:9808/reload.html";
                        this.webBrowserGE.ObjectForScripting = this;
                        this.webBrowserGE.ScriptErrorsSuppressed = false ;
                        //_server = new CassiniDev.Server(9630, "/", WEBSERVER_PATH, //"G:\\Desktop\\1111\\bin\\Debug\\NavFiles",
                        //         System.Net.IPAddress.Parse("127.0.0.1"), "", false, true);
                        //http://127.0.0.1:9809/map.asp?px1=178BFBFF00810F10&PX2=GLOWAY STK720GS3-S7
                        //http://192.168.0.196:9808/map.asp?px1=BFEBFBFF000906E9&PX2=SanDisk Cruzer Glide 3.0 USB Device
                        this.webBrowserGE.Navigate(PLUGIN_URL_LOCAL);
                        this.webBrowserGE.Visible = true;
                    }
                ));
            }));
            //啟動GoogleEarth裝載的線程
            geLazyLoadingThread.SetApartmentState(ApartmentState.STA);
            geLazyLoadingThread.Start();
        }
private string GetDiskID()
{
try
{
//獲取硬碟ID
String HDid = " ";
ManagementClass mc = new ManagementClass("Win32_DiskDrive");
ManagementObjectCollection moc = mc.GetInstances();
foreach (ManagementObject mo in moc)
{
HDid = (string)mo.Properties["Model"].Value;
}
moc = null;
mc = null;
return HDid;
}
catch
{
return "unknown";
}
finally
{
}
}
private string GetCpuID()
{
try
{
//獲取CPU序列號代碼
string cpuInfo = " ";//cpu序列號
ManagementClass mc = new ManagementClass("Win32_Processor");
ManagementObjectCollection moc = mc.GetInstances();
foreach (ManagementObject mo in moc)
{
cpuInfo = mo.Properties["ProcessorId"].Value.ToString();
}
moc = null;
mc = null;
return cpuInfo;
}
catch
{
return "unknown";
}
finally
{
}
}
4、此時地圖即可載入完成,萬水千山,踏出第一步。但是此時無法向谷歌地球添加kml或者三維模型。和一些其他的操作。如果要載入kml文件。繼續往下看。
5、此時啟動web容器 ,先添加引用 CassiniDev4-lib;找不到又不想下載? 傳送門來了:
鏈接:https://pan.baidu.com/s/1LOzD7plVaGG3NstMEEUb0g
提取碼:oymj
        /// <summary>
        /// 啟動Web容器服務
        /// </summary>
        public void Start_WebServer()
        {
            WEBSERVER_PATH = string.Concat(new object[] { Directory.GetCurrentDirectory(), Path.DirectorySeparatorChar, "3DView" });

            _server1 = new CassiniDev.Server(9630, "/", WEBSERVER_PATH,
                     System.Net.IPAddress.Parse("127.0.0.1"), "", false, true);

            if (!IsWebServerStarted)
            {
                try
                {
                    _server1.Start();
                    IsWebServerStarted = true;
                    MessageBox.Show("web 服務已經打開!");
                }
                catch (Exception ex)
                {
                    MessageBox.Show( "服務打開失敗!", "信息提示", MessageBoxButtons.OK, MessageBoxIcon.Error);
                    _server1.Dispose();
                    return;
                }
                /*
                try
                {
                    _server2.Start();
                    IsWebServerStarted = true;
                }
                catch (Exception ex)
                {
                    XtraMessageBox.Show(Program.devExpressDarkSkin, "GBQ服務2打開失敗!", "信息提示", MessageBoxButtons.OK, MessageBoxIcon.Error);
                    _server2.Dispose();
                    return;
                }
                */
            }
            else
            {
                try
                {
                    _server1.ShutDown();
                    IsWebServerStarted = false;
                }
                catch (Exception ex)
                {
                    MessageBox.Show( "服務關閉失敗!", "信息提示", MessageBoxButtons.OK, MessageBoxIcon.Error);
                    _server1.Dispose();
                    //return;
                }

                try
                {
                    _server1.Start();
                    IsWebServerStarted = true;
                }
                catch (Exception ex)
                {
                    MessageBox.Show( "服務打開失敗!", "信息提示", MessageBoxButtons.OK, MessageBoxIcon.Error);
                    _server1.Dispose();
                    return;
                }
            }
        }
6、此時小伙伴要問,為什麼要啟動一個web服務,不要著急,往下看。載入kml文件。
webBrowserGE.Document.InvokeScript("importLidarKmlFilebyUrl", new object[] { "http://127.0.0.1:9630/3DMap/zouhang1.kml",true });
是不是很神奇,只需要一行代碼,你的kml文件,或者kml文件中帶有有三維模型的文件,即可被載入成功,因為程式已經完全封裝了你所需要的功能。
解析上一個疑惑,為什麼要啟動一個web服務,因為invokescprit載入文件的時候需要以網址的形式載入,所以啟動一個web伺服器,並設置好root目錄,將你的kml文件放置到root目錄下即可。
7、你以為此時kml文件就可以載入成功了?成功的道路總是充滿坎坷的。此時的你載入kml的時候,應該是看不到任何反應的。因為我當初在這個地方踩了很多的坑。你們很幸運,不需要在這裡掙扎。記錄一下。分享給你們。
///重要重要重要

public string getMapServerandLag_callback()
        {
            return "7,1,18";
        }
多麼簡單的一個方法,但是沒有他你什麼也做不了。這個是地圖載入後的回調方法。務必加上。用於給層級賦值。
下麵還有幾個方法,分享給你門,可有可無。
//載入失敗後的回調函數
public void JSInitFailureCallback_(string error){
}

//載入成功後的回調函數
public void geSuccessLoadedCallback_()
{
}
8、經過以上的努力你已經達成了目標的80%了。你所想要的功能已經基本實現。
另外一些其他的載入方法在這裡附上
                webBrowserGE.Document.InvokeScript("importGoogleMapKmlFilebyUrl", new object[] { "http://127.0.0.1:9630/3DMap/ditu.kml" });
                webBrowserGE.Document.InvokeScript("importLidarKmlFilebyUrl", new object[] { "http://127.0.0.1:9630/3DMap/zouhang1.kml",true });
                webBrowserGE.Document.InvokeScript("importRemarkKmlFilebyUrl", new object[] { "http://127.0.0.1:9630/3DMap/1111.kml" });
                webBrowserGE.Document.InvokeScript("importDrawKmlFilebyUrl", new object[] { "http://127.0.0.1:9630/3DMap/1111.kml" });
                webBrowserGE.Document.InvokeScript("importLidarKmlFilebyUrl", new object[] { "http://127.0.0.1:9630/3DMap/1111.kml", true });
                webBrowserGE.Document.InvokeScript("importDrawKmlFilebyUrl", new object[] { "http://192.168.1.196:9630/3DPaint/KmlDrawings/1111.kml", true });
                webBrowserGE.Document.InvokeScript("searchLocation_e", new object[] { 38, 117 });
                webBrowserGE.Document.InvokeScript("importLidarKmlFilebyUrl", new object[] { "http://127.0.0.1:9630/3DMap/111.kml" });

                webBrowserGE.Document.InvokeScript("getGEKml_e");
                webBrowserGE.Document.InvokeScript("setMapLayersStatus", new object[] { false, false, false, false, false, false, false, false, false, false, false, false });
非常簡單,可自己摸索。
9、上圖

到這裡就結束了?不存在的。技術用於之境。下麵分享給大家,如何將二維高德地圖蒙皮到三維谷歌球體上。拭目以待。
10、載入高德地圖到谷歌地球上。實現谷歌地球與高德地圖之間的切換。
首先。需要下載兩個坐標轉換文件。傳送門:
鏈接:https://pan.baidu.com/s/18QCXtXdx98NJ-gkG5wU6_w
提取碼:b9c9
//此文件是實現坐標以及經緯度的轉換
<%@ Import Namespace="System.Web.HttpResponse" %> <%@ language="javascript" Debug="true"%> <% function downloadfile() { var xValue=Request.QueryString("x") var yValue=Request.QueryString("y") var zValue=Request.QueryString("z") var FileName="landun_"+ zValue*1+"_"+xValue*1+"_"+yValue*1+".kml" var kmlstring=GetKmlSrtring() Response.AddHeader("content-disposition", "attachment;filename="+FileName+";") Response.ContentType = "text/xml" Response.Write(kmlstring) Response.Flush Response.Clear } //生成kml文件的內容 function GetKmlSrtring() { var xValue=Request.QueryString("x") var yValue=Request.QueryString("y") var zValue=Request.QueryString("z") var kmlstr="<?xml version=\"1.0\" encoding=\"UTF-8\"?>\r\n<kml xmlns=\"http://www.opengis.net/kml/2.2\">" ///GetMercatorCoordinates(zValue*1,xValue*1,yValue*1,"y"); ///GetMercatorCoordinates(zValue*1,xValue*1+1,yValue*1+1,"y") ///GetMercatorCoordinates(zValue*1,xValue*1+1,yValue*1,"x") ///GetMercatorCoordinates(zValue*1,xValue*1,yValue*1,"x") if(zValue*1>=21) { kmlstr=kmlstr+"<Document>\r\n<Region>\r\n<Lod>\r\n<minLodPixels>256</minLodPixels>\r\n<maxLodPixels>-1</maxLodPixels>\r\n</Lod>\r\n<LatLonAltBox>\r\n" kmlstr=kmlstr+"<north>"+(GetMercatorCoordinates(zValue*1,xValue*1,yValue*1,"y"))+"</north>\r\n<south>"+(GetMercatorCoordinates(zValue*1,xValue*1+1,yValue*1+1,"y"))+"</south>\r\n<east>"+GetMercatorCoordinates(zValue*1,xValue*1+1,yValue*1,"x")+"</east>\r\n<west>"+GetMercatorCoordinates(zValue*1,xValue*1,yValue*1,"x")+"</west>\r\n</LatLonAltBox>\r\n</Region>\r\n<GroundOverlay>\r\n" kmlstr=kmlstr+"<drawOrder>1</drawOrder>\r\n<Icon>\r\n<href>http://wprd04.is.autonavi.com/appmaptile</href><httpQuery>&lang=zh_cn&size=1&scl=1&style=7&x="+(xValue*1)+"&y="+(yValue*1)+"&z="+(zValue*1)+"&</httpQuery></Icon>\r\n<LatLonAltBox>\r\n" kmlstr=kmlstr+"<north>"+(GetMercatorCoordinates(zValue*1,xValue*1,yValue*1,"y"))+"</north>\r\n<south>"+(GetMercatorCoordinates(zValue*1,xValue*1,yValue*1+1,"y"))+"</south>\r\n<east>"+GetMercatorCoordinates(zValue*1,xValue*1+1,yValue*1,"x")+"</east>\r\n<west>"+GetMercatorCoordinates(zValue*1,xValue*1,yValue*1,"x")+"</west>\r\n</LatLonAltBox>\r\n<altitudeMode>clampToGround</altitudeMode>\r\n<altitude>0</altitude>\r\n" kmlstr=kmlstr+"</GroundOverlay>\r\n</Document>\r\n</kml>" }else{ kmlstr=kmlstr+"<Document>\r\n<Region>\r\n<Lod>\r\n<minLodPixels>256</minLodPixels>\r\n<maxLodPixels>-1</maxLodPixels>\r\n</Lod>\r\n<LatLonAltBox>\r\n" kmlstr=kmlstr+"<north>"+(GetMercatorCoordinates(zValue*1,xValue*1,yValue*1,"y"))+"</north>\r\n<south>"+(GetMercatorCoordinates(zValue*1,xValue*1+1,yValue*1+1,"y"))+"</south>\r\n<east>"+GetMercatorCoordinates(zValue*1,xValue*1+1,yValue*1,"x")+"</east>\r\n<west>"+GetMercatorCoordinates(zValue*1,xValue*1,yValue*1,"x")+"</west>\r\n</LatLonAltBox>\r\n</Region>\r\n<NetworkLink>\r\n" kmlstr=kmlstr+"<name>"+(xValue*2)+"_"+(yValue*2)+"_"+(zValue*1+1)+"</name>\r\n<Region>\r\n<Lod>\r\n<minLodPixels>256</minLodPixels>\r\n<maxLodPixels>-1</maxLodPixels>\r\n</Lod>\r\n<LatLonAltBox>\r\n" kmlstr=kmlstr+"<north>"+(GetMercatorCoordinates(zValue*1+1,xValue*2,yValue*2,"y"))+"</north>\r\n<south>"+(GetMercatorCoordinates(zValue*1+1,xValue*2,yValue*2+1,"y"))+"</south>\r\n<east>"+GetMercatorCoordinates(zValue*1+1,xValue*2+1,yValue*2,"x")+"</east>\r\n<west>"+GetMercatorCoordinates(zValue*1+1,xValue*2,yValue*2,"x")+"</west>\r\n</LatLonAltBox>\r\n</Region>\r\n<Link>\r\n" kmlstr=kmlstr+"<href>http://127.0.0.1:9630/3DMap/ditu.aspx</href><httpQuery>mt=ditu&x="+(xValue*2)+"&y="+(yValue*2)+"&z="+(zValue*1+1)+"&v=1.7&dx=0&dy=0&trans=0</httpQuery>\r\n</Link>\r\n</NetworkLink>\r\n" kmlstr=kmlstr+"<NetworkLink>\r\n<name>"+(xValue*2+1)+"_"+(yValue*2)+"_"+(zValue*1+1)+"</name>\r\n<Region>\r\n<Lod>\r\n<minLodPixels>256</minLodPixels>\r\n<maxLodPixels>-1</maxLodPixels>\r\n</Lod>\r\n<LatLonAltBox>\r\n" kmlstr=kmlstr+"<north>"+(GetMercatorCoordinates(zValue*1+1,xValue*2+1,yValue*2,"y"))+"</north>\r\n<south>"+(GetMercatorCoordinates(zValue*1+1,xValue*2+1,yValue*2+1,"y"))+"</south>\r\n<east>"+GetMercatorCoordinates(zValue*1+1,xValue*2+2,yValue*2,"x")+"</east>\r\n<west>"+GetMercatorCoordinates(zValue*1+1,xValue*2+1,yValue*2,"x")+"</west>\r\n</LatLonAltBox>\r\n</Region>\r\n<Link>\r\n" kmlstr=kmlstr+"<href>http://127.0.0.1:9630/3DMap/ditu.aspx</href><httpQuery>mt=ditu&x="+(xValue*2+1)+"&y="+(yValue*2)+"&z="+(zValue*1+1)+"&v=1.7&dx=0&dy=0&trans=0</httpQuery>\r\n</Link>\r\n</NetworkLink>\r\n" kmlstr=kmlstr+"<NetworkLink>\r\n<name>"+(xValue*2)+"_"+(yValue*2+1)+"_"+(zValue*1+1)+"</name>\r\n<Region>\r\n<Lod>\r\n<minLodPixels>256</minLodPixels>\r\n<maxLodPixels>-1</maxLodPixels>\r\n</Lod>\r\n<LatLonAltBox>\r\n" kmlstr=kmlstr+"<north>"+(GetMercatorCoordinates(zValue*1+1,xValue*2,yValue*2+1,"y"))+"</north>\r\n<south>"+(GetMercatorCoordinates(zValue*1+1,xValue*2,yValue*2+2,"y"))+"</south>\r\n<east>"+GetMercatorCoordinates(zValue*1+1,xValue*2+1,yValue*2+1,"x")+"</east>\r\n<west>"+GetMercatorCoordinates(zValue*1+1,xValue*2,yValue*2+1,"x")+"</west>\r\n</LatLonAltBox>\r\n</Region>\r\n<Link>\r\n" kmlstr=kmlstr+"<href>http://127.0.0.1:9630/3DMap/ditu.aspx</href><httpQuery>mt=ditu&x="+(xValue*2)+"&y="+(yValue*2+1)+"&z="+(zValue*1+1)+"&v=1.7&dx=0&dy=0&trans=0</httpQuery>\r\n</Link>\r\n</NetworkLink>\r\n" kmlstr=kmlstr+"<NetworkLink>\r\n<name>"+(xValue*2+1)+"_"+(yValue*2+1)+"_"+(zValue*1+1)+"</name>\r\n<Region>\r\n<Lod>\r\n<minLodPixels>256</minLodPixels>\r\n<maxLodPixels>-1</maxLodPixels>\r\n</Lod>\r\n<LatLonAltBox>\r\n" kmlstr=kmlstr+"<north>"+(GetMercatorCoordinates(zValue*1+1,xValue*2+1,yValue*2+1,"y"))+"</north>\r\n<south>"+(GetMercatorCoordinates(zValue*1+1,xValue*2+1,yValue*2+2,"y"))+"</south>\r\n<east>"+GetMercatorCoordinates(zValue*1+1,xValue*2+2,yValue*2+1,"x")+"</east>\r\n<west>"+GetMercatorCoordinates(zValue*1+1,xValue*2+1,yValue*2+1,"x")+"</west>\r\n</LatLonAltBox>\r\n</Region>\r\n<Link>\r\n" kmlstr=kmlstr+"<href>http://127.0.0.1:9630/3DMap/ditu.aspx</href><httpQuery>mt=ditu&x="+(xValue*2+1)+"&y="+(yValue*2+1)+"&z="+(zValue*1+1)+"


