一、問題需求: 在項目中經常遇到需要寫配置文件地方,目的就是不想在程式中關於一些信息寫死,發佈的時候只需要修改一下配置文件就可以,不需要每次都修改程式,如項目名稱、資料庫連接字元串、IP埠之類 的;對於小項目或者服務程式,配置信息可以通過系統自帶的appSettings進行配置,但大項目或者配置信 ...
一、問題需求: 在項目中經常遇到需要寫配置文件地方,目的就是不想在程式中關於一些信息寫死,發佈的時候只需要修改一下配置文件就可以,不需要每次都修改程式,如項目名稱、資料庫連接字元串、IP埠之類 的;對於小項目或者服務程式,配置信息可以通過系統自帶的appSettings進行配置,但大項目或者配置信息太多,如果都用appSettings來配置就感覺比較雜亂,運維人員在修改配置的時候不好修改,而且如果想找某一模塊相關或者某一節點配置容易出錯,這時如果能分類管理,例如跟資料庫相關的寫到一個節點里,跟某個業務獨立相關的可以也能單獨寫一個節點上 等等;
二、解決方案:其實 使用.net自帶的configSections,將配置信息分塊管理,並提供實體類且還能單配置文件管理,這樣程式員可以根據業務類型等其他方式分類寫入配置文件,運維人員可以針對某一項進行修改部署維護;
三、具體實現:接下來演示一下幾種自定義的configSections節點,有單節點配置、多節點配置、自定義節點配置
1、 首先演示一下單節點配置:
1.1 新建一個類繼承ConfigurationSection,新增屬性及調用方法
 /// <summary>
    /// 單級自定義配置節點
    /// </summary>
   public class CustomerSingleConfig:ConfigurationSection
    {
        /// <summary>
        /// 獲取配置信息
        /// </summary>
        /// <returns></returns>
        public static CustomerSingleConfig GetConfig()
        {
            return GetConfig("CustomerSingleConfig");
        }
        /// <summary>
        /// 獲取配置信息
        /// </summary>
        /// <param name="sectionName"></param>
        /// <returns></returns>
        public static CustomerSingleConfig GetConfig(string sectionName)
        {
            CustomerSingleConfig section = (CustomerSingleConfig)ConfigurationManager.GetSection(sectionName);
            if (section == null)
                throw new ConfigurationErrorsException("Section " + sectionName + " is not found.");
            return section;
        }

        /// <summary>
        /// 平臺中文名稱
        /// </summary>
       [ConfigurationProperty("PlatChName",DefaultValue = "", IsRequired = true, IsKey = false)]
        public string PlatChName
        {
            get { return (string)this["PlatChName"]; }
            set { this["PlatChName"]=value; }
        }

        /// <summary>
        /// 平臺英文名稱
        /// </summary>
       [ConfigurationProperty("PlatEnName",DefaultValue = "", IsRequired = true, IsKey = false)]
        public string PlatEnName
        {
            get { return (string)this["PlatEnName"]; }
            set { this["PlatEnName"] = value; }
        }

    }
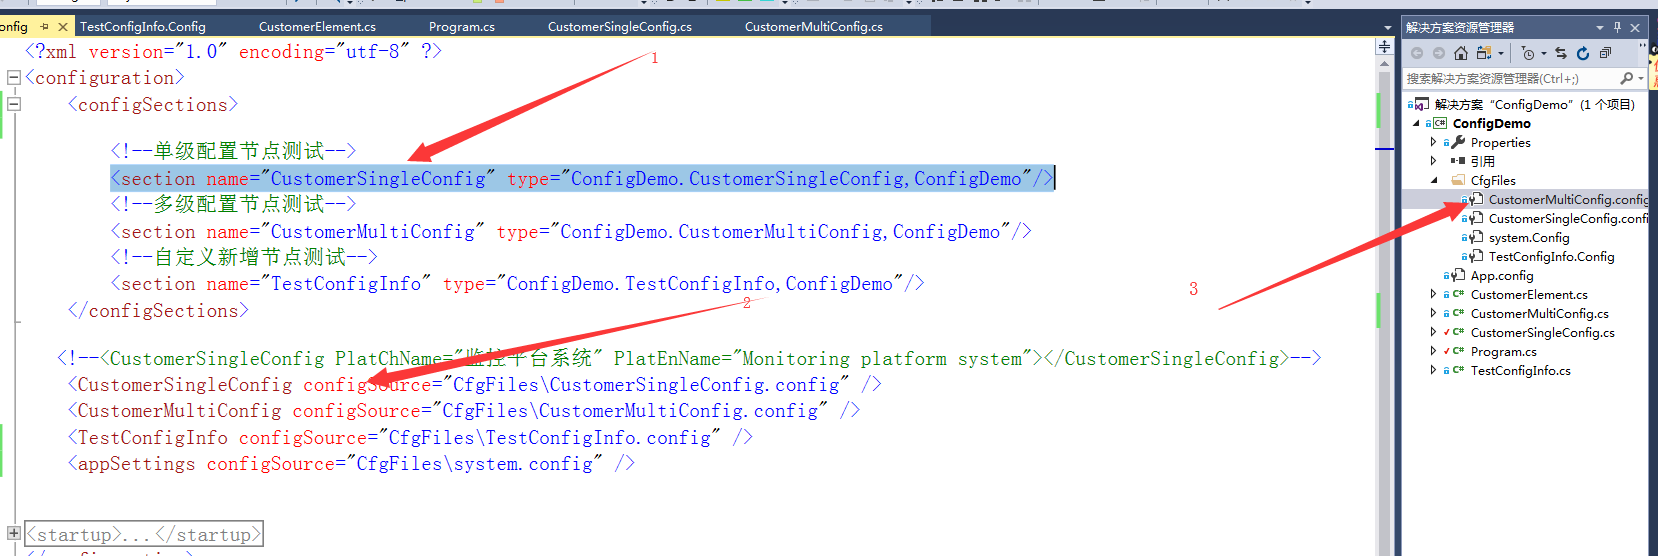
1.2 在app.config------>configuration--------->configSections裡面加入CustomerSingleConfig節點,如下:
<!--單級配置節點測試-->
        <section name="CustomerSingleConfig" type="ConfigDemo.CustomerSingleConfig,ConfigDemo"/>
1.3 在app.config------>configuration------->新建CustomerSingleConfig裡面加入配置信息
<CustomerSingleConfig PlatChName="監控平臺系統" PlatEnName="Monitoring platform system"></CustomerSingleConfig>
1.4 調用獲取配置信息
  static void Main(string[] args)
        {
            Console.WriteLine("---------------------單級配置節點測試-----------------");
            Console.WriteLine("PlatChName:" + CustomerSingleConfig.GetConfig().PlatChName);
            Console.WriteLine("PlatEnName:" + CustomerSingleConfig.GetConfig().PlatEnName);
        }
1.5 運行效果如下

1.6 針對1.3還可以更進一步分離配置寫法,可以單獨配置成一個config文件
將1.3 <section name="CustomerSingleConfig" type="ConfigDemo.CustomerSingleConfig,ConfigDemo"/>這個節點內容換成如下配置:
<CustomerSingleConfig configSource="CfgFiles\CustomerSingleConfig.config" />
再新一個CfgFiles文件夾在文件裡面新增CustomerSingleConfig.config:
<?xml version="1.0" encoding="utf-8" ?>
<CustomerMultiConfig >
<CustomerElement connectionString="Data Source='.';Initial Catalog='UniDataNH';User ID='sa';Password='123456'" enabled="true"></CustomerElement>
</CustomerMultiConfig>
整體截圖配置如下:

2、接下來演示一下多級節點
2.1先定義一個子節點類CustomerElement繼承ConfigurationElement
public class CustomerElement:ConfigurationElement
    {
        private const string EnablePropertyName = "enabled";

        private const string ConnectionStringPropery = "connectionString";

        [ConfigurationProperty(EnablePropertyName, IsRequired = true)]
        public bool Enabled
        {
            get { return (bool)base[EnablePropertyName]; }
            set { base[EnablePropertyName] = value; }
        }

        [ConfigurationProperty(ConnectionStringPropery, IsRequired = true)]
        public string ConnectionString
        {
            get { return (string)base[ConnectionStringPropery]; }
            set { base[ConnectionStringPropery] = value; }
        }
    }
2.2再定一個配置節點類CustomerMultiConfig繼承ConfigurationSection,和單個節點配置一樣
namespace ConfigDemo
{
    /// <summary>
    /// 多級配置文件自定義節點配置
    /// </summary>
   public class CustomerMultiConfig:ConfigurationSection
    {
        private const string CustomerConfigPropertyName = "CustomerElement";
        /// <summary>
        /// 獲取配置信息
        /// </summary>
        /// <returns></returns>
        public static CustomerMultiConfig GetConfig()
        {
            return GetConfig("CustomerMultiConfig");
        }
        /// <summary>
        /// 獲取配置信息
        /// </summary>
        /// <param name="sectionName">xml節點名稱</param>
        /// <returns></returns>
        public static CustomerMultiConfig GetConfig(string sectionName)
        {
            CustomerMultiConfig section = (CustomerMultiConfig)ConfigurationManager.GetSection(sectionName);
            if (section == null)
                throw new ConfigurationErrorsException("Section " + sectionName + " is not found.");
            return section;
        }
        [ConfigurationProperty(CustomerConfigPropertyName)]
        public CustomerElement CustomerElementConfig
        {
            get { return (CustomerElement)base[CustomerConfigPropertyName]; }
            set { base[CustomerConfigPropertyName] = value; }
        }
    }
}
2.3 接下就是在app.config------>configuration--------->configSections裡面加入CustomerMultiConfig節點,詳細步驟和單節點一下 如圖配置

2.4 調用獲取配置信息代碼如下:
Console.WriteLine("---------------------多級配置節點測試-----------------");
            Console.WriteLine("connectionString:" + CustomerMultiConfig.GetConfig().CustomerElementConfig.Enabled);
            Console.WriteLine("enabled:" + CustomerMultiConfig.GetConfig().CustomerElementConfig.ConnectionString);
2.5 運行效果如下圖:

3、再演示一下自定義節點配置,可以隨意添加配置節點信息
3.1 具體操作步驟類似,代碼如下:
namespace ConfigDemo
{
    public class TestConfigInfo : ConfigurationSection
    {
        [ConfigurationProperty("trackers", IsDefaultCollection = false)]
        public trackers Trackers { get { return (trackers)base["trackers"]; } }
        /// <summary>
        /// 獲取配置信息
        /// </summary>
        /// <returns></returns>
        public static TestConfigInfo GetConfig()
        {
            return GetConfig("TestConfigInfo");
        }
        /// <summary>
        /// 獲取配置信息
        /// </summary>
        /// <param name="sectionName">xml節點名稱</param>
        /// <returns></returns>
        public static TestConfigInfo GetConfig(string sectionName)
        {
            TestConfigInfo section = (TestConfigInfo)ConfigurationManager.GetSection(sectionName);
            if (section == null)
                throw new ConfigurationErrorsException("Section " + sectionName + " is not found.");
            return section;
        }
        [ConfigurationProperty("TestName", IsRequired = false)]
        public string TestName
        {
            get { return (string)base["TestName"]; }
            set { base["TestName"] = value; }
        }
        [ConfigurationProperty("TestID", IsRequired = false)]
        public string TestID
        {
            get { return (string)base["TestID"]; }
            set { base["TestID"] = value; }
        }
    }

    public class trackers : ConfigurationElementCollection
    {
        [ConfigurationProperty("TrackerName", IsRequired = false)]
        public string TrackerName
        {
            get { return (string)base["TrackerName"]; }
            set { base["TrackerName"] = value; }
        }
        protected override ConfigurationElement CreateNewElement()
        {
            return new tracker();
        }

        protected override object GetElementKey(ConfigurationElement element)
        {
            return ((tracker)element).Host;
        }
    }
    public class tracker : ConfigurationElement
    {
        #region 配置節設置,設定檔中有不能識別的元素、屬性時,使其不報錯

        protected override bool OnDeserializeUnrecognizedAttribute(string name, string value)
        {
            return base.OnDeserializeUnrecognizedAttribute(name, value);

        }

        protected override bool OnDeserializeUnrecognizedElement(string elementName, System.Xml.XmlReader reader)
        {
            return base.OnDeserializeUnrecognizedElement(elementName, reader);

        }
        #endregion

        [ConfigurationProperty("Host", DefaultValue = "localhost", IsRequired = true)]
        public string Host { get { return this["Host"].ToString(); } }

        [ConfigurationProperty("Port", DefaultValue = "22122", IsRequired = true)]
        public int Port { get { return (int)this["Port"]; } }

    }
}
3.2 在CfgFiles新建TestConfigInfo.Config配置文件
<?xml version="1.0" encoding="utf-8" ?>
<TestConfigInfo TestName="lxsh" TestID="8893">
    <trackers TrackerName="testName">
        <add Host="60.195.251.71" Port="22122" />
        <add Host="60.195.251.72" Port="22123" />
        <add Host="60.195.251.73" Port="22124" />
    </trackers>
</TestConfigInfo>
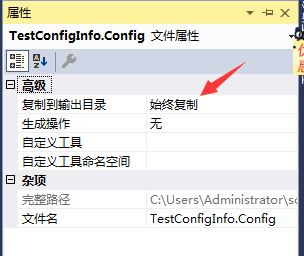
3.3 右鍵TestConfigInfo.Config屬性,選擇輸出目錄為始終複製,這樣操作目地是在運行目錄下麵生成該文件(其他配置文件也需要這樣操作)

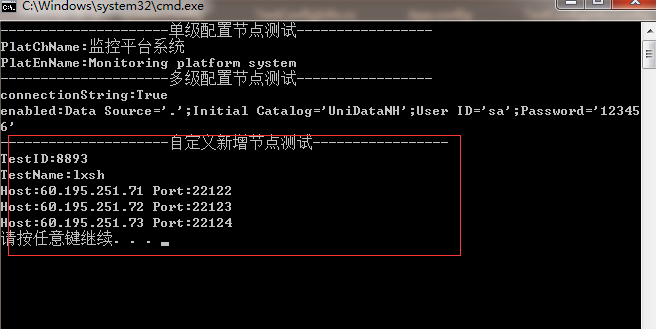
3.4 調用獲取配置信息代碼如下:
            Console.WriteLine("---------------------自定義新增節點測試-----------------");
            Console.WriteLine("TestID:" + TestConfigInfo.GetConfig().TestID);
            Console.WriteLine("TestName:" + TestConfigInfo.GetConfig().TestName);
            foreach (tracker item in TestConfigInfo.GetConfig().Trackers)
            {
                Console.WriteLine("Host:" + item.Host + " Port:" + item.Port);
            }
3.5 運行效果如下圖:

4 系統appSettings配置文件單獨建立配置文件
4.1 appconfig配置文件修改截圖如下

4.2 system.config配置文件內容如下

4.3 調用方式和沒有分開是一樣的,如下
  Console.WriteLine("---------------------系統自帶appSettings配置文件-----------------");
            Console.WriteLine("logLevel:" + System.Configuration.ConfigurationManager.AppSettings["logLevel"]);
            Console.WriteLine("LogType:" + System.Configuration.ConfigurationManager.AppSettings["LogType"]);
四、四種方式演示源碼Github地址:https://github.com/lxshwyan/ConfigDemo.git


