
對於沒有包含認證(authentication),的項目,你可以使用基架(scaffolder)把 Identity的程式集包加入到項目中,並且選擇性的添加Identity的代碼進行生成。 雖然基架已經生成了很多必須的代碼,但是你仍然需要更新你的項目來完善這個過程。 這篇文章主要就是解釋完善Iden ...
對於沒有包含認證(authentication),的項目,你可以使用基架(scaffolder)把 Identity的程式集包加入到項目中,並且選擇性的添加Identity的代碼進行生成。
雖然基架已經生成了很多必須的代碼,但是你仍然需要更新你的項目來完善這個過程。
這篇文章主要就是解釋完善Identity基架進行更新的一些步驟
當Identity基架添加以後,一個ScaffoldingReadme.txt 文件就被創建了,這裡面會包含一些完善Identity基架的說明。如下
ScaffoldingReadme.txt
Support for ASP.NET Core Identity was added to your project 支持把ASP.NET Core Identity添加到你的項目里
- The code for adding Identity to your project was generated under Areas/Identity. 添加Identity生成的代碼在Areas/Identity下麵

關於Identity 相關的服務配置在Areas/Identity/IdentityHostingStartup.cs 中可以被找到
Configuration of the Identity related services can be found in the Areas/Identity/IdentityHostingStartup.cs file.

UI需要支持靜態文件,可以在Configure方法中調用 app.UseStaticFiles()
The generated UI requires support for static files. To add static files to your app:
1. Call app.UseStaticFiles() from your Configure method

要使用ASP.NET Core Identity,你還需要允許認證(authentication),可以在Configure方法中調用 app.UseAuthentication(),在調用靜態文件之後做此設置
To use ASP.NET Core Identity you also need to enable authentication. To authentication to your app:
1. Call app.UseAuthentication() from your Configure method (after static files)

UI 要求MVC,可以通過在 Configure 方法中調用app.UseMvc(),在認證之後調用,
另外還需要在 ConfigureServices 中增加調用 services.AddMvc()
The generated UI requires MVC. To add MVC to your app:
1. Call services.AddMvc() from your ConfigureServices method
2. Call app.UseMvc() from your Configure method (after authentication)

Apps that use ASP.NET Core Identity should also use HTTPS. To enable HTTPS see https://go.microsoft.com/fwlink/?linkid=848054.
這篇文章會提供更詳細的說明
- 把Identity基架添加到一個空項目
- 把Identity基架添加到一個 不存在 認證(authentication)的 Razor項目(即項目中原來不存在認證的項目)
- 把Identity基架添加到一個 存在 認證(authentication)的 Razor項目(即項目中原來存在認證的項目)
- 把Identity基架添加到一個 不存在 認證(authentication)的 MVC項目(即項目中原來不存在認證的項目)
- 把Identity基架添加到一個 存在 認證(authentication)的 MVC項目(即項目中原來存在認證的項目)
- 創建一個完全的Identity UI (認證界面) 資源
把Identity基架添加到一個空項目
1.首先,準備一個空項目
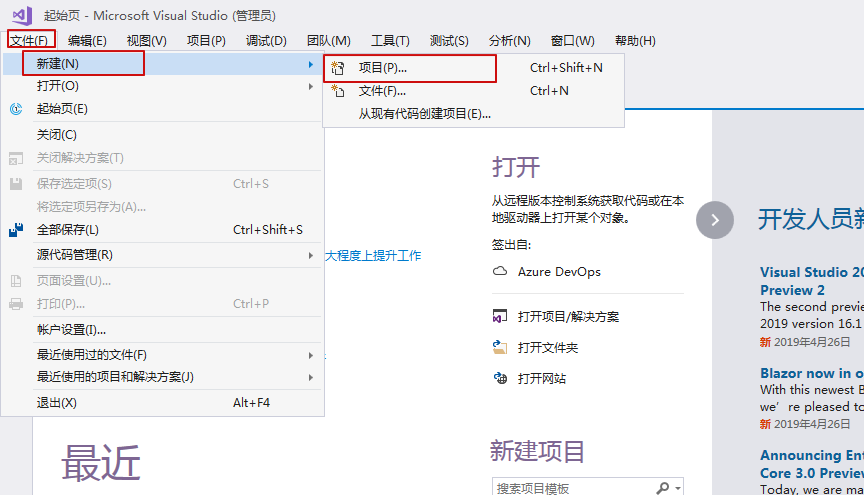
- 文件->新建->項目
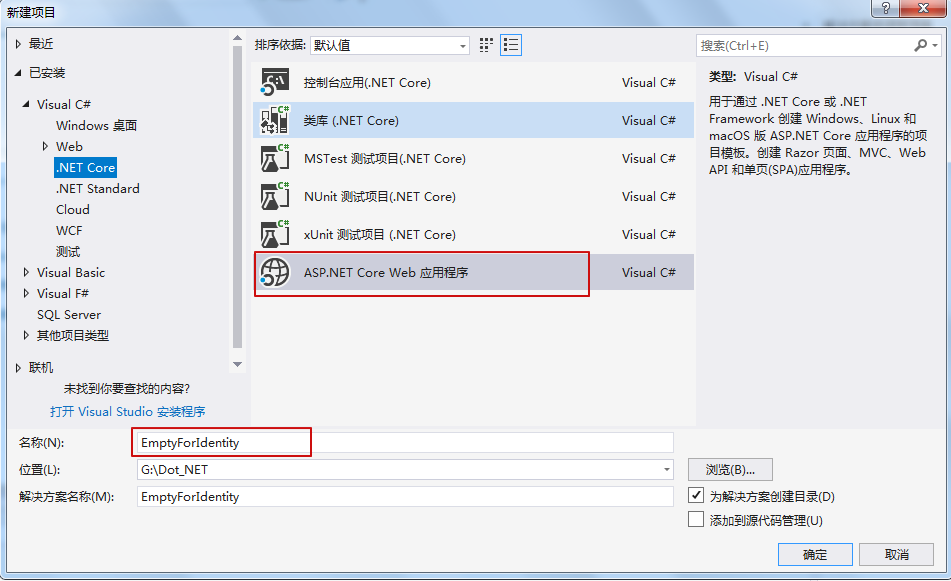
- ASP.NET Core web應用,項目名EmptyForIdentity,確定
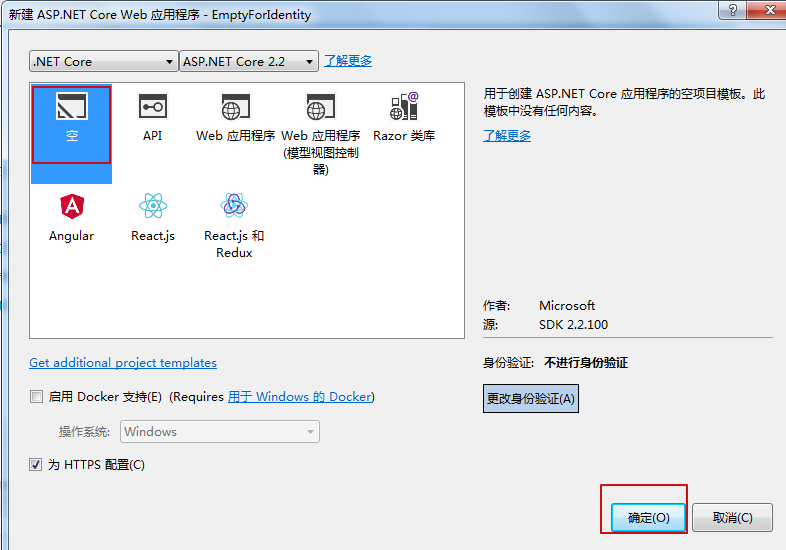
- 選擇空項目
操作如圖:
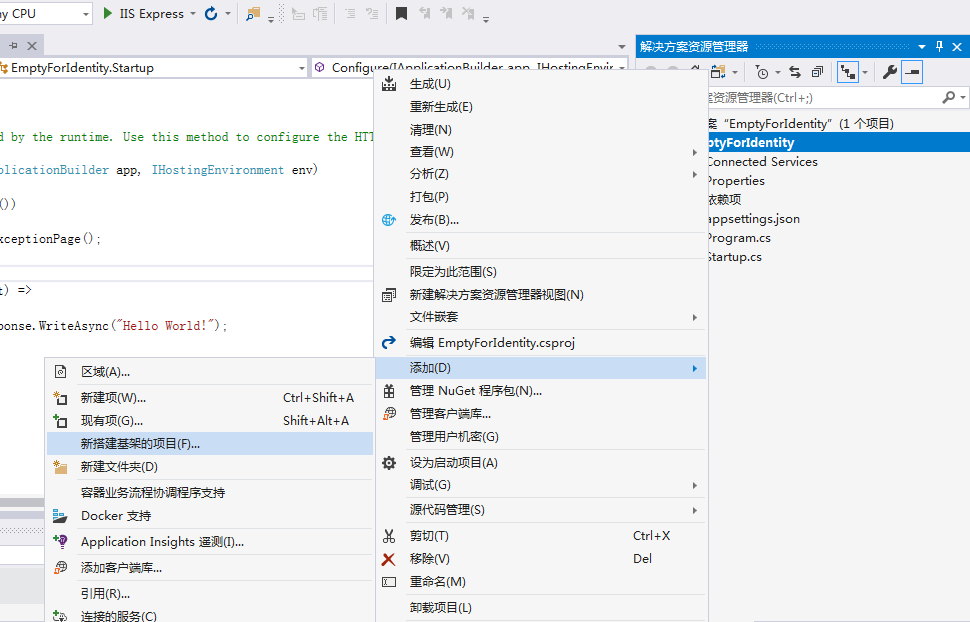
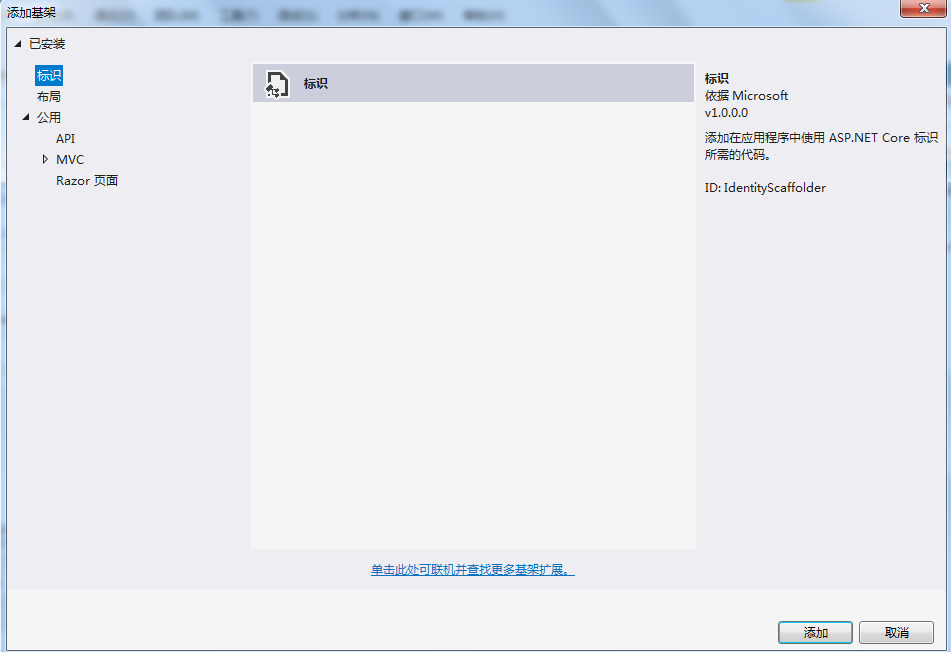
2.添加Identity基架
- 在項目上右鍵,添加->新搭建基架的項目
- 標識->添加
然後,選擇文件;
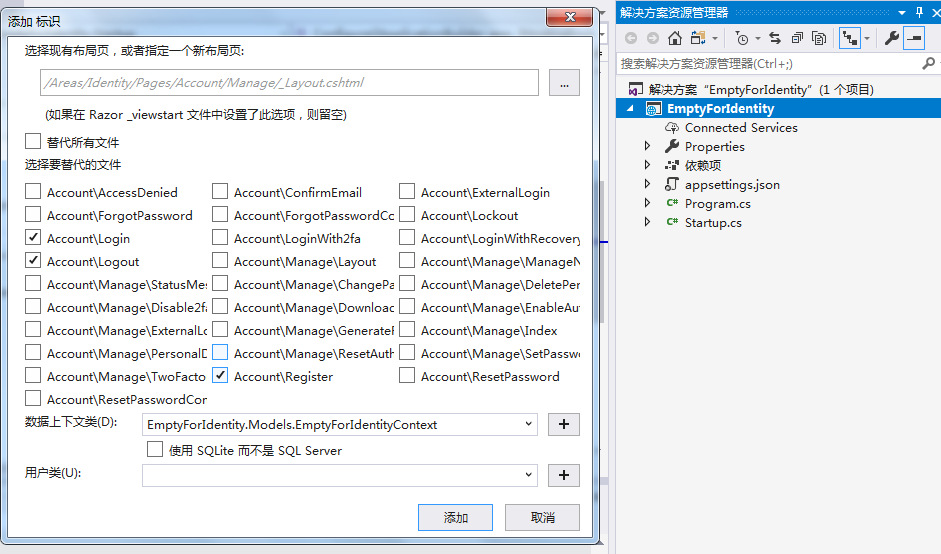
在這步,如果有佈局頁,可以選擇現有的佈局頁;
這裡沒有沒有佈局頁,也不需要指定一個新的佈局頁,就空著就可以了,它會自動生成一個新的佈局頁;
然後選擇你需要的功能頁面,這裡選擇的是登錄功能頁面,登錄功能頁面,註冊功能頁面;
再選擇數據上下文,這裡,如果存在的話,一樣可以選擇已經存在的;但是,在這個空項目中,是沒有數據上下文的,所以這裡直接點擊加號,
新增一個即可。
點擊添加
3.在StartUp文件類中,增加如下代碼:
public class Startup
    {
        // This method gets called by the runtime. Use this method to add services to the container.
        // For more information on how to configure your application, visit https://go.microsoft.com/fwlink/?LinkID=398940
        public void ConfigureServices(IServiceCollection services)
        {
       //新增的代碼
            services.AddMvc();
        }

        // This method gets called by the runtime. Use this method to configure the HTTP request pipeline.
        public void Configure(IApplicationBuilder app, IHostingEnvironment env)
        {
        //註釋的為空項目中原來的代碼
            //if (env.IsDevelopment())
            //{
            //    app.UseDeveloperExceptionPage();
            //}

            //app.Run(async (context) =>
            //{
            //    await context.Response.WriteAsync("Hello World!");
            //});

            if (env.IsDevelopment())
            {
                app.UseDeveloperExceptionPage();  //引入異常中間件,捕獲之後出現的異常
            }
            else
            {
                app.UseHsts();  //不是必須添加的,但推薦添加,之後會專門講解,待續
            }

       //新增的代碼
            app.UseHttpsRedirection();
            app.UseStaticFiles();
            app.UseAuthentication();
            app.UseMvc();

        }
    }
註意,如果StartUp按照原來空項目的代碼,去運行項目的話,像註冊,登錄,登出等功能頁面不能顯示,只列印 Hello world;
這裡從前面ScaffoldingReadme.txt 文件的說明也能看到,UI的顯示需要靜態文件和MVC等
4.遷移到資料庫
生成的Identity資料庫代碼需要用到Entity Framework Core Migrations(EFCore的遷移)來創建一個遷移,並更新到資料庫
如下:
Add-Migration CreateIdentitySchema
Update-Database
CreateIdentitySchema這個名字可以自己隨意取,但是最好能做到見名知義,知道做了哪些遷移
之後,可以自己打開vs上的sql server 對象資源管理器查看資料庫和表是否生成成功;
5.運行,查看效果
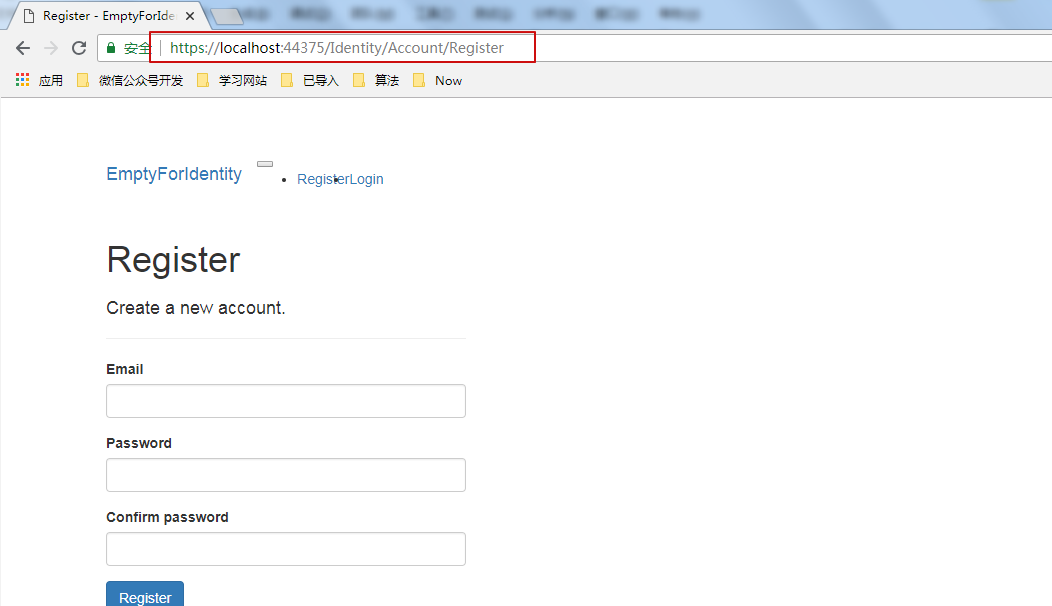
這裡,要說下這個路徑了,為什麼會是上圖標示的這個路徑呢
下麵展示下目錄結構,如下圖:
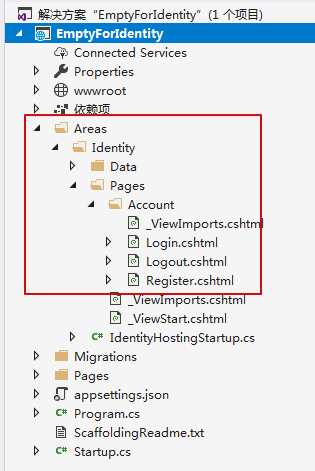
即區域(Areas)下的 Identity/Account/Login
這裡應該使用的是一種約定優先的路由方式,
這塊之後可能會給出一篇講解,這裡先知道怎麼找路由路徑即可
註意,下麵幾個與第一個類似,就不再給出詳細圖示,可以自己按步驟操作,如果有需要,後面再補充
把Identity基架添加到一個 不存在 認證(authentication)的 Razor項目
1.首先,準備一個項目中原來不帶認證的Razor項目
2.把Identity基架添加到項目中
- 在項目上右鍵,添加->新搭建基架的項目
- 標識->添加
- 選擇功能文件(類似登錄,登出等),添加
這裡操作同第一個,可以按需選擇進行添加
3.遷移(Migrations),添加認證,佈局
遷移
Add-Migration CreateIdentitySchema
Update-Database
允許認證
在StartUp文件的Configure方法中,在靜態文件(UseStaticFiles)之後,調用 UseAuthentication
public class Startup
{
    public Startup(IConfiguration configuration)
    {
        Configuration = configuration;
    }

    public IConfiguration Configuration { get; }

    public void ConfigureServices(IServiceCollection services)
    {
        services.AddMvc();
    }

    public void Configure(IApplicationBuilder app, IHostingEnvironment env)
    {
        if (env.IsDevelopment())
        {
            app.UseDeveloperExceptionPage();
        }
        else
        {
            app.UseExceptionHandler("/Error");
            app.UseHsts();
        }

        app.UseHttpsRedirection();
        app.UseStaticFiles();
        app.UseAuthentication(); //添加認證

        app.UseMvc();
    }
}
佈局變化
在佈局頁面(the layout file)中增加登錄分頁面(_LoginPartial)
<!DOCTYPE html>
<html>
<head>
<meta charset="utf-8" />
<meta name="viewport" content="width=device-width, initial-scale=1.0" />
<title>@ViewData["Title"] - RazorNoAuth8</title>
<environment include="Development">
<link rel="stylesheet" href="~/lib/bootstrap/dist/css/bootstrap.css" />
<link rel="stylesheet" href="~/css/site.css" />
</environment>
<environment exclude="Development">
<link rel="stylesheet" href="https://ajax.aspnetcdn.com/ajax/bootstrap/3.3.7/css/bootstrap.min.css"
asp-fallback-href="~/lib/bootstrap/dist/css/bootstrap.min.css"
asp-fallback-test-class="sr-only" asp-fallback-test-property="position" asp-fallback-test-value="absolute" />
<link rel="stylesheet" href="~/css/site.min.css" asp-append-version="true" />
</environment>
</head>
<body>
<nav class="navbar navbar-inverse navbar-fixed-top">
<div class="container">
<div class="navbar-header">
<button type="button" class="navbar-toggle" data-toggle="collapse" data-target=".navbar-collapse">
<span class="sr-only">Toggle navigation</span>
<span class="icon-bar"></span>
<span class="icon-bar"></span>
<span class="icon-bar"></span>
</button>
<a asp-page="/Index" class="navbar-brand">RazorNoAuth8</a>
</div>
<div class="navbar-collapse collapse">
<ul class="nav navbar-nav">
<li><a asp-page="/Index">Home</a></li>
<li><a asp-page="/About">About</a></li>
<li><a asp-page="/Contact">Contact</a></li>
</ul>
<partial name="_LoginPartial" />
</div>
</div>
</nav>
<partial name="_CookieConsentPartial" />
<div class="container body-content">
@RenderBody()
<hr />
<footer>
<p>© 2018 - RazorNoAuth8</p>
</footer>
</div>
<environment include="Development">
<script src="~/lib/jquery/dist/jquery.js"></script>
<script src="~/lib/bootstrap/dist/js/bootstrap.js"></script>
<script src="~/js/site.js" asp-append-version="true"></script>
</environment>
<environment exclude="Development">
<script src="https://ajax.aspnetcdn.com/ajax/jquery/jquery-3.3.1.min.js"
asp-fallback-src="~/lib/jquery/dist/jquery.min.js"
asp-fallback-test="window.jQuery"
crossorigin="anonymous"
integrity="sha384-K+ctZQ+LL8q6tP7I94W+qzQsfRV2a+AfHIi9k8z8l9ggpc8X+Ytst4yBo/hH+8Fk">
</script>
<script src="https://ajax.aspnetcdn.com/ajax/bootstrap/3.3.7/bootstrap.min.js"
asp-fallback-src="~/lib/bootstrap/dist/js/bootstrap.min.js"
asp-fallback-test="window.jQuery && window.jQuery.fn && window.jQuery.fn.modal"
crossorigin="anonymous"
integrity="sha384-Tc5IQib027qvyjSMfHjOMaLkfuWVxZxUPnCJA7l2mCWNIpG9mGCD8wGNIcPD7Txa">
</script>
<script src="~/js/site.min.js" asp-append-version="true"></script>
</environment>
@RenderSection("Scripts", required: false)
</body>
</html>
把Identity基架添加到一個 存在 認證(authentication)的 Razor項目
1.首先準備一個項目中原來存在認證的項目
2.把Identity基架添加到項目中
- 在項目上右鍵,添加->新搭建基架的項目
- 標識->添加
- 選擇功能文件(類似登錄,登出等),添加
註意,這裡在選擇佈局這個頁面操作時,你可以選擇已經存在的佈局哦,還有資料庫上下文,也可以選擇使用已經存在的,當然也可以新建
把Identity基架添加到一個 不存在 認證(authentication)的 MVC項目
1.首先準備項目中原來不存在認證的MVC項目
2.把Identity基架添加到項目中
- 在項目上右鍵,添加->新搭建基架的項目
- 標識->添加
- 選擇功能文件(類似登錄,登出等),添加
把登錄分頁(_LoginPartial)添加到Views/Shared/_Layout.cshtml 中
<!DOCTYPE html>
<html>
<head>
<meta charset="utf-8" />
<meta name="viewport" content="width=device-width, initial-scale=1.0" />
<title>@ViewData["Title"] - MvcNoAuth3</title>
<environment include="Development">
<link rel="stylesheet" href="~/lib/bootstrap/dist/css/bootstrap.css" />
<link rel="stylesheet" href="~/css/site.css" />
</environment>
<environment exclude="Development">
<link rel="stylesheet" href="https://ajax.aspnetcdn.com/ajax/bootstrap/3.3.7/css/bootstrap.min.css"
asp-fallback-href="~/lib/bootstrap/dist/css/bootstrap.min.css"
asp-fallback-test-class="sr-only" asp-fallback-test-property="position" asp-fallback-test-value="absolute" />
<link rel="stylesheet" href="~/css/site.min.css" asp-append-version="true" />
</environment>
</head>
<body>
<nav class="navbar navbar-inverse navbar-fixed-top">
<div class="container">
<div class="navbar-header">
<button type="button" class="navbar-toggle" data-toggle="collapse" data-target=".navbar-collapse">
<span class="sr-only">Toggle navigation</span>
<span class="icon-bar"></span>
<span class="icon-bar"></span>
<span class="icon-bar"></span>
</button>
<a asp-area="" asp-controller="Home" asp-action="Index" class="navbar-brand">MvcNoAuth3</a>
</div>
<div class="navbar-collapse collapse">
<ul class="nav navbar-nav">
<li><a asp-area="" asp-controller="Home" asp-action="Index">Home</a></li>
<li><a asp-area="" asp-controller="Home" asp-action="About">About</a></li>
<li><a asp-area="" asp-controller="Home" asp-action="Contact">Contact</a></li>
</ul>
<partial name="_LoginPartial" />
</div>
</div>
</nav>
<partial name="_CookieConsentPartial" />
<div class="container body-content">
@RenderBody()
<hr />
<footer>
<p>© 2018 - MvcNoAuth3</p>
</footer>
</div>
<environment include="Development">
<script src="~/lib/jquery/dist/jquery.js"></script>
<script src="~/lib/bootstrap/dist/js/bootstrap.js"></script>
<script src="~/js/site.js" asp-append-version="true"></script>
</environment>
<environment exclude="Development">
<script src="https://ajax.aspnetcdn.com/ajax/jquery/jquery-3.3.1.min.js"
asp-fallback-src="~/lib/jquery/dist/jquery.min.js"
asp-fallback-test="window.jQuery"
crossorigin="anonymous"
integrity="sha384-K+ctZQ+LL8q6tP7I94W+qzQsfRV2a+AfHIi9k8z8l9ggpc8X+Ytst4yBo/hH+8Fk">
</script>
<script src="https://ajax.aspnetcdn.com/ajax/bootstrap/3.3.7/bootstrap.min.js"
asp-fallback-src="~/lib/bootstrap/dist/js/bootstrap.min.js"
asp-fallback-test="window.jQuery && window.jQuery.fn && window.jQuery.fn.modal"
crossorigin="anonymous"
integrity="sha384-Tc5IQib027qvyjSMfHjOMaLkfuWVxZxUPnCJA7l2mCWNIpG9mGCD8wGNIcPD7Txa">
</script>
<script src="~/js/site.min.js" asp-append-version="true"></script>
</environment>
@RenderSection("Scripts", required: false)
</body>
</html>
然後,把 Pages/Shared/_LoginPartial.cshtml 移動到 Views/Shared/_LoginPartial.cshtml 位置
遷移
Add-Migration CreateIdentitySchema
Update-Database
添加認證
public class Startup
{

    public void ConfigureServices(IServiceCollection services)
    {
        services.AddMvc();
    }

    public void Configure(IApplicationBuilder app, IHostingEnvironment env)
    {
        if (env.IsDevelopment())
        {
            app.UseDeveloperExceptionPage();
        }
        else
        {
            app.UseExceptionHandler("/Home/Error");
            app.UseHsts();
        }

        app.UseHttpsRedirection();
        app.UseStaticFiles();
        app.UseAuthentication();
        app.UseMvcWithDefaultRoute(); //使用mvc預設路由
    }
}
把Identity基架添加到一個 存在 認證(authentication)的 MVC項目
1.首先準備一個項目中原本存在認證(authentication)的MVC項目
2.把Identity基架添加到項目中
- 在項目上右鍵,添加->新搭建基架的項目
- 標識->添加
- 選擇功能文件(類似登錄,登出等),添加
刪除 Pages/Shared 下的文件,和這個目錄
創建一個完全的Identity UI(認證界面)資源
下麵的代碼展示了對比預設Identity UI的一些變化,你可能會想對Identity UI更完全的控制。
public void ConfigureServices(IServiceCollection services)
{
    services.Configure<CookiePolicyOptions>(options =>
    {
        options.CheckConsentNeeded = context => true;
        options.MinimumSameSitePolicy = SameSiteMode.None;
    });

    services.AddDbContext<ApplicationDbContext>(options =>
        options.UseSqlServer(
            Configuration.GetConnectionString("DefaultConnection")));

    services.AddIdentity<IdentityUser, IdentityRole>()
        // services.AddDefaultIdentity<IdentityUser>()
        .AddEntityFrameworkStores<ApplicationDbContext>()
        .AddDefaultTokenProviders();

    services.AddMvc().SetCompatibilityVersion(CompatibilityVersion.Version_2_1)
        .AddRazorPagesOptions(options =>
        {
            options.AllowAreas = true;
            options.Conventions.AuthorizeAreaFolder("Identity", "/Account/Manage");
            options.Conventions.AuthorizeAreaPage("Identity", "/Account/Logout");
        });

  //這裡設置了登錄路徑,登出路徑,沒許可權訪問的路徑
    services.ConfigureApplicationCookie(options =>
    {
        options.LoginPath = $"/Identity/Account/Login";
        options.LogoutPath = $"/Identity/Account/Logout";
        options.AccessDeniedPath = $"/Identity/Account/AccessDenied";
    });

    // using Microsoft.AspNetCore.Identity.UI.Services; 這裡註冊了一個IEmailSender郵件發送介面的實現
    services.AddSingleton<IEmailSender, EmailSender>();
}
郵件實現的代碼:
public class EmailSender : IEmailSender
{
    public Task SendEmailAsync(string email, string subject, string message)
    {
        return Task.CompletedTask;
    }
}
結束!
參考文檔:
https://docs.microsoft.com/en-us/aspnet/core/security/authentication/scaffold-identity?view=aspnetcore-2.2&tabs=visual-studio#scaffold-identity-into-an-mvc-project-without-existing-authorization

