一.概述 在Ocelot中,為了保護下游api資源,用戶訪問時需要進行認證鑒權,這需要在Ocelot 網關中添加認證服務。添加認證後,ReRoutes路由會進行身份驗證,並使用Ocelot的基於聲明的功能。在Startup.cs中註冊認證服務,為每個註冊提供一個方案 (authenticationP ...
一.概述
在Ocelot中,為了保護下游api資源,用戶訪問時需要進行認證鑒權,這需要在Ocelot 網關中添加認證服務。添加認證後,ReRoutes路由會進行身份驗證,並使用Ocelot的基於聲明的功能。在Startup.cs中註冊認證服務,為每個註冊提供一個方案 (authenticationProviderKey身份驗證提供者密鑰)。
//下麵是在網關項目中,添加認證服務
public void ConfigureServices(IServiceCollection services)
{
    var authenticationProviderKey = "TestKey";

    services.AddAuthentication()
        .AddJwtBearer(authenticationProviderKey, x =>
        {
            //..
        });
}
其中TestKey是此提供程式已註冊的方案,將映射到ReRoute的配置中
      "AuthenticationOptions": {
            "AuthenticationProviderKey": "TestKey",
            "AllowedScopes": []
        }
當Ocelot運行時,會查看此configuration.json中的AuthenticationProviderKey節點,並檢查是否使用給定密鑰,該密鑰是否已註冊身份驗證提供程式。如果沒有,那麼Ocelot將無法啟動。如果有,則ReRoute將在執行時使用該提供程式。
本次示例有四個項目:
APIGateway網關項目 http://localhost:9000
AuthServer項目生成jwt令牌服務 http://localhost:9009
CustomerAPIServices 是web api項目 http://localhost:9001
ClientApp項目 模擬客戶端HttpClient
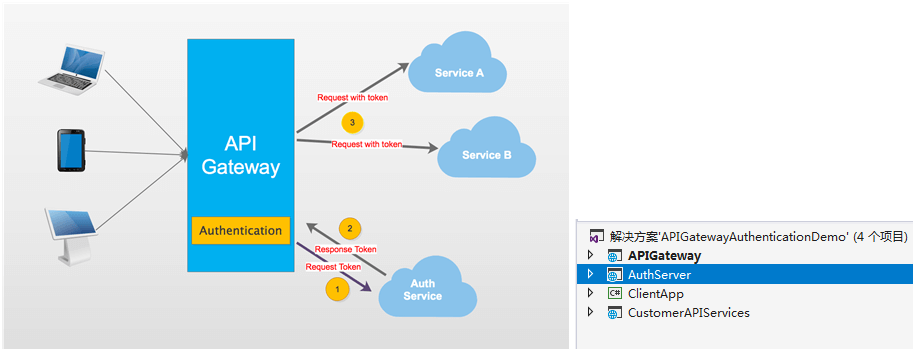
當客戶想要訪問web api服務時,首先訪問API網關的身份驗證模塊。我們需要首先訪問AuthServer以獲取訪問令牌,以便我們可以使用access_token訪問受保護的api服務。開源Github地址, 架構如下圖所示:

二. AuthServer項目
此服務主要用於,為用戶請求受保護的api,需要的jwt令牌。生成jwt關鍵代碼如下:
        /// <summary>
        ///用戶使用 用戶名密碼 來請求伺服器
        ///伺服器進行驗證用戶的信息
        ///伺服器通過驗證發送給用戶一個token
        ///客戶端存儲token,併在每次請求時附送上這個token值, headers: {'Authorization': 'Bearer ' + token}
        ///服務端驗證token值,並返回數據
        /// </summary>
        /// <param name="name"></param>
        /// <param name="pwd"></param>
        /// <returns></returns>
        [HttpGet]
        public IActionResult Get(string name, string pwd)
        {
            //驗證用戶,通過後發送一個token
            if (name == "catcher" && pwd == "123")
            {

                var now = DateTime.UtcNow;

                //添加用戶的信息,轉成一組聲明,還可以寫入更多用戶信息聲明
                var claims = new Claim[]
                {

                    //聲明主題
                    new Claim(JwtRegisteredClaimNames.Sub, name),
                    //JWT ID 唯一標識符
                    new Claim(JwtRegisteredClaimNames.Jti, Guid.NewGuid().ToString()),
                    //發佈時間戳 issued timestamp
                    new Claim(JwtRegisteredClaimNames.Iat, now.ToUniversalTime().ToString(), ClaimValueTypes.Integer64)
                };

                //下麵使用 Microsoft.IdentityModel.Tokens幫助庫下的類來創建JwtToken

                //安全秘鑰
                var signingKey = new SymmetricSecurityKey(Encoding.ASCII.GetBytes(_settings.Value.Secret));

                //生成jwt令牌(json web token)
                var jwt = new JwtSecurityToken(
                    //jwt發行方
                    issuer: _settings.Value.Iss,
                    //jwt訂閱者
                    audience: _settings.Value.Aud,
                    //jwt一組聲明
                    claims: claims,
                    notBefore: now,
                    //jwt令牌過期時間
                    expires: now.Add(TimeSpan.FromMinutes(2)),
                    //簽名憑證: 安全密鑰、簽名演算法
                    signingCredentials: new SigningCredentials(signingKey, SecurityAlgorithms.HmacSha256)
                );
                //序列化jwt對象,寫入一個字元串encodedJwt
                var encodedJwt = new JwtSecurityTokenHandler().WriteToken(jwt);

                var responseJson = new
                {
                    access_token = encodedJwt,
                    expires_in = (int)TimeSpan.FromMinutes(2).TotalSeconds
                };
                //以json形式返回
                return Json(responseJson);
            }
            else
            {
                return Json("");
            }
        }
    }
在之前講IS4的第55篇中,講ResourceOwnerPasswords項目,獲取token也是要發送用戶名和密碼,那是由is4來完成,包括自動:驗證用戶,生成jwtToken。這裡由System.IdentityModel.Tokens類庫來生成jwtToken。最後返回jwt令牌token給用戶。
當catcher用戶請求:http://localhost:9009/api/auth?name=catcher&pwd=123服務時,產生jwt令牌token,下麵是換了行的Token, 如下所示:
{"access_token":"eyJhbGciOiJIUzI1NiIsInR5cCI6IkpXVCJ9
.eyJzdWIiOiJjYXRjaGVyIiwianRpIjoiZWJmNWIyZGItNDg5YS00OTBjLTk0NjUtODZmOTE5YWEzMDRjIiwiaWF0IjoiMjAxOS80LzI1IDE6NTc6MjAiLCJuYmYiOjE1NTYxNTc0NDAsImV4cC
  I6MTU1NjE1NzU2MCwiaXNzIjoiaHR0cDovL3d3dy5jLXNoYXJwY29ybmVyLmNvbS9tZW1iZXJzL2NhdGNoZXItd29uZyIsImF1ZCI6IkNhdGNoZXIgV29uZyJ9
.O2jI7NSnothl9Agbr0VhmdoBsXhDEoxkYNOuGaSEkkg","expires_in":120}
簡單瞭解下JWT(JSON Web Token),它是在Web上以JSON格式傳輸的Token。該Token被設計為緊湊聲明表示格式,意味著位元組少,它可以在GET URL中,Header中,Post Parameter中進行傳輸。
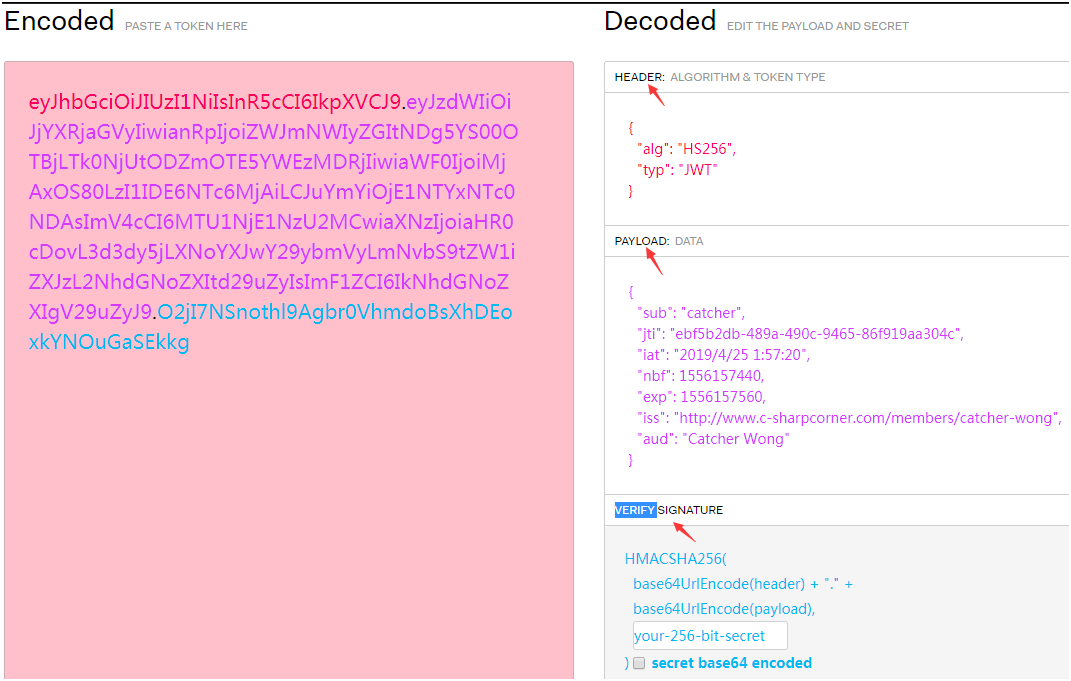
JWT一般由三段構成(Header.Payload.Signature),用"."號分隔開,是base64編碼的,可以把該字元串放到https://jwt.io/中進行查看,如下所示:

在Header中:alg:聲明加密的演算法,這裡為HS256。typ:聲明類型,這裡為JWT。
在Payload中:
sub: 主題, jwt發佈者名稱。
jti: jwt的唯一身份標識,主要用來作為一次性token,從而迴避重放攻擊。也就是請求生成的token不一樣。
iat: 簽發時間
nbf: 在什麼時間之前,該jwt都是不可用的,是時間戳格式。
exp:jwt的過期時間,這個過期時間必須要大於簽發時間。
adu: 訂閱者,接收jwt的一方。
iss: jwt的發行方。
Signature(數字簽名,防止信息被篡改):
包含了:base64後的Header,Payload ,Secret,secret就是用來進行jwt的簽發和jwt的驗證。相當於服務端的私鑰。該secret在示例中,用在AuthServer和CustomerAPIServices項目中。
三. CustomerAPIServices項目
在該web api 項目中啟用身份驗證來保護api服務,使用JwtBearer,將預設的身份驗證方案設置為TestKey。添加身份驗證代碼如下:
   public void ConfigureServices(IServiceCollection services)
        {
            //獲取當前用戶(訂閱者)信息
            var audienceConfig = Configuration.GetSection("Audience");

            //獲取安全秘鑰
            var signingKey = new SymmetricSecurityKey(Encoding.ASCII.GetBytes(audienceConfig["Secret"]));

            //token要驗證的參數集合
            var tokenValidationParameters = new TokenValidationParameters
            {
                //必須驗證安全秘鑰
                ValidateIssuerSigningKey = true,
                IssuerSigningKey = signingKey,

                //必須驗證發行方
                ValidateIssuer = true,
                ValidIssuer = audienceConfig["Iss"],

                //必須驗證訂閱者
                ValidateAudience = true,
                ValidAudience = audienceConfig["Aud"],

                //是否驗證Token有效期,使用當前時間與Token的Claims中的NotBefore和Expires對比
                ValidateLifetime = true,
                // 允許的伺服器時間偏移量
                ClockSkew = TimeSpan.Zero,
                //是否要求Token的Claims中必須包含Expires
                RequireExpirationTime = true,
            };
            //添加服務驗證,方案為TestKey
            services.AddAuthentication(o =>
            {
                o.DefaultAuthenticateScheme = "TestKey";
            })
            .AddJwtBearer("TestKey", x =>
             {
                 x.RequireHttpsMetadata = false;
                 ////在JwtBearerOptions配置中,IssuerSigningKey(簽名秘鑰)、ValidIssuer(Token頒發機構)、ValidAudience(頒發給誰)三個參數是必須的。
                 x.TokenValidationParameters = tokenValidationParameters;
             });

            services.AddMvc();
        }
新建一個CustomersController類,在api方法中使用Authorize屬性。
   [Route("api/[controller]")]
    public class CustomersController : Controller
    {
        //Authorize]:加了該標記,當用戶請求時,需要發送有效的jwt
        [Authorize]
        [HttpGet]
        public IEnumerable<string> Get()
        {
            return new string[] { "Catcher Wong", "James Li" };
        }

        //未加授權標記,不受保護,任何用戶都可以獲取
        [HttpGet("{id}")]
        public string Get(int id)
        {
            return $"Catcher Wong - {id}";
        }
    }
下麵運行,在瀏覽器中直接訪問http://localhost:9001/api/customers 報http 500錯誤,而訪問http://localhost:9001/api/customers/1 則成功http 200,顯示“Catcher Wong - 1”
四. APIGateway網關
添加認證服務,基本與CustomerAPIServices項目中的認證服務一樣。代碼如下:
  public void ConfigureServices(IServiceCollection services)
        {
            //獲取當前用戶(訂閱者)信息
            var audienceConfig = Configuration.GetSection("Audience");
            //獲取安全秘鑰
            var signingKey = new SymmetricSecurityKey(Encoding.ASCII.GetBytes(audienceConfig["Secret"]));

            //token要驗證的參數集合
            var tokenValidationParameters = new TokenValidationParameters
            {
                //必須驗證安全秘鑰
                ValidateIssuerSigningKey = true,
                IssuerSigningKey = signingKey,

                //必須驗證發行方
                ValidateIssuer = true,
                ValidIssuer = audienceConfig["Iss"],

                //必須驗證訂閱者
                ValidateAudience = true,
                ValidAudience = audienceConfig["Aud"],

                //是否驗證Token有效期,使用當前時間與Token的Claims中的NotBefore和Expires對比
                ValidateLifetime = true,

                // 允許的伺服器時間偏移量
                ClockSkew = TimeSpan.Zero,

                //是否要求Token的Claims中必須包含Expires
                RequireExpirationTime = true,
            };
            //添加服務驗證,方案為TestKey
            services.AddAuthentication(o =>
            {
                o.DefaultAuthenticateScheme = "TestKey";
            })
            .AddJwtBearer("TestKey", x =>
             {
                 x.RequireHttpsMetadata = false;
                 //在JwtBearerOptions配置中,IssuerSigningKey(簽名秘鑰)、ValidIssuer(Token頒發機構)、ValidAudience(頒發給誰)三個參數是必須的。
                 x.TokenValidationParameters = tokenValidationParameters;
             });
            //這裡也可以使用IS4承載令牌
            /*
             var authenticationProviderKey = "TestKey";
             Action<IdentityServerAuthenticationOptions> options = o =>
            {
                 o.Authority = "https://whereyouridentityserverlives.com";
                 o.ApiName = "api";
                 o.SupportedTokens = SupportedTokens.Both;
                 o.ApiSecret = "secret";
             };
            services.AddAuthentication()
                .AddIdentityServerAuthentication(authenticationProviderKey, options);
            */


            //添加Ocelot網關服務時,包括Secret秘鑰、Iss發佈者、Aud訂閱者
            services.AddOcelot(Configuration);
        }
在IS4中是由Authority參數指定OIDC服務地址,OIDC可以自動發現Issuer, IssuerSigningKey等配置,而o.Audience與x.TokenValidationParameters = new TokenValidationParameters { ValidAudience = "api" }是等效的。
下麵應該修改configuration.json文件。添加一個名為AuthenticationOptions的新節點,並使AuthenticationProviderKey與我們在Startup類中定義的相同。
        "ReRoutes": [
      {
        "DownstreamPathTemplate": "/api/customers",
        "DownstreamScheme": "http",
        "DownstreamHostAndPorts": [
          {
            "Host": "localhost",
            "Port": 9001
          }
        ],
        "UpstreamPathTemplate": "/customers",
        "UpstreamHttpMethod": [ "Get" ],
        "AuthenticationOptions": {
          "AuthenticationProviderKey": "TestKey",
          "AllowedScopes": []
        }
      }
APIGateway網關項目和CustomerAPIServices項目的appsettings.json文件,都配置了訂閱者信息如下:
{
    "Audience": {
        "Secret": "Y2F0Y2hlciUyMHdvbmclMjBsb3ZlJTIwLm5ldA==",
        "Iss": "http://www.c-sharpcorner.com/members/catcher-wong",
        "Aud": "Catcher Wong"
    }
}
五. ClientApp項目
最後使用的客戶端應用程式,來模擬API網關的一些請求。首先,我們需要添加一個方法來獲取access_token。
        /// <summary>
        /// 獲取jwtToken
        /// </summary>
        /// <returns></returns>
        private static string GetJwt()
        {
            HttpClient client = new HttpClient();

            //9000是網關,會自動轉發到下游伺服器,
            client.BaseAddress = new Uri( "http://localhost:9000");
            client.DefaultRequestHeaders.Clear();

            //轉發到AuthServer的9009
            var res2 = client.GetAsync("/api/auth?name=catcher&pwd=123").Result;

            dynamic jwt = JsonConvert.DeserializeObject(res2.Content.ReadAsStringAsync().Result);

            return jwt.access_token;
        }
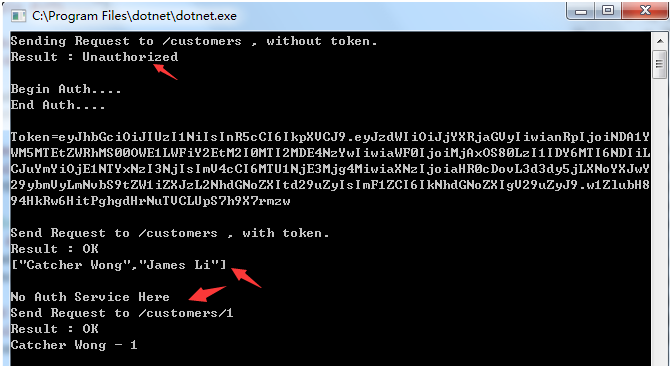
接著,編寫了三段代碼 , 通過API Gateway網關, 來訪問CustomerAPIServices項目中的api服務:
    static void Main(string[] args)
        {
            HttpClient client = new HttpClient();

            client.DefaultRequestHeaders.Clear();
            client.BaseAddress = new Uri("http://localhost:9000");

            // 1. 需要授權的api訪問,沒有token時,返回http狀態401
            var resWithoutToken = client.GetAsync("/customers").Result;

            Console.WriteLine($"Sending Request to /customers , without token.");
            Console.WriteLine($"Result : {resWithoutToken.StatusCode}");

            //2. 需要授權的api訪問,獲取令牌請求api,返回http狀態200正常
            client.DefaultRequestHeaders.Clear();
            Console.WriteLine("\nBegin Auth....");
            var jwt = GetJwt();
            Console.WriteLine("End Auth....");
            Console.WriteLine($"\nToken={jwt}");

            client.DefaultRequestHeaders.Add("Authorization", $"Bearer {jwt}");
            var resWithToken = client.GetAsync("/customers").Result;

            Console.WriteLine($"\nSend Request to /customers , with token.");
            Console.WriteLine($"Result : {resWithToken.StatusCode}");
            Console.WriteLine(resWithToken.Content.ReadAsStringAsync().Result);

            //3.不需要授權的api訪問,返回http狀態200正常
            Console.WriteLine("\nNo Auth Service Here ");
            client.DefaultRequestHeaders.Clear();
            var res = client.GetAsync("/customers/1").Result;

            Console.WriteLine($"Send Request to /customers/1");
            Console.WriteLine($"Result : {res.StatusCode}");
            Console.WriteLine(res.Content.ReadAsStringAsync().Result);

            Console.Read();
        }

參考文獻
在ASP.NET核心中使用Ocelot構建API網關 - 身份驗證


