
一、引言 大部分系統都離不開數據訪問,資料庫包括SQL和NOSQL,SQL是指關係型資料庫,常見的有SQL Server,Oracle,MySQL(開源),NOSQL是泛指非關係型資料庫,常見的有MongoDB,Redis。 用spring開發時我們常用的ORM框架有JDBC、Mybatis,Hib ...
一、引言
用spring開發時我們常用的ORM框架有JDBC、Mybatis,Hibernate,現在最常用的應該是Mybatis。
在Springboot中對於數據訪問層,無論是SQL還是NOSQL,都預設採用整合Spring Data的方式進行統一處理,Springboot會幫我們添加大量自動配置,屏蔽了很多設置。並引入各種xxxTemplate,xxxRepository來簡化我們對數據訪問層的操作。對我們來說只需要進行簡單的設置即可。這篇就來學習springboot整合JDBC,mybatis、JPA。
我們需要用什麼數據訪問,就引入相關的start進行開發。

二、
jdbc是我們最先學習的一個資料庫框架,SpringBoot也進行了相應整合.
<!--JDBC -->
<dependency>
  <groupId>org.springframework.boot</groupId>
  <artifactId>spring-boot-starter-jdbc</artifactId>
</dependency>
<!--mysql 驅動-->
<dependency>
  <groupId>mysql</groupId>
  <artifactId>mysql-connector-java</artifactId>
  <scope>runtime</scope>
</dependency>
2.2、
@Autowired
private DataSource dataSource;

@Test
public void test() throws SQLException {
    System.out.println(dataSource.getClass());
    Connection connection = dataSource.getConnection();
    System.out.println(connection);
    connection.close();
}
輸出為:com.zaxxer.hikari.HikariDataSource
說明預設數據源是com.zaxxer.hikari.HikariDataSource,而在springboot 2.0之前為org.apache.tomcat.jdbc.pool.DataSource。我們也可以通過改變spring.datasource.type 屬性來更改我們想自定義的數據源。數據源的相關配置都在DataSourceProperties,我們可以參考這個類進行配置。
2.3、
DataSourceInitializer這裡面有兩個方法runSchemaScripts()可以運行建表語句,runDataScripts()可以運行插入數據的sql語句。
預設使用schema-.sql創建建表語句,用data-
spring:
  datasource:
    schema:
     - classpath:department.sql
2.4、
@Autowired
JdbcTemplate jdbcTemplate;

@Test
public void jdbcTest(){
    List<Map<String, Object>> mapList = jdbcTemplate.queryForList("select * from user ");
    System.out.println(mapList.get(0));
}
結果:{id=1, username=王五, birthday=null, sex=2, address=null}
三、
<!-- https://mvnrepository.com/artifact/com.alibaba/druid -->
<dependency>
  <groupId>com.alibaba</groupId>
  <artifactId>druid</artifactId>
  <version>1.1.16</version>
</dependency>
Druid的常用配置如下:
type: com.alibaba.druid.pool.DruidDataSource
#   數據源其他配置
initialSize: 5
minIdle: 5
maxActive: 20
maxWait: 60000
timeBetweenEvictionRunsMillis: 60000
minEvictableIdleTimeMillis: 300000
validationQuery: SELECT 1 FROM DUAL
testWhileIdle: true
testOnBorrow: false
testOnReturn: false
poolPreparedStatements: true
#   配置監控統計攔截的filters,去掉後監控界面sql無法統計,'wall'用於防火牆
filters: stat,wall,log4j
maxPoolPreparedStatementPerConnectionSize: 20
useGlobalDataSourceStat: true
connectionProperties: druid.stat.mergeSql=true;druid.stat.slowSqlMillis=500
配置之後不會立刻生效,我們還需要編寫配置類:
@Configuration
public class DruidConfig {

    @ConfigurationProperties(prefix = "spring.datasource")
    @Bean
    public DataSource druid(){
        return new DruidDataSource();
    }
}
再次運行上面查詢數據源的方法,可以得到如下結果:

註:必須引入日誌依賴,否則會報錯
<!-- https://mvnrepository.com/artifact/log4j/log4j -->
<dependency>
  <groupId>log4j</groupId>
  <artifactId>log4j</artifactId>
  <version>1.2.17</version>
</dependency>
我們在加上Druid的監控配置:
//配置Druid的監控
//1、配置一個管理後臺的Servlet
@Bean
public ServletRegistrationBean statViewServlet(){
    ServletRegistrationBean bean = new ServletRegistrationBean(new StatViewServlet(), "/druid/*");
    Map<String,String> initParams = new HashMap<>();

    initParams.put("loginUsername","admin");
    initParams.put("loginPassword","123456");
    initParams.put("allow","");//預設就是允許所有訪問
    initParams.put("deny","192.168.15.21");

    bean.setInitParameters(initParams);
    return bean;
}


//2、配置一個web監控的filter
@Bean
public FilterRegistrationBean webStatFilter(){
    FilterRegistrationBean bean = new FilterRegistrationBean();
    bean.setFilter(new WebStatFilter());

    Map<String,String> initParams = new HashMap<>();
    initParams.put("exclusions","*.js,*.css,/druid/*");

    bean.setInitParameters(initParams);

    bean.setUrlPatterns(Arrays.asList("/*"));

    return  bean;
}
這樣我們可以直接通過後臺監控數據源訪問情況。
四、
    <dependency>
        <groupId>org.mybatis.spring.boot</groupId>
        <artifactId>mybatis-spring-boot-starter</artifactId>
        <version>1.3.1</version>
    </dependency>
也導入Druid數據源,並加入之前學習Mybatis時用到的實體,而後就可以進行測試,Mybatis的使用也有兩種方法,註解版和配置文件版,註解版用的很少,一般都是配置文件。
4.1、
@Mapper
public interface DepartmentMapper {
    @Select("select * from department where id=#{id}")
    Department getDeptById(Integer id);

    @Delete("delete from department where id=#{id}")
    int deleteDeptById(Integer id);

    @Options(useGeneratedKeys = true,keyProperty = "id")
    @Insert("insert into department(departmentName) values(#{departmentName})")
    int insertDept(Department department);

    @Update("update department set departmentName=#{departmentName} where id=#{id}")
    int updateDept(Department department);
}
測試:
@Autowired
UserMapper userMapper;

@Autowired
DepartmentMapper departmentMapper;

@Test
public void mybatisTest(){
    Department deptById = departmentMapper.getDeptById(1);
    System.out.println(deptById);

}
結果:Department(id=1, departmentName=AA)
4.2、
@Mapper
public interface UserMapper {
    User queryUserById(Integer id);
}
然後新增一個全局配置文件:SqlMapConfig.xml
<?xml version="1.0" encoding="UTF-8" ?>
<!DOCTYPE configuration
        PUBLIC "-//mybatis.org//DTD Config 3.0//EN"
        "http://mybatis.org/dtd/mybatis-3-config.dtd">
<configuration>

</configuration>
裡面暫時什麼配置都不需要,然後再引入相應的XXXMapper.xml文件,最後在配置文件中加上掃描文件配置即可
mybatis:
  config-location: classpath:mybatis/SqlMapConfig.xml
  mapper-locations: classpath:mybatis/mapper/*.xml
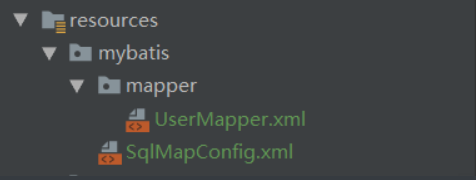
UserMapper.xml內容:
<?xml version="1.0" encoding="UTF-8" ?>
<!DOCTYPE mapper
        PUBLIC "-//mybatis.org//DTD Mapper 3.0//EN"
        "http://mybatis.org/dtd/mybatis-3-mapper.dtd">
<mapper namespace="com.yuanqinnan.mapper.UserMapper">
    <select id="queryUserById" parameterType="int" resultType="com.yuanqinnan.model.User">
    SELECT * FROM `user`where id=#{id}
   </select>

</mapper>
測試:
@Test
public void mybatisTest(){
    Department deptById = departmentMapper.getDeptById(1);
    System.out.println(deptById);
    User userById = userMapper.queryUserById(1);
    System.out.println(userById);
}
Mybatis的配置就是這麼簡單,基本不需要額外配置。
五、
JDBC和Mybatis我們之前都學習過,SpringBoot只不過是幫我們整合配置,而JPA我們之前沒有接觸過,所以還是要先解釋下,瞭解JPA之前我們先瞭解Spring Data:
Spring Data 項目的目的是為了簡化構建基於Spring 框架應用的數據訪問技術,包括非關係資料庫、Map-Reduce 框架、雲數據服務等等;另外也包含對關係資料庫的訪問支持。
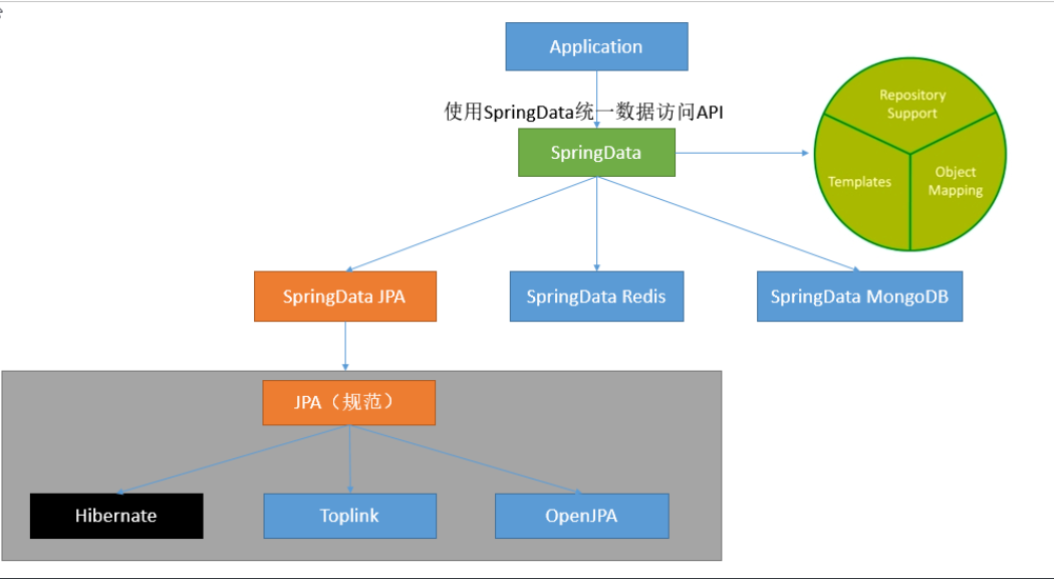
Spring Data 主要特點是:
SpringData為我們提供使用統一的API來對數據訪問層進行操作;這主要是Spring Data Commons項目來實現的。Spring Data Commons讓我們在使用關係型或者非關係型數據訪問技術時都基於Spring提供的統一標準,標準包含了CRUD(創建、獲取、更新、刪除)、查詢、排序和分頁的相關操作。
SpringData幫我們封裝了資料庫操作,我們只需要進程介面,就可以進行操作,SpringData有如下統一的介面
Repository<T, ID extends Serializable>:統一介面 RevisionRepository<T, ID extends Serializable, N extends Number & Comparable<N>>:基於樂觀鎖機制 CrudRepository<T, ID extends Serializable>:基本CRUD操作 PagingAndSortingRepository<T, ID extends Serializable>:基本CRUD及分頁
我們要使用JPA,就是繼承JpaRepository,我們只要按照它的命名規範去對命名介面,便可以實現資料庫操作功能,這樣說有些抽象,還是用一個例子來說明:
第一步:引入依賴
  <!-- springdata jpa依賴 -->
    <dependency>
      <groupId>org.springframework.boot</groupId>
      <artifactId>spring-boot-starter-data-jpa</artifactId>
    </dependency>
第二步:編寫表對應實體:
//使用JPA註解配置映射關係
@Entity //告訴JPA這是一個實體類(和數據表映射的類)
@Table(name = "order") //@Table來指定和哪個數據表對應;order;
@Data
public class Order {

    @Id //這是一個主鍵
    @GeneratedValue(strategy = GenerationType.IDENTITY)//自增主鍵
    private Integer id;

    @Column(name = "user_Id")
    private Integer userId;
    //這是和數據表對應的一個列
    @Column(name="number",length = 32)
    private String number;
    // 訂單創建時間,省略預設列名就是屬性名
    private Date createtime;
    // 備註
    private String note;
}
第三步:編寫倉庫介面:
@Repository
public interface OrderRepository extends JpaRepository<Order, Integer> {
}
這個時候OrderRepository 已經有了很多實現好的方法,我們只要跟著調用即可
測試:
@Autowired
OrderRepository orderRepository;

@Test
public void jpaTest(){
    List<Order> all = orderRepository.findAll();
    System.out.println(all);

}
一個簡單的JPA實現完成,當然JPA的內容很多,這裡只是一個非常簡單的例子,要進一步的學習的話還是要去看官方文檔。


