1. 創建項目 1.1 新建項目 首先新建一個項目,名為 mysite,命令如下: 運行成功,生成一些目錄: 1.2 啟動伺服器 執行成功,看到輸出如下信息: 在瀏覽器中訪問 ,看到以下信息,表示開啟成功(Django2.x 以下版本不一樣): 1.3 新建應用 現在我們新建一個應用(app),名為 ...
1. 創建項目
1.1 新建項目
首先新建一個項目,名為 mysite,命令如下:
django-admin startproject mysite # 或用 django-admin.py運行成功,生成一些目錄:
mysite/
    manage.py           # 管理 Django 項目的命令行工具
    mysite/             # 包,包含項目
        __init__.py
        settings.py     # 配置文件
        urls.py         # 路由文件
        wsgi.py         # WSGI 介面,web 伺服器進入點,提供底層網路通信功能,無需關心
1.2 啟動伺服器
python manage.py runserver          # 預設以 8000 埠開啟
python manage.py runserver 8080     # 指定埠
執行成功,看到輸出如下信息:

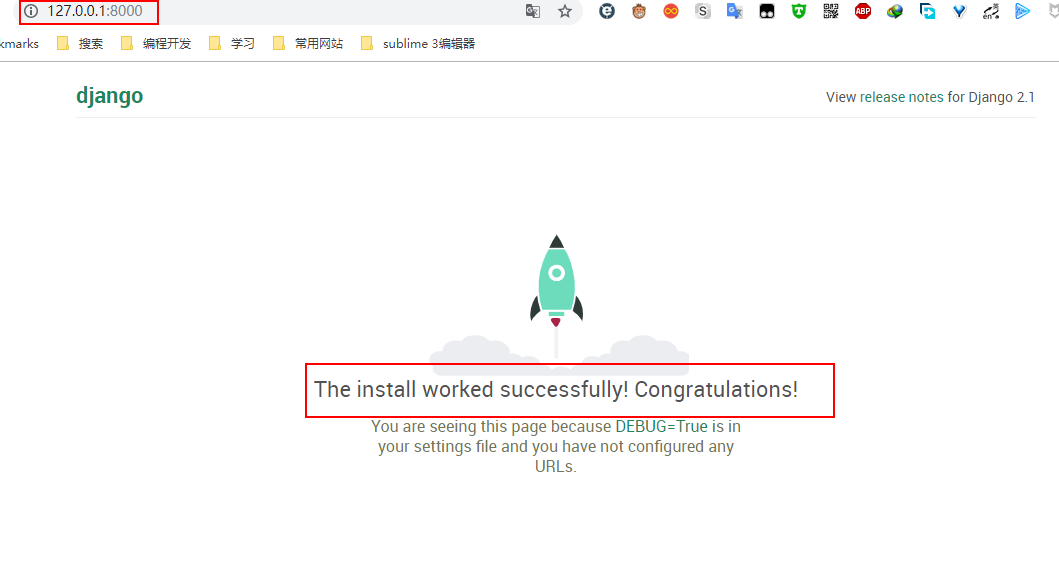
在瀏覽器中訪問 http://127.0.0.1:8000/,看到以下信息,表示開啟成功(Django2.x 以下版本不一樣):
1.3 新建應用
現在我們新建一個應用(app),名為 polls,命令如下:
cd mysite           # 切好到項目裡面
python manage.py startapp polls
執行成功後,可以看到 mysite 中多了一個 polls文件夾,打開 polls,裡面包含以下文件:
polls/
    __init__.py
    admin.py            # Django 提供的後臺管理程式
    apps.py
    migrations/         # 資料庫表生成記錄
        __init__.py
    models.py           # 模型(與資料庫相關)
    tests.py            # 測試文件
    views.py            # 視圖(一個視圖函數表示一個頁面)
項目與應用的區別
- 一個項目可以有一個或多個應用
- 一個應用往往是用來實現某個功能,如:博客、日程管理系統等
- 一個應用可以屬於多個項目
1.4 第一個視圖
一個視圖函數表示一個 Web 頁面,在 polls/views.py 中編寫:
from django.shortcuts import render, HttpResponse

def index(request):
    """首頁"""
    return HttpResponse('Is Ok!')
要調用視圖,我們需要先配置 urlconf,讓 Django 找到我們的視圖函數,在此之前我們先把 app 添加到 settings.py 中:
INSTALLED_APPS = [
    'django.contrib.admin',
    'django.contrib.auth',
    'django.contrib.contenttypes',
    'django.contrib.sessions',
    'django.contrib.messages',
    'django.contrib.staticfiles',

    'polls',        # 最好空一行,以示區分
]
配置 urlconf
編寫 mysite/urls.py:
from django.contrib import admin
from django.urls import path, include
from polls import views         # 導入視圖函數

urlpatterns = [
    path('admin/', admin.site.urls),
    path('index/', views.index, name='index'),
]
訪問 http://127.0.0.1:8000/index/,如果不出意外的話,會看到 Is Ok! 的字樣~
多級路由
上面我們只創建了一個 app,因此 url 路徑配置在項目 mysite/urls.py中毫無影響,但是當有多個應用且有多個相同的名字的視圖時,為了避免衝突,就需要用到多級路由了。
- 配置
mysite/urls.py:
from django.contrib import admin
from django.urls import path, include       # 引入 include

urlpatterns = [
    path('admin/', admin.site.urls),
    path('polls/', include('polls.urls')),      # include 就相當於多級路由,它會將去掉 url 前面的正則,將剩餘字元串傳遞給下一級路由,即 polls/urls.py 來判斷
]- 在應用 polls 目錄下新建一個
urls.py文件,配置如下:
from django.urls import path
from polls import views         # 導入視圖函數

urlpatterns = [
    path('index/', views.index, name='index'),
    # url(r'^index/', views.index, name='index'),       # django2.x 以前版本
]
那麼訪問地址將變成 http://127.0.0.1:8000/polls/index/。
2. 模型和後臺管理
2.1 資料庫配置
在 Django 中模型即指資料庫,Django 內置 SQLite 資料庫,可以直接使用它。但是 SQLite 一般僅用來測試使用,實際開發中一般很少不會使用。如果要使用其他資料庫,需要配置 settings,並安裝相應驅動,下麵我們以 MySQL 為例。
常用資料庫配置:
'django.db.backends.sqlite3',
'django.db.backends.postgresql',
'django.db.backends.mysql',
'django.db.backends.oracle',- 設置
settings.py
DATABASES = {
    'default': {
        'ENGINE': 'django.db.backends.mysql',
        'NAME': 'test',     # 資料庫名字,需要事先創建
        'USER': 'root',     # 用戶名
        'PASSWORD': '',     # 密碼
        'HOST': '',      # 留空預設為 localhost,資料庫主機名
        'PORT': '3306',
    }
}- 安裝 pymysql 模塊
pip install pymysql- 激活 MySQL,打開項目
mysite/__init__.py文件,配置如下:
import pymysql
pymysql.install_as_MySQLdb()
時區和語言
Django 預設使用 UTC 時區,以及英文,我們可以將其修改為東八區和中文:
LANGUAGE_CODE = 'zh-hans'
TIME_ZONE = 'Asia/Shanghai'
2.2 創建模型 Model
Django 通過 ORM(Object Relation Mapping)對象關係映射,以面向對象的方式去操作資料庫,即使不懂 SQL 語句也可以操作資料庫。
我們只需在模型中創建相應的 類以及欄位即可,然後再執行命令,Django會自動幫我們生成數據表:
- 類:對應數據表名
- 欄位:對應數據表的列
在此之前我們創建了一個投票應用 polls,現在我們將創建兩個數據表:問題表 Question(用來存儲問題以及發佈事件)、以及選擇人們的選擇表Choice。
下麵我們編寫 polls/models.py:
from django.db import models

class Question(models.Model):       # 每個類必須繼承 models.Model
    """數據表:問題表"""
    question_text = models.CharField(max_length=2000)       # 問題內容
    pub_date = models.DateTimeField('date published')       # 發佈日期


class Choice(models.Model):
    """數據表:選擇表"""
    choice_text = models.CharField(max_length=200)      # 選擇
    votes = models.IntegerField(default=0)      # 是否已經投票
question = models.ForeignKey(Question, on_delete=models.CASCADE) # 外鍵關聯- 在上面有些欄位我們指定了最長寬度
max_length,這將限制其輸入範圍,非必須但是最好有所限制 另外我們通過外鍵(資料庫內容)
ForeignKey將兩個表關聯起來,也就是這兩張表是一對多關係。一個問題可以有多個選擇,除此之外數據表間關聯還有 一對一、以及多對多關係,後面講詳細介紹。
模型創建和數據遷徙
接下來就是創建模型,執行 python manage.py makemigrations polls,會看到以下提示:
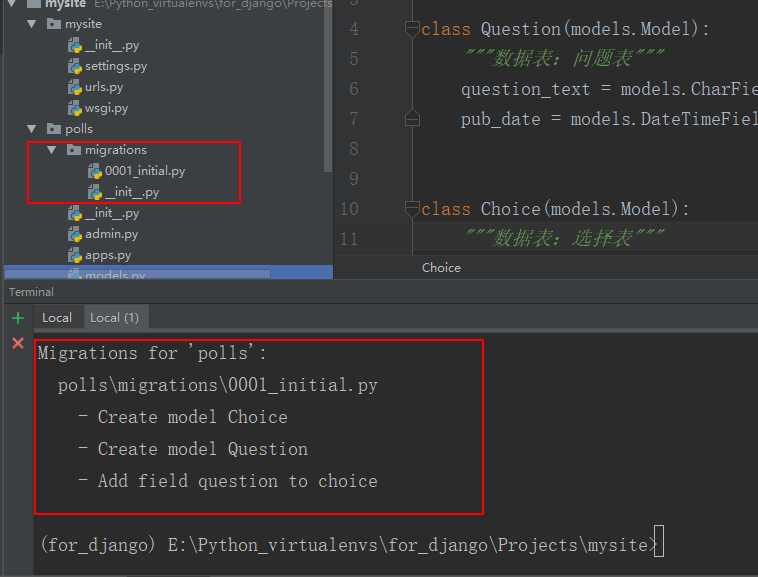
這表示在 polls\migrations\0001_initial.py 文件中創建相關模型記錄,當我們對數據表操作時,會在上面有相應記錄,保存在我們的電腦磁碟上面。
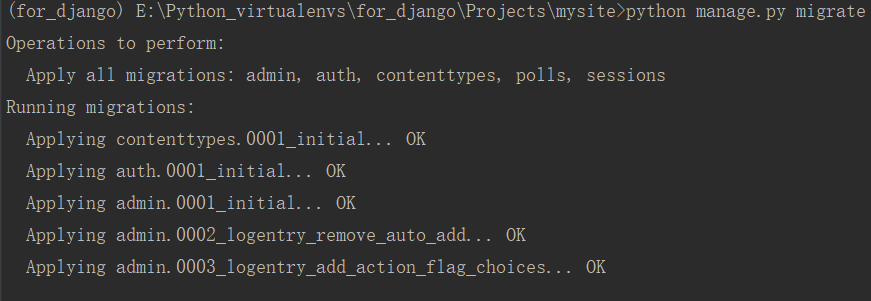
接著我們要將數據遷徙到真正的資料庫中去,執行 python manage.py migrate:
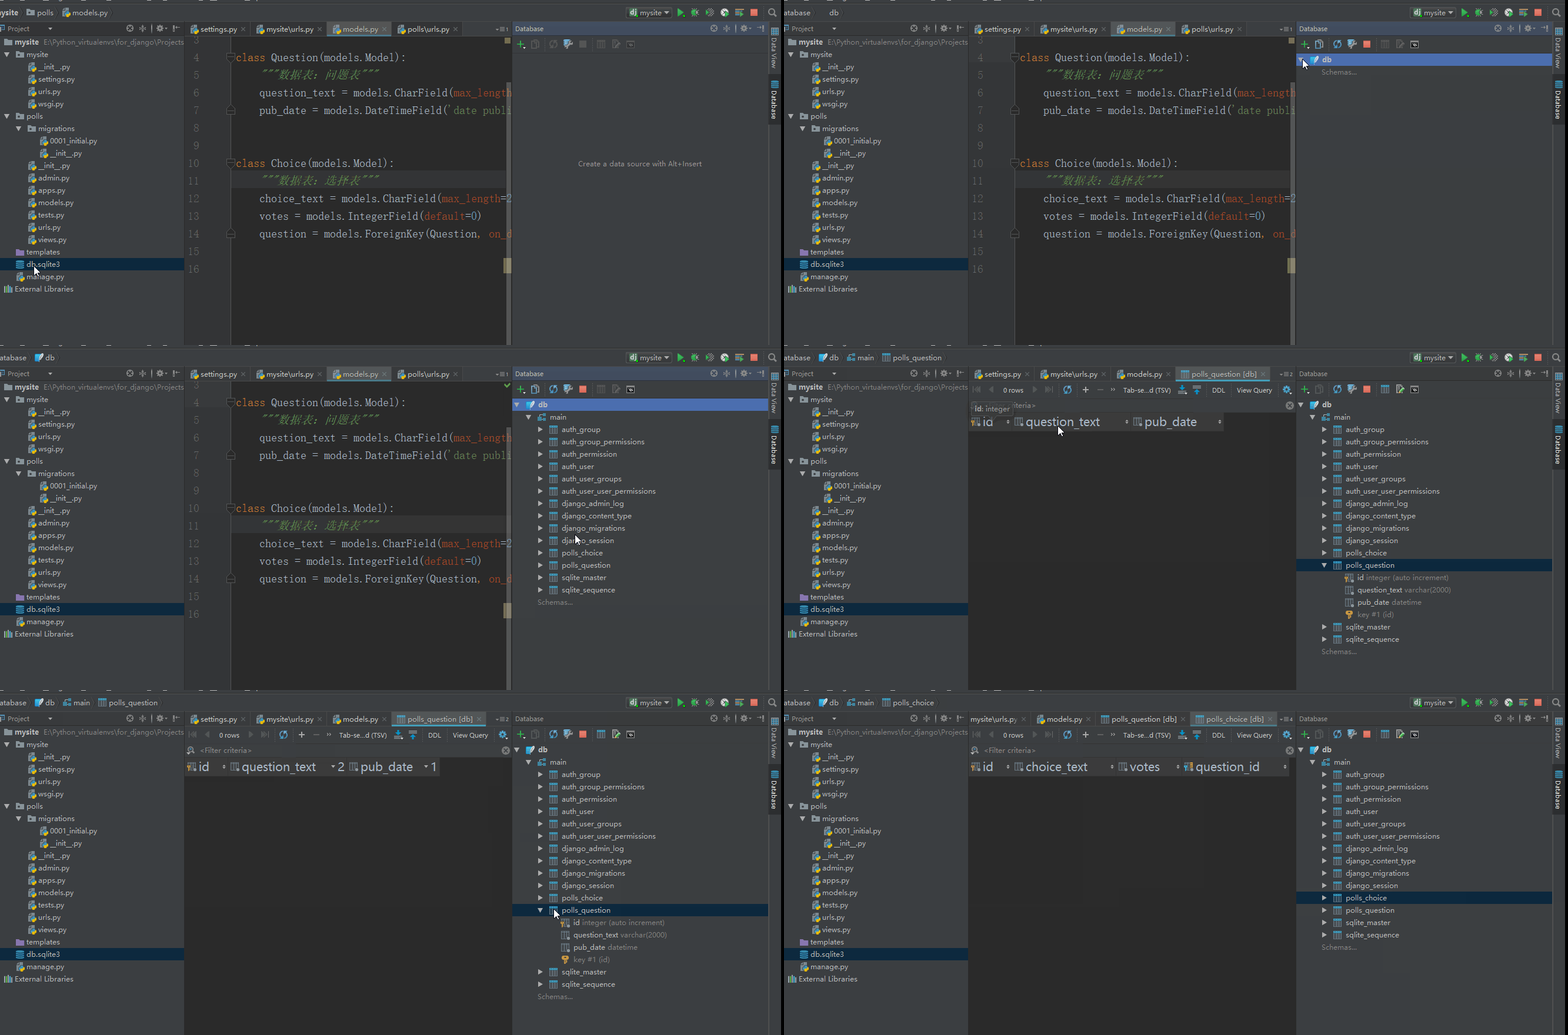
在 Pycharm 中打開 SQLite ,可以看到創建很多數據表:
Tips
- 創建模型時,我們不需要創建 id,Django 會自動幫我們創建
- 外鍵欄位,Django會在其名字之上加上一個
_id,表示與主表的 ID 進行關聯 - Django 運行隨時修改模型,只需按照以下三步走,即可不丟失數據
- 修改
models.py - 執行
python manage.py makemigrations app_name為改動創建遷徙記錄 - 執行
python manage.py migrate,將操作同步至資料庫
- 修改
2.3 操作模型
上面我們通過相應命令創建了模型,那麼我們該如何操作數據表中內容呢?Django為我們提供了一系列的 API,可以很方便地就能操作數據。
- 進入 Django 提供的 shell 交互環境
python manage.py shell
>>> from polls.models import Question, Choice   # 導入模型類
>>> Question.objects.all()      # 獲取所有 question 對象
<QuerySet []>                   # 因為裡面還沒數據,所有是空的

>>> from django.utils import timezone   # 導入 Django 內置的 timezone 模塊,獲取時間,來自於依賴庫 pytz
>>> q = Question(question_text="What's new?", pub_date=timezone.now())      # 創建 question 對象
>>> q.save()                # 保存到資料庫
>>> q.id                    # 通過對象屬性調用方式,訪問模型中欄位的值
1
>>> q.question_text
"What's new?"
>>> q.pub_date
datetime.datetime(2019, 2, 28, 8, 10, 18, 766500, tzinfo=<UTC>)

# 修改欄位的值,再保存
>>> q.question_text = "What's up?"
>>> q.save()

# .all() 方式查詢資料庫中所有對象,這裡是 question 對象
>>> Question.objects.all()
<QuerySet [<Question: Question object (1)>]>
在上面我們訪問 Question 中所有對象時,得到是一個 object 對象,這樣顯示很不友好,為此我們可以為模型添加一個 __str()__ 方法,使其能夠更具有可讀性:
from django.db import models
import datetime
from django.utils import timezone

class Question(models.Model):
    ...
    def __str__(self):
        return self.question_text       # 返回的是 question_text,而不是 object

class Choice(models.Model):
    ...
    def __str__(self):
return self.choice_text- 重新打開一個 shell,來看看其他 API
>>> from polls.models import Question, Choice
>>> Question.objects.all()
<QuerySet [<Question: What's up?>]>

# 關鍵字查詢 filter() 方法過濾 id=1
>>> Question.objects.filter(id=1)
<QuerySet [<Question: What's up?>]>

# 查詢 question_text 以 What 開頭的 question
>>> Question.objects.filter(question_text__startswith="What")
<QuerySet [<Question: What's up?>]>

# 導入 timezone
# 查詢今年發佈的問題
>>> from django.utils import timezone
>>> current_year = timezone.now().year      # 獲取今年時間:2019
>>> Question.objects.get(pub_date__year=current_year)       #  __year=2019
<Question: What's up?>

# 查詢不存在的 ID,出現異常
>>> Question.objects.get(id=2)
Traceback (most recent call last):
  File "<console>", line 1, in <module>
  File "E:\Python_virtualenvs\for_django\lib\site-packages\django\db\models\manager.py", line 82, in manager_method
    return getattr(self.get_queryset(), name)(*args, **kwargs)
  File "E:\Python_virtualenvs\for_django\lib\site-packages\django\db\models\query.py", line 399, in get
    self.model._meta.object_name
polls.models.Question.DoesNotExist: Question matching query does not exist.

# pk 即 primary key 縮寫,與 id 等同
>>> Question.objects.get(pk=1)
<Question: What's up?>

>>> q = Question.objects.get(pk=1)      # 創建 Question 對象
>>> q.choice_set.all()          # 通過 數據表名_set.all() 方式獲得與其關聯的數據表的所有對象
<QuerySet []>

# 創建三個 choices
>>> q.choice_set.create(choice_text='Not much', votes=0)
<Choice: Not much>
>>> q.choice_set.create(choice_text='The sky', votes=0)
<Choice: The sky>
>>> c = q.choice_set.create(choice_text='Just hacking again', votes=0)
>>> c.question
<Question: What's up?>

>>> q.choice_set.all()
<QuerySet [<Choice: Not much>, <Choice: The sky>, <Choice: Just hacking again>]>
>>> q.choice_set.count()
3

>>> Choice.objects.filter(question__pub_date__year=current_year)
<QuerySet [<Choice: Not much>, <Choice: The sky>, <Choice: Just hacking again>]>
>>> c = q.choice_set.filter(choice_text__startswith='Just hacking')
>>> c.delete()      # delete() 刪除對象
(1, {'polls.Choice': 1})
上面是官方文檔提供的一些例子,還有更多的有關 API 的操作,我們將在後面學習到。
總結
1、創建對象

q = Question.objects.all()      # QuerySet 對象集合
q = Question.objects.filter()   # QuerySet 對象集合
q = Question.objects.get()      # QuerySet 對象,一個


2、插入數據

q = Question(question_text="What's up?", pub_date=timezone.now())   # 方法一
q.save()

    訪問數據:
        q.id
        q.pub_date

Question.objects.create(question_text="What's up?", pub_date=timezone.now())    # 方法二

3、查詢數據

q = Question.objects.get(id=1)      # 通過 q.數據表名_set.all()  方式獲得與其關聯的數據表對象
q.choice_set.all()      # <QuerySet [<Choice: Not much>, <Choice: The sky>]>


4、刪除數據
q.delete()
2.4 後臺管理 Admin
Django 為我們提供了一個後臺管理工具 Admin,可以對數據進行簡單的增刪改查等,簡單易用,並支持拓展。
創建管理員用戶
python manage.py createsuperuser        # 運行命令,新建用戶名、郵箱和密碼
# username: xxx
# email:[email protected]
# password:xxx
註冊應用
將模型中的類註冊到 polls/admin.py 中,接收站點的管理:
from django.contrib import admin
from polls.models import Question, Choice

admin.site.register(Question)
admin.site.register(Choice)
訪問 Admin
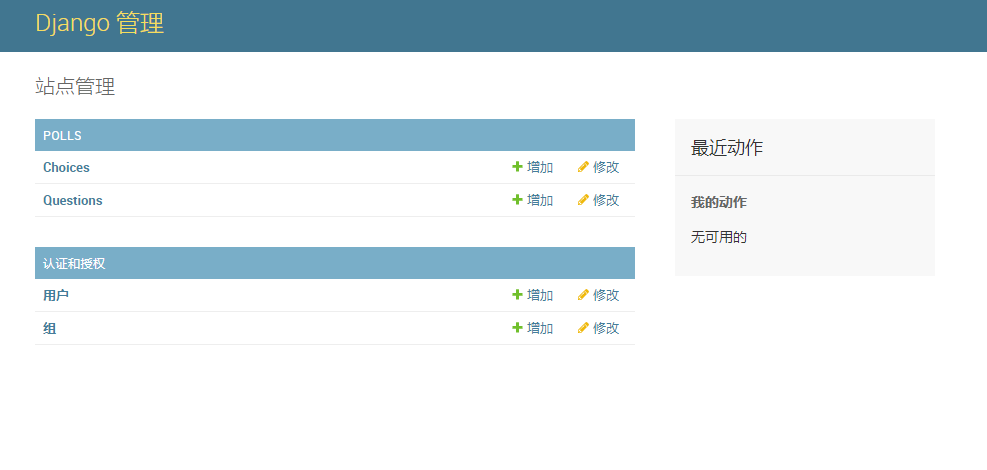
訪問 http://127.0.0.1:8000/admin/,輸入剛纔創建的用戶名和密碼:
樣式定製
修改 polls/admin.py:
from django.contrib import admin
from polls.models import Question, Choice

# 定製樣式,更多樣式見官方文檔
class QuestionAdmin(admin.ModelAdmin):
    list_display = ('id', 'question_text', 'pub_date')      # 要顯示的欄位
    list_editable = ('question_text', 'pub_date')       # 可編輯的

admin.site.register(Question, QuestionAdmin)
admin.site.register(Choice)
3. 模板和視圖
3.1 編寫視圖函數
Django 中每一個網頁都是通過視圖函數來處理的,在 polls 應用中,我們將創建以下四個視圖:
| URL | 視圖函數 | 模板 | 說明 |
|---|---|---|---|
| /index/ | index() | index.html | 主頁,顯示最新問題 |
| /results/ | results() | results.html | 投票結果 |
| /detail/ | detail() | detail.html | 問題詳細描述 |
| /vote/ | vote() | vote.html | 投票動作,是否投票 |
- 首先我們配置好
mysite/urlconf,以便能夠找到相應視圖函數:
from django.contrib import admin
from django.urls import path, include
from polls import views

urlpatterns = [
    path('admin/', admin.site.urls),
    path('index/', views.index, name='index'),
    path('detail/', views.detail, name='detail'),
    path('results/', views.results, name='results'),
    path('vote/', views.vote, name='vote'),
]- 編寫視圖
polls/views.py:
from django.shortcuts import render, HttpResponse

def index(request):
    """首頁"""
    return HttpResponse('Is Ok!')

def detail(request):
    """問題詳細描述"""
    return HttpResponse('問題詳細描述')

def results(request):
    """投票結果"""
    return HttpResponse('投票結果')

def vote(request):
    """是否投票"""
    return HttpResponse('是否已經投票')
現在視圖函數已經創建好了,我們可以訪問相應視圖看看 http://127.0.0.1:8000/detail/ 返回的是什麼。
3.2 使用模板
3.2.1 創建模板
在上面的視圖函數中,我們使用了 HttpResponse 對象返回了一個字元串,而實際開發中,我們得到的都是一個 HTML頁面。這就需要用到我們的模板系統了。
在 polls 目錄下創建一個 templates 目錄,再在 templates 目錄下創建一個新的 polls目錄。然後在 polls 中創建相應的模板文件(其路徑polls/templates/polls/),如:index.html/detail.html 等。
為什麼要再多創建一個 polls 目錄
當有另一個 app 也有 index.html 時,可以避免 Django 匹配錯誤。
配置 templates
要想 Django 能找到 templates 中的模板文件,那麼還要配置下 settings:
# 當 templates 在 mysite/templates 下,不要添加 polls
TEMPLATE_DIRS = (os.path.join(BASE_DIR, 'polls', 'templates'),)

TEMPLATES = [
    {
        'BACKEND': 'django.template.backends.django.DjangoTemplates',
        'DIRS': [os.path.join(BASE_DIR, 'templates')],      # 添加這行
        'APP_DIRS': True,
        'OPTIONS': {
            'context_processors': [
                'django.template.context_processors.debug',
                'django.template.context_processors.request',
                'django.contrib.auth.context_processors.auth',
                'django.contrib.messages.context_processors.messages',
            ],
        },
    },
]
3.2.2 渲染模板
- 渲染模板,Django 為我們提供了一個
render()函數,用於渲染模板文件,render()語法格式:
render(request, template_name, context=None) # 三個參數,第一個固定為請求對象request,第二個是要渲染的模板文件,第三個是個可選參數,即要傳遞的數據,是個字典格式編輯 polls/views.py:
from django.shortcuts import render, HttpResponse
from .models import Question

def index(request):
    """首頁"""
    question_list = Question.objects.all()      # 取出 Question 中所有 question

    return render(request, 'polls/index.html', {'question_list': question_list})

def detail(request, question_id):
    """問題詳細描述"""
    question = Question.objects.get(id=question_id)

    return render(request, 'polls/detail.html', {'question': question})
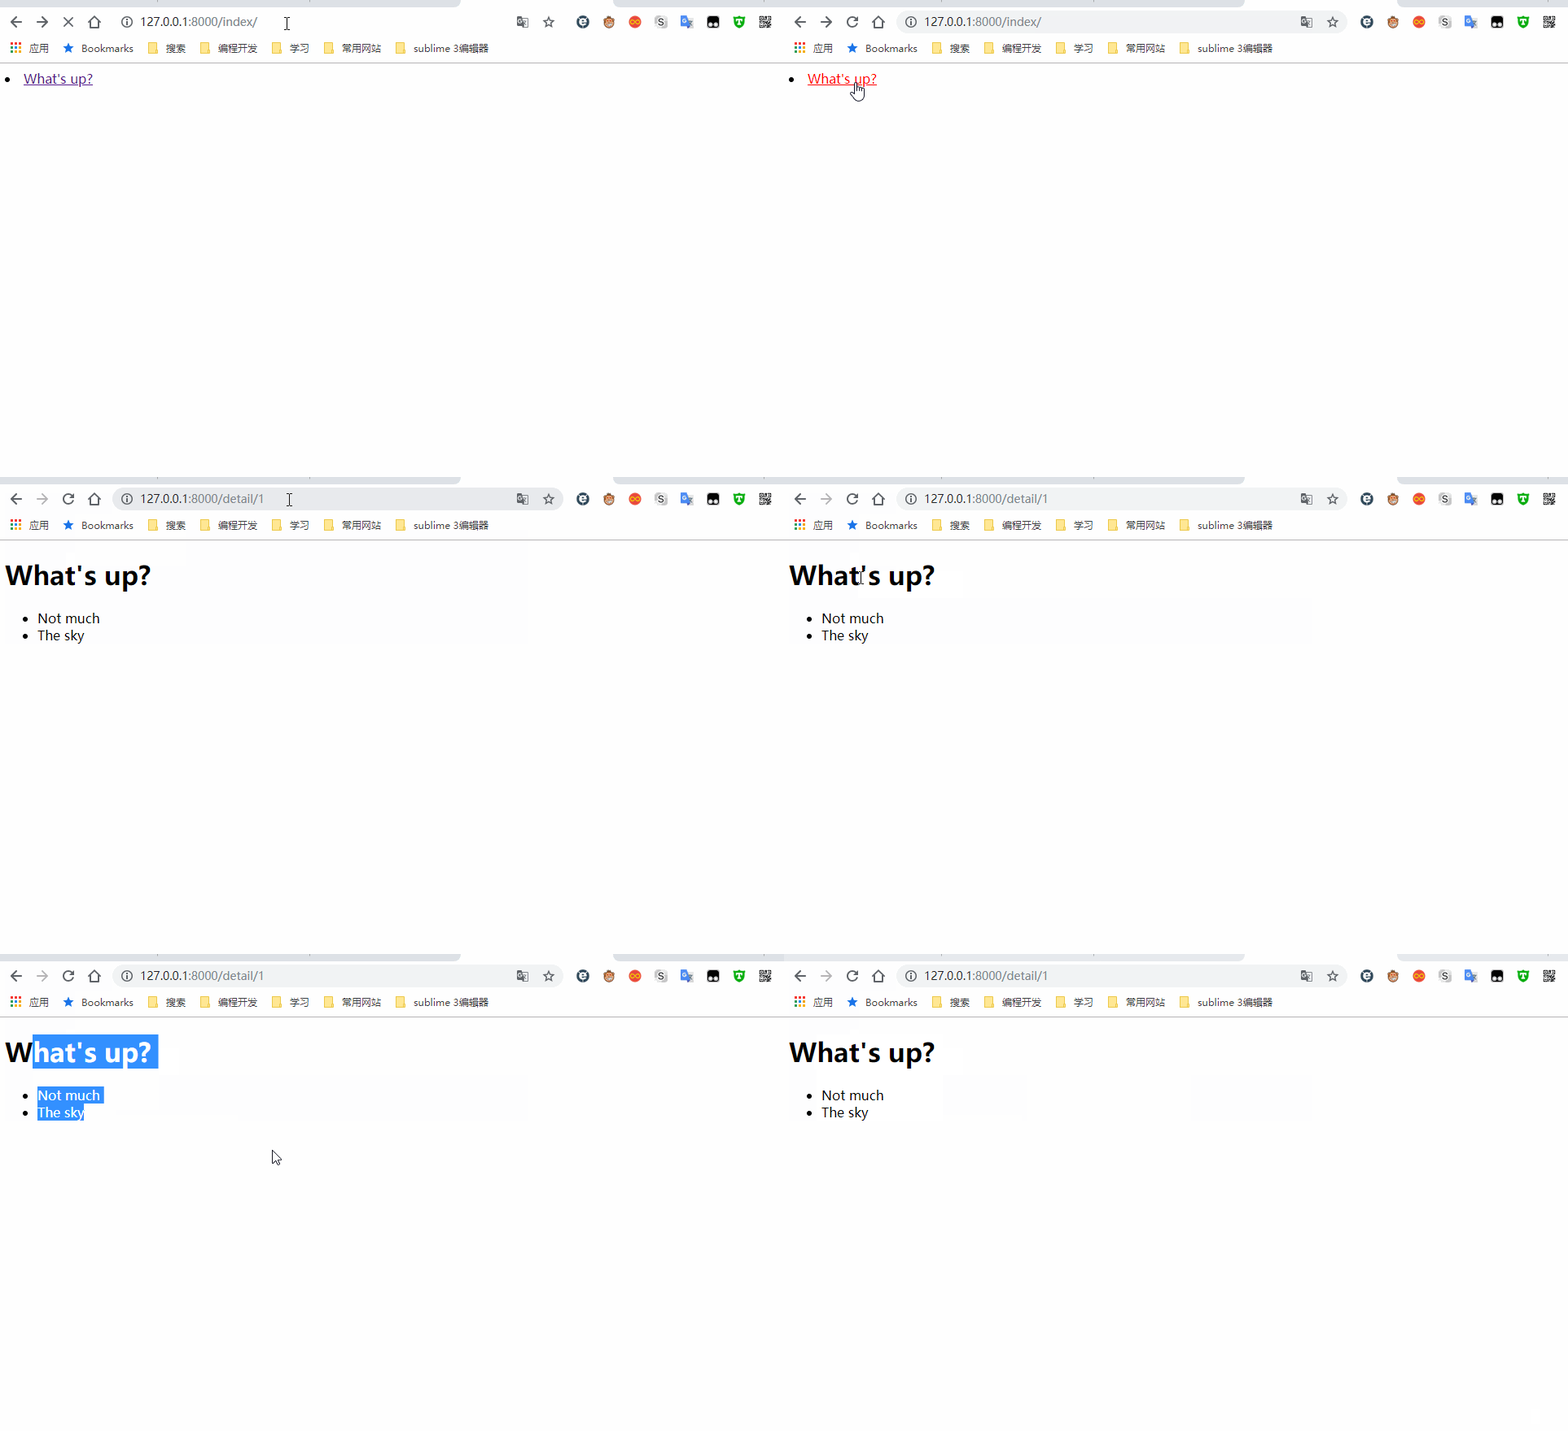
當我們訪問 http://127.0.0.1:8000/index/ 時,index() 函數會處理我們的視圖。它從 Question 取出所有的問題對象,並渲染到模板中。
- 創建模板文件
polls/templates/polls/index.html:
<!--index.html-->
<!DOCTYPE html>
<html lang="en">
<head>
    <meta charset="UTF-8">
    <title>Title</title>
</head>
<body>
    {% for question in question_list %}
    <!-- 相當於訪問 <a href='detail/1/'></a>-->
        <li><a href="{% url 'detail' question.id %}">{{ question.question_text }}</a> </li>
    {% endfor %}
</body>
</html>
在模板文件 index.html 中,我們使用 for 迴圈將所有問題迴圈,當我們點擊其中的 a 標簽的鏈接時,將會被定位到 http://127.0.0.1:8000/detail/1 中。
- 模板文件
polls/templates/polls/detail.html:
<!DOCTYPE html>
<html lang="en">
<head>
    <meta charset="UTF-8">
    <title>Detail</title>
</head>
<body>
    <h1>{{ question.question_text }}</h1>
    <ul>
        {% for choice in question.choice_set.all %}
            <li>{{ choice.choice_text }}</li>
        {% endfor %}
    </ul>
</body>
</html>- 配置
mysite/urls.py:
from django.contrib import admin
from django.urls import path, include
from polls import views

urlpatterns = [
    path('admin/', admin.site.urls),
    path('index/', views.index, name='index'),

    # 我們將 'detail/' 修改為: 'detail/<int:question_id>',以可匹配 http://127.0.0.1:8000/detail/1 這樣的路徑
    path('detail/<int:question_id>', views.detail, name='detail'),
]
在這裡我們將 'detail/' 修改為:'detail/<int:question_id>',以可匹配 http://127.0.0.1:8000/detail/1 這樣的路徑。其中 <int: question_id> 將匹配到一個正整數,另外不要忘了在視圖函數中也要接收相應 question_id:
def detail(request, question_id):
    """問題詳細描述"""
    question = Question.objects.get(id=question_id)

    return render(request, 'polls/detail.html', {'question': question})
這裡我們用的是 Django 提供的模板語言,將資料庫中的數據顯示在頁面上,後面將詳細介紹。
3.3 返回 404 錯誤
當我們訪問不存在的路徑時,會返回一個 Http404,我們可以定製下讓其返回我們想要的內容,編輯 polls/views.py:
from django.http import Http404
from django.shortcuts import render
from .models import Question

def detail(request, question_id):
    try:
        question = Question.objects.get(pk=question_id)
    except Question.DoesNotExist:
        raise Http404("Question 不存在")
    return render(request, 'polls/detail.html', {'question': question})
另外 Django 也為我們提供了一個快捷函數 get_object_or_404(),只需一行即可替代上面多行:
from django.shortcuts import get_object_or_404, render
from .models import Question

def detail(request, question_id):
    question = get_object_or_404(Question, pk=question_id)      # 第一個參數:模型,第二個:任意關鍵字
return render(request, 'polls/detail.html', {'question': question})- get_object_or_404():替代的是 get() 方法
- get_list_or_404():替代的是 filter() 方法
3.4 URL 命名空間
什麼是 URL 的命名空間呢?就是給每一個 URL 路徑,添加一個 別名,它有如下幾點好處:
- 當有多個 app 時,可以更好地區分是哪個 app 的路徑
- 避免硬編碼,在上面
index.html中,我們使用的就是 URL 命名空間,而不是<a href='/detail/{{question.id}}'這樣的硬編碼。這樣在我們修改匹配方法時,不需要做大量的修改。
添加命名空間
from django.contrib import admin
from django.urls import path, include
from polls import views

urlpatterns = [
    path('admin/', admin.site.urls),
    path('index/', views.index, name='index'),          # 其中 name='index' 即為 URL的 命名空間
    path('detail/<int:question_id>', views.detail, name='detail'),
]
當有多個應用時
當有多個應用時,我們只需在 urls.py 中添加一個 app_name ,併在使用時帶上它即可:
...
app_name = 'polls'      # 添加這行
urlpatterns = [
    path('admin/', admin.site.urls),
    path('index/', views.index, name='index'),          # 其中 name='index' 即為 URL的 命名空間
    path('detail/<int:question_id>', views.detail, name='detail'),
]
使用時,一定要記得帶上 app_name:
<li><a href="{% url 'polls:detail' question.id %}">{{ question.question_text }}</a></li>4. 表單和通用視圖
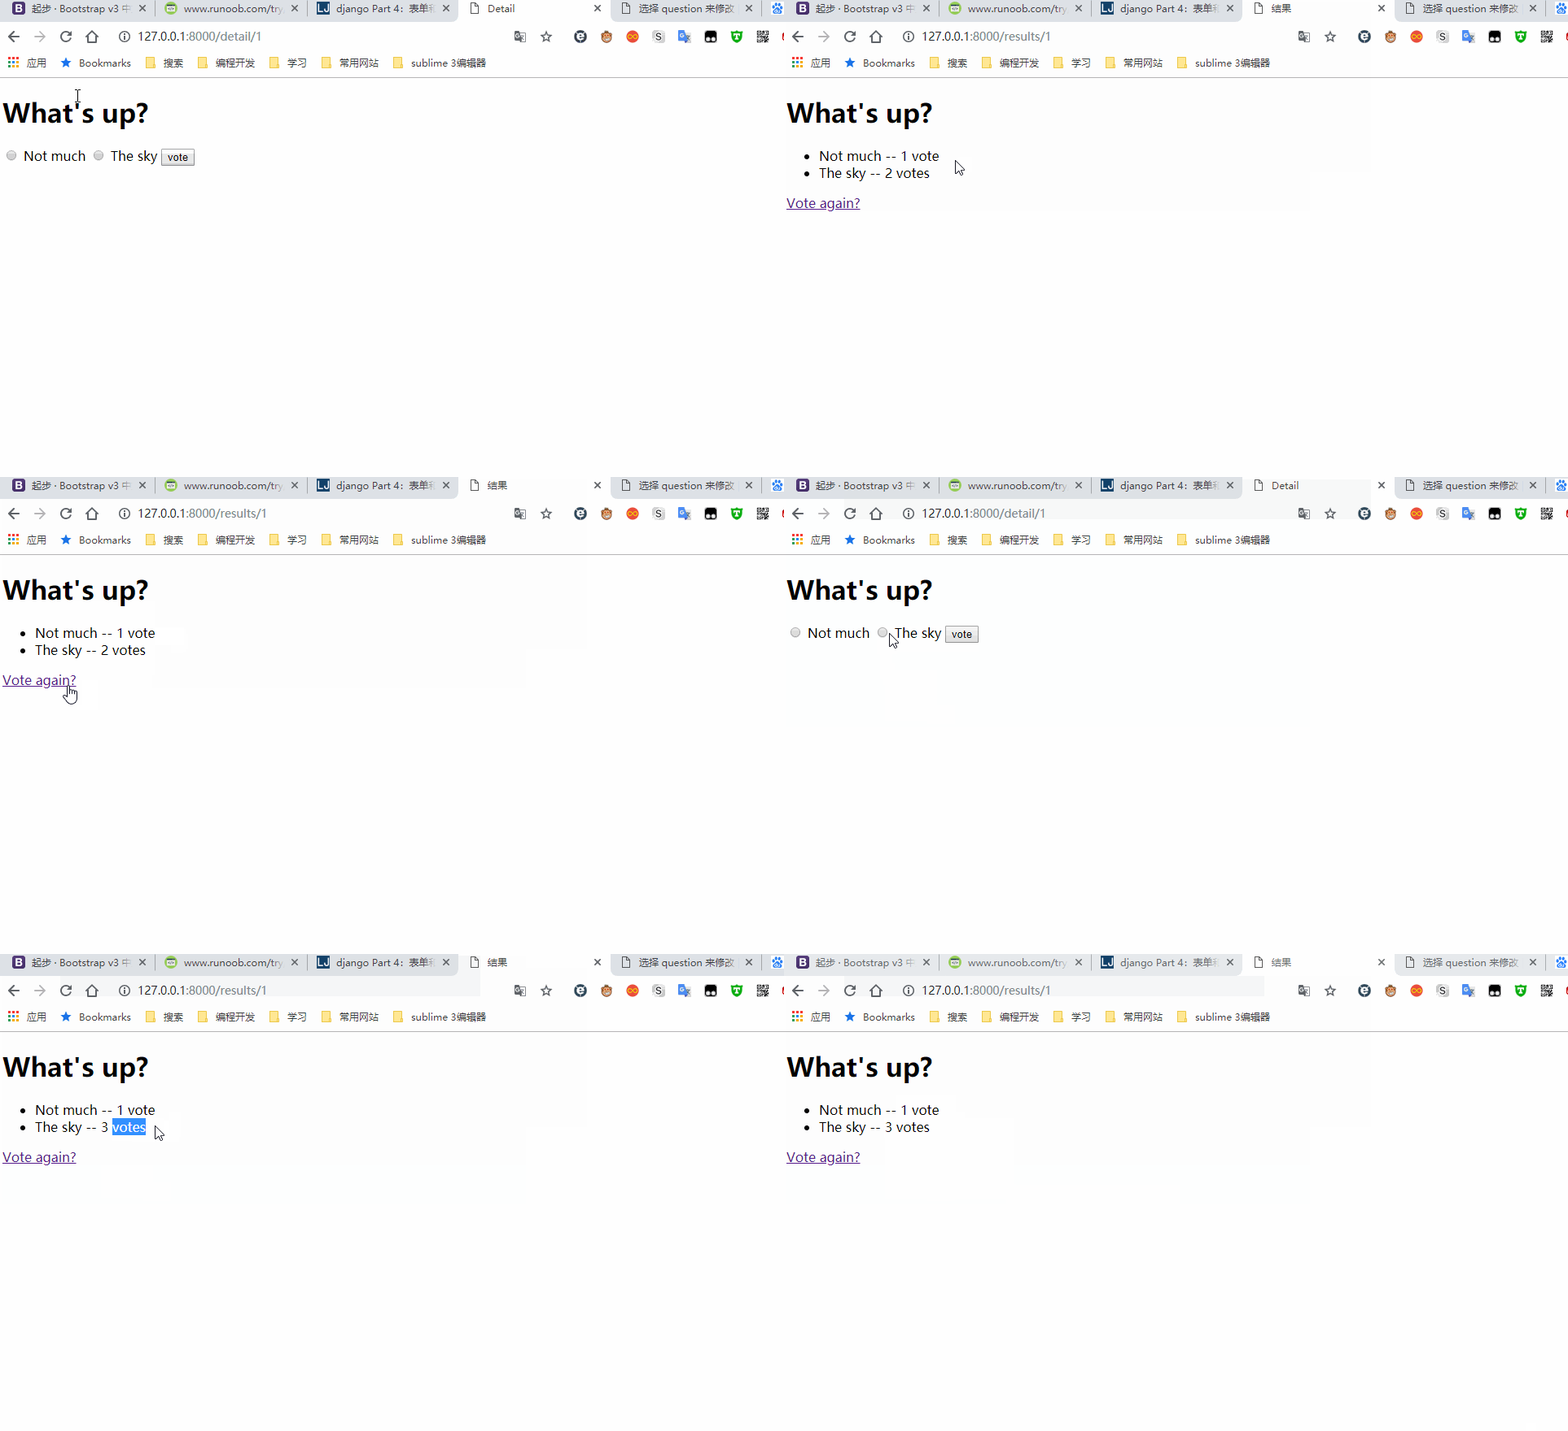
在創建表單之前,我們先來分析下程式的整體運行流程:
- 訪問首頁 index,將所有問題都顯示出來
- 點擊問題,跳轉到 detail,顯示詳細問題,並顯示投票選項
- 當用戶投票後,跳轉到 results 結果頁面,並詢問是否還要繼續投票。
從流程中可以看出,我們要在問題詳細頁面提供單選框,以供用戶選擇,下麵我們來創建第一個表單:
4.1 Form 表單
- 編寫
polls/detail.html:
<!DOCTYPE html>
<html lang="en">
<head>
    <meta charset="UTF-8">
    <title>Detail</title>
</head>
<body>
<!--問題-->
<h1>{{ question.question_text }}</h1>

<!-- 錯誤信息 -->
{% if error_message %}
    <p>{{ error_message }}</p>
{% endif %}


<form action="{% url 'vote' question.id %}" method="post">
    {% csrf_token %}        <!--csrf 攻擊,表單提交必須帶上這個-->

    <!-- 通過 question.choice_set.all 獲得所有 Choice 選項 -->
    {% for choice in question.choice_set.all %}             <!--choice1、choice2-->
        <input type="radio" name="choice" id="choice{{ forloop.counter }}" value="{{ choice.id }}">
        <label for="choice{{ forloop.counter }}">{{ choice.choice_text }}</label>
    {% endfor %}

    <!-- 提交 -->
    <input type="submit" value="vote">
</form>
</body>
</html>- 在上面
detail.html模板文件中,我們創建了一個表單,當用戶點擊提交時,會被提交到 action 對應的 URL 中去。 - 在表單中,我們通過
question.choice_set.all獲得所有 Choice 選項,並迴圈它。 - 再定義了一個單選框 radio,提交到伺服器的鍵為
choice,值為選項的 id。 - 另外要註意的是 form 表單發送 post 請求時,務必帶上
{% csrf_token %},否則將被禁止提交。
- 配置
mysite/urls.py:
# /index/
path('index/', views.index, name='index'),
# /detail/1/
path('detail/<int:question_id>', views.detail, name='detail'),
# /results/1/
path('results/<int:question_id>', views.results, name='results'),
# /vote/1/
path('vote/<int:question_id>', views.vote, name='vote'),- 編寫
polls/views.py:
from django.shortcuts import render, HttpResponse, get_object_or_404, redirect
from .models import Question, Choice
from django.http import HttpResponseRedirect
from django.urls import reverse

def vote(request, question_id):
    """處理投票"""
    print(question_id)
    question = get_object_or_404(Question, id=question_id)
    try:
        choice_id = request.POST.get('choice', None)
        print(choice_id)
        selected_choice = question.choice_set.get(id=choice_id)
    except (KeyError, Choice.DoesNotExist):
        # choice 沒找到,重新返回表單頁面,並給出提示信息
        return render(request, 'polls/detail.html', {'question': question, 'error_message': '你沒用選擇選項!'})
    else:
        selected_choice.votes += 1
        selected_choice.save()
        ret = reverse('results', args=(question.id,))       # /results/1
return HttpResponseRedirect(ret)question_id為問題所對應的 id- 在
detail.html模板中,我們將選項的 id 提交到了後臺,通過request.POST.get('choice')我們可以獲得用戶選擇的選項 id - 當沒有對應的 choice_id 時,重新返回表單頁面,並給出錯誤信息
- 當有相應 choice_id 時,對應 vote 則加 1,最後重定向到投票結果頁面
results。
- 編寫
polls/results.html
<!DOCTYPE html>
<html lang="en">
<head>
    <meta charset="UTF-8">
    <title>結果</title>
</head>
<body>
    <h1>{{ question.question_text }}</h1>
    <ul>
        {% for choice in question.choice_set.all %}
            <li>{{ choice.choice_text }} -- {{ choice.votes }} vote{{ choice.votes|pluralize }}</li>
        {% endfor %}

    </ul>
    <a href="{% url 'detail' question.id %}">Vote again?</a>
</body>
</html>
至此一個簡單的公共投票系統已大致編寫完成,以下為演示:
4.2 通用視圖
在視圖 polls/views中,我們寫了大量的類似於 index() 的重覆代碼,存在冗餘問題。
Django 為我們提供了一種 通用視圖系統,將常見的模式抽象畫,可以刪去很多冗餘代碼。為此我們需要以下三個步驟:
- 轉換 urlconf
- 刪除一些舊的、不需要的視圖
- 基於通用視圖,引入新的視圖
轉換 URLconf
編輯 mysite/urls.py:
urlpatterns = [
    path('admin/', admin.site.urls),
    path('index/', views.IndexView.as_view(), name='index'),
    path('detail/<int:pk>', views.DetailView.as_view(), name='detail'),
    path('results/<int:pk>', views.ResultsView.as_view(), name='results'),
    path('vote/<int:question_id>', views.vote, name='vote'),
]
在這裡我們將 question_id 修改為 pk,這是因為通用視圖從 url 中匹配的將是主鍵 pk。
修改視圖
from django.views import generic


class IndexView(generic.ListView):
    template_name = 'polls/index.html'  # 模板名稱
    context_object_name = 'question_list'   # 返回給模板的變數

    def get_queryset(self):
        return Question.objects.all()


class DetailView(generic.DetailView):
    model = Question    # 模型
    template_name = 'polls/detail.html'


class ResultsView(generic.DetailView):
    model = Question
    template_name = 'polls/results.html'


def vote(request, question_id):
pass- ListView:顯示對象的列表
- DetaiView:顯示特定類型對象詳細頁面
- context_object_name:返回給模板的變數
{'question_list':question_list}中的question_list - DetaiView:匹配的是 URL 中的 pk 主鍵
- template_name:返回的模板文件,格式為
<app_name>/<model name>_list.html
更多有關通用視圖:https://docs.djangoproject.com/zh-hans/2.1/topics/class-based-views/
5. 測試
測試是實際開發中不可或缺的一部分,它可以:
- 檢驗程式是否符合預期
- 及時發現問題,節省開發時間
- 更有利團隊合作等
測試分為手動測試和自動測試,手動測試往往費時費力,效率低下。我們可以藉助一些測試模塊,如:TestCase,自動幫我們完成測試工作,Django也有自動測試程式,它也是基於 TestCase 模塊來實現的。
在模型 models.py 中,我們給 Question 定義了一個 was_published_recently() 方法,用於返回問題是否是最近發佈的,當 Question 在最近一天發佈時返回 True。
class Question(models.Model):
    """數據表:問題表"""
    question_text = models.CharField(max_length=2000)       # 問題內容
    pub_date = models.DateTimeField('date published')       # 發佈日期

    def __str__(self):
        return self.question_text

    def was_published_recently(self):
        # 當前時間減去前一天,與問題發佈時間比較
        return self.pub_date >= timezone.now() - datetime.timedelta(days=1)
5.1 驗證 bug
進入 Django shell 環境:
>>> import datetime
>>> from django.utils import timezone
>>> from polls.models import Question

# 創建一個在發佈日期 30 天後的問題對象
>>> future_question = Question(pub_date=timezone.now() + datetime.timedelta(days=30))

# 測試返回值,發現也是 True
>>> future_question.was_published_recently()
True
我們創建了一個在發佈日期 30 天後的問題,測試發現還是返回 True,也就是說這裡被允許在未來時間發佈問題,這就是個 bug。
5.2 測試 bug
編寫 polls/tests.py:
from django.test import TestCase
import datetime
from django.utils import timezone
from .models import Question

class QuestionModelTests(TestCase):

    def test_was_published_recently_with_future_question(self):
    # 創建一個 pub_date 是未來30天後的 Question 示例,然後檢查 was_published_recently() 的返回值,它應該是 False
        time = timezone.now() + datetime.timedelta(days=30)
        future_question = Question(pub_date=time)
        self.assertIs(future_question.was_published_recently(), False)
執行 python manage.py test polls,會看到結果:
Creating test database for alias 'default'...
System check identified no issues (0 silenced).
F
======================================================================
FAIL: test_was_published_recently_with_future_question (polls.tests.QuestionModelTests)
----------------------------------------------------------------------
Traceback (most recent call last):
  File "E:\Python_virtualenvs\for_django\Projects\mysite\polls\tests.py", line 11, in test_was_published_recently_with_future_qu
estion
    self.assertIs(future_question.was_published_recently(), False)
AssertionError: True is not False

----------------------------------------------------------------------
Ran 1 test in 0.016s

FAILED (failures=1)
Destroying test database for alias 'default'...
我們創建了一個 pub_dae 值為 30 天後的 Question 實例,用 assertls() 方法判斷是否返回 False,結果發現返回 True。
5.3 修改 bug
我們要讓 pub_date 是未來某天時, Question.was_published_recently() 返回 False,修改 polls/models.py:
def was_published_recently(self):
    now = timezone.now()
    return now - datetime.timedelta(days=1) <= self.pub_date <= now
再進行測試,發現測試通過。測試在項目開發中很重要,也很常用,在這裡我們只是做個大概的瞭解,到後面再詳細的探討。
6. 靜態文件
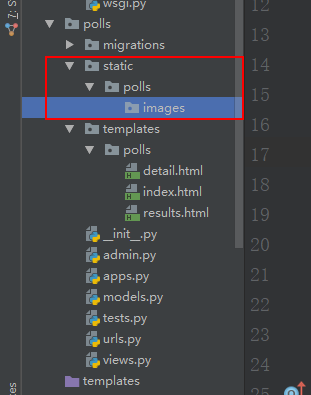
靜態文件即 Web 應用程式所要用到的一些必要文件,如:圖片、JS 腳本、CSS 樣式等。一個完整的 Web 應用應該有自己獨立靜態文件、模板文件,也就是說需要和項目本身區分開。
在應用 polls 下新建一個 static 的目錄,再新建一個以應用名字為名的文件夾,最後再分類存儲各種靜態文件,其目錄結構是這樣的:
配置靜態文件
與模板 templates 一樣,再使用前,需要先配置好靜態文件,這樣 Django 才能找到,編輯 settings.py:
STATIC_URL = '/static/'
STATICFILES_DIRS = (
    os.path.join(BASE_DIR, 'polls', 'static'),
)       # 一定不要忘記最後的逗號
使用靜態文件
在 polls/static/polls/ 下創建一個 images 目錄用來存儲圖片,再創建一個 css 目錄用來存儲 CSS 文件。然後在新建一個 style.css 的文件。
下麵我們來給首頁 index.html 添加背景圖片,編寫以下代碼:
li a{
    color: red;
}

body {
    background: white url("images/2.png") no-repeat;
}
然後在 index.html 中來載入 style.css 文件:
{% load static %}       <!--引入 static-->
<!DOCTYPE html>
<html lang="en">
<head>
    <meta charset="UTF-8">
    <title>Title</title>
    <!--再把 style.css 載入進來 -->
    <link rel="stylesheet" href="{% static 'polls/css/style.css' %}">
</head>
<body>
    {% for question in question_list %}
        <li><a href="{% url 'detail' question.id %}">{{ question.question_text }}</a> </li>
    {% endfor %}
</body>
</html>
我們再刷新下,發現已經給首頁添加好了背景圖片。除此之外我們還可以在模板文件中直接使用靜態文件,如:在模板中使用 jQuery:
# 同樣地,也要先引入 static
{% load static %}
<script src="{% static 'polls/js/jquery-3.1.1.js' %}"></script>

