
在搭建以LXC為基礎的虛擬網路時,網路參數繁多,配置過程繁瑣。面臨一個新的網路拓撲結構時,通常要花費大量時間來構建網路。因此,如果能通過配置文件,自動生成相對應的網路拓撲,並生成操作指令。不僅能加快網路的部署時間,更使網路拓撲結構的改變更加靈活。使構建大規模的網路拓撲成為可能。 ...
一、問題:
在搭建以LXC為基礎的虛擬網路時,網路參數繁多,配置過程繁瑣。面臨一個新的網路拓撲結構時,通常要花費大量時間來構建網路。因此,如果能通過配置文件,自動生成相對應的網路拓撲,並生成操作指令。不僅能加快網路的部署時間,更使網路拓撲結構的改變更加靈活。使構建大規模的網路拓撲成為可能。
二、相關組件與工具:
LXC:用於承載虛擬網路節點,在LXC中安裝OVS,Quagga等工具,使容器成為虛擬網路組件。
OVS:交換機組件。ovs創建網橋,每一個網橋相當於一個交換機。
Quagga:路由器組件。
Brctl:網橋工具。連接不同的容器。
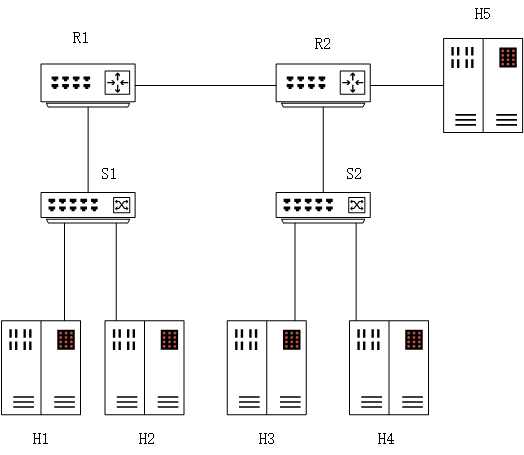
三、拓撲示例:
四、常用指令:
lxc基本操作:
文檔:https://linuxcontainers.org/
查看容器狀態
lxc-ls -f
啟動容器
lxc-start -n containerName
控制容器
lxc-console -n containerName
退出控制
ctrl-a和q
停止容器運行
sudo lxc-stop -n containerName
刪除容器
sudo lxc-destroy -n containerName
克隆容器
lxc-copy -n container -N clone_container
OVS基本操作:
文檔:http://www.openvswitch.org/
查看網橋信息
ovs-vsctl show
創建一個網橋
ovs-vsctl add-br br0
添加/刪除網橋上的埠
ovs-vsctl add-port br0 eth1
ovs-vsctl del-port br0 eth1
查看某網橋當前流表
ovs-ofctl dump-flows br0
Quagga基本操作:
文檔:https://www.quagga.net/docs.html
Brctl基本操作:
添加網橋
brctl addbr br1
刪除網橋
brctl delbr br1
查詢網橋信息
brctl show
brctl show br1
啟動網橋
ifconfig br1 up
五、部署流程
創建相應的容器模板:example_host,example_switcher,example_router
1.編寫XML配置文件
下麵給出例子


<?xml version="1.0" encoding="UTF-8" standalone="no"?>
<topo>
    <container type = "router">
        <name>Router1</name>
        <id>1</id>
        <protocol>rip</protocol>

        <port>
            <id>1</id>
            <ip>10.0.1.254</ip>
            <netmask>255.255.255.0</netmask>
            <link>
                <type>switch</type>
                <id>1:3</id>
            </link>
        </port>

        <port>
            <id>2</id>
            <ip>10.0.0.1</ip>
            <netmask>255.255.255.0</netmask>
            <link>
                <type>router</type>
                <id>2:3</id>
            </link>
        </port>
    </container>

    <container type = "router">
        <name>Router2</name>
        <id>2</id>
        <protocol>rip</protocol>

        <port>
            <id>1</id>
            <ip>10.0.2.254</ip>
            <netmask>255.255.255.0</netmask>
            <link>
                <type>switch</type>
                <id>2:3</id>
            </link>
        </port>

        <port>
            <id>2</id>
            <ip>10.0.4.254</ip>
            <netmask>255.255.255.0</netmask>
            <link>
                <type>host</type>
                <id>5:1</id>
            </link>
        </port>

        <port>
            <id>3</id>
            <ip>10.0.0.2</ip>
            <netmask>255.255.255.0</netmask>
            <link>
                <type>router</type>
                <id>1:2</id>
            </link>
        </port>
    </container>

    <container type="switch">
        <name>Switch1</name>
        <id>1</id>

        <bridge>
            <name>br1</name>
            <id>1</id>

            <port>
                <id>1</id>
                <link>
                    <type>host</type>
                    <id>1:1</id>
                </link>
            </port>

            <port>
                <id>2</id>
                <link>
                    <type>host</type>
                    <id>2:1</id>
                </link>
            </port>

            <port>
                <id>3</id>
                <link>
                    <type>router</type>
                    <id>1:1</id>
                </link>
            </port>
        </bridge>
    </container>


    <container type="switch">
        <name>Switch2</name>
        <id>2</id>

        <bridge>
            <name>br1</name>
            <id>1</id>

            <port>
                <id>1</id>
                <link>
                    <type>host</type>
                    <id>3:1</id>
                </link>
            </port>

            <port>
                <id>2</id>
                <link>
                    <type>host</type>
                    <id>4:1</id>
                </link>
            </port>

            <port>
                <id>3</id>
                <link>
                    <type>router</type>
                    <id>2:1</id>
                </link>
            </port>
        </bridge>

    </container>

    <container type="host">
        <name>Host1</name>
        <id>1</id>
        <port>
            <id>1</id>
            <ip>10.0.1.1</ip>
            <netmask>255.255.255.0</netmask>
            <gateway>10.0.1.254</gateway>
            <link>
                <type>switch</type>
                <id>1:1</id>
            </link>
        </port>
    </container>

    <container type="host">
        <name>Host2</name>
        <id>2</id>
        <port>
            <id>1</id>
            <ip>10.0.1.2</ip>
            <netmask>255.255.255.0</netmask>
            <gateway>10.0.1.254</gateway>
            <link>
                <type>switch</type>
                <id>1:2</id>
            </link>
        </port>
    </container>

    <container type="host">
        <name>Host3</name>
        <id>3</id>
        <port>
            <id>1</id>
            <ip>10.0.2.1</ip>
            <netmask>255.255.255.0</netmask>
            <gateway>10.0.2.254</gateway>
            <link>
                <type>switch</type>
                <id>2:1</id>
            </link>
        </port>
    </container>

    <container type="host">
        <name>Host4</name>
        <id>4</id>
        <port>
            <id>1</id>
            <ip>10.0.2.2</ip>
            <netmask>255.255.255.0</netmask>
            <gateway>10.0.2.254</gateway>
            <link>
                <type>switch</type>
                <id>2:2</id>
            </link>
        </port>
    </container>

    <container type="host">
        <name>Host5</name>
        <id>5</id>
        <port>
            <id>1</id>
            <ip>10.0.4.1</ip>
            <netmask>255.255.255.0</netmask>
            <gateway>10.0.4.254</gateway>
            <link>
                <type>router</type>
                <id>2:2</id>
            </link>
        </port>
    </container>
</topo>
配置文檔
2.解析XML配置文件
dom4j解析XML生成相應對象
3.修改相應配置LXC相應配置文件,生成命令腳本
容器目錄:/var/lib/lxc/s1/rootfs
host節點
修改網路配置
配置文件位置:/var/lib/lxc/hostname/config
追加內容:
lxc.net.1.type = veth
lxc.net.1.link = br-s1-h1
lxc.net.1.flags = up
lxc.net.1.hwaddr = 00:16:3e:4b:08:19
lxc.net.1.ipv4.address = 192.168.1.1/24
lxc.net.1.ipv4.gateway = 192.168.1.254
switch節點
第一步:修改網路配置
配置文件位置:/var/lib/lxc/switchname/config
追加內容:
lxc.net.1.type = veth
lxc.net.1.link = br-s1-h1
lxc.net.1.flags = up
lxc.net.1.hwaddr = 00:16:3e:47:65:38
lxc.net.2.type = veth
lxc.net.2.link = br-s1-h2
lxc.net.2.flags = up
lxc.net.2.hwaddr = 00:16:3e:47:65:39
lxc.net.3.type = veth
lxc.net.3.link = br-r1-s1
lxc.net.3.flags = up
lxc.net.3.hwaddr = 00:16:3e:47:65:40
第二步:設置啟動腳本
在ovs_example(switch模板)中設置啟動腳本:
/etc/rc.local
/etc/init.d/switch.sh
啟動時調用switch.sh腳本
啟動腳本範例:
vim /etc/init.d/switch.sh
#!/bin/bash
sudo ovs-vsctl add-br br1
sudo ovs-vsctl add-port br1 eth1
sudo ovs-vsctl add-port br1 eth2
sudo ovs-vsctl add-port br1 eth3
添加switch.sh執行權
sudo chmod +x /var/lib/lxc/Switch2/rootfs/etc/init.d/switch.sh
router節點
第一步:修改網路配置
配置文件位置:/var/lib/lxc/routername/config
追加內容:
lxc.net.1.type = veth
lxc.net.1.link = br-r1-s1
lxc.net.1.flags = up
lxc.net.1.ipv4.address = 10.0.1.254/24
lxc.net.1.hwaddr = 00:16:3e:c1:1b:fb
lxc.net.2.type = veth
lxc.net.2.link = br-r1-r2
lxc.net.2.flags = up
lxc.net.2.ipv4.address = 10.0.0.1/24
lxc.net.2.hwaddr = 00:16:3e:c1:1b:fc
第二步:設置啟動腳本
/etc/rc.local
在


