
Adroid佈局 有人形象地比喻,Android開發中的佈局就相當於一棟建築的外觀架構。佈局用得好,這棟建築的外觀才美觀高大上。 Android佈局管理器 Android佈局管理器本身是一個界面控制項,所有的佈局管理器都是ViewGroup類的子類,都是可以當做容器類來使用的。因此一個佈局管理器中可以 ...
Adroid佈局
有人形象地比喻,Android開發中的佈局就相當於一棟建築的外觀架構。佈局用得好,這棟建築的外觀才美觀高大上。
Android佈局管理器
Android佈局管理器本身是一個界面控制項,所有的佈局管理器都是ViewGroup類的子類,都是可以當做容器類來使用的。因此一個佈局管理器中可以嵌套其他的佈局管理器。
這是谷歌上找的一張佈局管理器層級圖

每一個ViewGroup都可以嵌套其他的ViewGroup和View(視圖)。一個ViewGroup的大小是相對的,它即可以是其他ViewGroup的父容器,也可以是其他ViewGroup的子容器。在Android中,ViewGroup指代的是佈局管理器,也就是下麵要講的佈局樣式,View指代的是佈局管理器中的一個個控制項。在Android中,控制項可以在XML文件中定義,也可以程式員根據自己的需要去定義一個類。本文重點先不討論視圖中的控制項,還是回歸到佈局。
Android六大基本佈局管理器分別是:
線性佈局(LinearLayout)、表格佈局(TableLayout)、網格佈局(GridLayout)、相對佈局(RelativeLayout)、絕對佈局(AbsoluteLayout)、層佈局(FrameLayout)
其中,表格佈局是線性佈局的子類。網格佈局是android 4.0後新增的佈局。
(1)線性佈局
線性佈局會將容器內的所有控制項一個挨著一個地排列。
屬性:
1. 排列方向
android:orienation = “ horizontal/vertical”
水平排列和垂直排列,Android中預設為垂直排列vertical
註意:預設情況下水平和垂直方向的排列只占一行,如果用android:layout_width來設定控制項的寬度,如果控制項寬度太大,超出屏幕的顯示範圍,屏幕是不會顯示超出的範圍的。
2. 對齊方式
用於控制元素(例如文字)在該控制項里的顯示位置。
屬性值:
可選的值有:top、bottom、left、right、center_vertical、fill_vertical、center_horizontal、fill_horizontal、center、fill、clip_vertical
也可以同時使用兩個屬性值,中間用 | 豎線隔開
例如:
android:gravity = “buttom|center_horizontal”
如果定義在控制項中的底部,垂直居中
舉一個簡單例子,我用LinearLayout線性佈局來實現常用的計算器
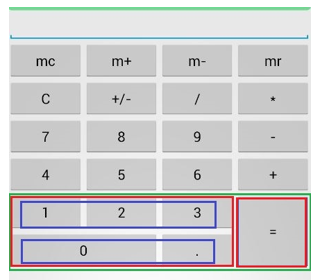
前面四行都很容易理解,用一個Linearout來包裹4個button控制項,並且設定排列方向為水平方向。這裡只列出其中一行的佈局代碼,其他三行的代碼與第一行幾乎相同。
<LinearLayout
        android:layout_width="match_parent"
        android:layout_height="wrap_content"
        android:orientation="horizontal" >
         <Button
             android:layout_width="match_parent"
             android:layout_height="wrap_content"
             android:text="mc" android:layout_weight="1">
            //layout_weight設定水平佈局中控制項的占比
         </Button>
         <Button
             android:layout_width="match_parent"
             android:layout_height="wrap_content"
             android:text="m+"
            android:layout_weight="1">
         </Button>
         <Button
             android:layout_width="match_parent"
             android:layout_height="wrap_content"
             android:text="m-"
            android:layout_weight="1">
         </Button>
         <Button
             android:layout_width="match_parent"
             android:layout_height="wrap_content"
             android:text="mr"
            android:layout_weight="1">
         </Button>
</LinearLayout>
最關鍵的是下麵兩行,即用綠色框框住的那一部分控制項如何佈局。這裡我使用佈局控制器內部嵌套佈局控制器的方法。首先將綠色框內部的控制項分成三個層級(我分別用不同顏色標註出來了)。第一個層級是綠色框,包含兩個兩列,即兩個紅色框。第二個層級是紅色框,每個紅色框看成一個整體的列,第一個列是左邊的紅色框,其內部包含兩個行;第二個列是右邊的紅色框,即“=”號,包含一個垂直佈局的列,占位兩行。再對左邊的紅色框進行第三層級的拆分。可以拆分成兩行,每一行占3個位。
於是就有下麵的代碼:
<!--綠色框-->
<LinearLayout android:orientation="horizontal"
        android:layout_width="match_parent"
        android:layout_height="wrap_content">

        <!--紅色框-->
        <LinearLayout android:orientation="vertical"
                android:layout_weight="3"
                android:layout_width="wrap_content"
                android:layout_height="wrap_content">

             <!--藍色框-->
             <LinearLayout android:orientation="horizontal"
                android:layout_width="match_parent"
                android:layout_height="wrap_content">
                <Button
                    android:layout_width="wrap_content"
                    android:layout_height="wrap_content"
                    android:layout_weight="1"
                    android:text="1"></Button>
                <Button
                    android:layout_width="wrap_content"
                    android:layout_height="wrap_content"
                    android:layout_weight="1"
                    android:text="2"></Button>
                <Button
                    android:layout_width="wrap_content"
                    android:layout_height="wrap_content"
                    android:layout_weight="1"
                    android:text="3"></Button>
             </LinearLayout>

             <!--藍色框 -->
             <LinearLayout android:orientation="horizontal"
                android:layout_width="match_parent"
                android:layout_height="wrap_content">
                <Button
                    android:layout_width="0px"
                    android:layout_height="wrap_content"
                    android:layout_weight="2"
                    android:text="0">
                        </Button>
                <Button
                    android:layout_width="0px"
                    android:layout_height="wrap_content"
                    android:layout_weight="1"
                    android:text=".">
                       </Button>
            </LinearLayout>
        </LinearLayout>

        <!--紅色框,=號-->
        <LinearLayout android:orientation="vertical"
                android:layout_weight="1"
                android:layout_width="wrap_content"
                android:layout_height="match_parent">
                <Button
                     android:layout_width="match_parent"
                     android:layout_height="match_parent"
                    android:text="=">
               </Button>
        </LinearLayout>
</LinearLayout>
(2)相對佈局
相對佈局是最靈活的一種佈局方式,可以相對父容器和相對與其他控制項進行佈局。
主要參數有:
1. 是否對齊父容器的語法格式為true/false:
例如:android:layout_alignParentLeft = “true”
2. 為於給定ID控制項不同方位的語法格式:
例如:android:layout_above="@id/btn1"
@id/btn1 控制項的ID必須是事前已經定義好的
android:layout_alignParentLeft 該控制項是否對齊父容器的左端
android:layout_alignParentRight 該控制項是否齊其父容器的右端
android:layout_alignParentTop 該控制項是否對齊父容器的頂部
android:layout_alignParentBottom 該控制項是否對齊父容器的底部
android:layout_centerInParent 該控制項是否相對於父容器居中
android:layout_toLeftOf 該控制項位於給定ID控制項的左方
android:layout_toRightOf 該控制項位於給定ID控制項的右方
android:layout_above 該控制項位於給定ID控制項的上方
android:layout_below 該控制項位於給定ID控制項的下方
android:layout_centerHorizontal 該控制項是否橫向居中
android:layout_centerVertical 該控制項是否垂直居中
實例代碼:
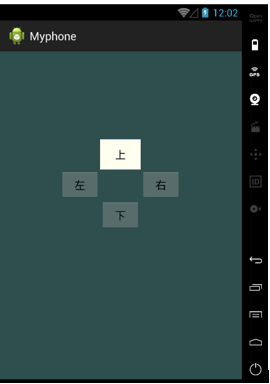
<RelativeLayout xmlns:android="http://schemas.android.com/apk/res/android"
    android:layout_width="match_parent"
    android:layout_height="match_parent"
    android:background="@color/darkslategray" >

    <Button android:id="@+id/btn1"
        android:layout_width="wrap_content"
        android:layout_height="wrap_content"
        android:layout_centerInParent="true"
        android:layout_centerHorizontal="true"
        android:text="下">
    </Button>
    <Button android:id="@+id/btn2"
        android:layout_width="wrap_content"
        android:layout_height="wrap_content"
        android:layout_toLeftOf="@id/btn1"
        android:layout_above="@id/btn1"
        android:text="左">
    </Button>
    <Button android:id="@+id/btn3"
        android:layout_width="wrap_content"
        android:layout_height="wrap_content"
        android:layout_toRightOf="@id/btn1"
        android:layout_above="@id/btn1"
        android:text="右">
    </Button>
    <Button android:id="@+id/btn4"
        android:layout_width="wrap_content"
        android:layout_height="wrap_content"
        android:layout_toRightOf="@id/btn2"
        android:layout_above="@id/btn2"
        android:background="@color/white"
        android:text="上">
    </Button>

</RelativeLayout>
效果圖
(3)表格佈局
表格佈局是最規整的一種佈局方式。想象一下EXCEL表格規整的行和列,android佈局管理器中的TableLayout與EXCEL中的單元格有不少相似之處。如果學過HTML,用過tbale,tr,td標簽,應該也會對下麵的用法有更好的理解。
表格佈局由一個TableLayout包裹起來,內部是一行行的控制項,每一行用一個TableRow來包裹,每一行的元素個數(即列數)都是可以不同的。預設情況下,一行中的所有控制項是等寬的。
控制項屬性,在TableLayout中定義,對所有行起作用:
1. android:collapseColumns=”” #指定被隱藏的列的序號
2. android:shrinkColumns=”” #指定被收縮的列的列序號
3. android:stretchColumns=”” #指定被拉伸的列的列序號
4. android:layout_column="3": #表示跳過第三個控制項,直接顯示下一個控制項,註意:這個屬性從1開始計數
5. android:layout_span="3" #表示合併3個單元格,也就說這個組件占3個單元格
註意:上面屬性的使用場合,是在TableLayout還是在TableRow中使用;如果是在TableRow中使用,需要在TableRow的子控制項中添加屬性。前四個屬性都是添加在TableLayout中的,最是添加在TableRow的子控制項中。
實例:
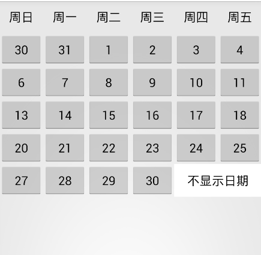
就以我們平常用的日曆為案例(由於屏幕太小,放不下最後一列星期六的日期)
實例代碼:
由於以下代碼有很多相似之處,我只截取了比較重要的一部分
1. 總體框架
<TableLayout  xmlns:android="http://schemas.android.com/apk/res/android"
    xmlns:tools="http://schemas.android.com/tools"
    android:id="@+id/TableLayout2"
    android:layout_width="fill_parent"
    android:layout_height="wrap_content" >
    <TableRow>
        <Button
            android:layout_width="wrap_content"
            android:layout_height="wrap_content"
            android:text="周日"
            android:background="#00000000"/>     #去除button控制項的樣式
        <Button
            android:layout_width="wrap_content"
            android:layout_height="wrap_content"
            android:text="周一"
            android:background="#00000000"/>

        <Button
            android:layout_width="wrap_content"
            android:layout_height="wrap_content"
            android:text="周二"
            android:background="#00000000"/>

        <Button
            android:layout_width="wrap_content"
            android:layout_height="wrap_content"
            android:text="周三"
            android:background="#00000000" />

        <Button
            android:layout_width="wrap_content"
            android:layout_height="wrap_content"
            android:text="周四"
            android:background="#00000000"/>

        <Button
            android:layout_width="wrap_content"
            android:layout_height="wrap_content"
            android:text="周五"
            android:background="#00000000" />
        <Button
            android:layout_width="wrap_content"
            android:layout_height="wrap_content"
            android:text="周六"
            android:background="#00000000" />
    </TableRow>
    <TableRow>
     ... ...
    </TableRow>
... ...
... ...
</TableLayout>
2. 最後一行“不顯示日期”的合併單元格樣式
<Button
       android:layout_width="wrap_content"
       android:layout_height="wrap_content"
       android:text="30" />

<Button
      android:layout_width="wrap_content"
      android:layout_height="wrap_content"
      android:layout_span="2"
      android:background="#ffffff"
      android:text="不顯示日期" />
(4)絕對佈局
絕對佈局指定每個控制項在手機上的具體坐標,每個控制項的位置和大小是固定的。由於不同手機屏幕大小可能不同,所以絕對佈局只適用於固定的手機屏幕。平常用得比較少,這裡就不做詳細介紹了。
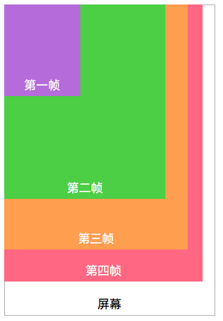
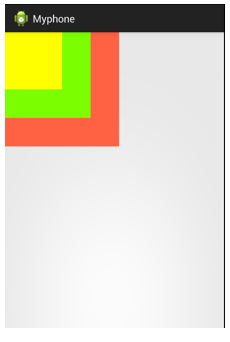
(5)層佈局
層佈局也叫幀佈局。每個控制項占據一層,後面添加的層會覆蓋前面的層。如果後面的層的大小大於或者等於前面的層,那麼前面的層就會被完全覆蓋。後面層中的控制項就看不到了。實際應用中如果想要得到一個空間浮現在另一個控制項的上方,可以在控制項內部嵌套層佈局。
下麵是層佈局的原理圖:
實例代碼:
<FrameLayout xmlns:android="http://schemas.android.com/apk/res/android"
    xmlns:tools="http://schemas.android.com/tools"
    android:id="@+id/FrameLayout1"
    android:layout_width="match_parent"
    android:layout_height="match_parent"
    tools:context=".MainActivity"
    android:foregroundGravity="right|bottom">

    <TextView
        android:layout_width="200dp"
        android:layout_height="200dp"
        android:background="#FF6143" />     //橙色
    <TextView
        android:layout_width="150dp"
        android:layout_height="150dp"
        android:background="#7BFE00" />     //綠色
     <TextView
        android:layout_width="100dp"
        android:layout_height="100dp"
        android:background="#FFFF00" />     //黃色

</FrameLayout>
效果圖,每一個textview都會被前一個textview覆蓋:
實際應用:
在手機程式設計中,絕對佈局基本上不用,用得相對較多的是線性佈局和相對佈局。


