1.添加初始化數據(Seed) 我們可以在初始化資料庫的過程中給資料庫添加一些數據。為了實現初始化數據(seed data)我們必須創建一個自定義的資料庫初始化器(DB initializer),並重寫其中的Seed方法。 下邊的慄子展示在School資料庫中給Standard表添加預設的數據: 第 ...
1.添加初始化數據(Seed)
我們可以在初始化資料庫的過程中給資料庫添加一些數據。為了實現初始化數據(seed data)我們必須創建一個自定義的資料庫初始化器(DB initializer),並重寫其中的Seed方法。
下邊的慄子展示在School資料庫中給Standard表添加預設的數據:
第一步:創建自定義初始化器
//繼承三種內置的初始化器中的DropCreateDatabaseAlways
public class SchoolDBInitializer : DropCreateDatabaseAlways<SchoolDBContext>
{
    protected override void Seed(SchoolDBContext context)
    {
        IList<Standard> defaultStandards = new List<Standard>();

        defaultStandards.Add(new Standard() { StandardName = "Standard 1", Description = "First Standard" });
        defaultStandards.Add(new Standard() { StandardName = "Standard 2", Description = "Second Standard" });
        defaultStandards.Add(new Standard() { StandardName = "Standard 3", Description = "Third Standard" });

        context.Standards.AddRange(defaultStandards);
     //初始化數據
        base.Seed(context);
    }
}
2.使用Seed方法添加初始化數據
public class SchoolContext: DbContext
{
    public SchoolContext(): base("SchoolDB")
    {
        Database.SetInitializer(new SchoolDBInitializer());
    }

    public DbSet<Student> Students { get; set; }
    public DbSet<Standard> Standards { get; set; }
}
2.資料庫遷移策略
前邊我們已經知道了EF中的資料庫遷移策略(CreateDatabaseIfNotExists,DropCreateDatabaseIfModelChanges, and DropCreateDatabaseAlways.),但是因為這些策略都是刪除舊的資料庫然後創建一個新的資料庫,所以使用這些策略會造成資料庫中的數據(不是seed data的數據)、存儲過程、觸發器等內容丟失。
針對上邊的問題,EF提供了一個新的資料庫初始化器 MigrateDatabaseToLastestVersion,這個工具在實體模型改變時自動幫我們更新資料庫,且不會造成數據丟失。
下邊介紹兩種更新資料庫的方法:
1.自動遷移
第一步:
在程式包管理器控制台輸入
enable-migrations –EnableAutomaticMigration:$true
執行成功後,EFAp創建了一個繼承自DbMigrationConfiguration類的Configuration類,如下
    internal sealed class Configuration : DbMigrationsConfiguration<EF6Demo.SchoolContext>
    {
        public Configuration()
        {
            AutomaticMigrationsEnabled = true;//自動遷移為true
            AutomaticMigrationDataLossAllowed = true;//允許數據丟失,預設生成時沒有這一項(不添加這一項時,只在添加/刪除實體類時自動生成,如果我們刪除了實體類的一個屬性就會拋出異常)
            ContextKey = "EF6Demo.SchoolContext";
        }

        protected override void Seed(EF6Demo.SchoolContext context)
        {
            //  This method will be called after migrating to the latest version.

            //  You can use the DbSet<T>.AddOrUpdate() helper extension method
            //  to avoid creating duplicate seed data.
        }
    }
第二步:
把資料庫初始化器添加到配置中,context代碼如下:
    public class SchoolContext : DbContext
    {
        public SchoolContext() {
            //添加MigrateDatabaseToLatestVersion資料庫初始化器
            Database.SetInitializer(new MigrateDatabaseToLatestVersion<SchoolContext, Configuration>());
        }
        public virtual DbSet<Student> Students { get; set; }
        public virtual DbSet<Standard> Standards { get; set; }

        protected override void OnModelCreating(DbModelBuilder modelBuilder)
        {
            base.OnModelCreating(modelBuilder);
        }
    }
完成上邊兩步,當我們修改實體類時運行程式就會自動更新資料庫。
2.使用代碼遷移
上邊我們瞭解了通過自動遷移來更新資料庫,這裡介紹通過代碼更新資料庫的方法。通過代碼更新資料庫的功能更強大,如我們可以給資料庫的列添加預設值,添加計算列等。
使用代碼遷移,我們在程式包控制台執行以下過程:
1.Enable-Migrations [-f]
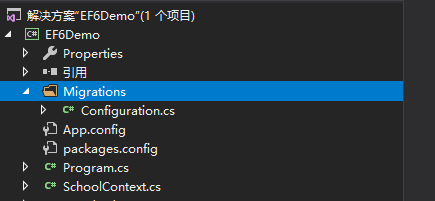
這條命令會生成一個Configuration文件,當配置文件存在時可通過-f尾碼強制覆蓋舊文件。執行成功後添加了Migrations文件夾,文件夾中包含一個Configuration配置類,如下:

Configuration配置類代碼如下:
    internal sealed class Configuration : DbMigrationsConfiguration<EF6Demo.SchoolContext>
    {
        public Configuration()
        {
            AutomaticMigrationsEnabled = false;
            ContextKey = "EF6Demo.SchoolContext";
        }

        protected override void Seed(EF6Demo.SchoolContext context)
        {
            //  This method will be called after migrating to the latest version.

            //  You can use the DbSet<T>.AddOrUpdate() helper extension method
            //  to avoid creating duplicate seed data.
        }
    }
2.Add-Migration [MigName]
首先在context類中指定初始化器是MigrateDatabaseToLatestVersion初始化器,如下:
   public class SchoolContext : DbContext
    {
        public SchoolContext() {
            //添加MigrateDatabaseToLatestVersion資料庫初始化器
            Database.SetInitializer(new MigrateDatabaseToLatestVersion<SchoolContext, Configuration>());

        }
        public virtual DbSet<Student> Students { get; set; }
        public virtual DbSet<Standard> Standards { get; set; }

        protected override void OnModelCreating(DbModelBuilder modelBuilder)
        {
            base.OnModelCreating(modelBuilder);
        }
    }
在包管理器控制台執行:
Add-Migration FirstInit
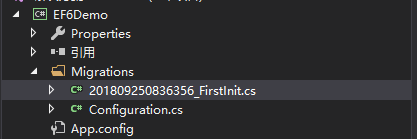
這會在Migration文件夾中生成一個<stamp>_name的遷移類:

遷移類的代碼如下:
    public partial class FirstInit : DbMigration
    {
        //升級
        public override void Up()
        {
            CreateTable(
                "dbo.Standards",
                c => new
                    {
                        StandardId = c.Int(nullable: false, identity: true),
                        StandardName = c.String(),
                    })
                .PrimaryKey(t => t.StandardId);

            CreateTable(
                "dbo.Students",
                c => new
                    {
                        StudentId = c.Int(nullable: false, identity: true),
                        StudentName = c.String(),
                        Standard_StandardId = c.Int(),
                    })
                .PrimaryKey(t => t.StudentId)
                .ForeignKey("dbo.Standards", t => t.Standard_StandardId)
                .Index(t => t.Standard_StandardId);

        }
        //降級
        public override void Down()
        {
            DropForeignKey("dbo.Students", "Standard_StandardId", "dbo.Standards");
            DropIndex("dbo.Students", new[] { "Standard_StandardId" });
            DropTable("dbo.Students");
            DropTable("dbo.Standards");
        }
    }
我們可以看到遷移類中包含Up()和Down()方法,分別用於資料庫的更新和回退。
3.Update-Database
① updata-database [-verbose]
在程式包控制臺中執行這條命令時,會執行Add-Migration命令創建的最新的遷移文件,並更新資料庫。
執行完上邊三步資料庫就生成了,以後當我們修改實體類時,執行Add-Migration [MigName]後再執行Update-Database [-verbose],就可方便地根據模型的變化更新資料庫。
② update-database -TargetMigration:xxx
如果我們想回退到某一個版本時執行:
update-database -TargetMigration:FirstInit//資料庫回退到第一次的版本
3.codeFirst中的設計器
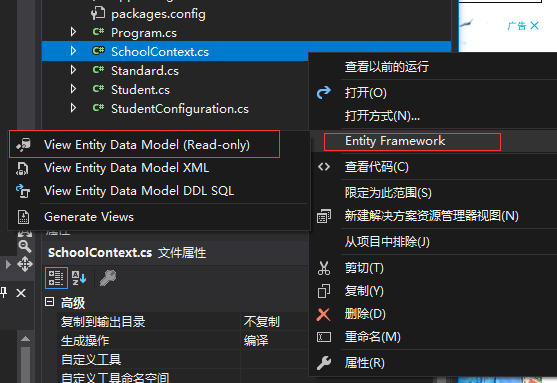
我們知道codeFirst模式中不支持設計器,設計器對我們理解實體間關係還是很有用的,怎麼在code-first中使用設計器呢?Visual Studio Marketplace.點擊鏈接下載工具,安裝即可,安裝完成重啟VS,在context上點擊右鍵,然後會有一個Entity Framework選項,如下圖:

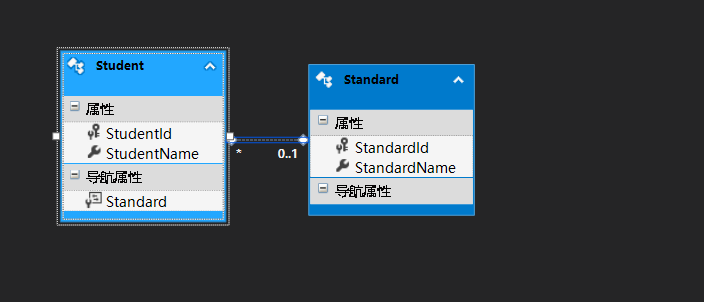
點擊ViewEntity Data Model選項就可以自動生成設計器,如下:

這個工具十分好用,同時也支持生成Model XML和DDL SQL推薦使用。


