概述 Retrofit是一個OkHttp網路請求框架的封裝庫,Retrofit通過註解配置網路參數,可以按照我們的規則去構造實際的HTTP請求,能夠靈活設置URL、頭部、請求體、返回值等,是目前最優雅的一個網路框架。 引入 Retrofit基本使用三部曲 創建實例 定義介面 創建 同步/非同步 回調 ...
概述
Retrofit是一個OkHttp網路請求框架的封裝庫,Retrofit通過註解配置網路參數,可以按照我們的規則去構造實際的HTTP請求,能夠靈活設置URL、頭部、請求體、返回值等,是目前最優雅的一個網路框架。
引入
implementation 'com.squareup.retrofit2:retrofit:2.2.0'

implementation 'com.squareup.retrofit2:adapter-rxjava2:2.2.0'//添加對RxJava的支持
implementation 'com.squareup.retrofit2:converter-gson:2.1.0' //添加Json數據的支持

<uses-permission android:name="android.permission.INTERNET"/>//網路請求必要的許可權
Retrofit基本使用三部曲
創建實例
 Retrofit retrofit = new Retrofit.Builder()
          .baseUrl("http://id1.option****.cc:***1/")//Retrofit2 的baseUlr 必須以 /(斜線) 結束
          .build();
RetrofitService service = retrofit.create(RetrofitService.class);//創建介面的代理對象
定義介面
public interface RetrofitService {

    @GET("/pursuit/getPursuitInfo")
    Call<ResponseBody> getBlog(@Query("id") int id);

    @GET("/pursuit/getPursuitInfo/{id}")
    Call<ResponseBody> getBlog2(@Path("id") String id);

}
創建 同步/非同步 回調
//非同步的回調
Call<ResponseBody> call = service.getBlog(123);
call.enqueue(new Callback<ResponseBody>() {
    @Override
    public void onResponse(Call<ResponseBody> call, retrofit2.Response<ResponseBody> response) {
        try {
            Log.i("返回信息",response.body().string()+"");//列印返回信息
        } catch (IOException e) {
            e.printStackTrace();
        }

    }
    @Override
    public void onFailure(Call<ResponseBody> call, Throwable t) {
        t.printStackTrace();//錯誤信息
    }
});

/*同步的回調,如果不是在一個Activity或者一個Fragment中去執行,那麼也就意味著,你可以不需要開啟子線程去執行網路請求。如果是在主線程,就必須開啟子線程來進行同步請求
使用call.execute()同步請求,只能調用一次。如果要多次使用這個方法,需要 call.clone()重新生成新的Call實例*/

new Thread(new Runnable() {
    @Override
    public void run() {
        try {
            retrofit2.Response<ResponseBody> response = call.execute();
            response.body();
        } catch (IOException e) {
            e.printStackTrace();
        }
    }
});
HTTP協議中的常用請求
GET: 請求指定的頁面信息,以?分割URL和傳輸數據,參數之間以&相連,最多只能是1024位元組,並返回實體主體,該操作用於獲取信息而非修改信息
HEAD: 只請求頁面的首部。
POST: POST表示可能修改變伺服器上的資源的請求,.POST的安全性要比GET的安全性高
PUT: 從客戶端向伺服器傳送的數據取代指定文檔的內容。
Retrofit註解的重點詳解
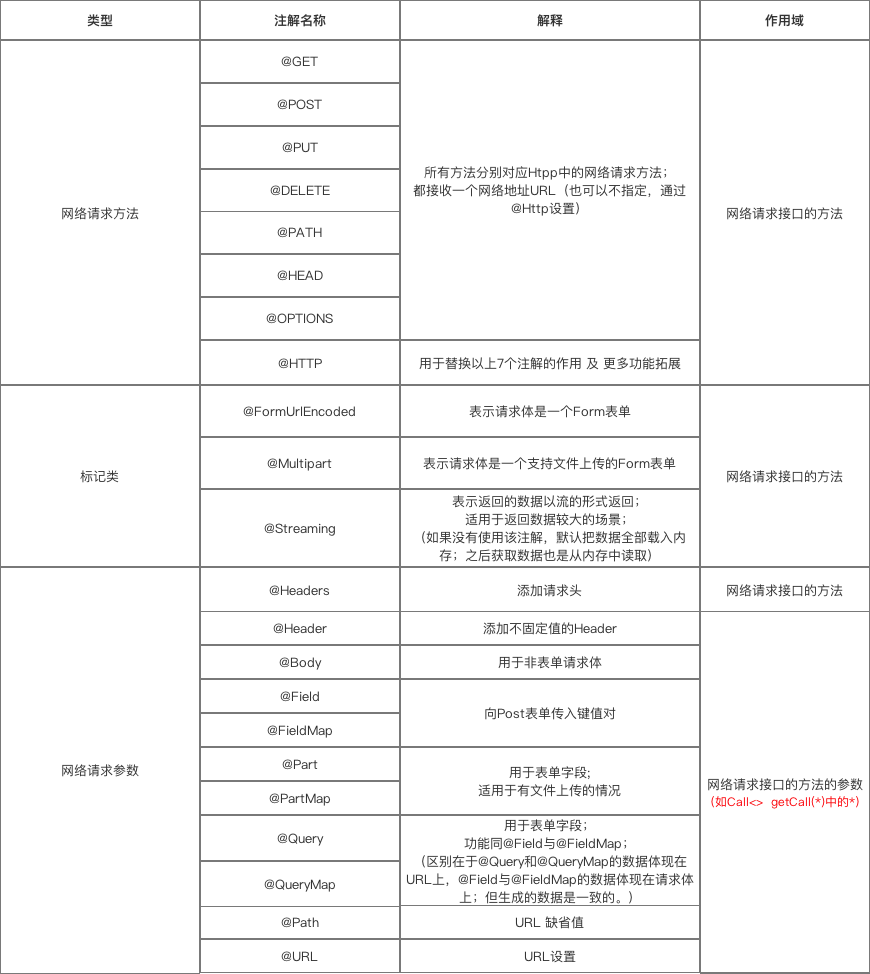
註解彙總
需要理解並靈活搭配使用

基本請求
Responsebody是Retrofit網路請求回來的原始數據類。get方式可以在url後面串聯
@Path註解用於替換請求參數,@Query註解相當於url後面的串聯,他們可以同時使用
請看下麵第三種表達式:
@GET("/pursuit/getPursuitInfo?id=123")
Call<ResponseBody>  getCall();

@POST("/pursuit/getPursuitInfo")
Call<ResponseBody> getBlog(@Query("id") int id);

@GET("/pursuit/getPursuitInfo/{id}")
Call<ResponseBody> getBlog2(@Path("id") String id);
自定義請求
需要用到@HTTP註解
/* method:網路請求的方法,註意大小寫
 * path:網路請求地址路徑
 * hasBody:是否有請求體
 * {id} 表示是一個變數*/
@HTTP(method = "GET", path = "/pursuit/getPursuitInfo/{id}", hasBody = false)
Call<ResponseBody> getCall(@Path("id") int id);
請求體非Form表單
@Body是Post方式提交非Form的表單
@POST("/pursuit/getPursuitInfo")
Observable<String> getPursuitInfo(@Body User user);
請求體是Form表單
如果請求的Form表單,需要用@FormUrlEncoded標註,@Field註解用於表單欄位,它和@FieldMap都需要@FormUrlEncoded配合使用
@Field和@Query都是表單欄位,@FieldMap和@Query都是批量增加表單的提交域。區別如上圖,一個拼接在URL上適用於get方式,一個體現在請求體上試用於post方式,區分好使用場景。
@POST("/pursuit/getPursuitInfo")
@FormUrlEncoded
Call<ResponseBody> testFormUrlEncoded1(@Field("username") String name, @Field("age") int age);
設置請求頭
兩種請求頭的,@Header用於添加不固定的請求頭,作用於方法的參數。@Headers用於添加固定的請求頭,作用於方法
@Headers("Authorization: authorization")
@GET("/pursuit/getPursuitInfo")
Call<ResponseBody> getUser();

@GET("/pursuit/getPursuitInfo")
Call<ResponseBody> getUser(@Header("Authorization") String authorization);
動態替換URL
用@Url替換已經設置的baseUrl
@GET
public Call<ResponseBody> profilePicture(@Url String url);
圖片上傳
@POST("user/updateAvatar.do")
@Multipart
Call<ResponseBody> upload(@Part("upload1\"; filename=\"image1.jpg\"") RequestBody imgs );
文件上傳
發送form-encoded的數據,用於有文件上傳的場景時要用 @Multipart 註解,@Part和@PartMap適用於有文件上傳的情況
@POST("mobile/upload")
@Multipart
Call<ResponseBody> upload(@Part MultipartBody.Part file);
文件上傳相關閱讀
※以上就是所有參數註解的用法,需要實踐靈活試用。
Retrofit與Gson
添加對gson的支持
Retrofit retrofit = new Retrofit.Builder()
        .baseUrl("http://id1.option****.cc:***1/")//Retrofit2 的baseUlr 必須以 /(斜線) 結束
        .addConverterFactory(GsonConverterFactory.create())//添加對gson的支持
        .build();
建立介面,返回Bean
public interface PostRoute {
   @Headers({"Content-Type: application/json","Accept: application/json"})//需要添加頭
   @POST("api/FlyRoute/Add")
   Call<FlyRouteBean> postFlyRoute(@Body RequestBody route);//傳入的參數為RequestBody
}
將Bean轉換成json字元串
FlyRouteBean flyRouteBean=new FlyRouteBean();
        flyRouteBean=initdata(flyRouteBean);//根據Bean類初始化一個需要提交的數據類
        Gson gson=new Gson();
        String route= gson.toJson(flyRouteBean);//通過Gson將Bean轉化為Json字元串形式
提交json數據
RequestBody body=RequestBody.create(okhttp3.MediaType.parse("application/json; charset=utf-8"),route); //將json轉換成RequestBody請求體
Call<FlyRouteBean> call=postRoute.postFlyRoute(body);//提交
Retrifit與RxJava
引入RxJava
compile 'io.reactivex.rxjava2:rxjava:2.1.0'
compile 'io.reactivex.rxjava2:rxandroid:2.0.1'
添加對RxJava的支持
Retrofit retrofit = new Retrofit.Builder()
        .baseUrl("http://id1.option****.cc:***1/")//Retrofit2 的baseUlr 必須以 /(斜線) 結束
        .addConverterFactory(GsonConverterFactory.create())//添加對gson的支持
        .addCallAdapterFactory(RxJava2CallAdapterFactory.create())//添加對RxJava的支持
        .build();
建立介面,返回Observable被觀察者
@GET("top250")
Observable<MovieEntity> getTopMovie(@Query("start") int start, @Query("count") int count);
建立觀察者
Observable<String> observable =service.getTopMovie(0, 10)
    .subscribeOn(Schedulers.io())
    .observeOn(AndroidSchedulers.mainThread())
    .subscribe(new Observer<ResponseBody>() {
        @Override
        public void onSubscribe(Disposable d) {

        }

        @Override
        public void onNext(ResponseBody responseBody) {

        }

        @Override
        public void onError(Throwable e) {

        }

        @Override
        public void onComplete() {

        }
    });
RxJava相關閱讀
Retrofit代碼混淆配置
-dontwarn retrofit.**
-keep class retrofit.** { *; }
-keepattributes Signature
-keepattributes Exceptions


