
原文鏈接:https://www.cnblogs.com/hua66/p/9600085.html 在使用Redis中,我們可能會遇到以下場景: 例如: 某用戶向伺服器中發送一個請求,伺服器將用戶請求加入Redis任務隊列,任務完成則移出隊列。 以上場景有幾點疑問: 解決方案: 以上解決方案都可以使 ...
原文鏈接:https://www.cnblogs.com/hua66/p/9600085.html
在使用Redis中,我們可能會遇到以下場景:
例如:
某用戶向伺服器中發送一個請求,伺服器將用戶請求加入Redis任務隊列,任務完成則移出隊列。
以上場景有幾點疑問:
- Redis隊列中數據如果不僅僅來自於我們的應用程式,那麼我們怎麼把這個數據加入Redis?
- 當Redis隊列中用戶的請求達程式所能處理的峰值。那麼我們該如何處理這些用戶請求?
解決方案:
- 對外提供介面,將請求數據添加至DB。啟動一個定時服務,在規定時間掃描DB中的請求數據並添加至Redis隊列。
- 使用分散式非同步隊列。
以上解決方案都可以使用插件來實現。
一、
關於Quartz.Net可以通過上面鏈接獲取官方API。它與SQL Server中的代理作業有著同樣功能。
代碼示例:


 1  /// <summary>
 2         /// 添加Job並以周期的形式運行
 3         /// </summary>
 4         /// <typeparam name="T"></typeparam>
 5         /// <param name="jobName">job名稱</param>
 6         /// <param name="jobGroupName">job組名稱</param>
 7         /// <param name="replace">job是否可修改</param>
 8         /// <param name="triggerName">job觸發器的名稱</param>
 9         /// <param name="minutes">job執行的時間間隔,以分為單位</param>
10         /// <returns></returns>
11         public DateTimeOffset AddJob<T>(string jobName, string jobGroupName, bool replace, string triggerName, int minutes) where T : IJob
12         {
13             IJobDetail jobDetail = JobBuilder.Create<T>().WithIdentity(jobName, jobGroupName).Build();
14             _sched.AddJob(jobDetail, replace);
15             ITrigger trigger = TriggerBuilder.Create()
16               .WithIdentity(triggerName, jobGroupName)
17               .StartNow()
18               .WithSimpleSchedule(x => x
19                   .WithIntervalInMinutes(minutes)//表示分鐘的時間間隔
20                   .RepeatForever())
21               .Build();
22             return _sched.ScheduleJob(jobDetail, trigger).Result;
23         }
View Code
以上的代碼中是基於Quartz封裝一個添加了Job的方法。這個方法依賴於 “IJobDetail” 和 “ITrigger” 這兩個對象。
“IJobDetail” 表示Job的身份信息,“ITrigger” 則包含了Job執行信息,它表示Job該如何執行。
以下為調用示例:
1 QuartzHelper quartzHelper = QuartzHelper.CreateInstance();
2                 quartzHelper.AddJob<TestJob>("testJob", "testJob_Group",false, "testJob_Trigger",1*10);
View Code
上述實例中的 “TestJob” 實現Quartz.Net中的 "IJob" 介面。這個介面只有一個方法 “Execute”,並由Quartz.Net框架自行調用該方法。
你可以在此方法中執行你的代碼。併在添加該Job制定你的執行策略 “ITrigger” 對象。然後框架會根據你制定的策略進行調用。調用參數請參見上述封裝。
下麵是向Redis隊列插入數據的示例Job:
 1 public class TestJob : IJob
 2     {
 3         Task IJob.Execute(IJobExecutionContext context)
 4         {
 5             //JobDataMap dataMap = context.JobDetail.JobDataMap;
 6             Task task = Task.Run(
 7                   () =>
 8                   {
 9                       Console.WriteLine(string.Format("{0}開始執行!當前系統時間{1}", this.GetType().Name, DateTime.Now));
10                       try
11                       {
12                           string redisKey = this.GetType().Name;
13                           RedisHelper redisHelper = new RedisHelper();
14                           if (redisHelper.KeyExists(redisKey))
15                           {
16                               redisHelper.KeyDelete(redisKey);
17                           };
18
19                           for (int i = 1; i <= 10; i++)
20                           {
21                               User user = new User()
22                               {
23                                   ID = i,
24                                   Name = "user" + DateTime.Now.Ticks +"_"+ i
25                               };
26                               redisHelper.ListLeftPush<User>(redisKey, user);//模擬DB用戶數據
27                           }
28                       }
29                       catch (Exception ex)
30                       {
31                           Console.WriteLine(string.Format("{0}任務出現異常,異常信息:{1}!當前系統時間{2}", this.GetType().Name, ex.Message, DateTime.Now));
32                       }
33                   }
34                   );
35             return task;
36         }
37     }
View Code
上面的 “TestJob” 模擬了從DB載入用戶請求數據至Redis隊列。至此我們已經解決了上面的第一個問題。
二、
在.Net中Redis的插件不多。比較流行有 "ServiceStack.Redis" 和 "StackExchange.Redis" 。
"ServiceStack.Redis" 為官方推出的插件。非開源插件,且普通版最高只支持 6000/S 讀寫。高級版是要收費的。為了後續擴展,這裡我們採用 "StackExchange.Redis" 。
關於StackExchange.Redis可以通過上面鏈接獲取官方API,目前是開源的。
在第一個問題中,已經通過定時Job的方式向Redis隊列中填充數據。下麵我們通過 "StackExchange.Redis" 獲取Redis隊列中的請求並處理這些請求。
1.載入數據至Redis:
 1 using APP_Test.Job;
 2 using Common.Quartz;
 3 using Common.Redis.StackExchange;
 4 using Quartz;
 5 using System;
 6 using System.Collections.Generic;
 7 using System.Linq;
 8 using System.Text;
 9 using System.Threading.Tasks;
10
11 namespace APP_Test
12 {
13     class Program
14     {
15         static void Main(string[] args)
16         {
17             {
18                 RedisHelper redisHelperA = new RedisHelper();
19                 RedisHelper redisHelperB = new RedisHelper();
20                 string stra = redisHelperA.StringGet("mykey");
21                 string strb = redisHelperB.StringGet("mykey");
22                 if (stra== strb)
23                 {
24                     Console.WriteLine(string.Format("***********{0}=={1}***********", stra, strb));
25                 }
26                 else
27                 {
28                     Console.WriteLine(string.Format("***********{0}!={1}***********", stra, strb));
29                 }
30             }
31
32             {
33
34                 QuartzHelper quartzHelper = QuartzHelper.CreateInstance();
35                 quartzHelper.AddJob<TestJob>("testJob", "testJob_Group",false, "testJob_Trigger",1*10);//這裡設置了以秒為單位
36             }
37
38             Console.ReadKey();
39         }
40
41     }
42 }
View Code
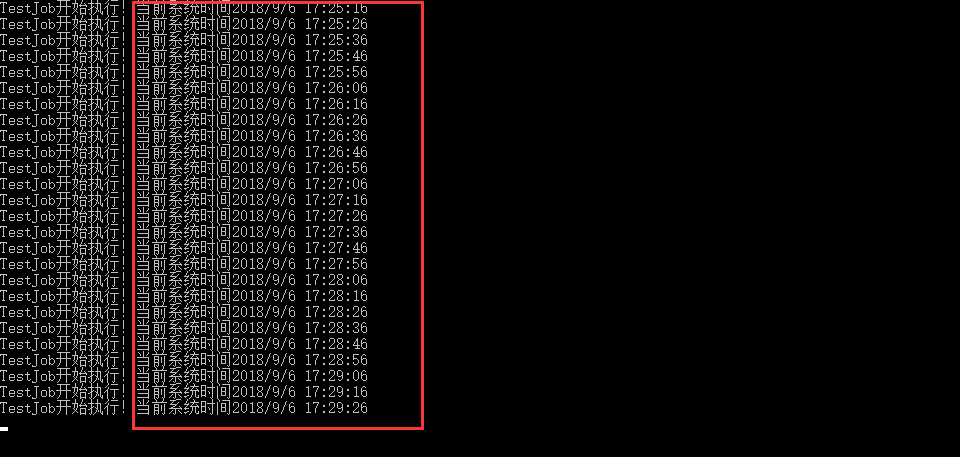
可以看到上面代碼執行的時間節點與我們所添加job中的 ”ITrigger “ 的觸發策略完全一致。至此,我們第一步已得到驗證。
2.啟動處理Redis隊列中請求的程式。
 1 using APP_Test.Models;
 2 using Common.Redis.StackExchange;
 3 using System;
 4 using System.Collections.Generic;
 5 using System.Linq;
 6 using System.Text;
 7 using System.Threading.Tasks;
 8
 9 namespace APP_RedisClientTest
10 {
11     class Program
12     {
13         static void Main(string[] args)
14         {
15             RedisHelper redisHelper = new RedisHelper();
16             string redisKey = "TestJob";
17             while (true)
18             {
19                 Action action = new Action(() =>
20                 {
21                     User user = redisHelper.ListLeftPop<User>(redisKey);//獲取請求數據並移出隊列
22                     if (user!=null)
23                     {
24                         Console.WriteLine(string.Format("*******{0}*******", user.Name));
25                     }
26                 }
27                     );
28                 action.EndInvoke(action.BeginInvoke(null, null));
29             }
30             Console.ReadKey();
31         }
32     }
33 }
View Code
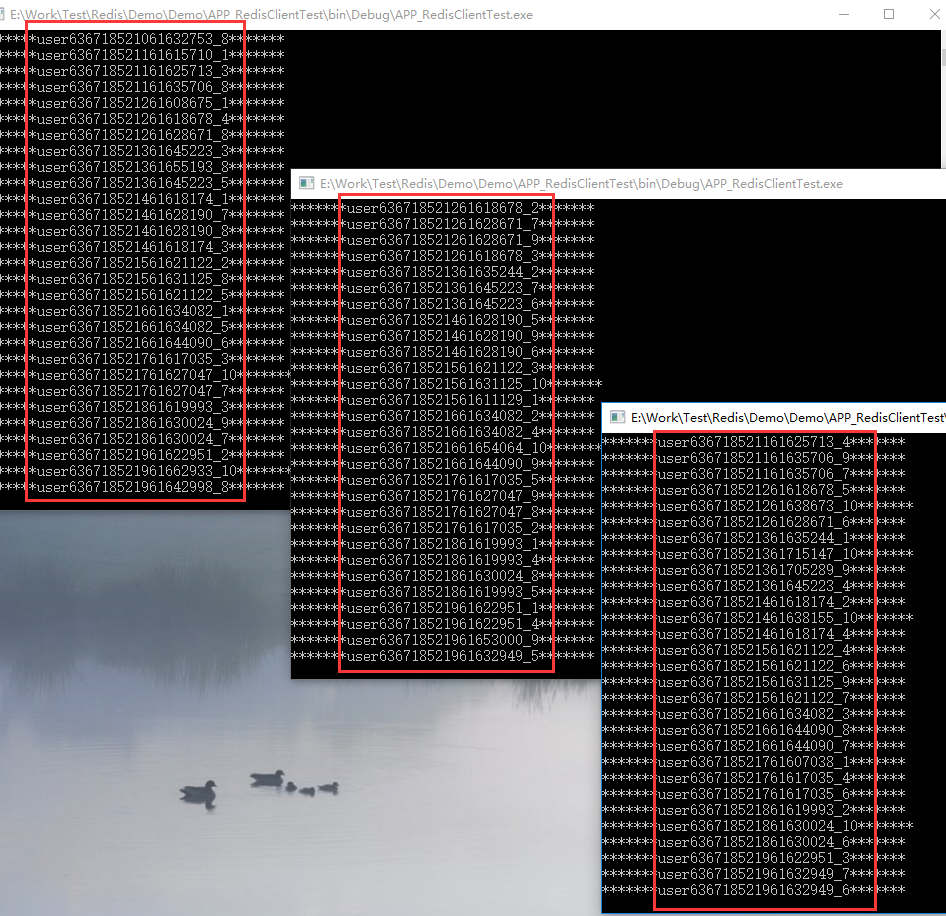
上面我啟動3個客戶端實例,他們一起處理Redis隊列中的請求。每當Job向Redis隊列中添加請求對象後就會立即被我們處理請求的程式獲取並消費,每當一個請求被消費就會被移出Redis隊列。並且遵循先入先出的準則。按照上述,如果出現主程式請求量過高情形,我們只需要啟動多個處理請求的輔助程式即可緩解主程式的壓力。
至此上面的兩個問題已得到驗證。
如下附個人基於 "Quartz.Net" 和 "StackExchange.Redis" 封裝的幫助類
  1 using System;
  2 using System.Collections.Generic;
  3
  4 namespace Common.Quartz
  5 {
  6     using global::Quartz;
  7     using global::Quartz.Impl;
  8     using global::Quartz.Impl.Matchers;
  9
 10     /// <summary>
 11     /// V:3.0.6.0
 12     /// </summary>
 13     public class QuartzHelper
 14     {
 15         private readonly static object _obj = new object();//單例鎖
 16
 17         //private  ISchedulerFactory _sf = null;
 18
 19         private static IScheduler _sched = null;
 20         /// <summary>
 21         /// 提供IScheduler對象,訪問非同步方法
 22         /// </summary>
 23         public IScheduler Scheduler { get { return _sched; } }
 24
 25         private static QuartzHelper _quartzHelper = null;//單例對象
 26
 27         private QuartzHelper()
 28         {
 29             //_sf = new StdSchedulerFactory();
 30             //_sched = _sf.GetScheduler().Result;
 31             _sched = StdSchedulerFactory.GetDefaultScheduler().Result;
 32             _sched.Start();
 33         }
 34
 35         /// <summary>
 36         /// 獲取單例對象
 37         /// </summary>
 38         /// <returns></returns>
 39         public static QuartzHelper CreateInstance()
 40         {
 41             if (_quartzHelper == null) //雙if +lock
 42             {
 43                 lock (_obj)
 44                 {
 45                     if (_quartzHelper == null)
 46                     {
 47                         _quartzHelper = new QuartzHelper();
 48                     }
 49                 }
 50             }
 51             return _quartzHelper;
 52         }
 53         public bool CheckExists(TriggerKey triggerKey)
 54         {
 55             return _sched.CheckExists(triggerKey).Result;
 56         }
 57         public bool CheckExists(JobKey jobKey)
 58         {
 59             return _sched.CheckExists(jobKey).Result;
 60         }
 61         public IReadOnlyCollection<IJobExecutionContext> GetCurrentlyExecutingJobs()
 62         {
 63             return _sched.GetCurrentlyExecutingJobs().Result;
 64         }
 65
 66         /// <summary>
 67         /// 添加Job並以周期的形式運行
 68         /// </summary>
 69         /// <typeparam name="T"></typeparam>
 70         /// <param name="jobName">job名稱</param>
 71         /// <param name="jobGroupName">job組名稱</param>
 72         /// <param name="replace">job是否可修改</param>
 73         /// <param name="triggerName">job觸發器的名稱</param>
 74         /// <param name="minutes">job執行的時間間隔,以分為單位</param>
 75         /// <returns></returns>
 76         public DateTimeOffset AddJob<T>(string jobName, string jobGroupName, bool replace, string triggerName, int minutes) where T : IJob
 77         {
 78             IJobDetail jobDetail = JobBuilder.Create<T>().WithIdentity(jobName, jobGroupName).Build();
 79             _sched.AddJob(jobDetail, replace);
 80             ITrigger trigger = TriggerBuilder.Create()
 81               .WithIdentity(triggerName, jobGroupName)
 82               .StartNow()
 83               .WithSimpleSchedule(x => x
 84                   .WithIntervalInSeconds(minutes)//seconds表示秒的時間間隔
 85                                                  //.WithIntervalInMinutes(minutes)//表示分鐘的時間間隔
 86                   .RepeatForever())
 87               .Build();
 88             return _sched.ScheduleJob(jobDetail, trigger).Result;
 89         }
 90         public bool DeleteJobs(IReadOnlyCollection<JobKey> jobKeys)
 91         {
 92             return _sched.DeleteJobs(jobKeys).Result;
 93         }
 94         public IJobDetail GetJobDetail(JobKey jobKey)
 95         {
 96             return _sched.GetJobDetail(jobKey).Result;
 97         }
 98         public IReadOnlyCollection<string> GetJobGroupNames()
 99         {
100             return _sched.GetJobGroupNames().Result;
101         }
102         public IReadOnlyCollection<JobKey> GetJobKeys(GroupMatcher<JobKey> matcher)
103         {
104             return _sched.GetJobKeys(matcher).Result;
105         }
106         public bool Interrupt(JobKey jobKey)
107         {
108             return _sched.Interrupt(jobKey).Result;
109         }
110         public bool IsJobGroupPaused(string groupName)
111         {
112             return _sched.IsJobGroupPaused(groupName).Result;
113         }
114         public ITrigger GetTrigger(TriggerKey triggerKey)
115         {
116             return _sched.GetTrigger(triggerKey).Result;
117         }
118         public IReadOnlyCollection<string> GetTriggerGroupNames()
119         {
120             return _sched.GetTriggerGroupNames().Result;
121         }
122         public IReadOnlyCollection<TriggerKey> GetTriggerKeys(GroupMatcher<TriggerKey> matcher)
123         {
124             return _sched.GetTriggerKeys(matcher).Result;
125         }
126         public IReadOnlyCollection<ITrigger> GetTriggersOfJob(JobKey jobKey)
127         {
128             return _sched.GetTriggersOfJob(jobKey).Result;
129         }
130         public TriggerState GetTriggerState(TriggerKey triggerKey)
131         {
132             return _sched.GetTriggerState(triggerKey).Result;
133         }
134         public IReadOnlyCollection<string> GetPausedTriggerGroups()
135         {
136             return _sched.GetPausedTriggerGroups().Result;
137         }
138         public bool Interrupt(string fireInstanceId)
139         {
140             return _sched.Interrupt(fireInstanceId).Result;
141         }
142         public bool IsTriggerGroupPaused(string groupName)
143         {
144             return _sched.IsTriggerGroupPaused(groupName).Result;
145         }
146         public void PauseAll()
147         {
148             _sched.PauseAll();
149         }
150         public void PauseJobs(GroupMatcher<JobKey> matcher)
151         {
152             _sched.PauseJobs(matcher);
153         }
154         public void PauseTriggers(GroupMatcher<TriggerKey> matcher)
155         {
156             _sched.PauseTriggers(matcher);
157         }
158         public void ResumeAll()
159         {
160             _sched.ResumeAll();
161         }
162         public void ResumeJobs(GroupMatcher<JobKey> matcher)
163         {
164             _sched.ResumeJobs(matcher);
165         }
166         public void ResumeTriggers(GroupMatcher<TriggerKey> matcher)
167         {
168             _sched.ResumeTriggers(matcher);
169         }
170         public void ScheduleJobs(IReadOnlyDictionary<IJobDetail, IReadOnlyCollection<ITrigger>> triggersAndJobs, bool replace)
171         {
172             _sched.ScheduleJobs(triggersAndJobs, replace);
173         }
174         public DateTimeOffset? RescheduleJob(TriggerKey triggerKey, ITrigger newTrigger)
175         {
176             return _sched.RescheduleJob(triggerKey, newTrigger).Result;
177         }
178         public void Shutdown(bool waitForJobsToComplete)
179         {
180             _sched.Shutdown(waitForJobsToComplete);
181         }
182         public void Clear()
183         {
184             _sched.Clear();
185         }
186
187
188     }
189 }
View Code
   1 using StackExchange.Redis;
   2 using System;
   3 using System.Collections.Generic;
   4 using System.Configuration;
   5 using System.IO;
   6 using System.Linq;
   7 using System.Runtime.Serialization.Formatters.Binary;
   8 using System.Threading.Tasks;
   9 using Newtonsoft.Json;
  10
  11 namespace Common.Redis.StackExchange
  12 {
  13     /// <summary>
  14     /// V:1.2.6.0
  15     /// </summary>
  16     public class RedisHelper
  17     {
  18         #region private field
  19
  20         /// <summary>
  21         /// 連接字元串
  22         /// </summary>
  23         private static readonly string ConnectionString;
  24
  25         /// <summary>
  26         /// redis 連接對象
  27         /// </summary>
  28         private static IConnectionMultiplexer _connMultiplexer;
  29
  30         /// <summary>
  31         /// 預設的 Key 值(用來當作 RedisKey 的首碼)
  32         /// </summary>
  33         private static readonly string DefaultKey;
  34
  35         /// <summary>
  36         /// 鎖
  37         /// </summary>
  38         private static readonly object Locker = new object();
  39
  40         /// <summary>
  41         /// 資料庫
  42         /// </summary>
  43         private readonly IDatabase _db;
  44
  45         #endregion private field
  46
  47         #region 構造函數
  48
  49         static RedisHelper()
  50         {
  51             ConnectionString = ConfigurationManager.ConnectionStrings["RedisConnectionString"].ConnectionString;
  52             _connMultiplexer = ConnectionMultiplexer.Connect(ConnectionString);
  53             DefaultKey = ConfigurationManager.AppSettings["Redis.DefaultKey"];
  54             AddRegisterEvent();
  55         }
  56
  57         public RedisHelper(int db = 0)
  58         {
  59             _db = _connMultiplexer.GetDatabase(db);
  60         }
  61
  62         #endregion 構造函數
  63
  64         #region 其它
  65
  66         /// <summary>
  67         /// 獲取 Redis 連接對象
  68         /// </summary>
  69         /// <returns></returns>
  70         public IConnectionMultiplexer GetConnectionRedisMultiplexer()
  71         {
  72             if (_connMultiplexer == null || !_connMultiplexer.IsConnected)
  73                 lock (Locker)
  74                 {
  75                     if (_connMultiplexer == null || !_connMultiplexer.IsConnected)
  76                         _connMultiplexer = ConnectionMultiplexer.Connect(ConnectionString);
  77                 }
  78
  79             return _connMultiplexer;
  80         }
  81
  82         public ITransaction GetTransaction()
  83         {
  84             return


