
1、說明 所謂的PXE是Preboot Execution Environment的縮寫,字面上的意思是開機前的執行環境。 要實現pxe,至少需要3個服務 2、流程 註意:全部用的udp封裝 1)client向pxe server上的dhcp發送IP地址請求消息,dhcp檢測client是否合法,同 ...

1、說明
所謂的PXE是Preboot Execution Environment的縮寫,字面上的意思是開機前的執行環境。
要實現pxe,至少需要3個服務

2、流程
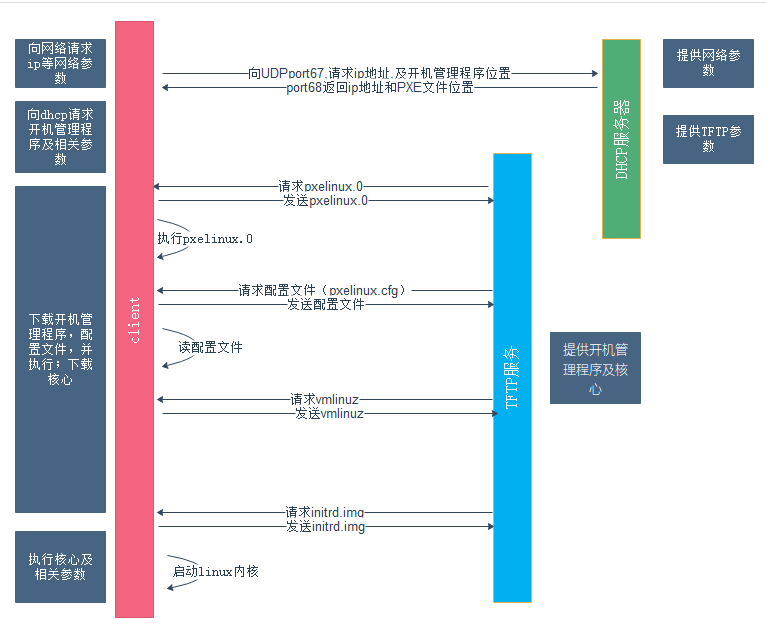
註意:全部用的udp封裝
1)client向pxe server上的dhcp發送IP地址請求消息,dhcp檢測client是否合法,同事將pxe環境下的boot loader文件pxelinux.0的位置信息發給client
2)client向pxe server上的tftp請求pxelinux.0,tftp收到消息向client發送pxelinux.0大小信息,試探client是否滿意,當tftp收到client發回的統一大小信息後,發送pxelinux.0.
3)client執行接收到的pxelinux.0
4)client向TFTP請求pxelinux.cfg文件(其實是目錄,裡面放了啟動菜單,即grub的配置文件),TFTP將配置文件發回client,繼而client根據配置文件執行後續的操作
5)client向TFTP發送linux內核請求信息,TFTP發送內核
6)client向TFTP發送根文件請求信息,TFTP接受到消息之後返回linux根文件系統
7)client載入linux內核(啟動參數已經在4中的配置文件中設置好了)。
8)client通過nfs/ftp/http下載系統安裝文件進行安裝,如果4中的配置文件指定了kickstart路徑,則回根據此文件自動應答安裝系統
幾個文件的說明
- vmlinuz:核心文件(kernel file);
- initrd.img:開啟過程中核心組件的參數;
- isolinux.cfg --> demo:開機pxe選擇參考;
3、部署
順序
DHCP
TFTP
提供bootloader及配置文件
掛載光碟,把內核文件cp到tftp目錄
部署httpd,並放置文件
設置菜單及提供系統安裝文件
3.1部署DHCP
  yum -y install
  dhcp[root@localhost ~]# cat /etc/dhcp/dhcpd.con
default-lease-time 600;
max-lease-time 7200;
subnet 192.168.216.0 netmask 255.255.255.0 {
  range dynamic-bootp 192.168.216.220 192.168.216.230;
  option domain-name-servers 192.168.216.147;
  option subnet-mask 255.255.255.0;
  option routers 192.168.216.147;
  default-lease-time 600;
  max-lease-time 7200;
  next-server 192.168.216.147;      ###這個就是tftp地址
  filename"pxelinux.0";          ###告知從tftp根目錄獲取bootloader文件
}
host clientA{                        ###可以綁定某台主機的ip地址,用mac綁定
        hardware ethernet 00:0C:29:83:A2:10;
        fixed-address 192.168.216.229;
}
ddns-update-style interim;
啟動服務
systemctl start dhcpd
3.2部署TFTP
  從流程得知boot loader文件pxelinux.0以及內核相關的配置文件(目錄pxelinux.cfg下)主要都是由TFTP來提供的
  yum install tftp-server
  yum -y install xinetd
  TFTP是由xinetd這個super daemon所管理的,因此設定好TFTP之後,要啟動的是xinetd;
[root@localhost ~]# cat /etc/xinetd.d/tftp
# default: off
# description: The tftp server serves files using the trivial file transfer \
#       protocol.  The tftp protocol is often used to boot diskless \
#       workstations, download configuration files to network-aware printers, \
#       and to start the installation process for some operating systems.
service tftp
{
        socket_type             = dgram
        protocol                = udp
        wait                    = yes
        user                    = root
        server                  = /usr/sbin/in.tftpd
        server_args             = -s /var/lib/tftpboot  ###這個是tftp的根目錄
        disable                 = no
        per_source              = 11
        cps                     = 100 2
        flags                   = IPv4
}
啟動tftp
systemctl start tftp
查看服務ps -ef |grep xinetd
[root@localhost tftpboot]# ps -ef |grep xinetd
root      49896      1  0 Aug29 ?        00:00:00 /usr/sbin/xinetd -stayalive -pidfile /var/run/xinetd.pid
root      61791  49577  0 16:15 pts/0    00:00:00 grep --color=auto xinetd
ss -unlp
查看一下埠是否監聽埠是69
3.3提供bootloader及配置文件

  yum -y install syslinux
   需要使用CentOS提供的syslinux包,從中copy幾個文件

  cp -a /usr/share/syslinux/{menu.c32,vesamenu.c32,pxelinux.0} /var/lib/tftpboot
[root@localhost tftpboot]# ll
total 47964
-rw-r--r-- 1 root root       84 Sep 21  2017 boot.msg
-rw-r--r-- 1 root root    20704 Sep 20  2017 chain.c32
-rw-r--r-- 1 root root      501 Sep 20  2017 fstab
-rw-r--r-- 1 root root 43372552 Sep 20  2017 initrd.img
-rw-r--r-- 1 root root    33628 Sep 20  2017 mboot.c32
-rw-r--r-- 1 root root    26140 Sep 20  2017 memdisk
-rw-r--r-- 1 root root    55012 Sep 20  2017 menu.c32      #圖形化菜單
-rw-r--r-- 1 root root    26764 Sep 20  2017 pxelinux.0     #bootloader
drwxr-xr-x 2 root root       21 Aug 29 18:34 pxelinux.cfg    #開機菜單設定
-rw-r--r-- 1 root root      186 Sep 21  2017 splash.png
-rw-r--r-- 1 root root   152976 Sep 21  2017 vesamenu.c32    #也是圖形菜單
-rwxr-xr-x 1 root root  5392080 Sep 20  2017 vmlinuz
註意:pxelinux.cfg是個目錄,可以放置預設的開機選項,也可以針對不同的客戶端主機提供不同的開機選項。可以在pxelinux.cfg目錄內建立一個名為default的文件來提供預設選項。
3.4部署http服務
yum install -y httpd
mkdir /media/cdrom
mount -r /dev/cdrom /media/cdrom
mount --bind /media/cdrom/ /var/www/html/centos7
3.4掛載光碟,把內核文件cp到tftpmulu
cd /var/www/html/centos7
cp isolinux/isolinux.cfg /var/lib/tftpboot/pxelinux.cfg/default
cp images/pxeboot/{vmlinuz,initrd.img} /var/lib/tftpboot
cp isolinux/{vesamenu.c32,boot.msg,splash.png} /var/lib/tftpboot/
3.5設置菜單及提供系統安裝文件
[root@localhost pxelinux.cfg]# cat default
default menu.c32   #這個必須有也可以使用vesamenu.c32
prompt 1
timeout 10       #超時時間

menu title ########## PXE Boot Menu ##########

label 1
menu label ^1) Install CentOS 7 x64 with Local Repo    #菜單文字
menu default                         #表示開機游標一開始停留在label上
kernel vmlinuz                          #內核文件路徑,相對路徑是從/tftpboot開始的
append initrd=initrd.img inst.repo=http://192.168.216.147/centos7   #內核啟動選項,其中initrd的路徑,還有其他的stage2文件,
ks=http://192.168.216.147/ks.cfg              #指定kickstart路徑
這樣就完成了配置,接下來開啟個服務,並開機自啟
systemctl restart dhcpd.service
systemctl restart xinetd.service
systemctl restart tftp.socket
systemctl restart tftp.service
systemctl restart httpd.service
systemctl enable dhcpd.service
systemctl enable xinetd.service
systemctl enable tftp.service
systemctl enable httpd.service
4、kickstart實現無人值守批量安裝(不完全是無人)
cp -a ~/anaconda-ks.cfg /var/www/html/ks.cfg
chmod +r /var/www/html/ks.cfg #使全局可讀
cd /var/www/html/
[root@localhost html]# cat ks.cfg
#version=DEVEL
# System authorization information
auth --useshadow --enablemd5
# Install OS instead of upgrade
install
# Use network installation
url --url="http://192.168.216.147/centos7"
# Use graphical install
graphical
# Firewall configuration
firewall --enabled
firstboot --disable
ignoredisk --only-use=sda
# Keyboard layouts
# old format: keyboard us
# new format:
keyboard --vckeymap=us --xlayouts='us'
# System language
lang en_US.UTF-8

# Network information
network  --bootproto=dhcp --device=link
network  --hostname=localhost.localdomain
# Reboot after installation
reboot
# Root password
rootpw --iscrypted $1$uH$aaWTA7AmvIxGMidj0sp.u1
# System services
services --disabled="chronyd"
# System timezone
timezone Asia/Shanghai --isUtc --nontp
# X Window System configuration information
xconfig  --startxonboot
# System bootloader configuration
bootloader --append=" crashkernel=auto" --location=mbr --boot-drive=sda
# Clear the Master Boot Record
zerombr
# Partition clearing information
clearpart --none --initlabel
# Disk partitioning information
part /boot --fstype="xfs" --size=300
part swap --fstype="swap" --size=3841
part / --fstype="xfs" --size=57298

%post
/usr/sbin/adduser zhangxingeng
/usr/sbin/usermod -p '$1$uH$aaWTA7AmvIxGMidj0sp.u1' zhangxingeng
/usr/bin/chfn -f "centos-7-64" zhangxingeng
mv /etc/rc.d/rc.local /etc/rc.d/rc.local.00
echo '#!/bin/bash' > /etc/rc.d/rc.local
ln -s ../rc.local /etc/rc.d/rc5.d/S99rclocal
chmod 755 /etc/rc.d/rc.local
echo 'mkdir -p /var/log/vmware' >> /etc/rc.d/rc.local
echo 'exec 1> /var/log/vmware/rc.local.log' >> /etc/rc.d/rc.local
echo 'exec 2>&1' >> /etc/rc.d/rc.local
echo 'set -x' >> /etc/rc.d/rc.local
echo 'echo Installing Open VM Tools' >> /etc/rc.d/rc.local
echo 'set -x' >> /etc/rc.d/rc.local
echo '/bin/eject sr0 || /bin/true' >> /etc/rc.d/rc.local
echo '/bin/eject sr1 || /bin/true' >> /etc/rc.d/rc.local
echo '/bin/vmware-rpctool' \'guest.upgrader_send_cmd_line_args --default\' >> /etc/rc.d/rc.local
echo '/bin/vmware-rpctool' \'upgrader.setGuestFileRoot /tmp\' >> /etc/rc.d/rc.local
echo '/bin/vmware-rpctool' \'toolinstall.installerActive 1\' >> /etc/rc.d/rc.local
echo '/bin/vmware-rpctool' \'toolinstall.installerActive 100\' >> /etc/rc.d/rc.local
echo 'rm -f /etc/rc.d/rc.local' >> /etc/rc.d/rc.local
echo 'rm -f /etc/rc.d/rc5.d/S99rclocal' >> /etc/rc.d/rc.local
echo 'mv /etc/rc.d/rc.local.00 /etc/rc.d/rc.local' >> /etc/rc.d/rc.local
/bin/echo done
%end

%packages
@base
@core
@desktop-debugging
@dial-up
@directory-client
@fonts
@gnome-desktop
@guest-desktop-agents
@input-methods
@internet-browser
@java-platform
@multimedia
@network-file-system-client
@print-client
@x11
binutils
ftp
gcc
kernel-devel
kexec-tools
make
open-vm-tools
patch
python

%end

%addon com_redhat_kdump --enable --reserve-mb='auto'

%end
[root@localhost html]#
先到這裡,本著學習的態度,只是為了熟悉一下整個pxe流程,本文參考:http://www.cnblogs.com/f-ck-need-u/p/7342919.html


