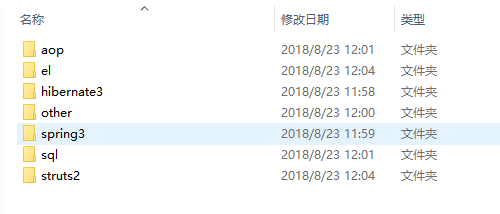
相關jar包分享:struts2+hibernate3+spring3 以及aop ,mysql,以及整合必須包。 鏈接:https://pan.baidu.com/s/1nCHmSsKU0hiV8DTj_V03sQ 密碼:29nf 在學習spring和hibernate的基礎後,試著將三大框架整合 ...
相關jar包分享:struts2+hibernate3+spring3 以及aop ,mysql,以及整合必須包。
鏈接:https://pan.baidu.com/s/1nCHmSsKU0hiV8DTj_V03sQ 密碼:29nf

在學習spring和hibernate的基礎後,試著將三大框架整合,下麵以登陸為例,作為學習筆記供初學者參考。
總結一下思路:
第一步:從客戶端獲取用戶輸入數據,即用戶名和密碼,然後交給action處理。
第二步:action需要使用service介面提供的功能,如登陸,註冊,修改信息等,並返回執行結果,然後給用戶響應。
第三步:service層負責業務邏輯,通過dao介面來增刪改查資料庫中多個表的數據,從而完成一個功能,實際應用中不可能像登陸這麼簡單。
第四步:hibernate完成了實體類持久化,所有dao層負責對model層實體類的管理,即實現了對錶數據的管理。
另外使用了事物管理器,使事物的管理更加規範,代碼也更加簡潔,這裡不做介紹,可以參考其他文章。
web.xml配置代碼:
註:其中這裡applicationContext.xml放在src目錄下,需用classpath指明。(系統預設的applicationContext.xml文件是在WEB-INF下)
 <!-- 配置Spring的核心監聽器 -->
         <listener>
            <listener-class>org.springframework.web.context.ContextLoaderListener</listener-class>
         </listener>
         <context-param>
            <param-name>contextConfigLocation</param-name>
            <param-value>classpath:applicationContext.xml</param-value>
         </context-param>

   <!-- 配置structs2 -->
   <filter>
    <filter-name>Struts2</filter-name>
        <filter-class>
            org.apache.struts2.dispatcher.ng.filter.StrutsPrepareAndExecuteFilter
        </filter-class>
    </filter>
     <filter-mapping>
        <filter-name>Struts2</filter-name>
        <url-pattern>*.do</url-pattern>
   </filter-mapping>
login.jsp代碼:
   <form  method="post"  onsubmit="return loginCheck()" id="loginForm">
        <div>
            <input type="text" id="name"/>
        </div>
        <div>
            <input type="password" id="pass"/>
        </div>
        <button id="submit"  type="submit">登 錄</button>
    </form>
在這裡並沒有用action="login.do"的方式提交表單,而是使用ajax非同步請求,讀者若不理解可以使用傳統的方式,下麵做簡單的介紹:
格式:$.ajax({type:'',data:'',async:''...})
參數:
cache: true緩存頁面 false不緩存頁面
type:get/post
data:發送到伺服器的數據,必須為Object/String類型,對象必須為key/value格式
dataType:想要伺服器返回數據的類型
success:(data,textStatus,jqXHR):請求成功後的回調函數。參數:由伺服器返回,並根據dataType參數進行處理後的數據;描述狀態的字元串。還有 jqXHR(在jQuery 1.4.x的中,XMLHttpRequest) 對象 。在jQuery 1.5, 成功設置可以接受一個函數數組。每個函數將被依次調用。
點擊登陸按鈕執行loginCheck()函數,代碼如下:
//登陸按鈕事件
function loginCheck(){
         $.ajax({
             url:"${pageContext.request.contextPath}/wp/login.do",
                data:{
                    username:function(){
                        return $("#name").val();//註:用id為name的值賦值給username(對應Action屬性里的username)
                    },
                    password:function(){
                        return $("#pass").val();
                    }
                },
             dataType:"json",
             cache:false,
             type:"POST",
             success:function(data){
                if(data =='ok'){
                   alert("登陸成功!");
                } else{
                   alert("登陸失敗!");
                }
             },
         });
         return false;
    }
loginAction代碼:
public class loginAction  extends ActionSupport{
    private String username;
    private String password;
    private UserService userService;//業務邏輯層的介面
    private User user;
    public String checkresult;//判斷結果,以json的方式傳給ajax

   public UserService getUserService() {
        return userService;
    }
    public void setUserService(UserService userService){
        this.userService = userService;
    }
    public User getUser() {
        return user;
    }
    public void setUser(User user) {
        this.user = user;
    }
    public String login(){
        this.user=userService.getUserByLoginname(username);
        if(user!=null&&user.getPassword().equals(password)){
             //System.out.println("success");
             ActionContext actionContext=ActionContext.getContext();
             actionContext.getSession().put("user", user);
             this.checkresult = "ok";
        }else{
             this.checkresult ="err";
        }
         return  SUCCESS;
    }

    public String getUsername() {
        return username;
    }
    public void setUsername(String username) {
        this.username = username;
    }
    public String getPassword() {
        return password;
    }
    public void setPassword(String password) {
        this.password = password;
    }
    public String getcheckresult() {
            return this.checkresult;
    }
}
struts.xml代碼:
<package name="user" namespace="/" extends="json-default">
        <action name="login" class="loginAction" method="login">
            <result type="json">
                <param name="root">checkresult</param>
            </result>
        </action>
</package>
以上已經完成表現層的設計,下麵我們要具體的設計業務邏輯層和數據訪問層,在這之前我們要先說明下各個文件的放置位置。
首先我們在包目錄:com.標識公司名.項目名.模塊名
下再分別建sevice,dao,action,model四個包,service和dao中新建Impl放介面的實現,一個模塊的包結構如下圖。

applicationContent.xml代碼:
<?xml version="1.0" encoding="UTF-8"?>
<beans xmlns="http://www.springframework.org/schema/beans"
    xmlns:xsi="http://www.w3.org/2001/XMLSchema-instance" xmlns:p="http://www.springframework.org/schema/p"
    xmlns:util="http://www.springframework.org/schema/util" xmlns:context="http://www.springframework.org/schema/context"
    xmlns:aop="http://www.springframework.org/schema/aop"
    xmlns:tx="http://www.springframework.org/schema/tx"
    xsi:schemaLocation="http://www.springframework.org/schema/beans http://www.springframework.org/schema/beans/spring-beans.xsd
       http://www.springframework.org/schema/util http://www.springframework.org/schema/util/spring-util.xsd
       http://www.springframework.org/schema/aop http://www.springframework.org/schema/aop/spring-aop.xsd
       http://www.springframework.org/schema/context http://www.springframework.org/schema/context/spring-context.xsd
       http://www.springframework.org/schema/tx  http://www.springframework.org/schema/tx/spring-tx.xsd"
        default-lazy-init ="true">
    <bean id="sessionFactory"
        class="org.springframework.orm.hibernate3.annotation.AnnotationSessionFactoryBean">
        <property name="configLocation" value="classpath:hibernate.cfg.xml" />
    </bean>
    <!-- 配置事務管理器 -->
    <bean id="transactionManager"
        class="org.springframework.orm.hibernate3.HibernateTransactionManager">
         <property name="sessionFactory" ref="sessionFactory" />
    </bean>
     <!-- 啟用事務註解掃描 -->
    <tx:annotation-driven transaction-manager="transactionManager"/>
<!-- User -->
<bean id="user" class="com.user.model.User" lazy-init="false"></bean>
<!--UserDaoImpl-->
<bean id="userDAO" class="com.user.dao.impl.UserDaoImpl">
<property name="sessionFactory">
<ref bean="sessionFactory" />
</property>
</bean>
<!--UserServiceImpl-->
<bean id="userService" class="com.user.service.impl.UserServiceImpl">
<property name="userDAO" ref="userDAO"/>
</bean>
<!--loginAction-->
<bean id="loginAction" class="com.user.action.loginAction" scope="prototype">
<property name="userService" ref="userService"/>
<property name="user" ref="user"/>
</bean>
</beans>
hibernate.cfg.xml :配置資料庫的連接池,以及.hbm.xml文件的映射。
<?xml version="1.0" encoding="UTF-8"?>
<!DOCTYPE hibernate-configuration PUBLIC "-//Hibernate/Hibernate Configuration DTD//EN"
                                         "http://hibernate.sourceforge.net/hibernate-configuration-3.0.dtd">
<hibernate-configuration>
 <session-factory>
  <property name="hibernate.bytecode.use_reflection_optimizer">false</property>
  <property name="hibernate.connection.driver_class">com.mysql.jdbc.Driver</property>
  <property name="hibernate.connection.password">123456</property>
  <property name="hibernate.connection.url">jdbc:mysql://localhost:3306/wp</property>
  <property name="hibernate.connection.username">root</property>
  <property name="hibernate.dialect">org.hibernate.dialect.MySQLDialect</property>
  <property name="hibernate.show_sql">true</property>
  <mapping resource="com/user/model/User.hbm.xml"/>
 </session-factory>
</hibernate-configuration>
User-hbm.xml 和User類放在model包下 :xml文件配置與User類的映射,註意與User類的對應,熟悉後可使用工具直接從資料庫生成。
資料庫user表有三個屬性:id,loginname,password
<?xml version="1.0"?>
<!DOCTYPE hibernate-mapping PUBLIC "-//Hibernate/Hibernate Mapping DTD 3.0//EN"
"http://hibernate.sourceforge.net/hibernate-mapping-3.0.dtd">
<hibernate-mapping>
    <class name="com.user.model.User" table="user" catalog="wp">
        <id name="id" type="long">
            <column name="id" />
            <generator class="identity" />
        </id>
        <property name="loginName" type="string">
            <column name="loginName" length="50" not-null="true" />
        </property>
        <property name="password" type="string">
            <column name="password" length="50" not-null="true" />
        </property>
    </class>
</hibernate-mapping>
User類:
public class User  {
    private long id;
    private String loginName;
    private String password;
    public User() {
    }
    public User(long id, String loginName, String password) {
        this.id = id;
        this.loginName = loginName;
        this.password = password;
    }

    public long getId() {
        return this.id;
    }

    public void setId(long id) {
        this.id = id;
    }

    public String getLoginName() {
        return this.loginName;
    }

    public void setLoginName(String loginName) {
        this.loginName = loginName;
    }

    public String getPassword() {
        return this.password;
    }

    public void setPassword(String password) {
        this.password = password;
    }


}
UserService介面放在sevice包中,如下所示。
public interface  UserService {
        public User getUserByLoginname(String username);// 判斷用戶名是否存在
        public boolean save(User user);//註冊
        public boolean modifyUser(User newuser);//修改用戶信息
        public boolean updatePass(Long id,String newPassword);//修改密碼
}
UserServiceImpl實現了 UserService介面,放在sevice.impl包中。
public class UserServiceImpl implements UserService{
        private UserDao userDao;

        public UserDao getUserDAO(){
            return userDAO;
        }
        public void setUserDAO(UserDao userDAO) {
            this.userDAO = userDAO;
        }
        public User getUserByLoginname(String username){
            User user= userDAO.findByLoginname(username);
            if(user!=null){
                return user;
            }
            else
                return null;
        }
        public boolean save(User user){
              return  userDAO.save(user);
        }
        @Override
        public boolean modifyUser(User newuser) {
            // TODO Auto-generated method stub
            return false;
        }
        @Override
        public boolean updatePass(Long id, String newPassword) {
            // TODO Auto-generated method stub
            return false;
        }


}
UserDao介面放在dao包中, UserDaoImpl實現介面,放在dao.impl中。
public interface UserDao {
     public boolean save(User user) ;
     public User getById(Long id);
     public User findByLoginname(String username);
     public boolean updateUser(User user);
     public boolean updateUser(User user,String newpassword);
}
@Transactional//事物註解
public class UserDaoImpl implements UserDao {
private SessionFactory sessionFactory;
    public SessionFactory getSessionFactory() {
        return sessionFactory;
    }
    public void setSessionFactory(SessionFactory sessionFactory) {
        this.sessionFactory = sessionFactory;
    }
    @Override
    public boolean save(User user) {
      Session session= sessionFactory.getCurrentSession();
      try{
         session.save(user);
      }catch(HibernateException e){
         return false;
      }
      return true;
    }
    @Override
    public User getById(Long id) {
        Session session = sessionFactory.getCurrentSession();
        User user=null;
        user=(User)session.get(User.class,id);
        return user;
    }
    @Override
    public User findByLoginname(String username) {
        List<User> users=findByProperty("loginName",username);
        if(users!=null&&users.size()==1)
               return users.get(0);
        return null;
    }
    public List<User> findByProperty(String PropertyName,Object value){
            Session session =sessionFactory.getCurrentSession();
            List<User> users=null;
            Criteria cr = session.createCriteria(User.class);
            cr.add(Restrictions.eq(PropertyName,value));
            users=cr.list();
        return users;
    }
    @Override
    public boolean updateUser(User user) {
        // TODO Auto-generated method stub
        return false;
    }
    @Override
    public boolean updateUser(User user, String newpassword) {
        // TODO Auto-generated method stub
        return false;
    }

}


