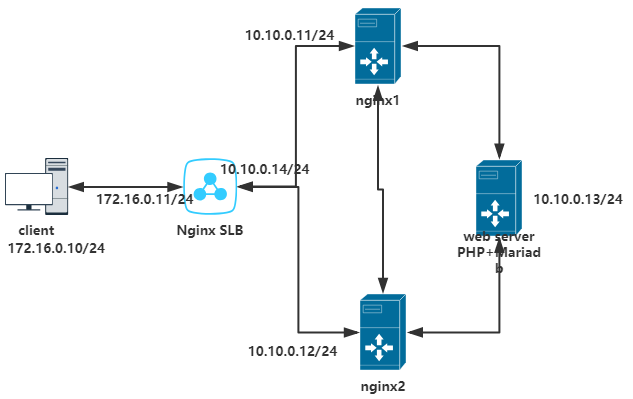
實例整體框架: 使用VMware搭建 5台Centos7虛擬機(包括客戶端),系統版本:CentOS Linux release 7.2.1511。實例所安裝的nginx版本:1.12.2,mariadb-server版本:5.5.56,php-fpm版本:5.4.16,PHPMyAdmin版本:4 ...
實例整體框架:

使用VMware搭建 5台Centos7虛擬機(包括客戶端),系統版本:CentOS Linux release 7.2.1511。實例所安裝的nginx版本:1.12.2,mariadb-server版本:5.5.56,php-fpm版本:5.4.16,PHPMyAdmin版本:4.0.10.20。此實例所有虛擬機均已關閉防火牆並設置selinux為Permissive(systemctl stop firewalld.service,setenforce 0)。
搭建web server:
1、安裝php-fpm和mariadb-server並創建web資源存放目錄:
[root@webserver Desktop]# yum install -y php php-fpm php-mbstring mariadb-server php-mysql
[root@webserver Desktop]# mkdir /data/html
2、配置php-fpm:
#配置php-fpm
[root@webserver Desktop]# vim /etc/php-fpm.d/www.conf
    listen = 0.0.0.0:9000
    listen.allowed_clients = 10.10.0.11,10.10.0.12
    pm.status_path = /status
    ping.path = /ping
    ping.response = pong
    php_value[session.save_handler] = files
    php_value[session.save_path] = /var/lib/php/session
#設置會話session文件屬主屬組
[root@webserver Desktop]# chown apache:apache /var/lib/php/session
[root@webserver Desktop]# ll -d /var/lib/php/session
    drwxrwx---. 2 apache apache 4096 Aug 20 15:50 /var/lib/php/session/
[root@webserver Desktop]# systemctl start php-fpm.service
[root@webserver Desktop]# ss -tan
State      Recv-Q Send-Q Local Address:Port               Peer Address:Port
LISTEN     0      128          *:9000                     *:*
LISTEN     0      5      192.168.122.1:53                       *:*
LISTEN     0      128          *:22                       *:*
LISTEN     0      128    127.0.0.1:631                      *:*
LISTEN     0      100    127.0.0.1:25                       *:*
LISTEN     0      128         :::22                      :::*
LISTEN     0      128        ::1:631                     :::*
LISTEN     0      100        ::1:25                      :::*
3、創建index.php頁面並並下載PHPMyAdmin和WordPress:
[root@webserver Desktop]# cd /data/html
[root@webserver html]# vim index.php
    <h1> 10.10.0.13 server</h1>
    <?php
        phpinfo();
    ?>
[root@webserver html]# wget https://cn.wordpress.org/wordpress-4.9.4-zh_CN.tar.gz
[root@webserver html]# wget https://files.phpmyadmin.net/phpMyAdmin/4.0.10.20/phpMyAdmin-4.0.10.20-all-languages.tar.gz
[root@webserver html]# tar xf wordpress-4.9.4-zh_CN.tar.gz
[root@webserver html]# tar xf phpMyAdmin-4.0.10.20-all-languages.tar.gz
[root@webserver html]# ln -sv phpMyAdmin-4.0.10.20-all-languages phpmyadmin
#配置wordpress所用資料庫
[root@webserver html]# cp /data/html/wordpress/wp-config-sample.php /data/html/wordpress/wp-config.php
[root@webserver html]# vim /data/html/wordpress/wp-config.php
    define('DB_NAME', 'wordpress');
    define('DB_USER', 'wpuser');
    define('DB_PASSWORD', '12345678');
    define('DB_HOST', 'localhost');
    define('DB_CHARSET', 'utf8');
4、配置mariadb:
[root@webserver html]# vim /etc/my.cnf
    [mysqld]
    skip_name_resolve=ON
    innodb_file_per_table=ON
root@webserver html]# systemctl start mariadb.service
#設置mariadb的安全許可權
root@webserver html]# mysql_secure_installation
...
#創建wordpress資料庫並授權wpuser操作許可權,跟wordpress配置文件保持一致
root@webserver html]# mysql -uroot -p
Enter password:
MariaDB [(none)]> create database wordpress;
MariaDB [(none)]> grant all on wordpress to 'wpuser'@'%' identified by '12345678';
MariaDB [(none)]> flush privileges;
MariaDB [(none)]> exit;
搭建nginx1:
1、安裝Nginx並創建web資源存放目錄
[root@nginx1 Desktop]# yum install -y nginx
[root@nginx1 Desktop]# mkdir -pv /data/html
2、創建index.html預設頁面並下載PHPMyAdmin和WordPress
[root@nginx1 Desktop]# cd /data/html
[root@nginx1 html]# vim index.html
    <h1>this is 10.10.0.11 nginx</h1>
[root@nginx1 html]# wget https://cn.wordpress.org/wordpress-4.9.4-zh_CN.tar.gz
[root@nginx1 html]# wget https://files.phpmyadmin.net/phpMyAdmin/4.0.10.20/phpMyAdmin-4.0.10.20-all-languages.tar.gz
[root@nginx1 html]# tar xf wordpress-4.9.4-zh_CN.tar.gz
[root@nginx1 html]# tar xf phpMyAdmin-4.0.10.20-all-languages.tar.gz
[root@nginx1 html]# ln -sv phpMyAdmin-4.0.10.20-all-languages phpmyadmin
#配置wordpress所用資料庫
[root@nginx1 html]# cp /data/html/wordpress/wp-config-sample.php /data/html/wordpress/wp-config.php
[root@nginx1 html]# vim /data/html/wordpress/wp-config.php
    define('DB_NAME', 'wordpress');
    define('DB_USER', 'wpuser');
    define('DB_PASSWORD', '12345678');
    define('DB_HOST', 'localhost');
    define('DB_CHARSET', 'utf8');
3、配置虛擬主機並啟動nginx:
[root@nginx1 html]# vim /etc/nginx/nginx.conf
#註釋nginx預設的主機配置
    ...
    server {
#        listen       80 default_server;
#        listen       [::]:80 default_server;
    ...
[root@nginx1 html]# vim /etc/nginx/conf.d/vhost.conf   #配置虛擬主機,頁面動靜分離
  server {
    listen 80;
    server_name www.test.org;
    index index.html;
    location / {
         root /data/html;
    }
    location ~* \.php$ {
      fastcgi_pass 10.10.0.13:9000;
      fastcgi_index index.php;
      include fastcgi_params;
      fastcgi_param SCRIPT_FILENAME /data/html/$fastcgi_script_name;
    }
    location ~* ^/(status|ping)$ {
      fastcgi_pass 10.10.0.13:9000;
      include fastcgi_params;
      fastcgi_param SCRIPT_FILENAME $fastcgi_script_name;
    }
    }
[root@nginx1 html]# systemctl start nginx.service
nginx2配置過程同nginx1.
搭建Nginx SLB:
安裝nginx併進行負載均衡配置:
[root@SLB Desktop]# yum -y install nginx
[root@SLB Desktop]# vim /etc/nginx/nginx
#在http欄位進行以下配置
    http {
        ...
        #定義集群
        upstream webservers {
            server 10.10.0.11:80 max_fails=3;
            server 10.10.0.12:80 max_fails=3;
            server 127.0.0.1:80 backup;
        }
        server {
        ...
        location / {
                proxy_pass http://webservers;   #反代給集群伺服器
                proxy_set_header host $http_host;   #設置代理請求報文的host欄位為$http_host
                proxy_set_header X-Forward-For $remote_addr;       #為代理請求報文添加X-Forward-For欄位以傳遞真實ip地址$remote_addr
            }
            ...
        }
[root@SLB Desktop]# systemctl start nginx.service
客戶端進行訪問:
1、修改hosts:
[root@client Desktop]# vim /etc/hosts
    ...
    172.16.0.11 www.test.org
2、訪問:


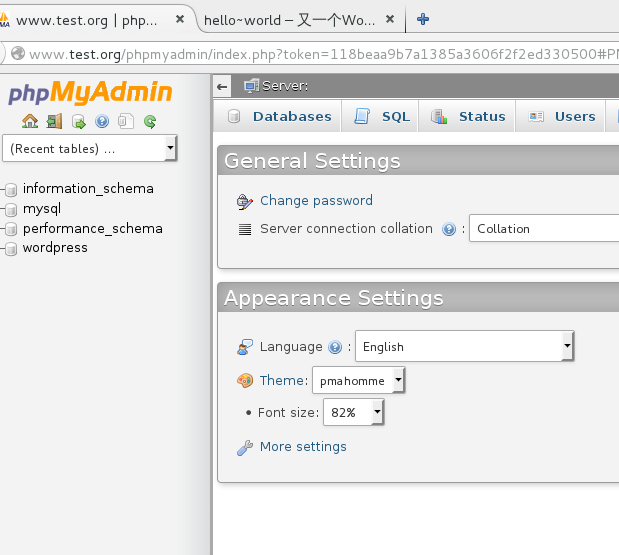
3、沒配置緩存時進行壓力測試:
[root@client Desktop]# ab -c 100 -n 100000 http://www.test.org/wordpress
This is ApacheBench, Version 2.3 <$Revision: 1430300 $>
Copyright 1996 Adam Twiss, Zeus Technology Ltd, http://www.zeustech.net/
Licensed to The Apache Software Foundation, http://www.apache.org/

Benchmarking www.test.org (be patient)
Completed 10000 requests
Completed 20000 requests
Completed 30000 requests
Completed 40000 requests
Completed 50000 requests
Completed 60000 requests
Completed 70000 requests
Completed 80000 requests
Completed 90000 requests
Completed 100000 requests
Finished 100000 requests


Server Software:        nginx/1.12.2
Server Hostname:        www.test.org
Server Port:            80

Document Path:          /wordpress
Document Length:        185 bytes

Concurrency Level:      100
Time taken for tests:   58.734 seconds
Complete requests:      100000
Failed requests:        0
Write errors:           0
Non-2xx responses:      100000
Total transferred:      41700001 bytes
HTML transferred:       18500000 bytes
Requests per second:    1702.59 [#/sec] (mean)
Time per request:       58.734 [ms] (mean)
Time per request:       0.587 [ms] (mean, across all concurrent requests)
Transfer rate:          693.34 [Kbytes/sec] received

Connection Times (ms)
              min  mean[+/-sd] median   max
Connect:        0    2   8.4      0     295
Processing:     2   57 124.9     31    2962
Waiting:        2   56 124.8     31    2962
Total:          7   58 125.3     33    2962

Percentage of the requests served within a certain time (ms)
  50%     33
  66%     51
  75%     66
  80%     77
  90%    111
  95%    157
  98%    273
  99%    375
 100%   2962 (longest request)
4、在SLB伺服器進行緩存配置:
#創建緩存存放目錄
[root@SLB Desktop]# mkdir -p /data/nginx/cache
[root@SLB Desktop]# vim /etc/nginx/nginx.conf
#在http欄位進行配置
    http {
        ...
        proxy_cache_path /data/nginx/cache levels=1:1 keys_zone=nginxcache:50m max_size=1g;
        ...

        server {
            ...
            proxy_cache nginxcache;
            proxy_cache_key $request_uri;
            proxy_cache_valid 200 301 302 1h;
            proxy_cache_methods GET HEAD;
            proxy_cache_valid any 1m;
            add_header X-cache '$upstream_cache_status from $host';
            proxy_cache_use_stale http_502;
            ...
        }
[root@SLB Desktop]# systemctl restart nginx.service
5、再次進行壓力測試:
[root@client Desktop]# ab -c 100 -n 100000 http://www.test.org/wordpress
This is ApacheBench, Version 2.3 <$Revision: 1430300 $>
Copyright 1996 Adam Twiss, Zeus Technology Ltd, http://www.zeustech.net/
Licensed to The Apache Software Foundation, http://www.apache.org/

Benchmarking www.test.org (be patient)
Completed 10000 requests
Completed 20000 requests
Completed 30000 requests
Completed 40000 requests
Completed 50000 requests
Completed 60000 requests
Completed 70000 requests
Completed 80000 requests
Completed 90000 requests
Completed 100000 requests
Finished 100000 requests


Server Software:        nginx/1.12.2
Server Hostname:        www.test.org
Server Port:            80

Document Path:          /wordpress
Document Length:        185 bytes

Concurrency Level:      100
Time taken for tests:   14.391 seconds
Complete requests:      100000
Failed requests:        0
Write errors:           0
Non-2xx responses:      100000
Total transferred:      41700000 bytes
HTML transferred:       18500000 bytes
Requests per second:    6948.98 [#/sec] (mean)
Time per request:       14.391 [ms] (mean)
Time per request:       0.144 [ms] (mean, across all concurrent requests)
Transfer rate:          2829.81 [Kbytes/sec] received

Connection Times (ms)
              min  mean[+/-sd] median   max
Connect:        0    1   1.9      0      48
Processing:     2   14   3.9     13      58
Waiting:        1   13   3.8     13      58
Total:          8   14   3.9     13      67

Percentage of the requests served within a certain time (ms)
  50%     13
  66%     14
  75%     14
  80%     14
  90%     16
  95%     24
  98%     27
  99%     29
 100%     67 (longest request)


