
Ps:mongod是mongodb實例,mongos被預設為為mongodb sharding的路由實例。 本文使用的mongodb版本為3.2.9,因此參考網址為:https://docs.mongodb.com/v3.2/sharding/ 此外最後幾個部分還引用了https://yq.aliy ...
Ps:mongod是mongodb實例,mongos被預設為為mongodb sharding的路由實例。 本文使用的mongodb版本為3.2.9,因此參考網址為:https://docs.mongodb.com/v3.2/sharding/ 此外最後幾個部分還引用了https://yq.aliyun.com/articles/60096中的一些問題描述及解決方案。 一、Sharding集群簡介
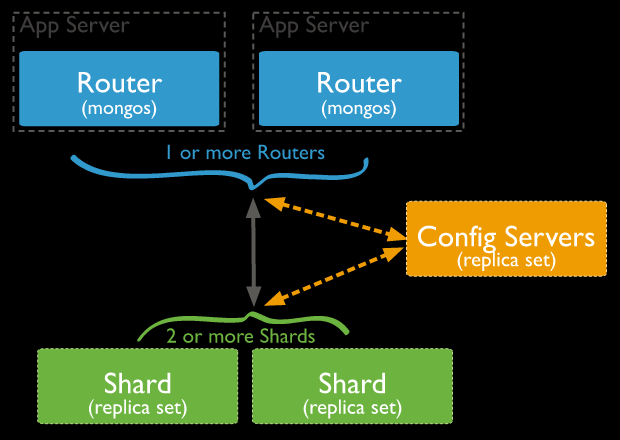 1.數據分片(Shards)
用來保存數據,保證數據的高可用性和一致性。可以是一個單獨的mongod實例,也可以是一個副本集。在生產環境下Shard一般是一個Replica Set,以防止該數據片的單點故障。可以將所有shard的副本集放在一個伺服器多個mongodb實例中。
2.查詢路由(Query Routers)
路由就是mongos的實例,客戶端直接連接mongos,由mongos把讀寫請求路由到指定的Shard上去。
一個Sharding集群,可以有一個mongos,也可以如上圖所示為每個App Server配置一個mongos以減輕路由壓力。
註意這裡的mongos並不要配置為rs,因為只是個路由,並不存儲數據,配置多個mongos的意思是配置多個單獨的mongos實例。
3.配置伺服器(Config servers)
保存集群的元數據(metadata),包含各個Shard的路由規則。3.2版本以後config server可以配置為replica set(CSRS),3.4以後config server必須配置為rs。
config server的rs不能有arbiter(3.2.9版本是這樣,其他版本未測試),生產上建議config server的rs至少要有3個副本集成員。
MongoDB是在collection級別實現的水平分片。
二、分片鍵:Shard keys
1.數據分片(Shards)
用來保存數據,保證數據的高可用性和一致性。可以是一個單獨的mongod實例,也可以是一個副本集。在生產環境下Shard一般是一個Replica Set,以防止該數據片的單點故障。可以將所有shard的副本集放在一個伺服器多個mongodb實例中。
2.查詢路由(Query Routers)
路由就是mongos的實例,客戶端直接連接mongos,由mongos把讀寫請求路由到指定的Shard上去。
一個Sharding集群,可以有一個mongos,也可以如上圖所示為每個App Server配置一個mongos以減輕路由壓力。
註意這裡的mongos並不要配置為rs,因為只是個路由,並不存儲數據,配置多個mongos的意思是配置多個單獨的mongos實例。
3.配置伺服器(Config servers)
保存集群的元數據(metadata),包含各個Shard的路由規則。3.2版本以後config server可以配置為replica set(CSRS),3.4以後config server必須配置為rs。
config server的rs不能有arbiter(3.2.9版本是這樣,其他版本未測試),生產上建議config server的rs至少要有3個副本集成員。
MongoDB是在collection級別實現的水平分片。
二、分片鍵:Shard keys
- shard key在sharding搭建完畢後是不能修改的,一個collection上只能有一個shard key。
- shard key上必須有索引(可以是以shard key開頭的聯合索引),如果沒有mongodb會為shard key創建索引。如果是已經存在的collection那麼必須手動為shard key創建索引。
- 在sharding的collection中只有_id和shard key首碼的索引可以是unique index,其他索引只能是普通索引。如果一個普通key上有unique index那麼你不能以其他key為shard key對collection進行sharding。
- shard key的選擇將會影響整個集群的效率,可擴展性和性能。而且也會影響你所能選擇的分片策略。
- sh.addShardTag() 給shard設置標簽A
- sh.addTagRange() 給集合的某個chunk範圍設置標簽A,最終MongoDB會保證設置標簽 A 的chunk範圍(或該範圍的超集)分佈設置了標簽 A 的 shard 上。
MongoDB版本:3.2.9
節點:192.168.20.70/71/72
架構說明:
70:包含mongos、config server(master)、3個shards(master)
71:包含config server(slave)、3個shards(slave)
72:包含3個shards(arbiter)
--網上很多資料說config server必須是奇數個,但至少在本次搭建的3.2.9版本中2個也是可以的。
1.配置config server
--master的mongo.conf(192.168.20.70)
directoryperdb=true
replSet=config
configsvr=true
logpath=/home/mongod/config_master/mongod.log
logappend=true
fork=true
port=27018
dbpath=/home/mongod/config_master
pidfilepath=/home/mongod/config_master/mongod.pid
--slave的mongo.conf(192.168.20.71)
directoryperdb=true
replSet=config
configsvr=true
logpath=/home/mongod/config_slave/mongod.log
logappend=true
fork=true
port=27018
dbpath=/home/mongod/config_slave
pidfilepath=/home/mongod/config_slave/mongod.pid
然後啟動並配置config server的rs(replica set):
mongod -f /home/mongod/config_master/mongo.conf
mongod -f /home/mongod/config_slave/mongo.conf
use admin
cfg={_id:"config",members:[{_id:0,host:'192.168.20.70:27018',priority:2}, {_id:1,host:'192.168.20.71:27018',priority:1}]};
rs.initiate(cfg)
2.配置shards
本例中配置了3個shards,分別使用70伺服器的27017,27020,27021埠,他們的slave和arbiter分別使用71和72伺服器上的相同埠。
--shard1的master、slave、arbiter的配置文件(分別在70、71、72上)
--master:
directoryperdb=true
replSet=shard1
shardsvr = true
logpath=/home/mongod/shard1_master/mongod.log
logappend=true
fork=true
port=27017
dbpath=/home/mongod/shard1_master
pidfilepath=/home/mongod/shard1_master/mongod.pid
--slave:
directoryperdb=true
replSet=shard1
shardsvr = true
logpath=/home/mongod/shard1_slave/mongod.log
logappend=true
fork=true
port=27017
dbpath=/home/mongod/shard1_slave
pidfilepath=/home/mongod/shard1_slave/mongod.pid
--arbiter:
directoryperdb=true
replSet=shard1
shardsvr = true
logpath=/home/mongod/shard1_arbiter/mongod.log
logappend=true
fork=true
port=27017
dbpath=/home/mongod/shard1_arbiter
pidfilepath=/home/mongod/shard1_arbiter/mongod.pid
shard2和shard3的配置文件與shard1基本一致,只需要把相應的replSet設為shard2\shard3,相應的目錄修改為shard2\shard3,相應的埠修改為27020/27021即可。 建好相應的dbpath目錄後,啟動併為每個shard配置replica set,步驟如下:
use admin
cfg={_id:"shard1",members:[{_id:0,host:'192.168.20.70:27017',priority:2}, {_id:1,host:'192.168.20.71:27017',priority:1},{_id:2,host:'192.168.20.72:27017',arbiterOnly:true}]};
rs.initiate(cfg)
shard2和shard3的配置步驟一樣,只需要把shard1修改為shard2/shard3,把埠修改為27020/27021即可。
3.完成config server和shards的rs配置後,就可以配置路由伺服器了,路由伺服器的官方名稱是mongos,我們這裡也也以mongos稱呼。
本例中只配置一個mongos,方法如下:
--註意:dbpath、directoryperdb等參數是不能出現在mongos的配置文件中的,簡單起見只配置如下參數即可:
configdb = config/192.168.20.70:27018,192.168.20.71:27018 --這裡的config是config server副本集的名稱,後接config server的2個副本集節點。
logpath=/home/mongod/mongos/mongod.log
logappend=true
fork=true
port=27019
pidfilepath=/home/mongod/mongos/mongod.pid
然後啟動mongos,註意mongos的啟動是與其他類型的mongo實例不一樣的:(用的mongos而不是mongod命令)
mongos -f /home/mongod/mongos/mongo.conf
4.至此完成了所有伺服器的配置,接下來開始配置具體collection的分片策略。
登錄mongos伺服器:
mongo --port=27019
use admin
sh.addShard("shard1/192.168.20.70:27017,192.168.20.71:27017,192.168.20.72:27017");
sh.addShard("shard2/192.168.20.70:27020,192.168.20.71:27020,192.168.20.72:27020");
sh.addShard("shard3/192.168.20.70:27021,192.168.20.71:27021,192.168.20.72:27021");
然後在mongos上為具體的資料庫配置sharding:
sh.enableSharding("test") --允許test資料庫進行sharding
sh.shardCollection("test.t",{id:"hashed"}) --對test.t集合以id列為shard key進行hashed sharding
通過db.t.getIndexes()可以看到自動為id列創建了索引。
5.hashed分片驗證
在第4步中針對test的t集合進行了分片配置,因此這裡向t插入1000條數據做測試:
mongo --port=27019 --27019是mongos的埠號
use test
for(i=1,i<=1000,i++){db.t.insert({id:i,name:"Leo"})}
在3個shard的primary上使用db.t.find().count()會發現1000條數據近似均勻的分佈到了3個shard上。
使用db.t.stats()查看分片結果,使用sh.status()查看本庫內所有集合的分片信息。
6.其他分片方式
sh.shardCollection("test.t",{id:1}) --對test.t集合以id列為shard key進行ranged sharding
ranged分片直接使用{id:1}方式指定即可,分片的chunk由mongos自主決定,例如在ranged分片集合中插入1000條數據,其結果如下:
for(i=1;i<=1000;i++){db.t.insert({id:i,name:"Leo"})}
--sh.status()的相關結果:
test.t
shard key: { "id" : 1 }
unique: false
balancing: true
chunks:
shard1 1
shard2 1
shard3 1
{ "id" : { "$minKey" : 1 } } -->> { "id" : 2 } on : shard1 Timestamp(2, 0)
{ "id" : 2 } -->> { "id" : 22 } on : shard3 Timestamp(3, 0)
{ "id" : 22 } -->> { "id" : { "$maxKey" : 1 } } on : shard2 Timestamp(3, 1)
從sh.status的結果可以看到id為[1,2)的被分配至shard1,[2,22)被分配至shard2,其他的全部被分配至shard3,分佈極其不均勻。
由於預設的ranged sharding策略會導致自增shard key分佈及其不均勻,我們需要在定時的使用sh.splitAt()方法來為分片指定分片chunk大小:
sh.splitAt("test.t",{id:500})
sh.splitAt("test.t",{id:1000})
sh.splitAt("test.t",{id:1500})
sh.splitAt("test.t",{id:2000})
for(i=1;i<=3000;i++){db.t.insert({id:i,name:"Leo"})}
--sh.status()顯示的分片結果如下:
test.t
shard key: { "id" : 1 }
unique: false
balancing: true
chunks:
shard1 2 --shard2上有2個chunks,分別是[1500,2000]和[2000,$maxKey)
shard2 2
shard3 1
{ "id" : { "$minKey" : 1 } } -->> { "id" : 500 } on : shard1 Timestamp(2, 0)
{ "id" : 500 } -->> { "id" : 1000 } on : shard3 Timestamp(3, 0)
{ "id" : 1000 } -->> { "id" : 1500 } on : shard1 Timestamp(4, 0)
{ "id" : 1500 } -->> { "id" : 2000 } on : shard2 Timestamp(4, 1)
{ "id" : 2000 } -->> { "id" : { "$maxKey" : 1 } } on : shard2 Timestamp(3, 3)
tag aware分片策略還未測試,有待以後補充。7.shards的擴容 當需要水平擴容時我們就需要進行shards添加了,添加步驟如下:(本例在70上直接添加單實例的27022埠的shard實例)
directoryperdb=true
shardsvr = true
logpath=/home/mongod/shard4/mongod.log
logappend=true
fork=true
port=27022
dbpath=/home/mongod/shard4
pidfilepath=/home/mongod/shard4/mongod.pid
啟動此實例後,在mongos上執行:
sh.addShard("192.168.20.70:27022")
一段時間後sh.status()看到的結果如下:
test.t
shard key: { "id" : 1 }
unique: false
balancing: true
chunks:
shard1 1
shard0004 1 --mongos自動將新的單實例mongoDB的chunk命名為shard0004
shard2 2
shard3 1
{ "id" : { "$minKey" : 1 } } -->> { "id" : 500 } on : shard0004 Timestamp(5, 0)
{ "id" : 500 } -->> { "id" : 1000 } on : shard3 Timestamp(3, 0)
{ "id" : 1000 } -->> { "id" : 1500 } on : shard1 Timestamp(5, 1)
{ "id" : 1500 } -->> { "id" : 2000 } on : shard2 Timestamp(4, 1)
{ "id" : 2000 } -->> { "id" : { "$maxKey" : 1 } } on : shard2 Timestamp(3, 3)
--可以看到balancer自動將chunk進行了遷移,遷移機製為mongodb內部決定,原理參見第八部分。
八、Sharding的負載均衡(即Balancer)
MongoDB Sharding的自動負載均衡目前是由mongos的後臺線程來做的,並且每個集合同一時刻只能有一個遷移任務,負載均衡主要根據集合在各個 shard上chunk的數量來決定的,相差超過一定閾值(跟chunk總數量相關)就會觸發chunk遷移。
Balancer預設是開啟的,為了避免chunk遷移影響到線上業務,可以通過設置遷移執行視窗,比如只允許凌晨2:00-6:00期間進行遷移。
mongo --port=27019 --連接到mongos
use config
db.settings.update(
{ _id: "balancer" },
{ $set: { activeWindow : { start : "02:00", stop : "06:00" } } },
{ upsert: true }
)
Balancer會在伺服器local time的凌晨2-6點才執行chunk的balance。
另外,在進行sharding備份時(通過mongos或者單獨備份config server和所有shard),需要停止負載均衡以免備份出來的數據出現狀態不一致問題。
sh.setBalancerState("false")
或者:
sh.stopBalancer()
九、其他問題
moveChunk歸檔設置
使用3.0及以前版本的Sharded cluster可能會遇到一個問題,停止寫入數據後,數據目錄里的磁碟空間占用還會一直增加。
上述行為是由sharding.archiveMovedChunks配置項決定的,該配置項在3.0及以前的版本預設為true,即在move chunk時,源shard會將遷移的chunk數據歸檔一份在數據目錄里,當出現問題時,可用於恢復。也就是說,chunk發生遷移時,源節點上的空間並沒有釋放出來,而目標節點又占用了新的空間。
在3.2版本,該配置項預設值也被設置為false,預設不會對moveChunk的數據在源shard上歸檔。
recoverShardingState設置
使用MongoDB Sharded cluster時,還可能遇到一個問題,就是啟動 shard後,shard 不能正常服務,Primary上調用ismaster時,結果卻為 true,也無法正常執行其他命令,其狀態類似如下:
PRIMARY> db.isMaster()
{
"hosts" : [
"host1:9003",
"host2:9003",
"host3:9003"
],
"setName" : "mongo-9003",
"setVersion" : 9,
"ismaster" : false, // primary 的 ismaster 為 false???
"secondary" : true,
"primary" : "host1:9003",
"me" : "host1:9003",
"electionId" : ObjectId("57c7e62d218e9216c70aa3cf"),
"maxBsonObjectSize" : 16777216,
"maxMessageSizeBytes" : 48000000,
"maxWriteBatchSize" : 1000,
"localTime" : ISODate("2016-09-01T12:29:27.113Z"),
"maxWireVersion" : 4,
"minWireVersion" : 0,
"ok" : 1
}
查看其錯誤日誌,會發現shard一直無法連接上config server,上述行為是由sharding.recoverShardingState選項決定,預設為true,也就是說,shard啟動時,其會連接config server進行sharding 狀態的一些初始化,而如果config server連不上,初始化工作就一直無法完成,導致 shard 狀態不正常。
有同學在將Sharded cluster所有節點都遷移到新的主機上時遇到了上述問題,因為config server的信息發生變化了,而shard啟動時還會連接之前的config server,通過在啟動命令行加上--setParameter recoverShardingState=false來啟動shard就能恢復正常了。
上述預設設計的確有些不合理,config server的異常不應該去影響shard,而且最終的問題的表象也很不明確,在3.4大版本里,MongoDB也會對這塊進行修改去掉這個參數,預設不會有recoverShardingState的邏輯,具體參考SERVER-24465。


