
bounds/frame/center/transform的解釋以及相對關係 ...
frame
frame的官方解釋如下:
The frame rectangle, which describes the view’s location and size in its superview’s coordinate system.
This rectangle defines the size and position of the view in its superview’s coordinate system. Use this rectangle during layout operations to set the size and position the view. Setting this property changes the point specified by the center property and changes the size in the bounds rectangle accordingly. The coordinates of the frame rectangle are always specified in points.
它定義了一個view相對於父視圖坐標系的位置和大小,它會影響center屬性和bounds屬性的size。
先看一下它究竟是什麼?
它是一個CGRect類型,如下:
struct CGRect {
    CGPoint origin;
    CGSize size;
};
typedef struct CG_BOXABLE CGRect CGRect;

struct CGPoint {
    CGFloat x;
    CGFloat y;
};
typedef struct CG_BOXABLE CGPoint CGPoint;

/* Sizes. */

struct CGSize {
    CGFloat width;
    CGFloat height;
};
typedef struct CG_BOXABLE CGSize CGSize;
其中的origin就是該view的位置,它是一個CGPoint類型,也是一個結構體,包含了我們熟知的常用二維坐標系的x、y。根據x、y可以在坐標系裡面唯一確定一個點。如下圖:
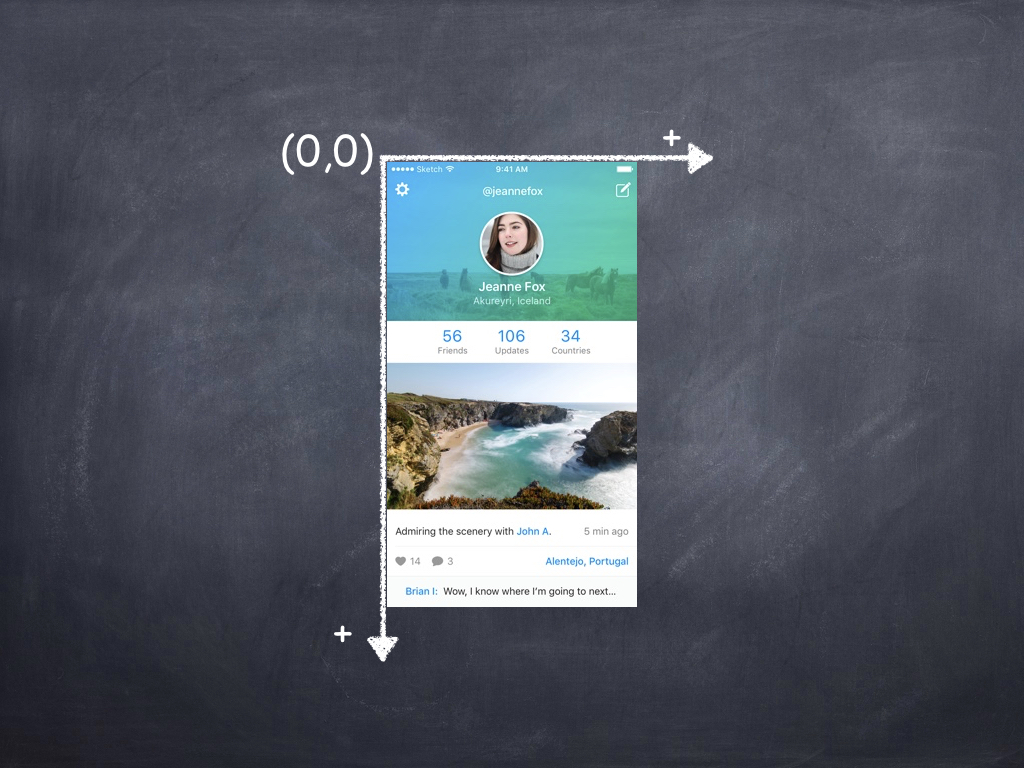
這個坐標系和我們平時接觸的還不太一樣,它是向右向下為正方向。所以對於window來說,其原點是左上角,比如現在的頭像的起始坐標就是(200,40)。按照原來常規的坐標系來說,應該是(200,-40)。
在設置一個CGRect的時候,用到的方法是CGRectMake,其實現如下:
CG_INLINE CGRect
CGRectMake(CGFloat x, CGFloat y, CGFloat width, CGFloat height)
{
  CGRect rect;
  rect.origin.x = x; rect.origin.y = y;
  rect.size.width = width; rect.size.height = height;
  return rect;
}
也就是自己在實現部分創建了一個rect,然後逐個賦值。
關於frame,這裡要註意的一點就是:frame是相對於父視圖的坐標系來定位的。如果你這樣設置frame:(0,0,100,200),也就是在父視圖左上角添加了一個寬100,高200的子視圖(前提是沒有改變父視圖的bounds,接下來會有介紹bounds)。
bounds
The bounds rectangle, which describes the view’s location and size in its own coordinate system.
The default bounds origin is (0,0) and the size is the same as the size of the rectangle in the frame property. Changing the size portion of this rectangle grows or shrinks the view relative to its center point. Changing the size also changes the size of the rectangle in the frame property to match. The coordinates of the bounds rectangle are always specified in points.
Changing the bounds rectangle automatically redisplays the view without calling its drawRect: method. If you want UIKit to call the drawRect: method, set the contentMode property to UIViewContentModeRedraw.
Changes to this property can be animated.
它也是描述的是視圖的位置和大小,只不過是在自己的坐標繫上。也就是說它描述的是當前視圖相對於自身坐標系的位置和大小。
舉個例子:
- (void)viewDidLoad {
    [super viewDidLoad];

    CGRect rect  = self.view.frame;
    self.parentView = [[ParentView alloc] initWithFrame:CGRectMake(60, 80, rect.size.width-120, rect.size.height - 160)];
    self.parentView.backgroundColor = [UIColor redColor];
    [self.view addSubview:_parentView];
    NSLog(@"frame:%@",NSStringFromCGRect(self.parentView.frame));
    NSLog(@"bounds:%@",NSStringFromCGRect(self.parentView.bounds));
    NSLog(@"center:%@",NSStringFromCGPoint(self.parentView.center));

}
輸出的結果如下:
frame:{{60, 80}, {200, 408}}
bounds:{{0, 0}, {200, 408}}
center:{160, 284}
由此可見,如果我們沒有去更改bounds的值,它預設的位置坐標點是(0,0)。
center
The center point of the view's frame rectangle.
The center point is specified in points in the coordinate system of its superview. Setting this property updates the origin of the rectangle in the frame property appropriately.
Use this property, instead of the frame property, when you want to change the position of a view. The center point is always valid, even when scaling or rotation factors are applied to the view's transform.
Changes to this property can be animated.
center是view的中點。該屬性是想歸於父類的坐標系確定的。從bounds小節裡面的例子可以看到center的值,其計算方法為:
center.x = frame.origin.x + frame.size.width/2
center.y = frame.origin.y + frame.size.height/2
transform
Specifies the transform applied to the view, relative to the center of its bounds.
Use this property to scale or rotate the view's frame rectangle within its superview's coordinate system. (To change the position of the view, modify the center property instead.) The default value of this property is CGAffineTransformIdentity.
Transformations occur relative to the view's anchor point. By default, the anchor point is equal to the center point of the frame rectangle. To change the anchor point, modify the anchorPoint property of the view's underlying CALayer object.
Changes to this property can be animated.
In iOS 8.0 and later, the transform property does not affect Auto Layout. Auto layout calculates a view’s alignment rectangle based on its untransformed frame.
它用於指定視圖的變換。使用這個屬性可以放大或者旋轉視圖,它的frame會因此改變,是以中心點為變換的。看例子:
- (void)viewDidLoad {
    [super viewDidLoad];

    CGRect rect  = self.view.frame;
    self.parentView = [[ParentView alloc] initWithFrame:CGRectMake(60, 80, rect.size.width-120, rect.size.height - 160)];
    self.parentView.backgroundColor = [UIColor redColor];
    [self.view addSubview:_parentView];
    NSLog(@"frame:%@",NSStringFromCGRect(self.parentView.frame));
    NSLog(@"bounds:%@",NSStringFromCGRect(self.parentView.bounds));
    NSLog(@"center:%@",NSStringFromCGPoint(self.parentView.center));

    self.parentView.transform = CGAffineTransformMakeRotation(60);

    NSLog(@"after change transform,frame:%@",NSStringFromCGRect(self.parentView.frame));
    NSLog(@"after change transform,bounds:%@",NSStringFromCGRect(self.parentView.bounds));
    NSLog(@"after change transform,center:%@",NSStringFromCGPoint(self.parentView.center));
}
看輸出的結果:
frame:{{60, 80}, {200, 408}}
bounds:{{0, 0}, {200, 408}}
center:{160, 284}
after change transform,frame:{{2.5773352536321568, 59.226689885086444}, {314.84532949273569, 449.54662022982711}}
after change transform,bounds:{{0, 0}, {200, 408}}
after change transform,center:{160, 284}
如圖:
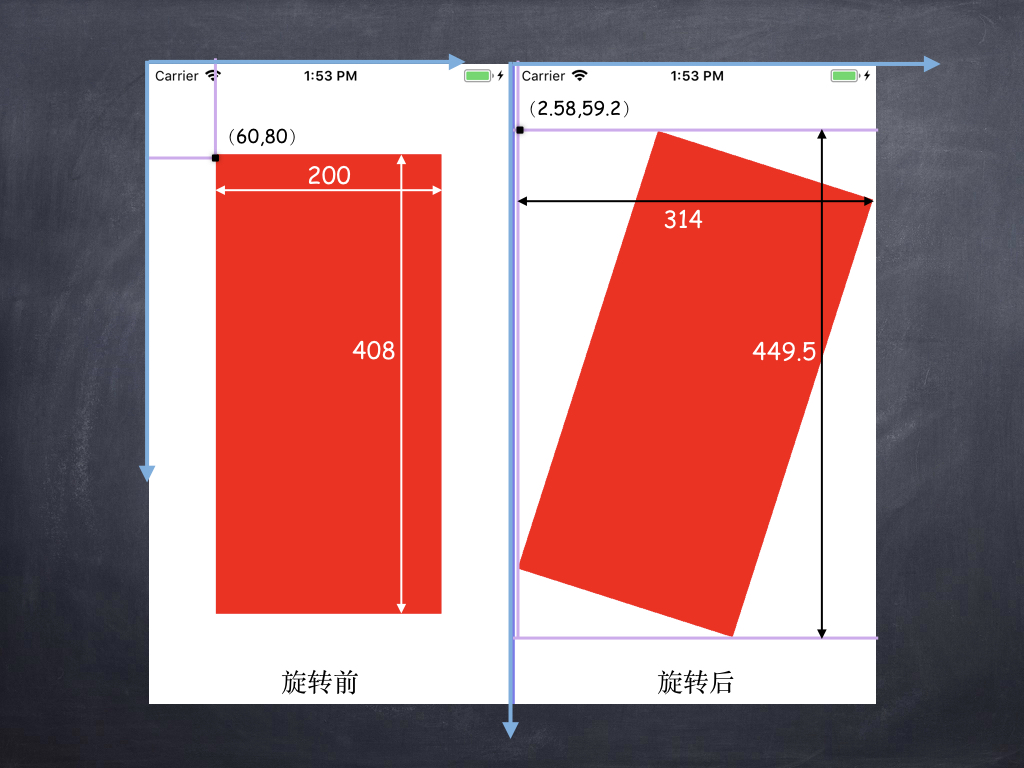
可以看出,當我們對圖像通過旋轉,旋轉後的圖片的frame已經變成了{{2.5773352536321568, 59.226689885086444}, {314.84532949273569, 449.54662022982711}},此時的起始位置為圖上旋轉後標的(2.58,59.2),大小也變成了雙箭頭黑線標註的大小。
因此得出結論:進行了transform變換,其frame改變了,但是其bounds和center並沒有修改。此時bounds的size和frame的size已經沒有關係了。當沒有進行任何transform時,frame的size總是和bounds相等。
以上便是對frame、bounds、center和transform做了一個簡單的介紹。
bounds的使用
接下來看一個例子(例子A):
- (void)viewDidLoad {
    [super viewDidLoad];

    CGRect rect  = self.view.frame;
    self.parentView = [[ParentView alloc] initWithFrame:CGRectMake(60, 80, rect.size.width-120, rect.size.height - 160)];
    self.parentView.backgroundColor = [UIColor redColor];
    [self.view addSubview:_parentView];
    NSLog(@"frame:%@",NSStringFromCGRect(self.parentView.frame));
    NSLog(@"bounds:%@",NSStringFromCGRect(self.parentView.bounds));
    NSLog(@"center:%@",NSStringFromCGPoint(self.parentView.center));

    self.parentView.bounds = CGRectMake(-40, -40, self.parentView.frame.size.width, self.parentView.frame.size.height);
    NSLog(@"parent change bound ,frame:%@",NSStringFromCGRect(self.parentView.frame));
    NSLog(@"parent change bound ,bounds:%@",NSStringFromCGRect(self.parentView.bounds));
    NSLog(@"parent change bound ,center:%@",NSStringFromCGPoint(self.parentView.center));

    self.childView = [[ChildView alloc] initWithFrame:CGRectMake(20, 20, 100, 100)];
    self.childView.backgroundColor = [UIColor yellowColor];
    [self.parentView addSubview:_childView];

    NSLog(@"childView frame:%@",NSStringFromCGRect(self.childView.frame));
    NSLog(@"childView ounds:%@",NSStringFromCGRect(self.childView.bounds));
    NSLog(@"childView center:%@",NSStringFromCGPoint(self.childView.center));
}
這裡在parentView上添加了一個childView,然後對parentView的bounds進行修改和不修改進行了測試,結果如下:
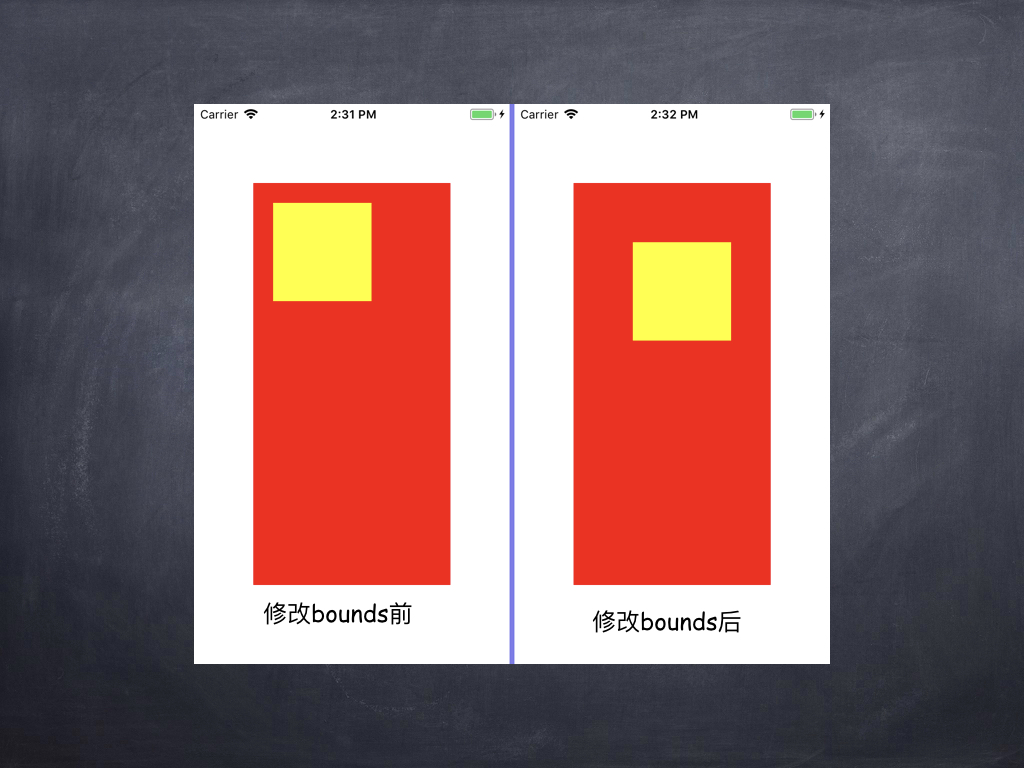
你會發現當修改了parentView的bounds之後,發現childView缺向右向下做了偏移。這裡設置parentView的bounds的origin為(-40,-40)為何會發生這種情況呢?接下來先看一下下麵這張圖:
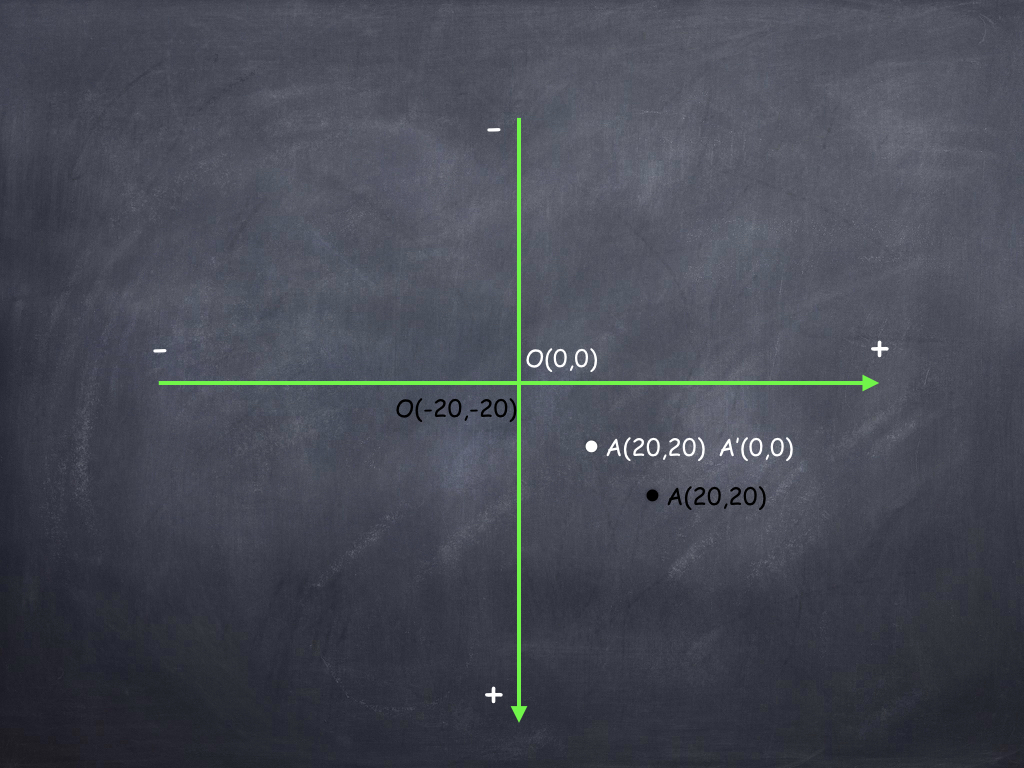
+代表正方向,-代表負方向。
如果此時我們沒有改變圖中O的坐標,那麼此時A的坐標是(20,20),如果我們更改了O的坐標為(-20,-20),那麼原來A點的坐標就成了A'(0,0),但是A坐標是不變的,所以它會到黑色A處。所以你改變了原點坐標為負之後,A點會移動到黑色A。相反如果你設置了坐標原點為(20,20),那麼A點就會和坐標原點重合。
這就是為什麼childView會向右向下移動的原因。
接下來再做如下操作(例子B):
- (void)viewDidLoad {
    [super viewDidLoad];

    CGRect rect  = self.view.frame;
    self.parentView = [[ParentView alloc] initWithFrame:CGRectMake(60, 80, rect.size.width-120, rect.size.height - 160)];
    self.parentView.backgroundColor = [UIColor redColor];
    [self.view addSubview:_parentView];

    NSLog(@"parent change bound ,frame:%@",NSStringFromCGRect(self.parentView.frame));
    NSLog(@"parent change bound ,bounds:%@",NSStringFromCGRect(self.parentView.bounds));
    NSLog(@"parent change bound ,center:%@",NSStringFromCGPoint(self.parentView.center));

    self.childView = [[ChildView alloc] initWithFrame:CGRectMake(self.parentView.frame.origin.x, self.parentView.frame.origin.y+self.parentView.frame.size.height-200, 100, 100)];
    self.childView.backgroundColor = [UIColor yellowColor];
    [self.parentView addSubview:_childView];


    NSLog(@"childView frame:%@",NSStringFromCGRect(self.childView.frame));
    NSLog(@"childView ounds:%@",NSStringFromCGRect(self.childView.bounds));
    NSLog(@"childView center:%@",NSStringFromCGPoint(self.childView.center));
    NSLog(@"\n--------\n");
    CGRect parentBounds = self.parentView.bounds;
    [UIView animateWithDuration:2 animations:^{

        self.parentView.bounds = CGRectMake(parentBounds.origin.x, 400, parentBounds.size.width, parentBounds.size.height);
    } completion:^(BOOL finished) {
        NSLog(@"anim finished,parentView frame:%@",NSStringFromCGRect(self.parentView.frame));
        NSLog(@"anim finished,parentView ounds:%@",NSStringFromCGRect(self.parentView.bounds));
        NSLog(@"anim finished,parentView center:%@",NSStringFromCGPoint(self.parentView.center));
        NSLog(@"anim finished,childView frame:%@",NSStringFromCGRect(self.childView.frame));
        NSLog(@"anim finished,childView bounds:%@",NSStringFromCGRect(self.childView.bounds));
        NSLog(@"anim finished,childView center:%@",NSStringFromCGPoint(self.childView.center));
    }];
}
輸出結果如下:
parent change bound ,frame:{{60, 80}, {200, 408}}
parent change bound ,bounds:{{0, 0}, {200, 408}}
parent change bound ,center:{160, 284}
childView frame:{{60, 288}, {100, 100}}
childView ounds:{{0, 0}, {100, 100}}
childView center:{110, 338}
--------
anim finished,parentView frame:{{60, 80}, {200, 408}}
anim finished,parentView ounds:{{0, 400}, {200, 408}}
anim finished,parentView center:{160, 284}
anim finished,childView frame:{{60, 288}, {100, 100}}
anim finished,childView bounds:{{0, 0}, {100, 100}}
anim finished,childView center:{110, 338}
運行效果是childView向上移動,然後停止。結果前後對比圖如下:
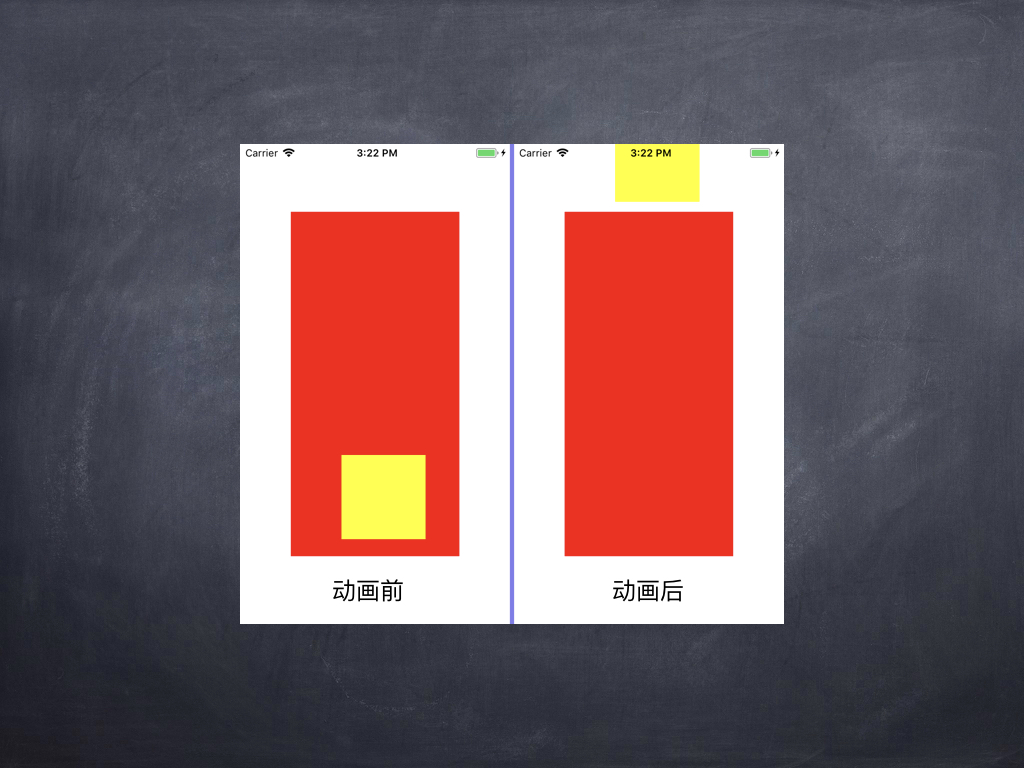
直觀來看,按說childView的frame改變了,但是從console輸出的結果來看,childView的frame/bounds/center都沒有改變,但是直觀來看其位置卻改變了。再看一下parentView,只有bounds改變了,frame和center卻沒變,從直觀來看parentView沒有任何更改。所以很有可能是parentView的bounds修改引起了childView的位置更改。這是為什麼呢?這裡先不說明為什麼,再看一下最常用的UIScrollView:
- (void)viewDidLoad {
    [super viewDidLoad];
    self.scrollView = [[ZGUIScrolLView alloc] initWithFrame:self.view.frame];
    self.scrollView.delegate = self;
    [self.view addSubview:_scrollView];
    NSLog(@"scrollview frame:%@",NSStringFromCGRect(_scrollView.frame));
    NSLog(@"scrollview bounds:%@",NSStringFromCGRect(_scrollView.bounds));
    NSLog(@"scrollview center:%@",NSStringFromCGPoint(_scrollView.center));
    self.scrollView.contentSize = CGSizeMake(800, 800);
    self.parentView = [[ParentView alloc] initWithFrame:CGRectMake(20, 100, 250, 300)];
    self.parentView.backgroundColor = [UIColor redColor];
    [self.scrollView addSubview:_parentView];
    NSLog(@"parentView frame:%@",NSStringFromCGRect(_parentView.frame));
    NSLog(@"parentView bounds:%@",NSStringFromCGRect(_parentView.bounds));
    NSLog(@"parentView center:%@",NSStringFromCGPoint(_parentView.center));

}
- (void)scrollViewDidScroll:(UIScrollView *)scrollView {
    NSLog(@"didScroll scrollview frame:%@",NSStringFromCGRect(_scrollView.frame));
    NSLog(@"didScroll scrollview bounds:%@",NSStringFromCGRect(_scrollView.bounds));
    NSLog(@"didScroll scrollview center:%@",NSStringFromCGPoint(_scrollView.center));
    NSLog(@"didScroll parentView frame:%@",NSStringFromCGRect(_parentView.frame));
    NSLog(@"didScroll parentView bounds:%@",NSStringFromCGRect(_parentView.bounds));
    NSLog(@"didScroll parentView center:%@",NSStringFromCGPoint(_parentView.center));
    printf("\n-------------------------------------------\n");
}
當滾動視圖的時候,console輸出結果如下:
scrollview frame:{{0, 0}, {320, 568}}
scrollview bounds:{{0, 0}, {320, 568}}
scrollview center:{160, 284}
parentView frame:{{20, 100}, {250, 300}}
parentView bounds:{{0, 0}, {250, 300}}
parentView center:{145, 250}
didScroll scrollview frame:{{0, 0}, {320, 568}}
didScroll scrollview bounds:{{0, -20}, {320, 568}}
didScroll scrollview center:{160, 284}
didScroll parentView frame:{{20, 100}, {250, 300}}
didScroll parentView bounds:{{0, 0}, {250, 300}}
didScroll parentView center:{145, 250}
-------------------------------------------
didScroll scrollview frame:{{0, 0}, {320, 568}}
didScroll scrollview bounds:{{8.5, 31.5}, {320, 568}}
didScroll scrollview center:{160, 284}
didScroll parentView frame:{{20, 100}, {250, 300}}
didScroll parentView bounds:{{0, 0}, {250, 300}}
didScroll parentView center:{145, 250}
-------------------------------------------
didScroll scrollview frame:{{0, 0}, {320, 568}}
didScroll scrollview bounds:{{25.5, 162}, {320, 568}}
didScroll scrollview center:{160, 284}
didScroll parentView frame:{{20, 100}, {250, 300}}
didScroll parentView bounds:{{0, 0}, {250, 300}}
didScroll parentView center:{145, 250}
根據輸出結果可以看到,parentView的center、frame、bounds在滾動過程中都沒有作出更改,但是我們看到的它的位置的確改變了。而對於scrollView來說,其frame和center也沒有更改,但是bounds更改了。
這種現象和上面提到的(例子B)的現象一樣,都是對bounds進行了修改。然後子視圖從新進行了佈局。說道子視圖重新佈局,讓我想到了一個方法:
- (void)layoutSubviews;從字面意思看就是佈局某個視圖的子視圖,那麼會不會和這個方法有關呢?因此我在自定義的ZGUIScrollView裡面實現了該方法:
- (void)layoutSubviews {
    NSLog(@"scrollview's layoutSubViews called");
    [super layoutSubviews];
}
再次滾動界面,發現每次滾動都會調用scrollview的layoutSubViews方法。蘋果官方文檔介紹:
Lays out subviews.
The default implementation of this method does nothing on iOS 5.1 and earlier. Otherwise, the default implementation uses any constraints you have set to determine the size and position of any subviews.
Subclasses can override this method as needed to perform more precise layout of their subviews. You should override this method only if the autoresizing and constraint-based behaviors of the subviews do not offer the behavior you want. You can use your implementation to set the frame rectangles of your subviews directly.
You should not call this method directly. If you want to force a layout update, call the setNeedsLayout method instead to do so prior to the next drawing update. If you want to update the layout of your views immediately, call the layoutIfNeeded method.
它的作用就是佈局一個視圖上的子視圖。確定子視圖的大小和位置。如果你想強制佈局更新,你不能直接去調用這個方法,而是在下次更新圖形之前調用setNeedsLayout方法,如果你要立即更新視圖佈局,調用layoutIfNeeded方法。
由此可知,UIScrollView的實現就是通過bounds來實現的。contentOffset是bounds的origin。然後當bounds修改之後,會在layoutSubviews方法裡面對子視圖進行佈局。對子類進行更新。
另外,我們還可以用bounds實現如下效果:
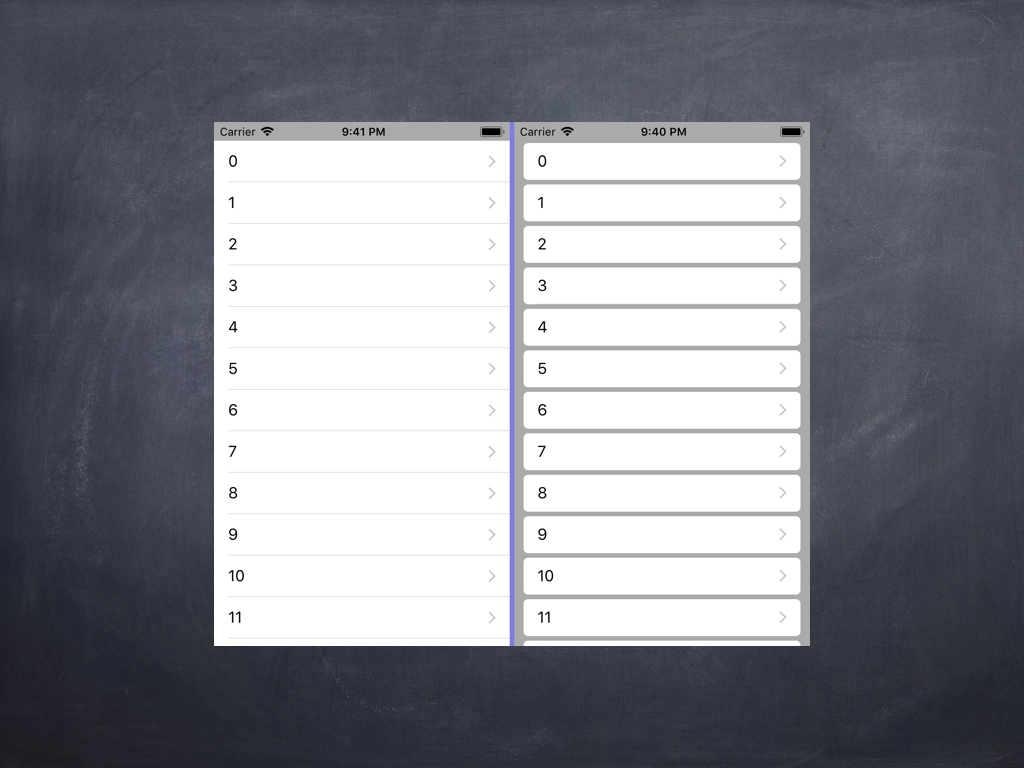
圖上右側便是使用了bounds實現的效果。實現方式就是在自定義cell中重寫drawReact:
- (void)drawRect:(CGRect)rect {
     self.bounds = CGRectMake(self.bounds.origin.x, self.bounds.origin.y, self.frame.size.width-20, self.frame.size.height - 5);
    [super drawRect:rect];
}
其實UITableView(它是UIScrollView)的實現也是類似,更改了bounds,來實現滾動載入cell。
總結
對bounds和frame的理解就是這些,其實系統用bounds的地方還是很多的。例如UIScrollView的實現就用到了。有疑問的話可以留言交流。
註:轉贊請標明來源:張貴的博客

