spring boot 使用 starter 解決了很多配置問題, 但是, 他是怎麼來解決這些問題的呢? 這裡通過一個簡單的例子, 來看一下, starter是怎麼來設置預設配置的. 一. 建 starter 項目 自定義的starter, 項目命名規範是 : 自定義名-spring-boot-st ...
spring boot 使用 starter 解決了很多配置問題, 但是, 他是怎麼來解決這些問題的呢?
這裡通過一個簡單的例子, 來看一下, starter是怎麼來設置預設配置的.
一. 建 starter 項目

自定義的starter, 項目命名規範是 : 自定義名-spring-boot-starter
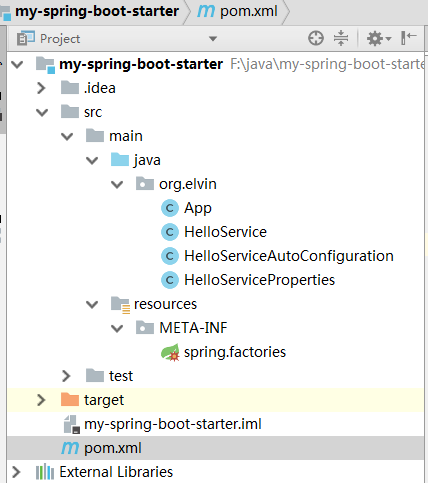
先來看一下, 我最後的目錄結構

1. 修改pom.xml文件
<project xmlns="http://maven.apache.org/POM/4.0.0" xmlns:xsi="http://www.w3.org/2001/XMLSchema-instance"
  xsi:schemaLocation="http://maven.apache.org/POM/4.0.0 http://maven.apache.org/xsd/maven-4.0.0.xsd">
  <modelVersion>4.0.0</modelVersion>

  <groupId>org.elvin</groupId>
  <artifactId>my-spring-boot-starter</artifactId>
  <version>1.0-SNAPSHOT</version>
  <packaging>jar</packaging>

  <name>my-spring-boot-starter</name>
  <url>http://maven.apache.org</url>

  <properties>
    <project.build.sourceEncoding>UTF-8</project.build.sourceEncoding>
  </properties>

  <dependencies>
    <dependency>
      <groupId>org.springframework.boot</groupId>
      <artifactId>spring-boot-autoconfigure</artifactId>
      <version>1.5.9.RELEASE</version>
    </dependency>

    <dependency>
      <groupId>junit</groupId>
      <artifactId>junit</artifactId>
      <version>3.8.1</version>
      <scope>test</scope>
    </dependency>
  </dependencies>

  <build>
    <plugins>
      <plugin>
        <groupId>org.apache.maven.plugins</groupId>
        <artifactId>maven-compiler-plugin</artifactId>
        <version>2.3.2</version>
        <configuration>
          <source>1.8</source>
          <target>1.8</target>
        </configuration>
      </plugin>
    </plugins>
  </build>
</project>
其實只是加入了 spring-boot-autoconfigure
App文件中的main方法, 我註釋掉了, 這個在這裡沒有用到
2. 配置屬性對應的接收文件
package org.elvin;

import org.springframework.boot.context.properties.ConfigurationProperties;/**
 * author: Elvin
 * Date: 2017/12/12 14:51
 * Description:
 */
@ConfigurationProperties(prefix = "hello")
public class HelloServiceProperties {
    //預設配置內容
    private static final String MSG = "world";

    private String msg = MSG;

    public String getMsg() {
        return msg;
    }

    public void setMsg(String msg) {
        this.msg = msg;
    }
}
3. 對外Service
package org.elvin;

/**
 * author: Elvin
 * Date: 2017/12/12 14:55
 * Description:
 */
public class HelloService {

    private String msg;

    public String sayHello(){
        return "Hello " + msg;
    }

    public String getMsg() {
        return msg;
    }

    public void setMsg(String msg) {
        this.msg = msg;
    }
}
4. 對外service與配置對應文件關聯
package org.elvin;

import org.springframework.beans.factory.annotation.Autowired;
import org.springframework.boot.autoconfigure.condition.ConditionalOnClass;
import org.springframework.boot.autoconfigure.condition.ConditionalOnMissingBean;
import org.springframework.boot.autoconfigure.condition.ConditionalOnProperty;
import org.springframework.boot.context.properties.EnableConfigurationProperties;
import org.springframework.context.annotation.Bean;
import org.springframework.context.annotation.Configuration;

/**
 * author: Elvin
 * Date: 2017/12/12 14:59
 * Description:
 */
@Configuration
@EnableConfigurationProperties(HelloServiceProperties.class)
@ConditionalOnClass(HelloService.class)
@ConditionalOnProperty(prefix = "hello", value="enabled", matchIfMissing =true )
public class HelloServiceAutoConfiguration {

    @Autowired
    private HelloServiceProperties helloServiceProperties;

    @Bean
    @ConditionalOnMissingBean(HelloService.class)
    public HelloService helloService(){
        HelloService helloService = new HelloService();
        helloService.setMsg(helloServiceProperties.getMsg());
        return helloService;
    }
}
5. starter配置 : spring.factories
org.springframework.boot.autoconfigure.EnableAutoConfiguration=org.elvin.HelloServiceAutoConfiguration
做完這些之後, 通過 mvn clean install , 打包到maven庫裡面
二. spring boot 項目使用
新建一個spring boot 項目, 選擇web即可.
目錄結構:

先看一下引用pom.xml
        <dependency>
            <groupId>org.elvin</groupId>
            <artifactId>my-spring-boot-starter</artifactId>
            <version>1.0-SNAPSHOT</version>
        </dependency>
再看一下HelloController
package org.elvin.learn.springboot.controller;

import org.springframework.beans.factory.annotation.Autowired;
import org.springframework.web.bind.annotation.RequestMapping;
import org.springframework.web.bind.annotation.RestController;

import  org.elvin.*;

/**
 * author: Elvin
 * Date: 2017/12/12 15:34
 * Description:
 */
@RestController
@RequestMapping("hello")
public class HelloController {

    @Autowired
    private HelloService helloService;

    @RequestMapping("index")
    public String index(){
        return helloService.sayHello();
    }

}
這裡的 HelloService 就是 前面自定義 starter 裡面的.
1. 結果: 未配置情況下, 應該是輸出 hello world

2. 在配置文件中, 加入 hello.msg=hahahahahah


這個例子很簡單, 只是顯示一下主要的過程, 別的都是各插件自己的邏輯判斷了.
參考資料:
JavaEE開發的顛覆者 Spring Boot實戰


