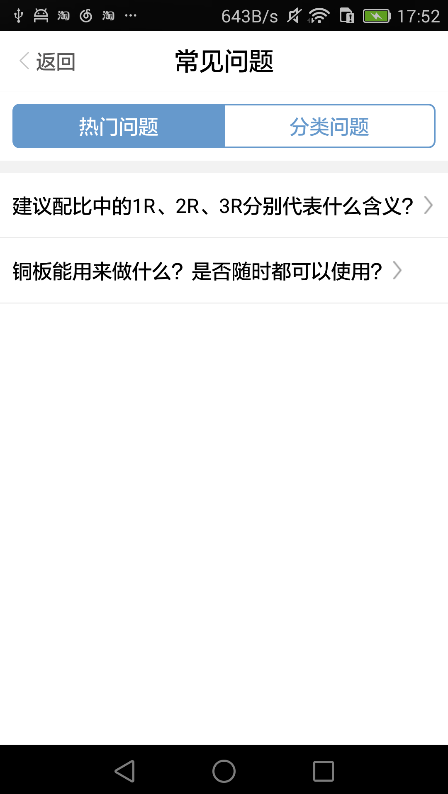
在ios7中有一種扁平風格的控制項叫做分段選擇控制項UISegmentedControl,控制項分為一排,橫放著幾個被簡單線條隔開的按鈕,每次點擊只能選擇其中一個按鈕,他類似於tabbar但是又稍微有點區別,新版的qq手機客戶端就用到了這種控制項。 但是在android中並沒有現成的控制項可用,不過andro ...
在ios7中有一種扁平風格的控制項叫做分段選擇控制項UISegmentedControl,控制項分為一排,橫放著幾個被簡單線條隔開的按鈕,每次點擊只能選擇其中一個按鈕,他類似於tabbar但是又稍微有點區別,新版的qq手機客戶端就用到了這種控制項。
但是在android中並沒有現成的控制項可用,不過android中有著功能類似但UI相差很大的RadioGroup控制項,可以通過定義RadioGroup的外觀來達到相同的目的。其實android中也沒有TabBar,但是很多app通過修改RadioGroup來實現ios中的UITabBar效果,看來RadioGroup是還真是很實用的控制項,雖然原生的真的很醜。
新手對RadioGroup的自定義可能很難下手,git上有了一個現成的封裝好了的庫以及例子,可以下載學習,如果你是用eclipse開發的項目,可能需要改改才能用,因為他提供的是android studio的項目結構。
項目地址:https://github.com/hoang8f/android-segmented-control
使用:

<?xml version="1.0" encoding="utf-8"?>
<LinearLayout xmlns:android="http://schemas.android.com/apk/res/android"
    android:layout_width="match_parent"
    android:layout_height="match_parent"
    android:background="@color/content_backgroud"
    android:orientation="vertical">


    <info.hoang8f.android.segmented.SegmentedGroup xmlns:segmentedgroup="http://schemas.android.com/apk/res-auto"
        android:id="@+id/segmented2"
        android:layout_width="match_parent"
        android:layout_height="wrap_content"
        android:background="@color/white"
        android:orientation="horizontal"
        android:padding="10dp"
        segmentedgroup:sc_border_width="1.5dp"
        segmentedgroup:sc_corner_radius="5dp">

        <RadioButton
            android:id="@+id/question_hot"
            style="@style/SegmentRadioButton"
            android:layout_width="0dp"
            android:layout_height="wrap_content"
            android:layout_weight="1"
            android:paddingBottom="7dp"
            android:paddingTop="7dp"
            android:text="熱門問題"
            android:textSize="16sp" />

        <RadioButton
            android:id="@+id/question_category"
            style="@style/SegmentRadioButton"
            android:layout_width="0dp"
            android:layout_height="wrap_content"
            android:layout_weight="1"
            android:paddingBottom="7dp"
            android:paddingTop="7dp"
            android:text="分類問題"
            android:textSize="16sp" />
    </info.hoang8f.android.segmented.SegmentedGroup>

    <FrameLayout
        android:layout_marginTop="10dp"
        android:id="@+id/rl_container"
        android:layout_width="match_parent"
        android:layout_height="match_parent" />

</LinearLayout>
@Override
public void onClick(View v) {
    BaseFragment fragment = null;
    switch (v.getId()) {
        case R.id.question_hot:
            fragment = QuestionHotFragment.newInstance();
            break;
        case R.id.question_category:
            fragment = QuestionCategoryFragment.newInstance();
            break;
        default:
            break;
    }

    if (fragment != null) {
        FragmentManager fragmentManager = getSupportFragmentManager();
        FragmentTransaction transaction = fragmentManager.beginTransaction();
        transaction.replace(R.id.rl_container, fragment);
        transaction.commit();
    }
}


