上一節看了一眼預編譯的總體代碼,這一節分析convert-argv模塊。 這個模塊主要是對命令參數的解析。 生成預設配置文件名數組 函數內部,首先判斷了argv.d與argv.p屬性是否存在,這個屬性來源於參數d與p,即webpack -d -p,測試如圖: 因為懶得加,所以直接跳過,進入到第二階段 ...
上一節看了一眼預編譯的總體代碼,這一節分析convert-argv模塊。
這個模塊主要是對命令參數的解析,也是yargs框架的核心用處。
生成預設配置文件名數組
module.exports = function(yargs, argv, convertOptions) {
    var options = [];
    // webapck -d
    // 生成map映射文件,告知模塊打包地點
    if(argv.d) { /* ... */ }
    // webpack -p
    // 壓縮文件
    if(argv.p) { /* ... */ }
    // 配置文件載入標記
    var configFileLoaded = false;
    // 配置文件載入後的載體
    var configFiles = [];
    // 排序
    var extensions = Object.keys(interpret.extensions).sort(function(a, b) {
        return a === ".js" ? -1 : b === ".js" ? 1 : a.length - b.length;
    });
    // 指定所有預設配置文件名
    var defaultConfigFiles = ["webpack.config", "webpackfile"].map(function(filename) {
        return extensions.map(function(ext) {
            return {
                path: path.resolve(filename + ext),
                ext: ext
            };
        });
    }).reduce(function(a, i) {
        return a.concat(i);
    }, []);

    // more code...
}
函數內部,首先判斷了argv.d與argv.p屬性是否存在,這個屬性來源於參數d與p,即webpack -d -p,測試如圖:


因為懶得加,所以直接跳過,進入到第二階段,生成預設配置文件名數組。
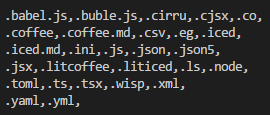
這裡引入了一個小的模塊interpret,調用Object.keys(interpret.extensions)返回一系列文件擴展名的數組,如圖:

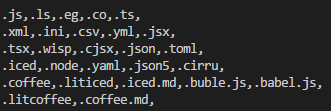
由於獲取到的數組為亂序,所以這裡首先進行排序,規則為.js放在第一位,後面的按長度從小到大,結果是這樣:

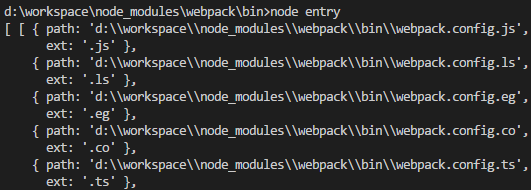
接下來是兩個map與一個reduce的調用,首先兩個map會返回一個數組,包含兩個對象數組,對象包含path、ext兩個屬性,path代表路徑+文件名+尾碼,ext就是尾碼,調用map後會得到如下數組 (截取部分):


最後調用reduce方法將二維數組扁平化為一維數組,圖就不截了。
定義配置文件路徑與尾碼
有了預設列表,第二步就是嘗試獲取對應的配置文件:
var i;
// 從命令行讀取--config
// argv.config => config.js
if(argv.config) {
    var getConfigExtension = function getConfigExtension(configPath) {
        for(i = extensions.length - 1; i >= 0; i--) {
            var tmpExt = extensions[i];
            if(configPath.indexOf(tmpExt, configPath.length - tmpExt.length) > -1) {
                return tmpExt;
            }
        }
        return path.extname(configPath);
    };

    var mapConfigArg = function mapConfigArg(configArg) {
        // 獲取文件絕對路徑
        var resolvedPath = path.resolve(configArg);
        // 獲取文件尾碼
        var extension = getConfigExtension(resolvedPath);
        return {
            path: resolvedPath,
            ext: extension
        };
    };
    // 包裝成數組 統一處理單、多配置文件情況
    var configArgList = Array.isArray(argv.config) ? argv.config : [argv.config];
    configFiles = configArgList.map(mapConfigArg);
}
// 如果未指定配置文件 嘗試匹配預設文件名
else {
    for(i = 0; i < defaultConfigFiles.length; i++) {
        var webpackConfig = defaultConfigFiles[i].path;
        // 檢測路徑中是否存在對應文件
        if(fs.existsSync(webpackConfig)) {
            configFiles.push({
                path: webpackConfig,
                ext: defaultConfigFiles[i].ext
            });
            break;
        }
    }
}
這裡的代碼比較簡單,如果調用了--config自定義配置文件,該指令後面的會被當成參數傳給argv.config。
存在argv.config則會對文件名與合法尾碼數組進行匹配,檢測出配置文件的尾碼包裝成對象返回。
如果不指定配置文件,會進入else代碼段開始遍歷預設配置文件數組,fs.existsSync檢測當前路徑是否存在該文件,有就當成配置文件包裝返回。
獲取配置文件輸出模塊並做簡單處理
上一步只是代表接確定了配置文件的絕對路徑,這個文件並不一定是有效且存在的。
這一步會獲取到配置文件的輸出並簡單處理:
if(configFiles.length > 0) {
    var registerCompiler = function registerCompiler(moduleDescriptor) {
        // ...
    };

    var requireConfig = function requireConfig(configPath) {
        // 獲取到modules.exports輸出的內容
        var options = require(configPath);
        // 二次處理
        options = prepareOptions(options, argv);
        return options;
    };
    // 本例中configFiles => [{path:'d:\\workspace\\node_modules\\webpack\\bin\\config.js',ext:'.js'}]
    configFiles.forEach(function(file) {
        // interpret.extensions[.js]為null
        // 這裡直接跳出
        registerCompiler(interpret.extensions[file.ext]);
        // 這裡的options是convert-argv.js開頭聲明的數組
        options.push(requireConfig(file.path));
    });
    // 代表配置文件成功載入
    configFileLoaded = true;
}
這裡的處理情況有兩個:
1、根據尾碼名二次處理
2、將路徑傳進一個prepareOptions模塊處理
這個模塊內容十分簡單,可以看一下:
"use strict";

module.exports = function prepareOptions(options, argv) {
    argv = argv || {};
    // 判斷是否通過export default輸出
    options = handleExport(options);
    // 非數組
    if(Array.isArray(options)) {
        options = options.map(_options => handleFunction(_options, argv));
    } else {
        // 當options為函數時
        options = handleFunction(options, argv);
    }
    return options;
};

function handleExport(options) {
    const isES6DefaultExported = (
        typeof options === "object" && options !== null && typeof options.default !== "undefined"
    );
    options = isES6DefaultExported ? options.default : options;
    return options;
}

function handleFunction(options, argv) {
    if(typeof options === "function") {
        options = options(argv.env, argv);
    }
    return options;
}
這裡針對多配置(數組)與單配置進行了處理,判斷了模塊輸出的方式(ES6、CMD)以及輸出的類型(對象、函數),最後返回處理後的配置對象並標記配置文件已被載入。
終極處理函數
接下來就是最後一個階段:
if(!configFileLoaded) {
    return processConfiguredOptions({});
} else if(options.length === 1) {
    return processConfiguredOptions(options[0]);
} else {
    return processConfiguredOptions(options);
}

function processConfiguredOptions(options) {
    // 非法輸出類型
    if(options === null || typeof options !== "object") {
        console.error("Config did not export an object or a function returning an object.");
        process.exit(-1); // eslint-disable-line
    }
    // promise檢測
    if(typeof options.then === "function") {
        return options.then(processConfiguredOptions);
    }
    // export default檢測
    if(typeof options === "object" && typeof options.default === "object") {
        return processConfiguredOptions(options.default);
    }
    // 數組
    if(Array.isArray(options) && argv["config-name"]) { /* ... */ }
    // 數組
    if(Array.isArray(options)) { /* ... */ }
    else {
        // 單配置
        processOptions(options);
    }

    if(argv.context) {
        options.context = path.resolve(argv.context);
    }
    // 設置預設上下文為進程當前絕對路徑
    if(!options.context) {
        options.context = process.cwd();
    }
    // 跳過
    if(argv.watch) { /* ... */ }
    if(argv["watch-aggregate-timeout"]) { /* ... */ }
    if(typeof argv["watch-poll"] !== "undefined") { /* ... */ }
    if(argv["watch-stdin"]) { /* ... */ }
    return options;
}
這裡根據不同的情況傳入空對象、單配置對象、多配置數組。
在函數的開頭又再次檢測了合法性、promise、ES6模塊輸出方法,由於本例只有一個配置對象,所以直接進processOptions函數,這個函數很長,簡化後源碼如下:
function processOptions(options) {
    // 是否存在output.filename
    var noOutputFilenameDefined = !options.output || !options.output.filename;

    function ifArg(name, fn, init, finalize) { /* ... */ }
    function ifArgPair(name, fn, init, finalize) { /* ... */ }
    function ifBooleanArg(name, fn) { /* ... */ }
    function mapArgToBoolean(name, optionName) { /* ... */ }
    function loadPlugin(name) { /* ... */ }
    function ensureObject(parent, name) { /* ... */ }
    function ensureArray(parent, name) { /* ... */ }function bindRules(arg) { /* ... */ }var defineObject;

    // 中間穿插大量ifArgPair、ifArg、ifBooleanArg等

    mapArgToBoolean("cache");

    function processResolveAlias(arg, key) { /* ... */ }
    processResolveAlias("resolve-alias", "resolve");
    processResolveAlias("resolve-loader-alias", "resolveLoader");

    mapArgToBoolean("bail");

    mapArgToBoolean("profile");
    // 無輸出文件名配置
    if (noOutputFilenameDefined) { /* ... */ }
    // 處理命令參數
    if (argv._.length > 0) { /* ... */ }
    // 無入口文件配置
    if (!options.entry) { /* ... */ }
}
首先看一下裡面的工具函數,區別了不同參數類型的命令。
指令分類如下:
ifArg:基本處理函數
ifArgpair:命令參數存在鍵值對形式
ifBooleanArg:無參命令
mapArgToBoolean:命令參數為布爾類型
(這裡面的argv[name]均代表一個對應的指令,如:argv["entry"]代表--entry。)
1、ifArgpair、ifArg
function ifArgPair(name, fn, init, finalize) {
    // 直接進入ifArg函數
    // content => argv[name]的數組元素
    // idx => 索引
    ifArg(name, function(content, idx) {
        // 字元"="索引
        var i = content.indexOf("=");
        if (i < 0) {
            // 無等號的字元
            return fn(null, content, idx);
        } else {
            // 傳入=號左邊與右邊的字元
            return fn(content.substr(0, i), content.substr(i + 1), idx);
        }
    }, init, finalize);
}

// init => 構造函數
// finalize => 析構函數
function ifArg(name, fn, init, finalize) {
    if (Array.isArray(argv[name])) {
        if (init) { init(); }
        argv[name].forEach(fn);
        if (finalize) { finalize(); }
    } else if (typeof argv[name] !== "undefined" && argv[name] !== null) {
        if (init) { init(); }
        fn(argv[name], -1);
        if (finalize) { finalize(); }
    }
}
2、ifBooleanArg
// 當argv[name]不為false時才執行fn函數
function ifBooleanArg(name, fn) {
    ifArg(name, function(bool) {
        if (bool) { fn(); }
    });
}
3、mapArgToBoolean
// 處理布爾值指令
function mapArgToBoolean(name, optionName) {
    ifArg(name, function(bool) {
        if (bool === true)
            options[optionName || name] = true;
        else if (bool === false)
            options[optionName || name] = false;
    });
}
4、ensureObject、ensureArray
// 保證指定屬性為對象
function ensureObject(parent, name) {
    if (typeof parent[name] !== "object" || parent[name] === null) {
        parent[name] = {};
    }
}
// 保證指定屬性為數組
function ensureArray(parent, name) {
    if (!Array.isArray(parent[name])) {
        parent[name] = [];
    }
}
5、bindRules
function bindRules(arg) {
    // 指令可以是a=b 也可以是單獨的a
    ifArgPair(arg, function(name, binding) {
        // 沒有等號的時候
        if(name === null) {
            name = binding;
            binding += "-loader";
        }
        // 生成對應的test正則與loader
        var rule = {
            test: new RegExp("\\." + name.replace(/[\-\[\]\/\{\}\(\)\*\+\?\.\\\^\$\|]/g, "\\$&") + "$"), // eslint-disable-line no-useless-escape
            loader: binding
        };
        // 生成前置或後置loader
        if(arg === "module-bind-pre") {
            rule.enforce = "pre";
        } else if(arg === "module-bind-post") {
            rule.enforce = "post";
        }
        options.module.rules.push(rule);
    }, function() {
        ensureObject(options, "module");
        ensureArray(options.module, "rules");
    });
}
bindRules("module-bind");
bindRules("module-bind-pre");
bindRules("module-bind-post");
後面的bindRules可以看出如果要在命令中引入loader,可以使用module-bind、module-bind-pre、module-bind-post三個參數。
該指令參數一般用“=”號連接需要轉換的文件類型與對應的loader,測試案例如下:

等號兩側的字元串會變成name與binding傳入函數中,並自動生成對應的test、loader並push進module.rules中。
也可以用沒有等號的字元串,此時name預設為該字元串,loader會在後面加一個-loader,測試代碼如下:

至於其餘兩個pre、post沒啥講的。
6、loadPlugin
function loadPlugin(name) {
    var loadUtils = require("loader-utils");
    var args;
    try {
        var p = name && name.indexOf("?");
        if(p > -1) {
            // 解析參數
            args = loadUtils.parseQuery(name.substring(p));
            name = name.substring(0, p);
        }
    } catch(e) {
        console.log("Invalid plugin arguments " + name + " (" + e + ").");
        process.exit(-1); // eslint-disable-line
    }

    var path;
    try {
        var resolve = require("enhanced-resolve");
        // 嘗試獲取插件模塊的絕對路徑
        path = resolve.sync(process.cwd(), name);
    } catch(e) {
        console.log("Cannot resolve plugin " + name + ".");
        process.exit(-1); // eslint-disable-line
    }
    var Plugin;
    try {
        // 載入模塊
        Plugin = require(path);
    } catch(e) {
        console.log("Cannot load plugin " + name + ". (" + path + ")");
        throw e;
    }
    try {
        // 返回插件實例
        return new Plugin(args);
    } catch(e) {
        console.log("Cannot instantiate plugin " + name + ". (" + path + ")");
        throw e;
    }
}
這裡的步驟比較清晰,如下:
1、判斷傳入參數是否形式類似於pluginname?params,對後面的參數進行解析
2、嘗試獲取插件的絕對路徑
3、嘗試載入模塊
4、嘗試調用new方法並返回模塊實例
參數解析用到了loadUtils模塊的parseQuery方法,這裡進去看一下源碼:
const specialValues = {
    "null": null,
    "true": true,
    "false": false
};

function parseQuery(query) {
    // 傳入的query字元串必須以?開頭
    if(query.substr(0, 1) !== "?") {
        throw new Error("A valid query string passed to parseQuery should begin with '?'");
    }
    query = query.substr(1);
    // 如果只傳一個問號返回空對象
    if(!query) {
        return {};
    }
    // ?{...}的情況
    // 調用JSON5嘗試進行對象解析
    // JSON5是對JSON的擴展
    if(query.substr(0, 1) === "{" && query.substr(-1) === "}") {
        return JSON5.parse(query);
    }
    // 其餘情況切割,或&符號
    const queryArgs = query.split(/[,&]/g);
    const result = {};
    queryArgs.forEach(arg => {
        const idx = arg.indexOf("=");
        // 類似於處理get請求的參數 例如:?a=1&b=2
        if(idx >= 0) {
            let name = arg.substr(0, idx);
            // decodeURIComponent對URI進行解碼
            let value = decodeURIComponent(arg.substr(idx + 1));
            // 將null、true、false字元串轉換為值
            if(specialValues.hasOwnProperty(value)) {
                value = specialValues[value];
            }
            // key以[]結尾
            if(name.substr(-2) === "[]") {
                // 截取key並設置值為數組
                name = decodeURIComponent(name.substr(0, name.length - 2));
                if(!Array.isArray(result[name]))
                    result[name] = [];
                result[name].push(value);
            }
            // 正常情況直接在result對象上添加屬性
            else {
                name = decodeURIComponent(name);
                result[name] = value;
            }
        } else {
            // ?-a&+b&c => result = {a:false,b:true,c:true}
            if(arg.substr(0, 1) === "-") {
                result[decodeURIComponent(arg.substr(1))] = false;
            } else if(arg.substr(0, 1) === "+") {
                result[decodeURIComponent(arg.substr(1))] = true;
            } else {
                result[decodeURIComponent(arg)] = true;
            }
        }
    });
    return result;
}
除去不合理的傳參,可以用兩種模式進行傳參:
1、正常模式:?a&a=1&-a&+b&a[]=1
首碼為"-"、"+"會在else被處理,"-"符號開頭值會被視為false,無首碼或者為"+"會被視為true。
類似於get請求參數會被一樣處理,進行字元串切割並依次添加進result對象。
最後一種比較特殊,代表參數a是一個數組,學過JAVA或者C++應該會熟悉這種聲明方式。
2、JSON模式:?{...}
以"{"開頭"}"結尾會被進行JSON解析,註意這裡不是普通的JSON.parse,而是引入了一個JSON的擴展JSON5,該工具相對於JSON擴展了多項功能,例如:
(1)JSON不允許有註釋
(2)JSON中的key必須要用雙引號包起來
(3)JSON對象、數組尾部不允許出現多餘的逗號
等等。
詳情可見:https://www.npmjs.com/package/json5
測試代碼如下:
普通模式: 
JSON模式:
7、processResolveAlias
function processResolveAlias(arg, key) {
    ifArgPair(arg, function(name, value) {
        // 必須以a=1這種鍵值對形式進行傳參
        if(!name) {
            throw new Error("--" + arg + " <string>=<string>");
        }
        /**
         * resolve:{
         *     alias:{
         *
         *     }
         * }
         */
        ensureObject(options, key);
        ensureObject(options[key], "alias");
        options[key].alias[name] = value;
    });
}
processResolveAlias("resolve-alias", "resolve");
processResolveAlias("resolve-loader-alias", "resolveLoader");
這裡處理--resolve-alias指令與resolve-loader-alias指令,該指令參數必須嚴格按照a=b形式。
測試代碼如下:

因為配置文件只有entry和output,所以屬性都是undefined或false,都會跳過。
這裡簡單看幾個常用的:
// 熱重載
ifBooleanArg("hot", function() {
    ensureArray(options, "plugins");
    var HotModuleReplacementPlugin = require("../lib/HotModuleReplacementPlugin");
    options.plugins.push(new HotModuleReplacementPlugin());
});
// loaderOptionsPlugin插件
ifBooleanArg("debug", function() {
    ensureArray(options, "plugins");
    var LoaderOptionsPlugin = require("../lib/LoaderOptionsPlugin");
    options.plugins.push(new LoaderOptionsPlugin({
        debug: true
    }));
});
// 代碼壓縮插件
ifBooleanArg("optimize-minimize", function() {
    ensureArray(options, "plugins");
    var UglifyJsPlugin = require("../lib/optimize/UglifyJsPlugin");
    var LoaderOptionsPlugin = require("../lib/LoaderOptionsPlugin");
    options.plugins.push(new UglifyJsPlugin({
        // devtool參數
        sourceMap: options.devtool && (options.devtool.indexOf("sourcemap") >= 0 || options.devtool.indexOf("source-map") >= 0)
    }));
    options.plugins.push(new LoaderOptionsPlugin({
        minimize: true
    }));
});
可以看到,使用--hot、--debug、--optimize-minimize指令會分別載入3個插件,一個是處理loader中Options屬性的LoaderOptionsPlugin插件,一個是代碼壓縮插件UglifyJsPlugin,還有一個就是熱重載插件,3個插件後面的章節有空再講。所有屬性在之前的config-yargs中被配置,但是預設值為false,而ifBooleanArg在傳入值為false時不會執行回調,所以這裡並不是載入任何東西。
其他還有很多指令類似於--output-path可以設置output.path參數等等,有興趣的可以自己去源碼看。
最後剩下3個代碼塊:
    // 無輸出文件名配置
    if (noOutputFilenameDefined) { /* ... */ }
    // 處理命令參數
    if (argv._.length > 0) { /* ... */ }
    // 無入口文件配置
    if (!options.entry) { /* ... */ }
由於指令沒有傳任何額外參數,所以argv._是一個空數組,中間的可以跳過。
所以只需要看其餘兩個,首先看簡單的無入口文件配置的情況,即配置文件沒有entry屬性:
if (!options.entry) {
    // 存在配置文件 但是沒有入口函數
    if (configFileLoaded) {
        console.error("Configuration file found but no entry configured.");
    }
    // 未找到配置文件
    else {
        console.error("No configuration file found and no entry configured via CLI option.");
        console.error("When using the CLI you need to provide at least two arguments: entry and output.");
        console.error("A configuration file could be named 'webpack.config.js' in the current directory.");
    }
    console.error("Use --help to display the CLI options.");
    // 退出進程
    process.exit(-1); // eslint-disable-line
}
可以看出這是必傳參數,根據是否找到對應的配置文件報不同的錯誤。
另一種情況是不存在ouput或output.filename屬性:
if (noOutputFilenameDefined) {
    ensureObject(options, "output");
    // convertOptions來源於第三個參數
    // module.exports = function(yargs, argv, convertOptions) {...}
    // var options = require("./convert-argv")(yargs, argv)
    // 只傳了兩個參數 所以跳過
    if (convertOptions && convertOptions.outputFilename) {
        options.output.path = path.resolve(path.dirname(convertOptions.outputFilename));
        options.output.filename = path.basename(convertOptions.outputFilename);
    }
    // 嘗試從命令參數獲取output.filename
    // 命令的最後一個參數會被當成入口文件名
    else if (argv._.length > 0) {
        options.output.filename = argv._.pop();
        options.output.path = path.resolve(path.dirname(options.output.filename));
        options.output.filename = path.basename(options.output.filename);
    }
    // 老套的報錯 不解釋
    else if (configFileLoaded) {
        throw new Error("'output.filename' is required, either in config file or as --output-filename");
    } else {
        console.error("No configuration file found and no output filename configured via CLI option.");
        console.error("A configuration file could be named 'webpack.config.js' in the current directory.");
        console.error("Use --help to display the CLI options.");
        process.exit(-1); // eslint-disable-line
    }
}
可以看出,output.filename也是必須的,但是不一定需要在配置文件中,有兩個方式可以傳入。
一個是作為convert-argv.js的第三個參數傳入,由於在之前解析時預設只傳了兩個,這裡會跳過,暫時不清楚傳入地點。
另外一個是在命令中傳入,測試代碼:


至此,模塊全部解析完畢,輸出options如圖所示:

真是累……


