
Nginx是個輕量級的反向代理,當然,也有相應的SSL身份認證。本文主要採用一種自我寄宿的方式,使用Nginx集群,通過windows證書(X.509證書),講述客戶端如何訪問伺服器的方法。客戶端以BasicHttpBinding進行訪問Nginx,然後Nginx進行負載均衡,將消息分發到後端任意一... ...
目錄
1 大概思路... 1
2 Nginx集群之WCF分散式身份驗證... 1
3 BasicHttpBinding、ws2007HttpBinding. 2
4 Windows證書生成私鑰、公鑰(X.509證書)... 3
5 編寫WCF服務、客戶端程式... 7
6 URL保留項... 13
7 部署WCF服務程式到區域網內3台PC機... 14
8 Nginx集群配置搭建... 15
9 SoapUI和WCF客戶端程式的運行結果... 16
10 總結... 18
1 大概思路
l Nginx集群之WCF分散式身份驗證
l BasicHttpBinding、Ws2007HttpBinding
l Windows證書生成公鑰、私鑰(x509證書)
l 編寫WCF服務、客戶端程式
l URL保留項
l 部署WCF服務程式到區域網內3台PC機
l Nginx集群配置搭建
l SoapUI和WCF客戶端程式的運行結果
l 總結
2 Nginx集群之WCF分散式身份驗證
Nginx是個輕量級的反向代理,當然,也有相應的SSL身份認證。本文主要採用一種自我寄宿的方式,使用Nginx集群,通過windows證書(X.509證書),講述客戶端如何訪問伺服器的方法。
本文源代碼主要分類:
l HighlyConcurrentHosting
使用BasicHttpBinding的源代碼(本文主要以這種方式進行Nginx集群)
l HighlyConcurrentHosting_Ws2007HttpBinding
使用ws2007HttpBinding的源代碼(這是一種點對點的Windows認證方式)
l Nginx配置
nginx.conf
l Windows證書
wcf_zhyongfeng.cer(客戶端需要安裝的證書)
wcf_zhyongfeng.pfx(伺服器需要安裝的證書)
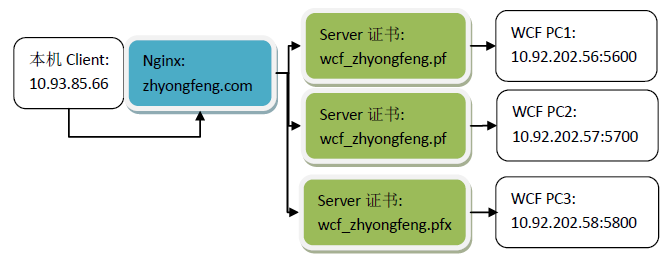
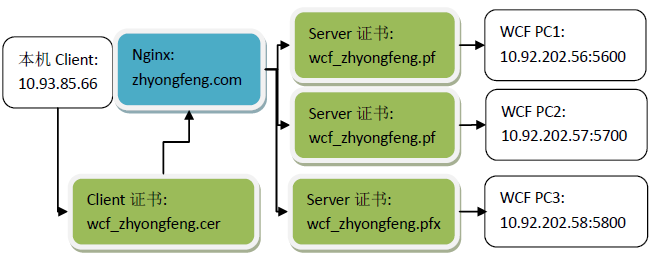
以下是本文講述的主要結構圖:
客戶端以BasicHttpBinding進行訪問Nginx,然後Nginx進行負載均衡,將消息分發到後端任意一臺WCF的PC機,後端需要被訪問的WCF伺服器,都要安裝Windows證書(僅被訪問的伺服器需要安裝wcf_zhyongfegn.pfx證書)。
若以ws2007HttpBinding進行點對點Windows認證,則Nginx只能起到通過劃分IP綁定特定一臺伺服器訪問的作用,並不能起到集群負載均衡,同時除了伺服器要wcf_zhyongfeng.pfx安裝證書外,客戶端也需要進行安裝wcf_zhyongfeng.cer證書,這裡不作為重點講述。
3 BasicHttpBinding、ws2007HttpBinding
這裡WCF的Ningx集群,主要用的是BasicHttpBinding。BasicHttpBinding的預設安全模式是None,即沒有任何安全設置,消息都以明文傳送,對客戶端也不進行驗證。 但是basicHttpBinding綁定可以實現安全傳輸,也可以通過傳輸層和消息層來保證消息的安全性。 basicHttpBinding設置為Transport安全模式,傳輸層的安全是使用IIS的安全機制,比如基本身份驗證、集成windows驗證、SSL安全通道等等
.NET Framework 3.5 介紹了一種用於Web 服務交互稱為ws2007HttpBinding綁定的新的綁定。這個綁定類似於ws2007HttpBinding綁定除了它支持最新的WS-* 消息,安全,可信賴消息和事務標準。
ws2007HttpBinding支持的標準:
|
WS-SecureConversation v1.3 |
WS-Security的擴展,為多個消息交換提供一個安全上下文 |
|
WS-Trust v1.3 |
WS-Security的擴展,請求並標記問題,管理可依賴關係。 |
|
WS-SecurityPolicy v1.2 |
WS-Security的安全斷言,WS-Security轉換以及使用WS-Policy表達的WS-Trust |
|
Web Services Reliable Messaging v1.1 |
保證消息被傳遞,適當編碼且不會重覆接收的協議 |
|
Web Services Coordination v1.1 |
為分散式平臺的動作合作提供協議的平臺 |
4 Windows證書生成私鑰、公鑰(X.509證書)
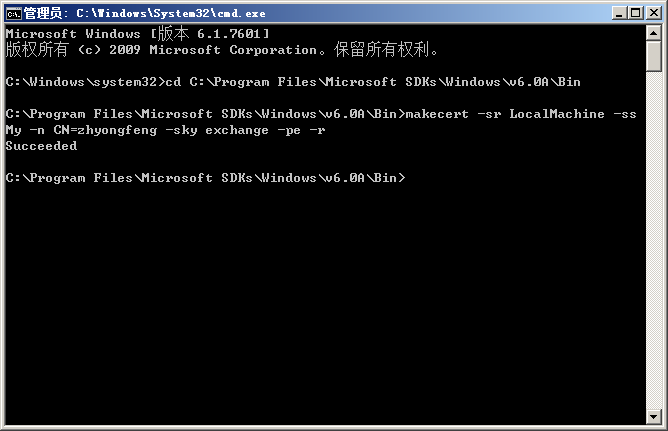
進行C:\Windows\system32,以管理員運行cmd.ext
Microsoft Windows [版本 6.1.7601]
版權所有 (c) 2009 Microsoft Corporation。保留所有權利。

C:\Windows\system32>cd C:\Program Files\Microsoft SDKs\Windows\v6.0A\Bin

C:\Program Files\Microsoft SDKs\Windows\v6.0A\Bin>makecert -r -pe -n "CN=wcf_zhyongfeng" -ss My -sky exchange
Succeeded

C:\Program Files\Microsoft SDKs\Windows\v6.0A\Bin>
查看Windows證書的生成,開始->運行,輸入:
certmgr.msc
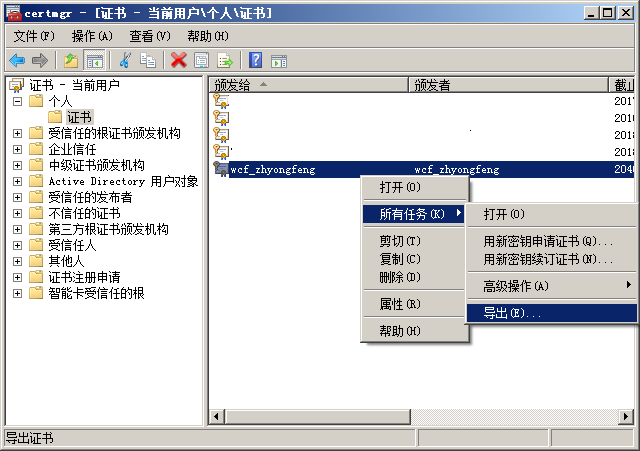
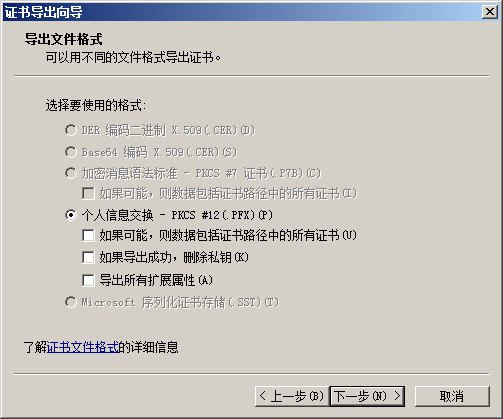
Windows導出wcf_zhyongfeng.pfx服務端證書:
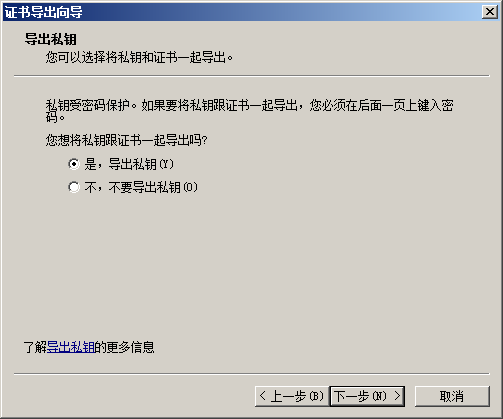


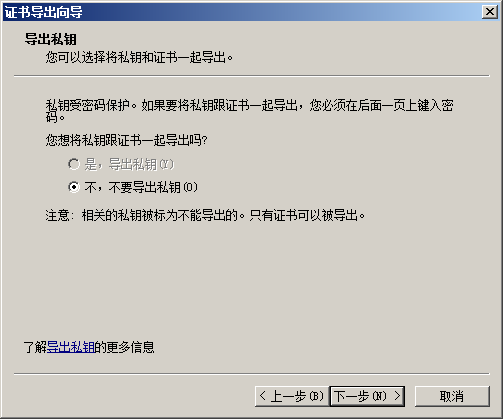
Windows導出wcf_zhyongfeng.cer客戶端證書:


5 編寫WCF服務、客戶端程式
l WCF服務程式
Program.cs
using Service;
using System;
using System.ServiceModel;

namespace HighlyConcurrentHosting
{
    class Program
    {
        static void Main(string[] args)
        {
            using (ServiceHost host = new ServiceHost(typeof(OutputSomething)))
            {
                host.Opened += delegate
                {
                    Console.WriteLine(host.Description.Endpoints[0].Address.Uri + "已經啟動,按任意鍵終止服務!");
                };

                host.Open();
                Console.Read();
            }
        }
    }

    /// <summary>
    /// 證書驗證帳戶名,密碼
    /// </summary>
    public class UserNamePasswordValidator : System.IdentityModel.Selectors.UserNamePasswordValidator
    {
        public override void Validate(string userName, string password)
        {
            if (userName != "zhyongfeng" || password != "123456")
            {
                throw new System.IdentityModel.Tokens.SecurityTokenException("Unknown Username or Password");
            }
        }
    }
}
服務端配置文件:
<?xml version="1.0" encoding="utf-8" ?>
<configuration>
  <system.serviceModel>
    <behaviors>
      <serviceBehaviors>
        <behavior name="metadataBehavior">
          <serviceMetadata httpGetEnabled="true"/>
          <!-- 要接收故障異常詳細信息以進行調試,請將以下值設置為 true。在部署前設置為 false 以避免泄漏異常信息 -->
          <serviceDebug includeExceptionDetailInFaults="true"/>

          <serviceCredentials>
            <!--指定一個 X.509 證書,用戶對認證中的用戶名密碼加密解密-->
            <!--C:\Program Files\Microsoft SDKs\Windows\v6.0A\Bin,使用makecert -r -pe -n "CN=wcf_zhyongfeng" -ss My -sky exchange-->
            <serviceCertificate findValue="wcf_zhyongfeng" x509FindType="FindBySubjectName" storeLocation="CurrentUser" storeName="My"/>
            <clientCertificate>
              <!--自定義對客戶端進行證書認證方式 這裡為 None-->
              <authentication certificateValidationMode="None"></authentication>
            </clientCertificate>

            <!--自定義用戶名和密碼驗證的設置-->
            <userNameAuthentication userNamePasswordValidationMode="Custom" customUserNamePasswordValidatorType="HighlyConcurrentHosting.UserNamePasswordValidator,HighlyConcurrentHosting" />
          </serviceCredentials>
        </behavior>
      </serviceBehaviors>
    </behaviors>

    <bindings>
      <basicHttpBinding>
        <!--這個是需要輸入用戶名密碼的-->
        <binding name="YesCertificate">
          <security mode="TransportCredentialOnly">
            <transport clientCredentialType="Basic"></transport>
            <message clientCredentialType="UserName"/>
          </security>
        </binding>
      </basicHttpBinding>
  </bindings>

    <services>
      <service name="Service.OutputSomething" behaviorConfiguration="metadataBehavior" >
        <host>
          <baseAddresses>
            <add baseAddress="http://127.0.0.1:5600/hello"/>
          </baseAddresses>
        </host>
        <endpoint binding="basicHttpBinding" bindingConfiguration="YesCertificate" contract="Service.Interface.IOutputSomething"/>
        <endpoint binding="basicHttpBinding" bindingConfiguration="YesCertificate" contract="Service.Interface.IOutputSomethingCertificate" />
      </service>
    </services>
  </system.serviceModel>

  <startup>
    <supportedRuntime version="v4.0" sku=".NETFramework,Version=v4.5" />
  </startup>
</configuration>
l 客戶端程式
using HighlyConcurrentClient.HighlyConcurrentService;
using System;
using System.Net;

namespace HighlyConcurrentClient
{
    class Program
    {
        static void Main(string[] args)
        {

            string AddressIP = string.Empty;
            foreach (IPAddress _IPAddress in Dns.GetHostEntry(Dns.GetHostName()).AddressList)
            {
                if (_IPAddress.AddressFamily.ToString() == "InterNetwork")
                {
                    AddressIP = _IPAddress.ToString();
                }
            }
            Console.WriteLine(string.Format("本機IP是:{0}", AddressIP));
            using (OutputSomethingCertificateClient proxy = new OutputSomethingCertificateClient())
            {

                proxy.ClientCredentials.UserName.UserName = "zhyongfeng";
                proxy.ClientCredentials.UserName.Password = "123456";
                for (int i = 0; i < 20; i++)
                {
                    Console.WriteLine(proxy.GetCertContentData(i));
                }
            }
            Console.Read();
        }
    }
}
客戶端配置文件:
<?xml version="1.0" encoding="utf-8" ?>
<configuration>
  <configSections>
  </configSections>
  <startup>
    <supportedRuntime version="v4.0" sku=".NETFramework,Version=v4.5" />
  </startup>
  <system.serviceModel>
    <bindings>
      <basicHttpBinding>
        <binding name="BasicHttpBinding_IOutputSomething">
          <security mode="TransportCredentialOnly">
            <transport clientCredentialType="Basic" />
          </security>
        </binding>
        <binding name="BasicHttpBinding_IOutputSomethingCertificate">
          <security mode="TransportCredentialOnly">
            <transport clientCredentialType="Basic" />
          </security>
        </binding>
      </basicHttpBinding>
    </bindings>
    <client>
      <endpoint address="http://zhyongfeng.com/hello" binding="basicHttpBinding"
        bindingConfiguration="BasicHttpBinding_IOutputSomething" contract="HighlyConcurrentService.IOutputSomething"
        name="BasicHttpBinding_IOutputSomething" />
      <endpoint address="http://zhyongfeng.com/hello" binding="basicHttpBinding"
        bindingConfiguration="BasicHttpBinding_IOutputSomethingCertificate"
        contract="HighlyConcurrentService.IOutputSomethingCertificate"
        name="BasicHttpBinding_IOutputSomethingCertificate" />
    </client>
  </system.serviceModel>
</configuration>
客戶端添加引用時,會產生
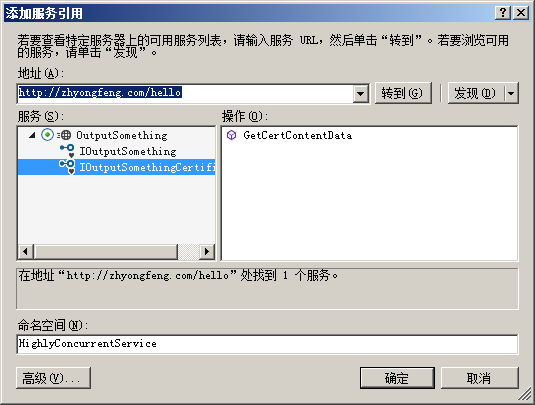

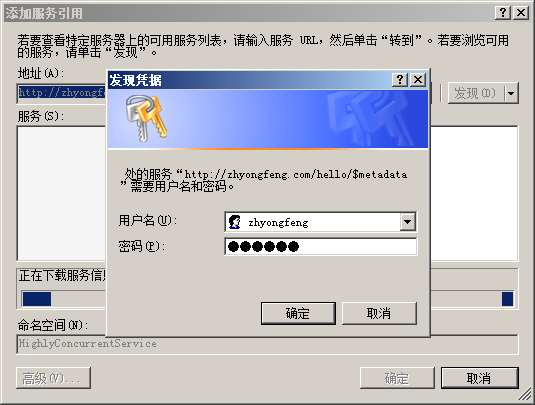
客戶端添加服務引用後,Address可能是某一臺PC機的IP地址(例如:address="http:// 10.92.202.56:5600/hello")這是需要修改為以下Nginx的地址
address="http://zhyongfeng.com/hello".
即如圖所示:

6 URL保留項
詳見:http://www.cnblogs.com/yongfeng/p/7851039.html
7 部署WCF服務程式到區域網內3台PC機
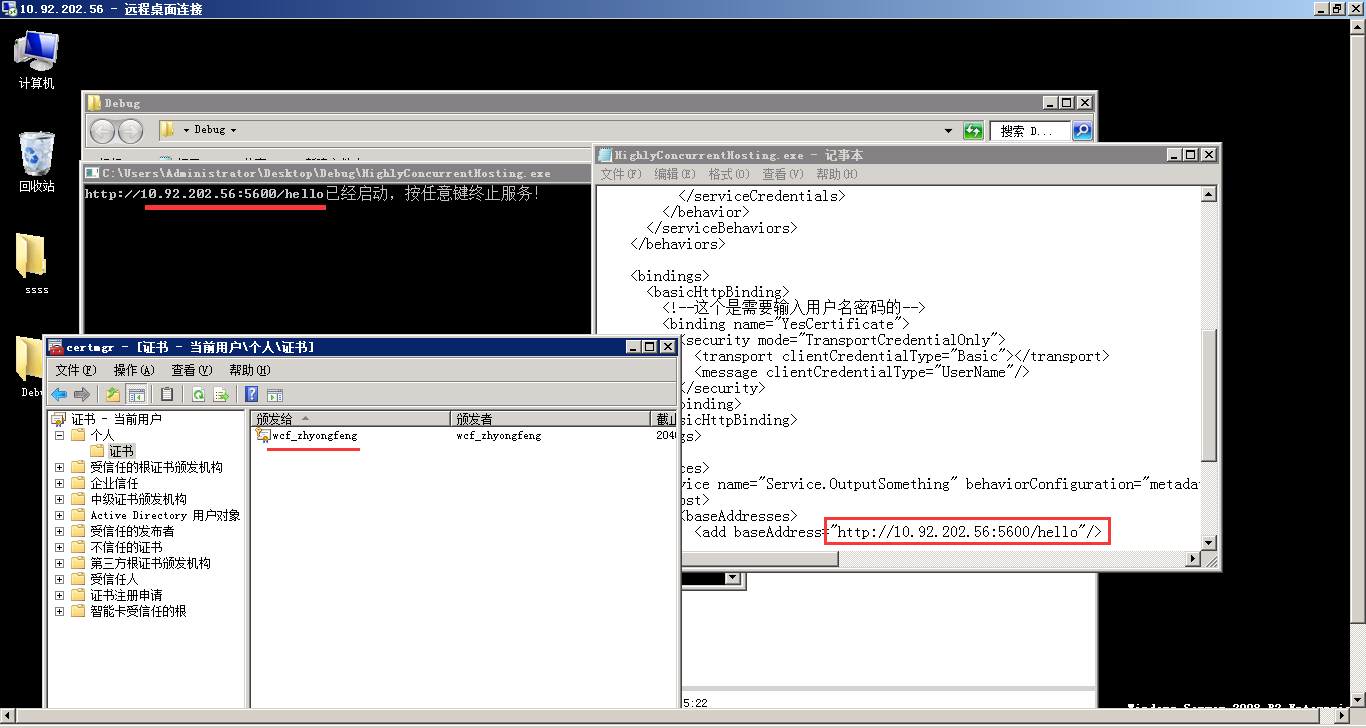
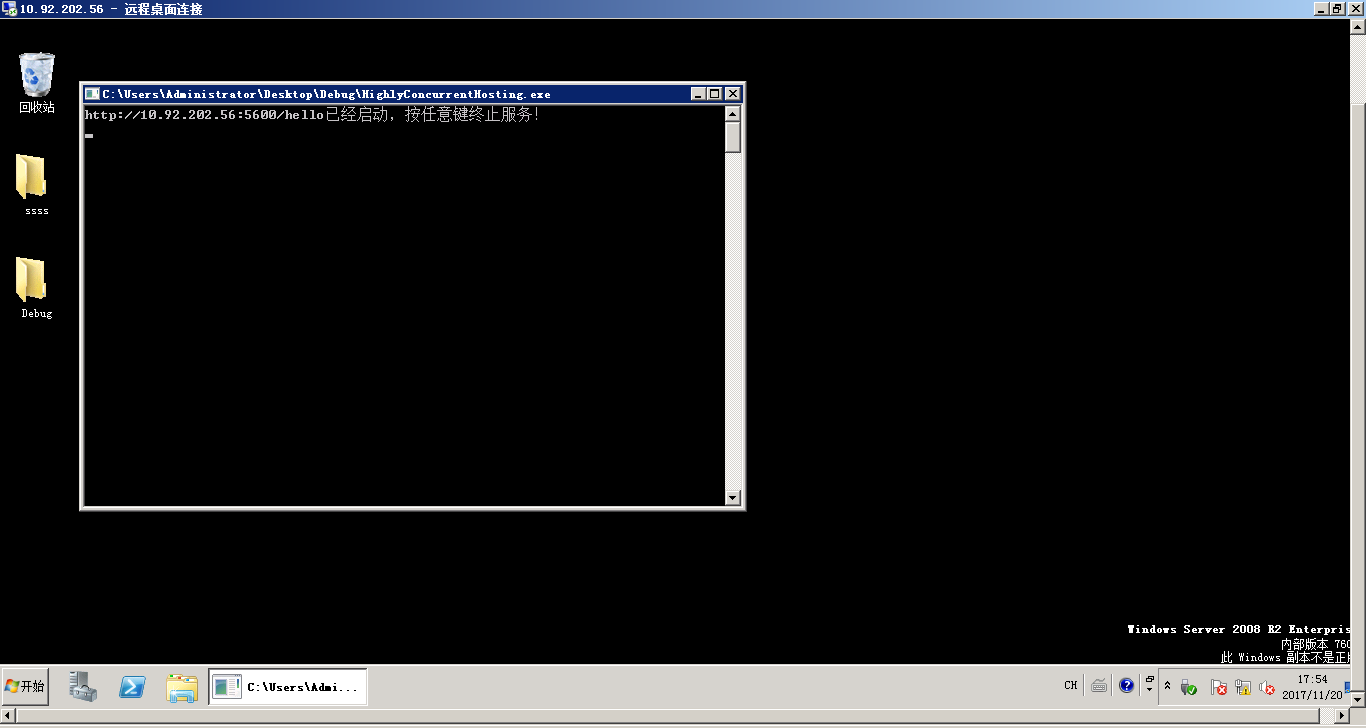
遠程進行部署WCF服務程式時,需要雙擊安裝伺服器wcf_zhyongfeng.pfx證書、修改config三台機的配置文件:10.92.202.56:5600、10.92.202.57:5700、10.92.202.58:5800
然後啟動遠程電腦的WCF服務程式,運行效果如下:

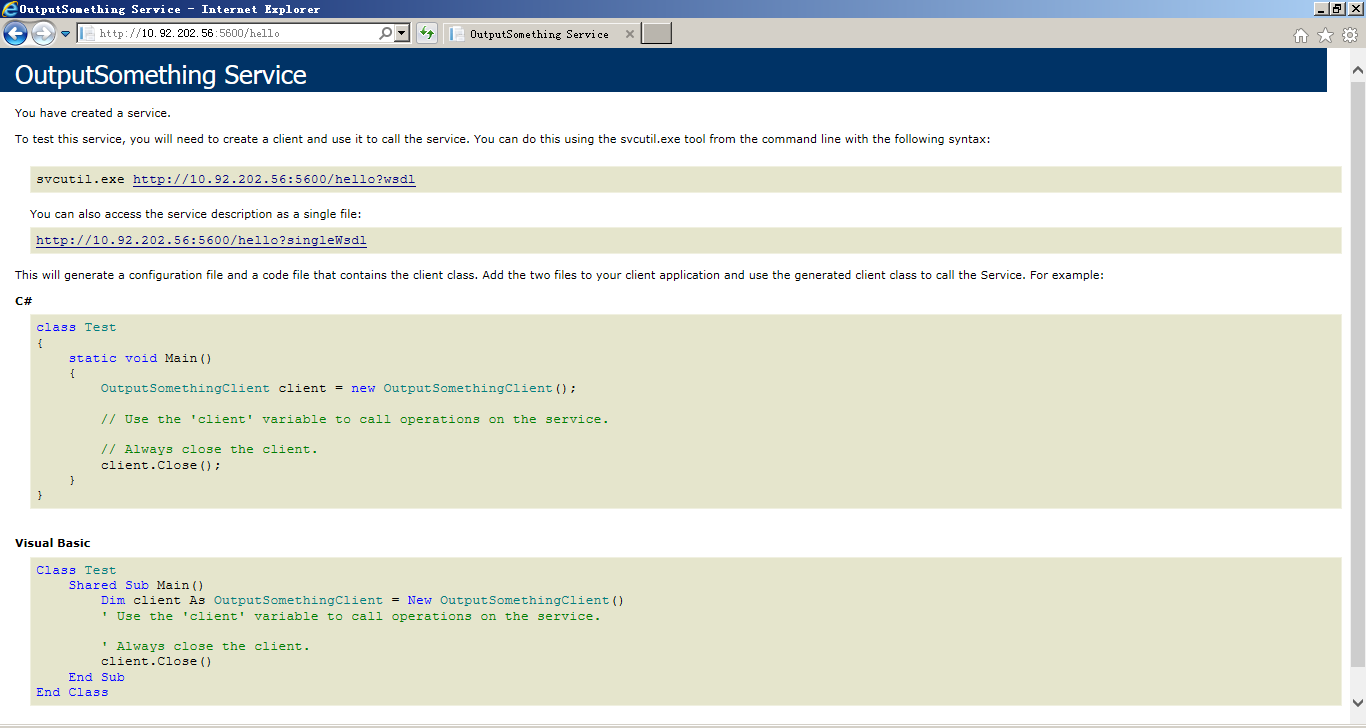
本機IE上訪問WCF服務端的運行效果:
8 Nginx集群配置搭建
通過自主義功能變數名稱zhyongfeng.com:80埠進行負載均衡集群訪問,則訪問C:\Windows\System32\drivers\etc\hosts,添加下列“本機IP 自定義的功能變數名稱”:
10.93.85.66 zhyongfeng.com
針對WCF部署的多台PC機配置(設置了proxy_connect_timeout為10s,如果其中一臺機down掉了,可以轉發到另一臺機器)如下:
worker_processes  1;
events {
    worker_connections  1024;
}
http {
    include       mime.types;
    default_type  application/octet-stream;
    sendfile        on;
    keepalive_timeout  65;

    upstream zhyongfeng.com {
        server    10.92.202.56:5600;
        server    10.92.202.57:5700;
        server    10.92.202.58:5800;
    }
    server {
        listen       80;
        server_name  zhyongfeng.com;
        location / {
            proxy_pass   http://zhyongfeng.com;
            proxy_connect_timeout       10s;
        }
    }
}
運行CMD:
D:\DTLDownLoads\nginx-1.10.2>start nginx

D:\DTLDownLoads\nginx-1.10.2>nginx -s reload
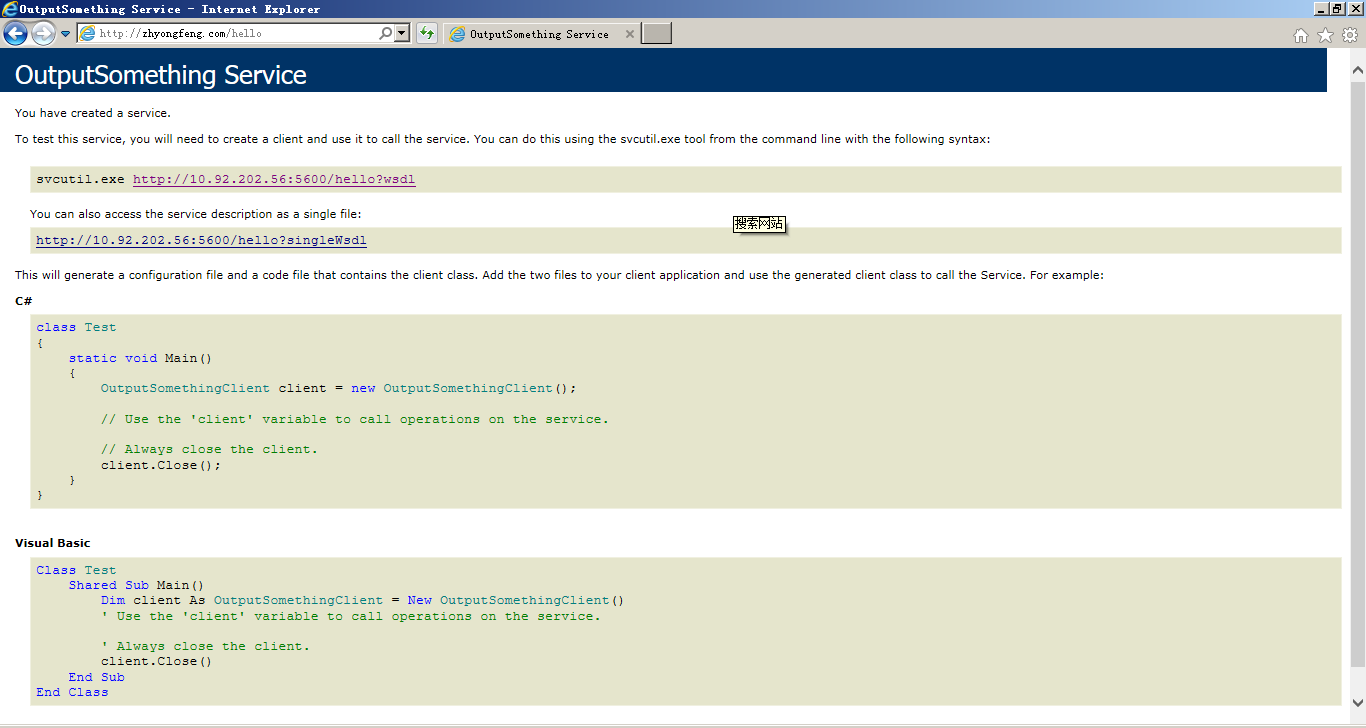
訪問WCF服務端:http://zhyongfeng.com/hello,運行結果:
9 SoapUI和WCF客戶端程式的運行結果
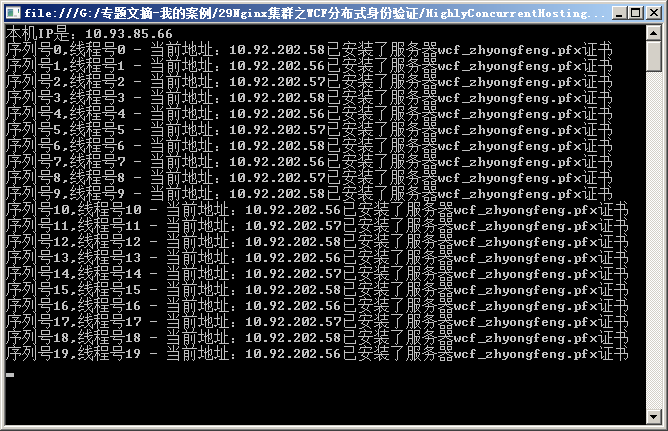
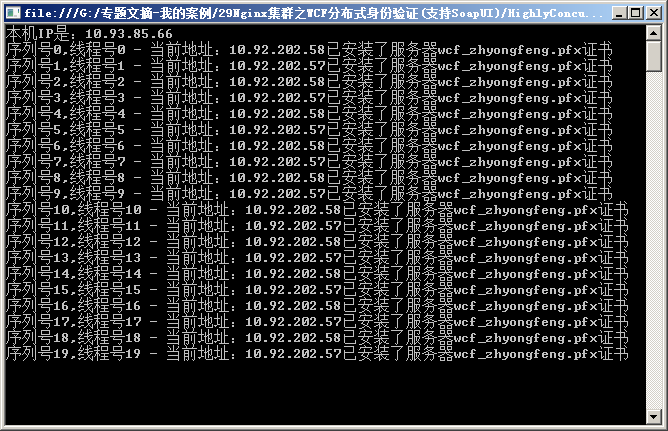
Soap協議,可以使用SoapUI測試並添加WCF的wsdl:http://zhyongfeng.com/hello?wsdl,運行效果如下:

啟動WCF客戶端程式,運行效果圖如下:
遠程桌面關掉其中一臺10.92.202.56:5600的PC機:
重新啟動WCF客戶端程式,因為Nginx配置文件設置了proxy_connect_timeout為10s,則關閉的PC機10.92.202.56:5600在10s後會將它的消息轉發給10.92.202.57:5700,繼續由其它2台PC機執行:
10 總結
通過使用BasicHttpBinding,除了能讓WCF客戶端訪問之外,還增加了WSDL的訪問方式。Nginx集群讓WCF客戶端具備用戶名密碼驗證的同時,達到負載均衡分散式處理的效果。
源代碼下載:
http://download.csdn.net/download/ruby_matlab/10126187
PDF下載:
Nginx集群之WCF分散式身份驗證(支持soap).pdf


