1.1 cobbler簡介 Cobbler是一個Linux伺服器安裝的服務,可以通過網路啟動(PXE)的方式來快速安裝、重裝物理伺服器和虛擬機,同時還可以管理DHCP,DNS等。 Cobbler可以使用命令行方式管理,也提供了基於Web的界面管理工具(cobbler-web),還提供了API介面,可 ...
1.1 cobbler簡介
Cobbler是一個Linux伺服器安裝的服務,可以通過網路啟動(PXE)的方式來快速安裝、重裝物理伺服器和虛擬機,同時還可以管理DHCP,DNS等。
Cobbler可以使用命令行方式管理,也提供了基於Web的界面管理工具(cobbler-web),還提供了API介面,可以方便二次開發使用。
Cobbler是較早前的kickstart的升級版,優點是比較容易配置,還自帶web界面比較易於管理。
Cobbler內置了一個輕量級配置管理系統,但它也支持和其它配置管理系統集成,如Puppet,暫時不支持SaltStack。
Cobbler官網http://cobbler.github.io
在使用cobbler之前需要瞭解kickstart的使用: http://www.cnblogs.com/clsn/p/7833333.html
1.1.1 cobbler集成的服務
PXE服務支持
DHCP服務管理
DNS服務管理(可選bind,dnsmasq)
電源管理
Kickstart服務支持
YUM倉庫管理
TFTP(PXE啟動時需要)
Apache(提供kickstart的安裝源,並提供定製化的kickstart配置)
1.2 安裝cobbler
1.2.1 環境說明
[root@Cobbler ~]# cat /etc/redhat-release
CentOS Linux release 7.4.1708 (Core)

[root@Cobbler ~]# uname -r
3.10.0-693.el7.x86_64

[root@Cobbler ~]# getenforce
Disabled

[root@Cobbler ~]# systemctl status firewalld.service
● firewalld.service - firewalld - dynamic firewall daemon
   Loaded: loaded (/usr/lib/systemd/system/firewalld.service; disabled; vendor preset: enabled)
   Active: inactive (dead)
     Docs: man:firewalld(1)

[root@Cobbler ~]# hostname -I
10.0.0.202 172.16.1.202
yum源說明:
curl -o /etc/yum.repos.d/CentOS-Base.repo http://mirrors.aliyun.com/repo/Centos-7.repo
curl -o /etc/yum.repos.d/epel.repo http://mirrors.aliyun.com/repo/epel-7.repo
1.2.2 使用yum安裝cobbler
yum -y install cobbler cobbler-web dhcp tftp-server pykickstart httpd
說明:cobbler是依賴與epel源下載
1.2.3 cobbler語法檢查前先啟動http與cobbler
systemctl start httpd.service
systemctl start cobblerd.service
cobbler check
1.2.4 進行語法檢查
[root@Cobbler ~]# cobbler check
The following are potential configuration items that you may want to fix:

1 : The 'server' field in /etc/cobbler/settings must be set to something other than localhost, or kickstarting features will not work.  This should be a resolvable hostname or IP for the boot server as reachable by all machines that will use it.

2 : For PXE to be functional, the 'next_server' field in /etc/cobbler/settings must be set to something other than 127.0.0.1, and should match the IP of the boot server on the PXE network.

3 : change 'disable' to 'no' in /etc/xinetd.d/tftp

4 : Some network boot-loaders are missing from /var/lib/cobbler/loaders, you may run 'cobbler get-loaders' to download them, or, if you only want to handle x86/x86_64 netbooting, you may ensure that you have installed a *recent* version of the syslinux package installed and can ignore this message entirely.  Files in this directory, should you want to support all architectures, should include pxelinux.0, menu.c32, elilo.efi, and yaboot. The 'cobbler get-loaders' command is the easiest way to resolve these requirements.

5 : enable and start rsyncd.service with systemctl

6 : debmirror package is not installed, it will be required to manage debian deployments and repositories

7 : The default password used by the sample templates for newly installed machines (default_password_crypted in /etc/cobbler/settings) is still set to 'cobbler' and should be changed, try: "openssl passwd -1 -salt 'random-phrase-here' 'your-password-here'" to generate new one

8 : fencing tools were not found, and are required to use the (optional) power management features. install cman or fence-agents to use them

Restart cobblerd and then run 'cobbler sync' to apply changes.
1.2.5 解決當中的報錯
命令集

sed -i 's/server: 127.0.0.1/server: 172.16.1.202/' /etc/cobbler/settings
sed -i 's/next_server: 127.0.0.1/next_server: 172.16.1.202/' /etc/cobbler/settings
sed -i 's/manage_dhcp: 0/manage_dhcp: 1/' /etc/cobbler/settings
sed -i 's/pxe_just_once: 0/pxe_just_once: 1/' /etc/cobbler/settings
sed -ri "/default_password_crypted/s#(.*: ).*#\1\"`openssl passwd -1 -salt 'oldboy' '123456'`\"#" /etc/cobbler/settings
sed -i 's#yes#no#' /etc/xinetd.d/tftp

systemctl start rsyncd
systemctl enable rsyncd
systemctl enable tftp.socket
systemctl start tftp.socket
systemctl restart cobblerd.service

sed -i.ori 's#192.168.1#172.16.1#g;22d;23d' /etc/cobbler/dhcp.template

cobbler sync
View 命令集 單擊+打開
詳解
解決1、2
cp /etc/cobbler/settings{,.ori}
sed -i 's/server: 127.0.0.1/server: 172.16.1.202/' /etc/cobbler/settings
sed -i 's/next_server: 127.0.0.1/next_server: 172.16.1.202/' /etc/cobbler/settings
問題3
sed 's#yes#no#g' /etc/xinetd.d/tftp -i
4下載包所需的軟體包
[root@Cobbler ~]# cobbler get-loaders
[root@Cobbler ~]# ls  /var/lib/cobbler/loaders
COPYING.elilo     elilo-ia64.efi   menu.c32    yaboot
COPYING.syslinux  grub-x86_64.efi  pxelinux.0
COPYING.yaboot    grub-x86.efi     README
5啟動rsync服務
[root@Cobbler ~]# systemctl start rsyncd.service
[root@Cobbler ~]# systemctl enable rsyncd.service
6 debian相關無需修改
7、修改安裝完成後的root密碼
openssl passwd -1 -salt 'random-phrase-here' 'your-password-here'
random-phrase-here  隨機字元串
your-password-here 密碼
示例
[root@Cobbler ~]# openssl passwd -1 -salt 'CLSN' '123456'
$1$CLSN$LpJk4x1cplibx3q/O4O/K/
管理dhcp
sed -i 's/manage_dhcp: 0/manage_dhcp: 1/' /etc/cobbler/settings
防止重裝
sed -i 's/pxe_just_once: 0/pxe_just_once: 1/' /etc/cobbler/settings
修改dhcp模板
sed -i.ori 's#192.168.1#172.16.1#g;22d;23d' /etc/cobbler/dhcp.template
cobbler組配置文件位置
/etc/cobbler/settings
註意:修改完成之後要使用cobbler sync 進行同步,否則不生效。
1.2.6 修改之後
再次檢查語法:
[root@Cobbler ~]# cobbler check
The following are potential configuration items that you may want to fix:

1 : debmirror package is not installed, it will be required to manage debian deployments and repositories
2 : fencing tools were not found, and are required to use the (optional) power management features. install cman or fence-agents to use them

Restart cobblerd and then run 'cobbler sync' to apply changes.
重啟所有服務
systemctl restart httpd.service
systemctl restart cobblerd.service
systemctl restart dhcpd.service
systemctl restart rsyncd.service
systemctl restart tftp.socket
到此cobbler就安裝完成,下麵進行web界面的操作。
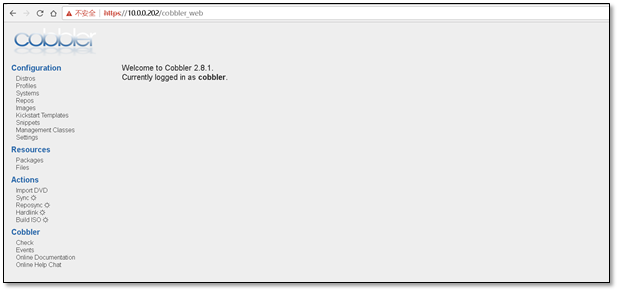
1.3 cobbler的web及界面操作
瀏覽器訪問https://10.0.0.202/cobbler_web
註意CentOS7中cobbler只支持https訪問。
賬號密碼預設均為cobbler
1.3.1 操作說明--導入鏡像
1)在虛擬機上添加上鏡像
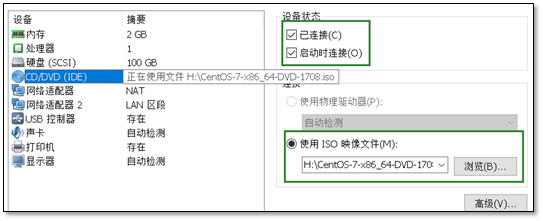
2)掛載上鏡像
[root@Cobbler ~]# mount /dev/cdrom  /mnt/
mount: /dev/sr0 is write-protected, mounting read-only

[root@Cobbler ~]# df -h |grep mnt
/dev/sr0        4.3G  4.3G     0 100% /mnt
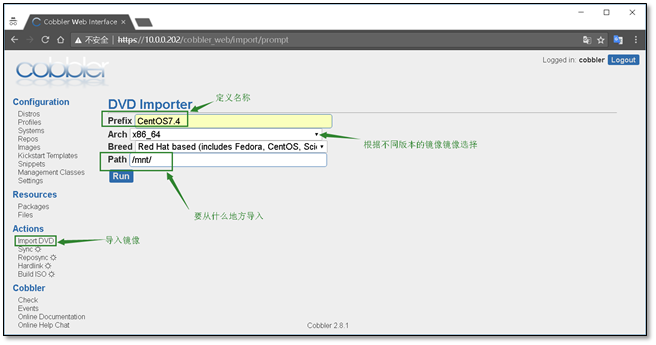
3)進行導入鏡像
選擇Import DVD 輸入Prefix(文件首碼),Arch(版本),Breed(品牌),Path(要從什麼地方導入)
在導入鏡像的時候要註意路徑,防止迴圈導入。
信息配置好後,點擊run,即可進行導入。
導入過程使用rsync進行導入,三個進程消失表示導入完畢
[root@Cobbler mnt]# ps -ef |grep rsync
root   12026      1  0 19:04 ?   00:00:00 /usr/bin/rsync --daemon --no-detach
root  13554  11778 12 19:51 ?    00:00:06 rsync -a /mnt/ /var/www/cobbler/ks_mirror/CentOS7.4-x86_64 --progress
root   13555  13554  0 19:51 ?     00:00:00 rsync -a /mnt/ /var/www/cobbler/ks_mirror/CentOS7.4-x86_64 --progress
root   13556  13555 33 19:51 ?        00:00:17 rsync -a /mnt/ /var/www/cobbler/ks_mirror/CentOS7.4-x86_64 --progress
root   13590  10759  0 19:52 pts/1    00:00:00 grep --color=auto rsync
查看日誌可以發現右running進程
日誌位於 Events

導入完成後生成的文件夾
[root@Cobbler ks_mirror]# pwd
/var/www/cobbler/ks_mirror

[root@Cobbler ks_mirror]# ls
CentOS7.4-x86_64  config
1.3.2 創建一臺空白虛擬機,進行測試網路安裝
註意:虛擬機的記憶體不能小於2G,網卡的配置要保證網路互通
啟動虛擬機
啟動虛擬機即可發現會有cobbler的選擇界面
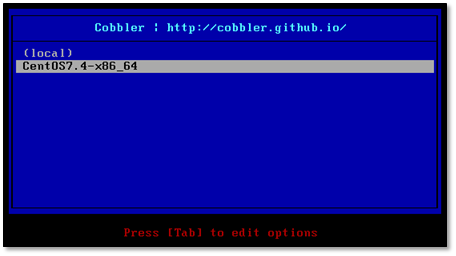
選擇CentOS7.4即可進行安裝,安裝過程與光碟安裝一致,這裡就不在覆述。
1.4 定製化安裝操作系統
1.4.1 添加內核參數
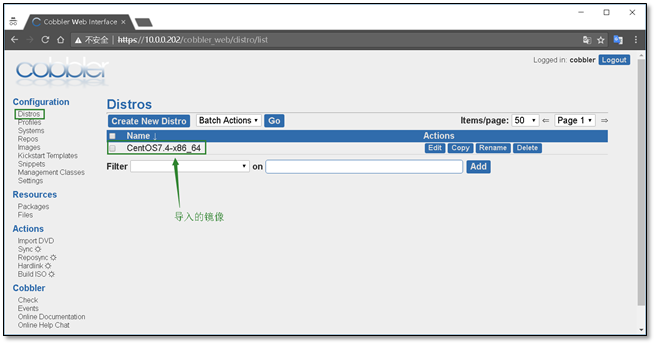
1)查看導入的鏡像,點擊edit
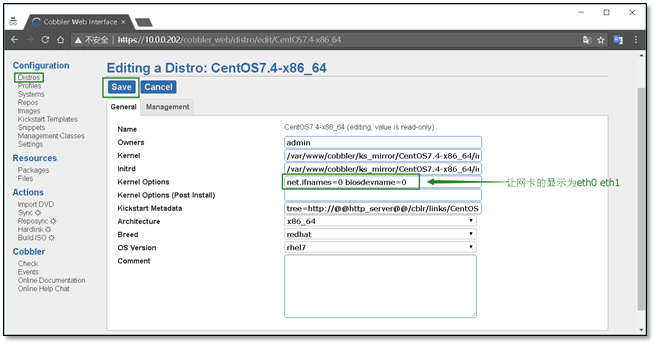
2)在內核參數中添加net.ifnames=0 biosdevname=0
能夠讓顯示的網卡變為eth0 ,而不是CentOS7中的ens33
修改完成後點擊保存
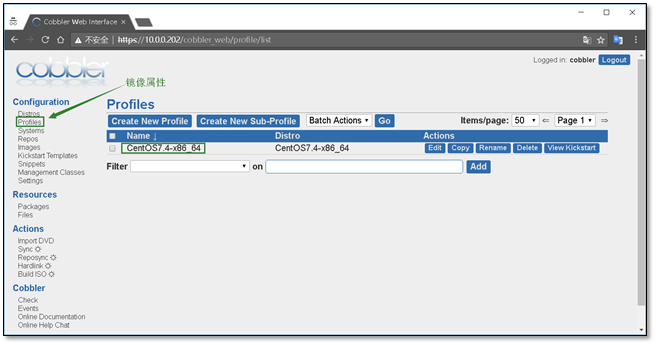
1.4.2 查看鏡像屬性
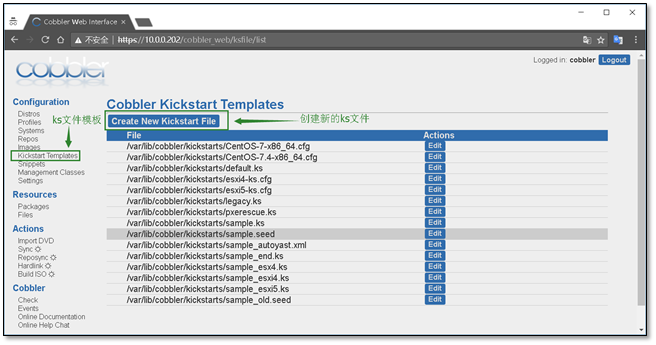
1.4.3 編寫ks文件
1)創建新的ks文件
2)添加ks文件,並配置文件名
創建完成後點擊Save進行保存
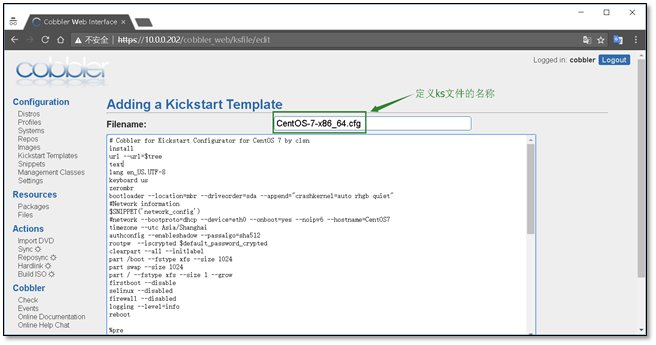
CentOS7 ks配置文件參考

 1 # Cobbler for Kickstart Configurator for CentOS 7 by clsn
 2 install
 3 url --url=$tree
 4 text
 5 lang en_US.UTF-8
 6 keyboard us
 7 zerombr
 8 bootloader --location=mbr --driveorder=sda --append="crashkernel=auto rhgb quiet"
 9 #Network information
10 $SNIPPET('network_config')
11 #network --bootproto=dhcp --device=eth0 --onboot=yes --noipv6 --hostname=CentOS7
12 timezone --utc Asia/Shanghai
13 authconfig --enableshadow --passalgo=sha512
14 rootpw  --iscrypted $default_password_crypted
15 clearpart --all --initlabel
16 part /boot --fstype xfs --size 1024
17 part swap --size 1024
18 part / --fstype xfs --size 1 --grow
19 firstboot --disable
20 selinux --disabled
21 firewall --disabled
22 logging --level=info
23 reboot
24
25 %pre
26 $SNIPPET('log_ks_pre')
27 $SNIPPET('kickstart_start')
28 $SNIPPET('pre_install_network_config')
29 # Enable installation monitoring
30 $SNIPPET('pre_anamon')
31 %end
32
33 %packages
34 @^minimal
35 @compat-libraries
36 @core
37 @debugging
38 @development
39 bash-completion
40 chrony
41 dos2unix
42 kexec-tools
43 lrzsz
44 nmap
45 sysstat
46 telnet
47 tree
48 vim
49 wget
50 %end
51
52 %post
53 systemctl disable postfix.service
54 %end
View Code ks文件內容(centos7.x)
1.4.4 自定義安裝系統
1)選擇systems 創建一個新的系統
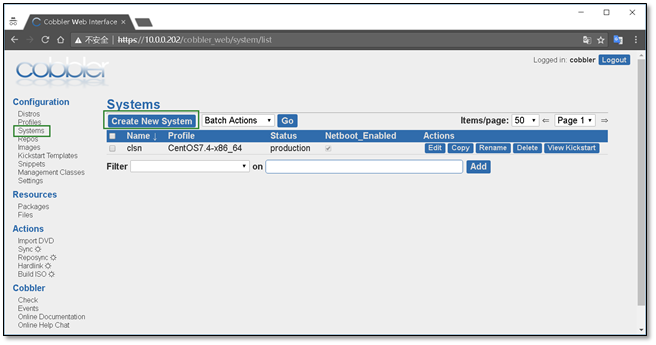
2)定義系統信息
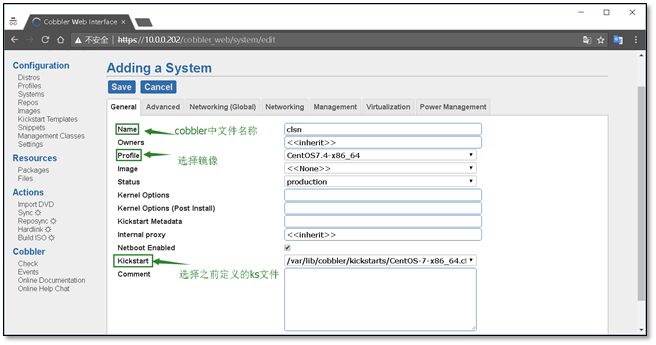
3)配置全局網路信息
主機名、網關、DNS
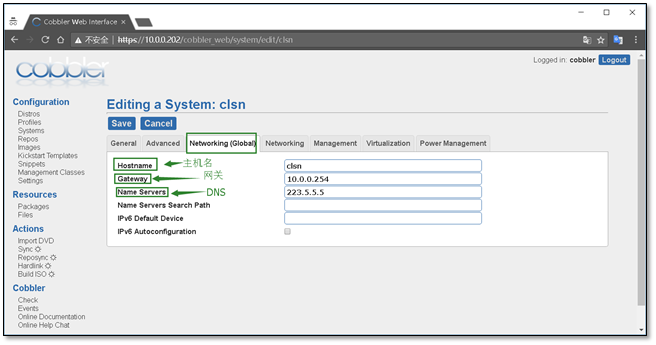
4)配置網卡信息,eth0,eth1
需要註意,選擇static靜態,

以上的所有配置完成後,點擊Save進行保存
附錄:
VMware workstation中查看虛擬機mac地址的方法。在虛擬機設置中。

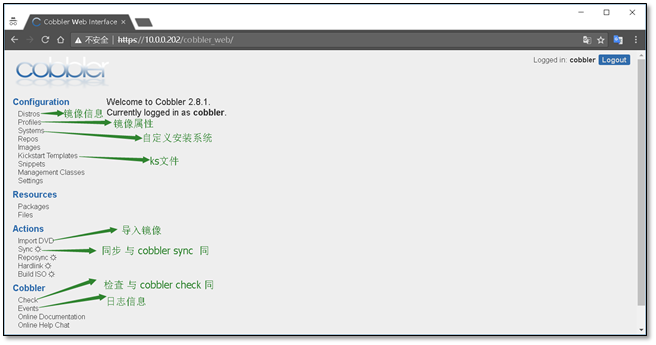
cobbler web 界面說明
1.5 安裝虛擬機
1.5.1 開啟虛擬機
如果之前的設置就顯示安裝進度

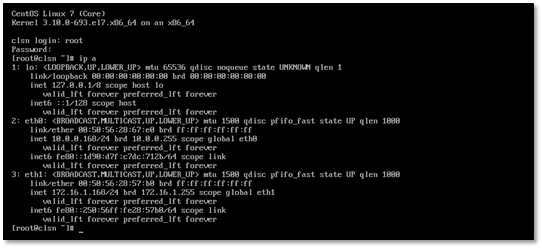
1.5.2 安裝完成進行檢查
1.6 cobbler使用常見錯誤
1.6.1 cobbler check報錯
[root@Cobbler ~]# cobbler sync
Traceback (most recent call last):
  File "/usr/bin/cobbler", line 36, in <module>
    sys.exit(app.main())
  File "/usr/lib/python2.7/site-packages/cobbler/cli.py", line 662, in main
    rc = cli.run(sys.argv)
  File "/usr/lib/python2.7/site-packages/cobbler/cli.py", line 269, in run
    self.token         = self.remote.login("", self.shared_secret)
  File "/usr/lib64/python2.7/xmlrpclib.py", line 1233, in __call__
    return self.__send(self.__name, args)
  File "/usr/lib64/python2.7/xmlrpclib.py", line 1587, in __request
    verbose=self.__verbose
  File "/usr/lib64/python2.7/xmlrpclib.py", line 1273, in request
    return self.single_request(host, handler, request_body, verbose)
  File "/usr/lib64/python2.7/xmlrpclib.py", line 1306, in single_request
    return self.parse_response(response)
  File "/usr/lib64/python2.7/xmlrpclib.py", line 1482, in parse_response
    return u.close()
  File "/usr/lib64/python2.7/xmlrpclib.py", line 794, in close
    raise Fault(**self._stack[0])
xmlrpclib.Fault: <Fault 1: "<class 'cobbler.cexceptions.CX'>:'login failed'">
解決辦法
systemctl restart httpd.service
systemctl restart cobblerd.service
cobbler check
1.6.2 No space left on device

出現這個錯誤的原因是虛擬機的記憶體不足2G,
將記憶體調為2G即可(這個錯誤只會出現在CentOS7.3之上)
1.7 附錄cobbler_CentOS6.x_ks配置文件

# Cobbler for Kickstart Configurator for CentOS 6  by clsn
install
url --url=$tree
text
lang en_US.UTF-8
keyboard us
zerombr
bootloader --location=mbr --driveorder=sda --append="crashkernel=auto rhgb quiet"
$SNIPPET('network_config')
timezone --utc Asia/Shanghai
authconfig --enableshadow --passalgo=sha512
rootpw  --iscrypted $default_password_crypted
clearpart --all --initlabel
part /boot --fstype=ext4 --asprimary --size=200
part swap --size=1024
part / --fstype=ext4 --grow --asprimary --size=200
firstboot --disable
selinux --disabled
firewall --disabled
logging --level=info
reboot

%pre
$SNIPPET('log_ks_pre')
$SNIPPET('kickstart_start')
$SNIPPET('pre_install_network_config')
# Enable installation monitoring
$SNIPPET('pre_anamon')
%end

%packages
@base
@compat-libraries
@debugging
@development
tree
nmap
sysstat
lrzsz
dos2unix
telnet
%end

%post --nochroot
$SNIPPET('log_ks_post_nochroot')
%end

%post
$SNIPPET('log_ks_post')
# Start yum configuration
$yum_config_stanza
# End yum configuration
$SNIPPET('post_install_kernel_options')
$SNIPPET('post_install_network_config')
$SNIPPET('func_register_if_enabled')
$SNIPPET('download_config_files')
$SNIPPET('koan_environment')
$SNIPPET('redhat_register')
$SNIPPET('cobbler_register')
# Enable post-install boot notification
$SNIPPET('post_anamon')
# Start final steps
$SNIPPET('kickstart_done')
# End final steps
%end
View ks文件參考 centos6.x
1.8 參考文檔
http://blog.oldboyedu.com/autoinstall-cobbler/
http://www.zyops.com/autoinstall-cobbler


