
1.背景介紹 作為運維,在公司經常遇到一些機械性重覆工作要做,例如:為新機器裝系統,一臺兩台機器裝系統,可以用光碟、U盤等介質安裝,1小時也完成了,但是如果有成百台的伺服器還要用光碟、U盤去安裝,就顯得有些力不從心了。PXE技術就能很好的解決這個問題,本文將會對PXE的工作原理有所介紹,而cobbl ...
1.背景介紹
作為運維,在公司經常遇到一些機械性重覆工作要做,例如:為新機器裝系統,一臺兩台機器裝系統,可以用光碟、U盤等介質安裝,1小時也完成了,但是如果有成百台的伺服器還要用光碟、U盤去安裝,就顯得有些力不從心了。PXE技術就能很好的解決這個問題,本文將會對PXE的工作原理有所介紹,而cobbler則是基於PXE技術的工作原理的二次封裝,通過命令的方式簡化了PXE配置過程。
2.PXE原理介紹
2.1原理與概念
事實上把PXE稱作是一種引導方式而不是安裝方式似乎更加準確,PXE(Pre-boot Execution Environment)是由Intel設計的協議,它可以使電腦通過網路啟動,但是有一個前提條件是電腦的網卡必須具有引導功能,這個網卡中要有一個PXE客戶端。當電腦POST自檢成功以後,BIOS把網卡中ROM的PXE客戶端調入記憶體執行,PXE客戶端通過網路中的DHCP伺服器獲取一個IP地址,拿到IP地址以後PXE繼續引導電腦與網路中的TFTP客戶端建立連接,從而從TFTP伺服器中獲取開機引導文件之後請求並下載安裝需要的文件。在這個過程中需要一臺伺服器來提供啟動文件、安裝文件、以及安裝過程中的自動應答文件等。
2.2PXE工作步驟如下圖:
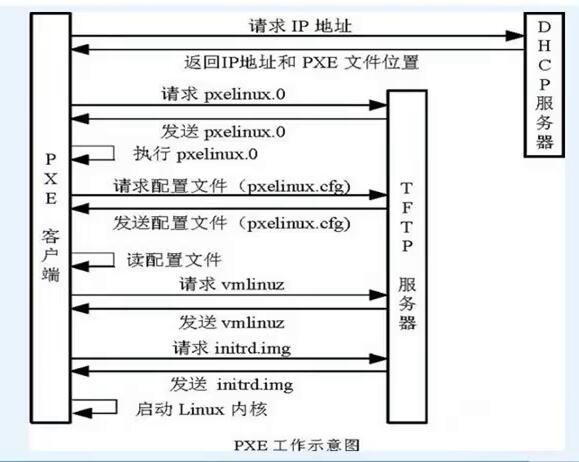
原理介紹
- Client向PXE Server上的DHCP發送IP地址請求消息,DHCP檢測Client是否合法(主要是檢測Client的網卡MAC地址),如果合法則返回Client的IP地址,同時將啟動文件pxelinux.0的位置信息一併傳送給Client
- Client向PXE Server上的TFTP發送獲取pxelinux.0請求消息,TFTP接收到消息之後再向Client發送pxelinux.0大小信息,試探Client是否滿意,當TFTP收到Client發回的同意大小信息之後,正式向Client發送pxelinux.0
- Client執行接收到的pxelinux.0文件
- Client向TFTP Server發送針對本機的配置信息文件(在TFTP服務的pxelinux.cfg目錄下,這是系統菜單文件,格式和isolinux.cfg格式一樣,功能也是類似),TFTP將配置文件發回Client,繼而Client根據配置文件執行後續操作。
- Client向TFTP發送Linux內核請求信息,TFTP接收到消息之後將內核文件發送給Client
- Client向TFTP發送根文件請求信息,TFTP接收到消息之後返回Linux根文件系統
- Client啟動Linux內核
- Client下載安裝源文件,讀取自動化安裝腳本
3.Cobbler
鑒於pxe自動裝系統網上一搜一大把,我就不詳細操作舉例了,今天主要講一講Cobbler。
3.1Cobbler介紹
Cobbler是一個Linux伺服器快速網路安裝的服務,由python開發,小巧輕便(15k行python代碼),可以通過PXE的方式來快速安裝、重裝物理伺服器和虛擬機,同時還可以管理DHCP,DNS,TFTP、RSYNC以及yum倉庫、構造系統ISO鏡像。
Cobbler可以使用命令行方式管理,也提供了基於Web的界面管理工具(cobbler-web),還提供了API介面,可以方便二次開發使用。
3.2Cobbler工作流程
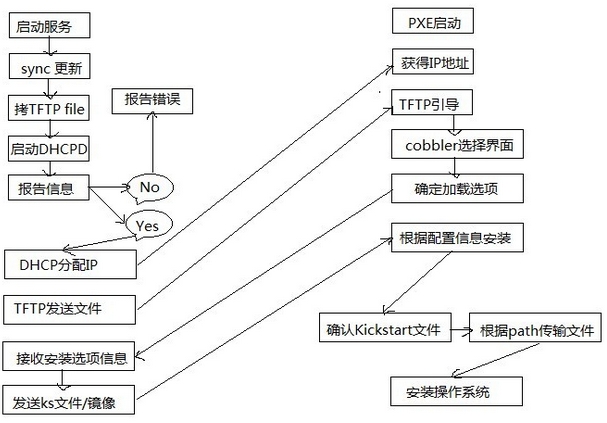
- client裸機配置了從網路啟動後,開機後會廣播包請求DHCP伺服器 (cobbler server)發送其分配好的一個IP
- DHCP伺服器(cobbler server)收到請求後發送responese,包括其ip地址
- client裸機拿到ip後再向cobbler server發送請求OS引導文件的請求
- cobbler server告訴裸機OS引導文件的名字和TFTP server的ip和 port
- client裸機通過上面告知的TFTP server地址通信,下載引導文件
- client裸機執行執行該引導文件,確定載入信息,選擇要安裝的os, 期間會再向cobbler server請求kickstart文件和os image
- cobbler server發送請求的kickstart和os iamge
- client裸機載入kickstart文件
- client裸機接收os image,安裝該os image
3.3Cobbler集成的服務
- PXE服務支持
- DHCP服務管理
- DNS服務管理(可選bind,dnsmasq)
- 電源管理
- Kickstart服務支持
- YUM倉庫管理
- TFTP(PXE啟動時需要)
- Apache(提供kickstart的安裝源,並提供定製化的kickstart配置)
3.4配置目錄
配置文件目錄:
/etc/cobbler
/etc/cobbler/settings : cobbler 主配置文件
/etc/cobbler/iso/: iso模板配置文件
/etc/cobbler/pxe: pxe模板文件
/etc/cobbler/power: 電源配置文件
/etc/cobbler/user.conf: web服務授權配置文件
/etc/cobbler/users.digest: web訪問的用戶名密碼配置文件
/etc/cobbler/dhcp.template : dhcp伺服器的的配置末班
/etc/cobbler/dnsmasq.template : dns伺服器的配置模板
/etc/cobbler/tftpd.template : tftp服務的配置模板
/etc/cobbler/modules.conf : 模塊的配置文件
數據目錄:
/var/lib/cobbler/config/: 用於存放distros,system,profiles 等信 息配置文件
/var/lib/cobbler/triggers/: 用於存放用戶定義的cobbler命令
/var/lib/cobbler/kickstart/: 預設存放kickstart文件
/var/lib/cobbler/loaders/: 存放各種引導程式 鏡像目錄
/var/www/cobbler/ks_mirror/: 導入的發行版系統的所有數據
/var/www/cobbler/images/ : 導入發行版的kernel和initrd鏡像用於 遠程網路啟動
/var/www/cobbler/repo_mirror/: yum 倉庫存儲目錄
日誌目錄:
/var/log/cobbler/installing: 客戶端安裝日誌
/var/log/cobbler/cobbler.log : cobbler日誌
3.5命令介紹
cobbler commands介紹
cobbler check 核對當前設置是否有問題
cobbler list 列出所有的cobbler元素
cobbler report 列出元素的詳細信息
cobbler sync 同步配置到數據目錄,更改配置最好都要執行下
cobbler reposync 同步yum倉庫
cobbler distro 查看導入的發行版系統信息
cobbler system 查看添加的系統信息
cobbler profile 查看配置信息
3.6/etc/cobbler/settings中重要的參數設置
default_password_crypted: "$1$gEc7ilpP$pg5iSOj/mlxTxEslhRvyp/"
manage_dhcp:1
manage_tftpd:1
pxe_just_once:1
next_server:< tftp伺服器的 IP 地址>
server:
4.Cobbler安裝
4.1系統信息
 1 [root@localhost ~]#  cat /etc/redhat-release
 2 CentOS Linux release 7.2.1511 (Core)
 3 [root@localhost ~]#  uname -r
 4 3.10.0-327.el7.x86_64
 5 [root@localhost ~]#  getenforce
 6 Disabled
 7 [root@localhost ~]#  systemctl status firewalld.service
 8 ● firewalld.service - firewalld - dynamic firewall daemon
 9    Loaded: loaded (/usr/lib/systemd/system/firewalld.service; disabled; vendor preset: enabled)
10    Active: inactive (dead)
11      Docs: man:firewalld(1)
12 [root@localhost ~]#  ifconfig eno16777736|awk -F "[ :]+" 'NR==2 {print $3}'
13 10.0.0.101
14 [root@localhost ~]#  hostname
15 localhost.localdomain
16 [root@localhost ~]#
4.2配置yum源
[root@localhost ~]## rpm -ivh http://dl.fedoraproject.org/pub/epel/7/x86_64/e/epel-release-7-10.noarch.rpm
[root@localhost ~]## yum makecache
4.3開始安裝Cobbler
4.3.1安裝cobbler以及相關的軟體
[root@localhost ~]# yum -y install httpd dhcp tftp python-ctypes cobbler xinetd cobbler-web
4.3.2啟動相關服務
[root@localhost ~]# systemctl start httpd
[root@localhost ~]# systemctl enable httpd
[root@localhost ~]# systemct1 enable cobblerd
[root@localhost ~]# systemctl start cobblerd
4.3.3通過cobbler check 核對當前設置是否有問題
 1 [root@localhost ~]# cobbler check
 2 The following are potential configuration items that you may want to fix:
 3
 4 1 : The 'server' field in /etc/cobbler/settings must be set to something other than localhost, or kickstarting features will not work.  This should be a resolvable hostname or IP for the boot server as reachable by all machines that will use it.
 5 2 : For PXE to be functional, the 'next_server' field in /etc/cobbler/settings must be set to something other than 127.0.0.1, and should match the IP of the boot server on the PXE network.
 6 3 : change 'disable' to 'no' in /etc/xinetd.d/tftp
 7 4 : Some network boot-loaders are missing from /var/lib/cobbler/loaders, you may run 'cobbler get-loaders' to download them, or, if you only want to handle x86/x86_64 netbooting, you may ensure that you have installed a *recent* version of the syslinux package installed and can ignore this message entirely.  Files in this directory, should you want to support all architectures, should include pxelinux.0, menu.c32, elilo.efi, and yaboot. The 'cobbler get-loaders' command is the easiest way to resolve these requirements.
 8 5 : enable and start rsyncd.service with systemctl
 9 6 : debmirror package is not installed, it will be required to manage debian deployments and repositories
10 7 : The default password used by the sample templates for newly installed machines (default_password_crypted in /etc/cobbler/settings) is still set to 'cobbler' and should be changed, try: "openssl passwd -1 -salt 'random-phrase-here' 'your-password-here'" to generate new one
11 8 : fencing tools were not found, and are required to use the (optional) power management features. install cman or fence-agents to use them
12
13 Restart cobblerd and then run 'cobbler sync' to apply changes.
按照提示一個一個的解決問題:
問題1:
[root@localhost ~]# sed -i 's/^server: 127.0.0.1/server: 10.0.0.101/' /etc/cobbler/settings # 修改server的ip地址為本機ip
問題2:
[root@localhost ~]# sed -i 's/^next_server: 127.0.0.1/next_server: 10.0.0.101/' /etc/cobbler/settings # TFTP Server 的IP地址
問題3:
 1 service tftp
 2 {
 3         socket_type             = dgram
 4         protocol                = udp
 5         wait                    = yes
 6         user                    = root
 7         server                  = /usr/sbin/in.tftpd
 8         server_args             = -s /var/lib/tftpboot
 9         disable                 = no  # 修改為no
10         per_source              = 11
11         cps                     = 100 2
12         flags                   = IPv4
13 }
問題4:
[root@localhost ~]# cobbler get-loaders  # 下載缺失的文件
task started: 2017-10-15_113824_get_loaders
task started (id=Download Bootloader Content, time=Sun Oct 15 11:38:24 2017)
downloading https://cobbler.github.io/loaders/README to /var/lib/cobbler/loaders/README
downloading https://cobbler.github.io/loaders/COPYING.elilo to /var/lib/cobbler/loaders/COPYING.elilo
downloading https://cobbler.github.io/loaders/COPYING.yaboot to /var/lib/cobbler/loaders/COPYING.yaboot
downloading https://cobbler.github.io/loaders/COPYING.syslinux to /var/lib/cobbler/loaders/COPYING.syslinux
downloading https://cobbler.github.io/loaders/elilo-3.8-ia64.efi to /var/lib/cobbler/loaders/elilo-ia64.efi
downloading https://cobbler.github.io/loaders/yaboot-1.3.17 to /var/lib/cobbler/loaders/yaboot
downloading https://cobbler.github.io/loaders/pxelinux.0-3.86 to /var/lib/cobbler/loaders/pxelinux.0
downloading https://cobbler.github.io/loaders/menu.c32-3.86 to /var/lib/cobbler/loaders/menu.c32
downloading https://cobbler.github.io/loaders/grub-0.97-x86.efi to /var/lib/cobbler/loaders/grub-x86.efi
downloading https://cobbler.github.io/loaders/grub-0.97-x86_64.efi to /var/lib/cobbler/loaders/grub-x86_64.efi
*** TASK COMPLETE ***
問題5:
# 添加rsync到自啟動並啟動rsync
[root@localhost ~]# systemctl enable rsyncd
Created symlink from /etc/systemd/system/multi-user.target.wants/rsyncd.service to /usr/lib/systemd/system/rsyncd.service.
[root@localhost ~]# systemctl start rsyncd
問題6:
跟debian 相關,可以忽略
問題7:
# 修改密碼為123456 ,salt後面是常用的加鹽方式加密
[root@localhost ~]# openssl passwd -1 -salt '123456' '123456'
$1$123456$wOSEtcyiP2N/IfIl15W6Z0
[root@localhost ~]# vim /etc/cobbler/settings # 修改settings配置文件中下麵位置,把新生成的密碼加進去
default_password_crypted: "$1$123456$wOSEtcyiP2N/IfIl15W6Z0
再次執行cobbler check
[root@localhost ~]# cobbler check The following are potential configuration items that you may want to fix: 1 : debmirror package is not installed, it will be required to manage debian deployments and repositories# debian相關2 : fencing tools were not found, and are required to use the (optional) power management features. install cman or fence-agents to use them# fence設備相關,不需要Restart cobblerd and then run 'cobbler sync' to apply changes.
以上兩個問題暫時可以忽略
4.3.4配置cobbler-DHCP
修改cobbler配置
[root@localhost ~]# vim /etc/cobbler/settings # 修改settings中參數,由cobbler控制dhcp
manage_dhcp: 1
修改dhcp.templates配置文件(僅列出修改部分)
[root@localhost ~]# vim /etc/cobbler/dhcp.template
subnet 10.0.0.0 netmask 255.255.255.0 {
     option routers             10.0.0.2;
     option domain-name-servers 10.0.0.2;
     option subnet-mask         255.255.255.0;
     range dynamic-bootp        10.0.0.100 10.0.0.250;
重啟服務並同步配置,改完dhcp必須要sync同步配置
 1 [root@localhost ~]# systemctl restart cobblerd.service
 2 [root@localhost ~]# cobbler sync
 3 task started: 2017-10-15_122732_sync
 4 task started (id=Sync, time=Sun Oct 15 12:27:32 2017)
 5 running pre-sync triggers
 6 cleaning trees
 7 removing: /var/lib/tftpboot/pxelinux.cfg/default
 8 removing: /var/lib/tftpboot/grub/efidefault
 9 removing: /var/lib/tftpboot/grub/grub-x86.efi
10 removing: /var/lib/tftpboot/grub/images
11 removing: /var/lib/tftpboot/grub/grub-x86_64.efi
12 removing: /var/lib/tftpboot/s390x/profile_list
13 copying bootloaders
14 trying hardlink /var/lib/cobbler/loaders/grub-x86.efi -> /var/lib/tftpboot/grub/grub-x86.efi
15 trying hardlink /var/lib/cobbler/loaders/grub-x86_64.efi -> /var/lib/tftpboot/grub/grub-x86_64.efi
16 copying distros to tftpboot
17 copying images
18 generating PXE configuration files
19 generating PXE menu structure
20 rendering DHCP files
21 generating /etc/dhcp/dhcpd.conf
22 rendering TFTPD files
23 generating /etc/xinetd.d/tftp
24 cleaning link caches
25 running post-sync triggers
26 running python triggers from /var/lib/cobbler/triggers/sync/post/*
27 running python trigger cobbler.modules.sync_post_restart_services
28 running: dhcpd -t -q
29 received on stdout:
30 received on stderr:
31 running: service dhcpd restart
32 received on stdout:
33 received on stderr: Redirecting to /bin/systemctl restart  dhcpd.service
34
35 running shell triggers from /var/lib/cobbler/triggers/sync/post/*
36 running python triggers from /var/lib/cobbler/triggers/change/*
37 running python trigger cobbler.modules.scm_track
38 running shell triggers from /var/lib/cobbler/triggers/change/*
39 *** TASK COMPLETE ***
檢查dhcp
[root@localhost ~]# netstat -lnup|grep dhcp
udp        0      0 0.0.0.0:39776           0.0.0.0:*                           53381/dhcpd
udp        0      0 0.0.0.0:67              0.0.0.0:*                           53381/dhcpd
udp6       0      0 :::46146                :::*                                53381/dhcpd
4.3.5導入CentOs-7的鏡像
[root@localhost ~]# mount /dev/cdrom  /mnt # 掛載光碟鏡像
mount: /dev/sr0 is write-protected, mounting read-only
[root@localhost ~]# cobbler import --path=/mnt --name=Centos-7.2 --arch=x86_64 # cobbler導入鏡像
task started: 2017-10-15_145401_import
task started (id=Media import, time=Sun Oct 15 14:54:01 2017)
Found a candidate signature: breed=redhat, version=rhel6
Found a candidate signature: breed=redhat, version=rhel7
Found a matching signature: breed=redhat, version=rhel7
Adding distros from path /var/www/cobbler/ks_mirror/Centos-7.2-x86_64: # 導入鏡像的位置
creating new distro: Centos-7.2-x86_64
trying symlink: /var/www/cobbler/ks_mirror/Centos-7.2-x86_64 -> /var/www/cobbler/links/Centos-7.2-x86_64
creating new profile: Centos-7.2-x86_64
associating repos
checking for rsync repo(s)
checking for rhn repo(s)
checking for yum repo(s)
starting descent into /var/www/cobbler/ks_mirror/Centos-7.2-x86_64 for Centos-7.2-x86_64
processing repo at : /var/www/cobbler/ks_mirror/Centos-7.2-x86_64
need to process repo/comps: /var/www/cobbler/ks_mirror/Centos-7.2-x86_64
looking for /var/www/cobbler/ks_mirror/Centos-7.2-x86_64/repodata/*comps*.xml
Keeping repodata as-is :/var/www/cobbler/ks_mirror/Centos-7.2-x86_64/repodata
*** TASK COMPLETE ***
# --path 鏡像路徑# --name 為安裝源定義一個名字# --arch 指定安裝源是32位、64位、ia64, 目前支持的選項有: x86│x86_64│ia64# 安裝源的唯一標示就是根據name參數來定義,本例導入成功後,安裝源的唯一標示就是:CentOS-7.1-x86_64,如果重覆,系統會提示導入失敗
導入完鏡像以後,那麼就使查看下cobbler
[root@localhost ks_mirror]# cobbler list
distros:
   Centos-7.2-x86_64

profiles:
   Centos-7.2-x86_64

systems:

repos:

images:

mgmtclasses:

packages:

files:
4.3.6導入kickstarts配置文件
[root@localhost kickstarts]# ls
default.ks    esxi5-ks.cfg      legacy.ks     sample_autoyast.xml  sample_esx4.ks   sample_esxi5.ks  sample_old.seed
esxi4-ks.cfg  install_profiles  pxerescue.ks  sample_end.ks        sample_esxi4.ks  sample.ks        sample.seed
[root@localhost kickstarts]# pwd
/var/lib/cobbler/kickstarts
[root@localhost kickstarts]# rz
rz waiting to receive.
 zmodem trl+C ȡ

  100%       1 KB    1 KB/s 00:00:01       0 Errors.
查看導入信息及預設ks文件
[root@localhost kickstarts]# cobbler report
distros:
==========
Name                           : Centos-7.2-x86_64
Architecture                   : x86_64
TFTP Boot Files                : {}
Breed                          : redhat
Comment                        :
Fetchable Files                : {}
Initrd                         : /var/www/cobbler/ks_mirror/Centos-7.2-x86_64/images/pxeboot/initrd.img
Kernel                         : /var/www/cobbler/ks_mirror/Centos-7.2-x86_64/images/pxeboot/vmlinuz
Kernel Options                 : {}
Kernel Options (Post Install)  : {}
Kickstart Metadata             : {'tree': 'http://@@http_server@@/cblr/links/Centos-7.2-x86_64'}
Management Classes             : []
OS Version                     : rhel7
Owners                         : ['admin']
Red Hat Management Key         : <<inherit>>
Red Hat Management Server      : <<inherit>>
Template Files                 : {}


profiles:
==========
Name                           : Centos-7.2-x86_64
TFTP Boot Files                : {}
Comment                        :
DHCP Tag                       : default
Distribution                   : Centos-7.2-x86_64
Enable gPXE?                   : 0
Enable PXE Menu?               : 1
Fetchable Files                : {}
Kernel Options                 : {}
Kernel Options (Post Install)  : {}
Kickstart                      : /var/lib/cobbler/kickstarts/sample_end.ks  # 預設ks文件,這裡需要修改為我們自己配置好的ks文件
Kickstart Metadata             : {}
Management Classes             : []
Management Parameters          : <<inherit>>
Name Servers                   : []
Name Servers Search Path       : []
Owners                         : ['admin']
Parent Profile                 :
Internal proxy                 :
Red Hat Management Key         : <<inherit>>
Red Hat Management Server      : <<inherit>>
Repos                          : []
Server Override                : <<inherit>>
Template Files                 : {}
Virt Auto Boot                 : 1
Virt Bridge                    : xenbr0
Virt CPUs                      : 1
Virt Disk Driver Type          : raw
Virt File Size(GB)             : 5
Virt Path                      :
Virt RAM (MB)                  : 512
Virt Type                      : kvm


systems:
==========

repos:
==========

images:
==========

mgmtclasses:
==========

packages:
==========

files:
==========
我ks文件(只是簡單配置的,具體可以按自己業務來)
 1 #platform=x86, AMD64, or Intel EM64T
 2 #version=DEVEL
 3 # Install OS instead of upgrade
 4 install
 5 # Keyboard layouts
 6 keyboard 'us'
 7 # Root password
 8 rootpw --iscrypted $1$m1pE0DG6$vALBphGGynqvUzfJaWZ6U1
 9 # Use network installation
10 url --url="$tree"
11 # System language
12 lang en_US
13 # Firewall configuration
14 firewall --disabled
15 # System authorization information
16 auth  --useshadow  --passalgo=sha512
17 # Use graphical install
18 graphical
19 firstboot --disable
20 # SELinux configuration
21 selinux --disabled
22
23 # Network information
24 network  --bootproto=dhcp --device=eth0
25 network  --bootproto=dhcp --device=eth1
26 # Reboot after installation
27 reboot
28 # System timezone
29 timezone Asia/Shanghai
30 # System bootloader configuration
31 bootloader --location=mbr
32 # Clear the Master Boot Record
33 zerombr
34 # Partition clearing information
35 clearpart --all --initlabel
36 # Disk partitioning information
37 part /boot --asprimary --fstype="ext4" --size=200
38 part swap --fstype="swap" --size=1024
39 part / --fstype="ext4" --grow --size=1
40 %packages
41 @base
42 @core
43 @compat-libraries
44 @debugging
45 @development
46 @gnome-desktop
47 @X Window System
48 %end
檢查ks命令
# 寫完 ks 文件之後,先通過 validateks 測試一下有沒有語法錯誤
# cobbler validateks
# 通過下麵這個命令查看 ks 文件,發現一些邏輯上的問題
# cobbler system getks --name=test
編輯修改指定ks文件為我們剛剛上傳的ks
1 [root@localhost kickstarts]# cobbler profile list 2 Centos-7.2-x86_64 3 [root@localhost kickstarts]# cobbler profile edit --name Centos-7.2-x86_64 --kickstart=/var/lib/cobbler/kickstarts/Centos7.2-x86_64.cfg # 編輯profile,修改ks文件為我們剛剛上傳的Centos7.2-x86_64.cfg 4 [root@localhost kickstarts]# cobbler profile edit --name Centos-7.2-x86_64 --kopts='net.ifnames=0 biosdevname=0'
#修改安裝系統的內核參數,在CentOS7系統有一個地方變了,就是網卡名變成eno16777736這種形式,但是為了運維標準化,我們需要將它變成我們常用的eth0,因此使用上面的參數。但要註意是CentOS7才需要上面的步驟,CentOS6不需要。5 [root@localhost kickstarts]# cobbler profile report 6 Name : Centos-7.2-x86_64 7 TFTP Boot Files : {} 8 Comment : 9 DHCP Tag : default 10 Distribution : Centos-7.2-x86_64 11 Enable gPXE? : 0 12 Enable PXE Menu? : 1 13 Fetchable Files : {} 14 Kernel Options : {'biosdevname': '0', 'net.ifnames': '0'} 15 Kernel Options (Post Install) : {} 16 Kickstart : /var/lib/cobbler/kickstarts/Centos7.2-x86_64.cfg # ks文件已經修改為我們上傳的ks文件 17 Kickstart Metadata : {} 18 Management Classes : [] 19 Management Parameters : <<inherit>> 20 Name Servers : [] 21 Name Servers Search Path : [] 22 Owners : ['admin'] 23 Parent Profile : 24 Internal proxy : 25 Red Hat Management Key : <<inherit>> 26 Red Hat Management Server : <<inherit>> 27 Repos : [] 28 Server Override : <<inherit>> 29 Template Files : {} 30 Virt Auto Boot : 1 31 Virt Bridge : xenbr0 32 Virt CPUs : 1 33 Virt Disk Driver Type : raw 34 Virt File Size(GB) : 5 35 Virt Path : 36 Virt RAM (MB) : 512 37 Virt Type : kvm
4.3.7同步cobbler
 1 [root@localhost kickstarts]# cobbler sync
 2 task started: 2017-10-15_154709_sync
 3 task started (id=Sync, time=Sun Oct 15 15:47:09 2017)
 4 running pre-sync triggers
 5 cleaning trees
 6 removing: /var/www/cobbler/images/Centos-7.2-x86_64
 7 removing: /var/lib/tftpboot/pxelinux.cfg/default
 8 removing: /var/lib/tftpboot/grub/efidefault
 9 removing: /var/lib/tftpboot/grub/grub-x86.efi
10 removing: /var/lib/tftpboot/grub/images
11 removing: /var/lib/tftpboot/grub/grub-x86_64.efi
12 removing: /var/lib/tftpboot/images/Centos-7.2-x86_64
13 removing: /var/lib/tftpboot/s390x/profile_list
14 copying bootloaders
15 trying hardlink /var/lib/cobbler/loaders/grub-x86.efi -> /var/lib/tftpboot/grub/grub-x86.efi
16 trying hardlink /var/lib/cobbler/loaders/grub-x86_64.efi -> /var/lib/tftpboot/grub/grub-x86_64.efi
17 copying distros to tftpboot
18 copying files for distro: Centos-7.2-x86_64
19 trying hardlink /var/www/cobbler/ks_mirror/Centos-7.2-x86_64/images/pxeboot/vmlinuz -> /var/lib/tftpboot/images/Centos-7.2-x86_64/vmlinuz
20 trying hardlink /var/www/cobbler/ks_mirror/Centos-7.2-x86_64/images/pxeboot/initrd.img -> /var/lib/tftpboot/images/Centos-7.2-x86_64/initrd.img
21 copying images
22 generating PXE configuration files
23 generating PXE menu structure
24 copying files for distro: Centos-7.2-x86_64
25 trying hardlink /var/www/cobbler/ks_mirror/Centos-7.2-x86_64/images/pxeboot/vmlinuz -> /var/www/cobbler/images/Centos-7.2-x86_64/vmlinuz
26 trying hardlink /var/www/cobbler/ks_mirror/Centos-7.2-x86_64/images/pxeboot/initrd.img -> /var/www/cobbler/images/Centos-7.2-x86_64/initrd.img
27 Writing template files for Centos-7.2-x86_64
28 rendering DHCP files
29 generating /etc/dhcp/dhcpd.conf
30 rendering TFTPD files
31 generating /etc/xinetd.d/tftp
32 processing boot_files for distro: Centos-7.2-x86_64
33 cleaning link caches
34 running post-sync triggers
35 running python triggers from /var/lib/cobbler/triggers/sync/post/*
36 running python trigger cobbler.modules.sync_post_restart_services
37 running: dhcpd -t -q
38 received on stdout:
39 received on stderr:
40 running: service dhcpd restart
41 received on stdout:
42 received on stderr: Redirecting to /bin/systemctl restart  dhcpd.service
43
44 running shell triggers from /var/lib/cobbler/triggers/sync/post/*
45 running python triggers from /var/lib/cobbler/triggers/change/*
46 running python trigger cobbler.modules.scm_track
47 running shell triggers from /var/lib/cobbler/triggers/change/*
48 *** TASK COMPLETE ***
5.新建一個虛擬機測試
為避免發生未知問題,先把服務端所有服務重啟
[root@localhost cobbler]#systemctl restart xinetd.service
[root@localhost cobbler]#systemctl restart cobblerd.service
[root@localhost cobbler]#systemctl restart httpd.service
新建虛擬機從pxe啟動,如果出現下麵圖形,則說明已經成功了

上圖中網址也可以定製為我們自己的
[root@localhost cobbler]# vim /etc/cobbler/pxe/pxedefault.template
MENU TITLE Cobbler | I'm here # 修改這裡為你想修改的內容
[root@localhost cobbler]# cobbler sync # 同步之後就可以看到效果了
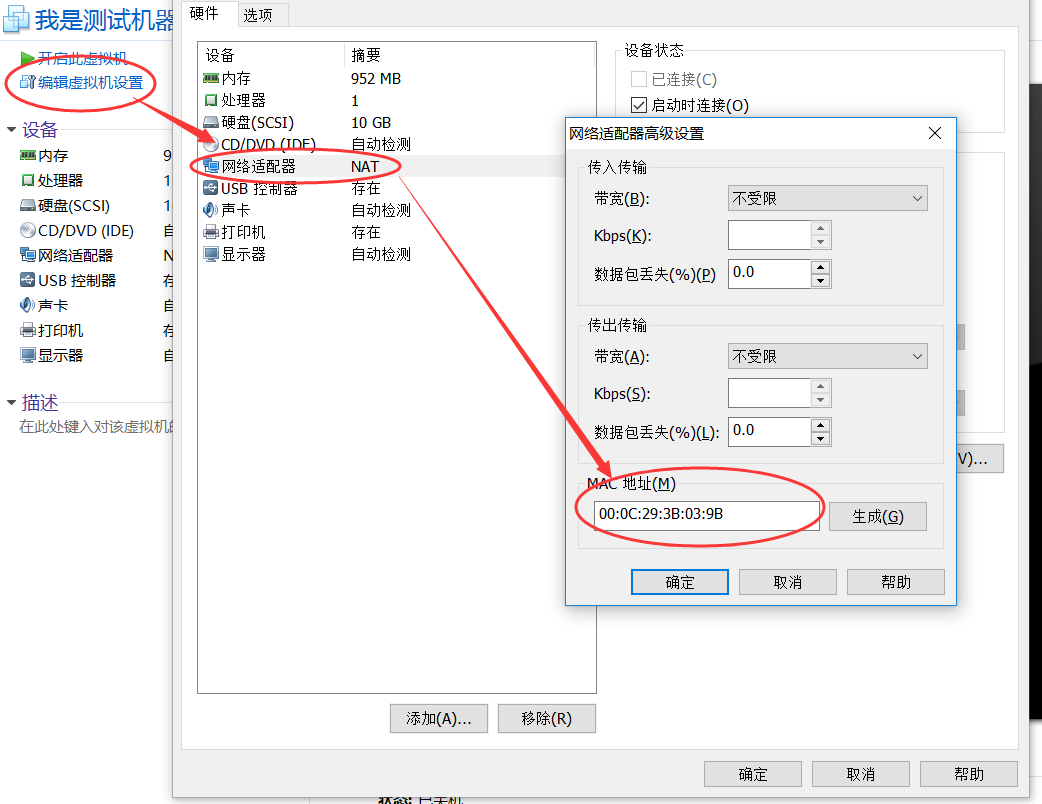
6.通過MAC地址定製化安裝
我們可以根據不同的MAC地址來給安裝 不同的操作系統,配置不同的靜態iP,設置不同的主機名等等,虛擬機查看MAC地址步驟如圖:
配置定製化安裝(需要驗證,後續驗證後添加驗證結果)
[root@localhost cobbler]# cobbler system add \
--name=linux-web01 \
--mac=00:0C:29:3B:03:9B \
--profile=Centos-7.2-x86_64 \
--ip-address=10.0.0.200 \
--subnet=255.255.255.0 \
--gateway=10.0.0.2 \
--interface=eth0 \
--static=1 \
--hostname=linux-web01 \
--name-servers="10.0.0.2" \
--kickstart=/var/lib/cobbler/kickstarts/Centos7.2-x86_64.cfg
system add # 添加定製系統
name # 定製系統名稱
mac # mac地址
profile #指定profile
ip-address # 指定IP地址
subnet # 指定子網掩碼
gateway # 指定網關
interface # 指定網卡,eth0上面配置已經修改,centos7預設網卡名稱不是eth0
static # 1表示啟用靜態IP
hostname # 定義hostname
name-server # dns伺服器
kickstart # 指定ks文件
配置成功後我們可以查看到剛纔定製的系統
[root@localhost cobbler]# cobbler system list
linux-web01
接下來我們創建一個虛擬機,mac地址為00:0C:29:3B:03:9B,啟動後你就會發現自動進入安裝系統了,等安裝完以後,所有的配置都和我們當初設置的一樣。
7.使用koan實現重新安裝系統
在客戶端安裝koan(要配置好源)
[root@localhost ~]# rpm -ivh http://dl.fedoraproject.org/pub/epel/7/x86_64/e/epel-release-7-10.noarch.rpm
[root@localhost ~]# yum install koan
查看cobbler上的配置文件
1 [root@localhost ~]# koan --server=10.0.0.101 --list=profiles
2 - looking for Cobbler at http://10.0.0.101:80/cobbler_api
3 Centos-7.2-x86_64
重新安裝客戶端系統
[root@localhost ~]# koan --replace-self --server=10.0.0.101 --profile=webserver1
重啟系統後會自動重裝系統
cobbler-web相關配置,後續文章再更。。。
參考文章:
http://www.cnblogs.com/liaojiafa/p/6445759.html
http://www.voidcn.com/article/p-dwdfkmfh-boa.html
http://werewolftj.blog.51cto.com/1606482/1673779
http://www.cnblogs.com/qige2017/p/7545812.html


