一、SSH框架的概念 SSH框架是java web開發流行的一個開源集合框架,SSH框架包含了Struts框架,Spring框架和Hibernate框架。SSH框架可以用於構建靈活、易於擴展的多層Web應用程式。 二、SSH框架的工作原理 SSH框架中的Struts負責攔截用戶請求,正常情況下用戶請
一、SSH框架的概念
SSH框架是java web開發流行的一個開源集合框架,SSH框架包含了Struts框架,Spring框架和Hibernate框架。SSH框架可以用於構建靈活、易於擴展的多層Web應用程式。
二、SSH框架的工作原理
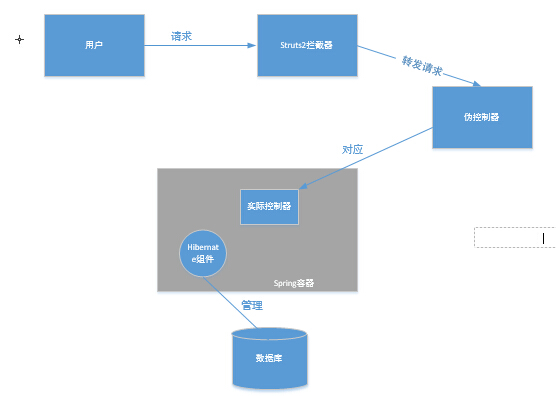
SSH框架中的Struts負責攔截用戶請求,正常情況下用戶請求到達Struts框架時,Struts框架的核心攔截器攔截到該請求,Struts框架會根據請求創建action實例。而在SSH框架中,由Spring容器來管理Action實例。當用戶請求到達SSH框架應用程式時,Struts框架的核心控制器攔截到用戶的請求,然後將請求轉發到Struts框架中提供的Spring插件的偽Action中,再由偽Action獲取Spring容器中的對應的請求的Action實例,然後通過Spring容器中根據相關的業務組件來連接Hibernate框架,使用Hibernate框架來管理資料庫。


SSH框架工作原理圖
三、SSH框架的搭建過程
1.創建一個web項目
2.導入Struts2所需的基本jar文件包,必須包含struts2-spring-plugin這個jar包,負責管理偽控制器,然後在web.xml中配置struts核心攔截器,在web.xml中加入如下配置代碼
<!-- 配置Struts2的核心過濾器 -->
 <filter>
     <filter-name>struts2</filter-name>
     <filter-class>org.apache.struts2.dispatcher.ng.filter.StrutsPrepareAndExecuteFilter</filter-class>
 </filter>
 <filter-mapping>
     <filter-name>struts2</filter-name>
     <url-pattern>/*</url-pattern>
 </filter-mapping>
3.導入Spring開發所需的jar包:spring-beans.jar,spring-context.jar,spring-core.jar,spring-expression.jar,commons-logging.jar,spring-web.jar
在web.xml中加入如下代碼,配置Spring容器啟動監聽器
 <!-- 配置Spring的監聽器 -->
 <listener>
     <listener-class>org.springframework.web.context.ContextLoaderListener</listener-class>
 </listener>
<!-- 如果沒有配置下麵的項,預設載入web-inf下的applicationConext.xml -->
 <context-param>
     <param-name>contextConfigLocation</param-name>
     <param-value>classpath:applicationContext.xml</param-value>
 </context-param>
4.導入Hibernate開發包,資料庫驅動包,連接池(c3p0)包,然後在src創建jdbc.properties文件和applicationContext.xml文件,添加如下代碼進行配置
jdbc.properties:
jdbc.driver = com.mysql.jdbc.Driver
jdbc.url = jdbc:mysql:///shop
jdbc.user = root
jdbc.password =123456
applicationContext.xml:
<?xml version="1.0" encoding="UTF-8"?>
<beans xmlns="http://www.springframework.org/schema/beans"
    xmlns:xsi="http://www.w3.org/2001/XMLSchema-instance"
    xmlns:context="http://www.springframework.org/schema/context"
    xmlns:aop="http://www.springframework.org/schema/aop"
    xmlns:tx="http://www.springframework.org/schema/tx"
    xsi:schemaLocation="http://www.springframework.org/schema/beans
    http://www.springframework.org/schema/beans/spring-beans.xsd
    http://www.springframework.org/schema/context
    http://www.springframework.org/schema/context/spring-context.xsd
    http://www.springframework.org/schema/aop
    http://www.springframework.org/schema/aop/spring-aop.xsd
    http://www.springframework.org/schema/tx
    http://www.springframework.org/schema/tx/spring-tx.xsd">
<!-- 配置連接池 -->
<context:property-placeholder location="classpath:jdbc.properties"/>
<bean id="dataSource" class="com.mchange.v2.c3p0.ComboPooledDataSource">
    <property name="driverClass" value="${jdbc.driver}"></property>
    <property name="jdbcUrl" value="${jdbc.url}"></property>
    <property name="user" value="${jdbc.user}"></property>
    <property name="password" value="${jdbc.password}"></property>
</bean>

<!-- hibernate相關配置 -->
<bean id="sessionFactory" class="org.springframework.orm.hibernate3.LocalSessionFactoryBean">
    <property name="dataSource" ref="dataSource"></property>
    <property name="hibernateProperties">
        <props>
            <prop key="hibernate.dialect">org.hibernate.dialect.MySQLDialect</prop>
            <prop key="hibernate.show_sql">true</prop>
            <prop key="hibernate.format_sql">true</prop>
            <prop key="hibernate.connection.autocommit">false</prop>
            <prop key="hibernate.hbm2ddl.auto">update</prop>
        </props>
    </property>
    <!-- hibernate映射文件 -->
</bean>
</beans>
搭建完成後的web.xml配置如下:

<?xml version="1.0" encoding="UTF-8"?>
<web-app version="2.5" xmlns="http://java.sun.com/xml/ns/javaee"
    xmlns:xsi="http://www.w3.org/2001/XMLSchema-instance"
    xsi:schemaLocation="http://java.sun.com/xml/ns/javaee
    http://java.sun.com/xml/ns/javaee/web-app_2_5.xsd">
    <display-name></display-name>
    <!-- struts2攔截器配置 -->
    <filter>
        <filter-name>struts2</filter-name>
        <filter-class>org.apache.struts2.dispatcher.ng.filter.StrutsPrepareAndExecuteFilter</filter-class>
    </filter>
    <filter-mapping>
        <filter-name>struts2</filter-name>
        <url-pattern>/*</url-pattern>
    </filter-mapping>

    <!-- spring容器啟動監聽器配置 -->
    <listener>
     <listener-class>org.springframework.web.context.ContextLoaderListener</listener-class>
 </listener>
 <context-param>
     <param-name>contextConfigLocation</param-name>
     <param-value>classpath:applicationContext.xml</param-value>
 </context-param>
</web-app>
View Code
至此,SSH框架已經搭建完成,就可以使用SSH框架進行相關開發了。


