本文主要分享一下博主在學習wxpy 的過程中開發的一個小程式。博主在最近有一個監控報警的需求需要完成,然後剛好在學習wxpy 這個東西,因此很巧妙的將工作和學習聯繫在一起。 博文中主要使用到的技術設計到Python,Redis,以及Java。涉及到的技術看似很多,但是主要的語言是基於Pytho... ...
概述:
本文主要分享一下博主在學習wxpy 的過程中開發的一個小程式。博主在最近有一個監控報警的需求需要完成,然後剛好在學習wxpy 這個東西,因此很巧妙的將工作和學習聯繫在一起。
博文中主要使用到的技術設計到Python,Redis,以及Java。涉及到的技術看似很多,但是主要的語言是基於Python進行開發的。
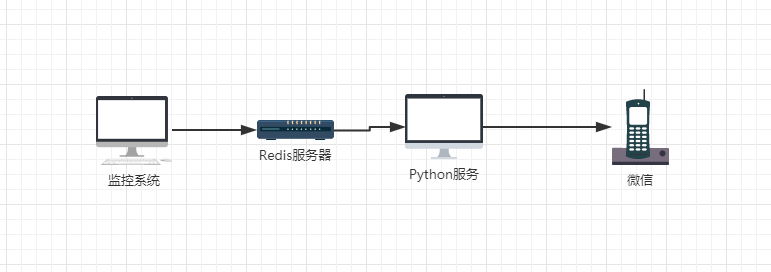
架構涉及主要採用了 生產者消費者的涉及模式,使用Redis作為消息隊列進行解耦操作。
主要架構涉及如下:

接下來開始介紹一下程式的實現過程,主要講解wxpy -> python.redis -> Java.redis
1、Wxpy初體驗
項目使用的python 是3.5版本的,因此語法會和2.x版本有所區別,wxpy 支持python3.4-3.6 以及python2.7版本 ,因此在python版本上不用太過於糾結
1.1 安裝wxpy
在這裡預設大家以及安裝好了pip,我們需要安裝wxpy 以及wechat_sender 兩個包,這裡推薦使用國內的豆瓣源,如果大家網速過硬 請忽略。。。。
pip install wxpy -i "https://pypi.doubanio.com/simple/"
pip install wechat_sender -i "https://pypi.doubanio.com/simple/"
1.2 wxpy 登陸
wxpy 使用起來非常簡單,我們只需要創建一個bot 對象,程式運行後,會彈出二維碼,掃描二維碼後顯示登陸成功。
下述代碼在登陸完成後,會向我們的文件傳輸助手發送一個“hello world!”。(每個程式都需要一個hello world)
from wxpy import *

bot = Bot()

bot.file_helper.send('hello world!')

print("ending")
關於Bot()對象的相關參數說明,我們可以在源碼中的註釋中看到:
"""
:param cache_path:
    * 設置當前會話的緩存路徑,並開啟緩存功能;為 `None` (預設) 則不開啟緩存功能。
    * 開啟緩存後可在短時間內避免重覆掃碼,緩存失效時會重新要求登陸。
    * 設為 `True` 時,使用預設的緩存路徑 'wxpy.pkl'。
:param console_qr:
    * 在終端中顯示登陸二維碼,需要安裝 pillow 模塊 (`pip3 install pillow`)。
    * 可為整數(int),表示二維碼單元格的寬度,通常為 2 (當被設為 `True` 時,也將在內部當作 2)。
    * 也可為負數,表示以反色顯示二維碼,適用於淺底深字的命令行界面。
    * 例如: 在大部分 Linux 系統中可設為 `True` 或 2,而在 macOS Terminal 的預設白底配色中,應設為 -2。
:param qr_path: 保存二維碼的路徑
:param qr_callback: 獲得二維碼後的回調,可以用來定義二維碼的處理方式,接收參數: uuid, status, qrcode
:param login_callback: 登陸成功後的回調,若不指定,將進行清屏操作,並刪除二維碼文件
:param logout_callback: 登出時的回調
"""
這裡介紹一下兩個主要使用到的參數:
cache_path: 在開發過程中可以設置為True 避免每次登陸都需要重新掃描,具有緩存的作用。

qr_path:用於保存二維碼生成圖片,主要解決伺服器圖片展示不方便的問題
1.3 wxpy 好友與聊天群
如代碼所示,我們可以通過Bot.friends 以及Bot.groups 來獲取到所有的好友以及聊天群,這裡需要註意的是,聊天群需要保存到通訊錄中,不然可能會出現找不到聊天群的情況。
在搜索方法中,可以提供的參數有:姓名,city,province,sex 等相關變數。
關於好友的詳細API文檔,可以參考---》 微信好友API
from wxpy import *

bot = Bot()

# 獲取所有好友
friends = bot.friends()

# 遍歷輸出好友名稱
for friend in friends:
    print(friend)

# 找到好友
friend = bot.friends.search('被單')[0]
print(friend)
friend.send("hello world!")

# 獲取所有聊天群
groups = bot.groups()

for group in groups:
    print(group)

# 找到目標群
group = groups.search("409")[0]

group.send("hello world!")
1.4 wxpy 消息處理
接下來主要介紹一下用戶發送消息的類型,目前wxpy 支持發送文本,圖片,視頻以及文件。主要的發送方式如代碼所示:
這裡比較重要的就是關於 @bot.register() 的使用,該註釋主要用於註冊消息接收器,我們可以根據特定的需求,配置不一樣的消息接收器。
Bot.register(chats=None, msg_types=None, except_self=True, run_async=True, enabled=True) 詳情可以查看源碼中的介紹
關於消息處理API,讀者可以在該地址下查看詳細的配置,這裡不做過多的描述。
代碼中有使用到:embed() 這個方法, 主要用於阻塞進程,避免由於程式運行結束導致無法接收消息。
from wxpy import *

bot = Bot()
# 獲取好友
my_friend = bot.friends().search('被單')[0]

# 搜索信息
messages = bot.messages.search(keywords='測試', sender=bot.self)

for message in messages:
    print(message)

# 發送文本
my_friend.send('Hello, WeChat!')
# 發送圖片
my_friend.send_image('my_picture.png')
# 發送視頻
my_friend.send_video('my_video.mov')
# 發送文件
my_friend.send_file('my_file.zip')
# 以動態的方式發送圖片
my_friend.send('@img@my_picture.png')

# 發送公眾號
my_friend.send_raw_msg(
    # 名片的原始消息類型
    raw_type=42,
    # 註意 `username` 在這裡應為微信 ID,且被髮送的名片必須為自己的好友
    raw_content='<msg username="wxpy_bot" nickname="wxpy 機器人"/>'
)


# 消息接收監聽器
@bot.register()
def print_others(msg):
    # 輸出監聽到的消息
    print(msg)
    # 回覆消息
    msg.reply("hello world")


embed()
1.4 wxpy 圖靈機器人
wxpy 接入圖靈機器人相當方便,我們首先需要到圖靈近期人官網進行註冊,哆啦A夢的任意門。
通過註冊Tuling 對象,當我們接收到消息的時候,可以直接使用tuling機器人來幫我們進行答覆。其他的業務需求各位可以根據自己的需求來完成相應的邏輯。
from wxpy import *

bot = Bot()

# 獲取好友
dear = bot.friends().search('被單')[0]

#  註冊獲得個人的圖靈機器人key 填入
tuling = Tuling(api_key='******')


# 使用圖靈機器人自動與指定好友聊天
@bot.register(dear)
def reply_my_friend(msg):
    print(msg)
    tuling.do_reply(msg)


embed()
1.5 wechat_sender
在熟悉了wxpy 的相關操作後,我們接下來介紹一下一個主要使用到的工具。由於wxpy 的設計,導致了一些業務操作並不好進行實現。因此我們在這裡引入一個工具類:wechat_sender 。
首先我們需要像往常一樣進行微信登陸,然後使用 listen() 進行對我們的 bot() 對象進行監聽。
在這裡我們可以看到了和上面代碼的區別,這裡使用的是listen(),上面是使用embed()進行監聽。 我們再這裡使用listen 進行監聽對象後,可以設置相應的配置。監聽預設設置的接收對象為self.file_helper,通過設置receivers 可以配置消息的接收者。
# login.py
from wxpy import *
from wechat_sender import *

bot = Bot()

friend = bot.friends().search('被單')[0]

listen(bot, token='test', receivers=[friend])
# sender.py  coding: utf-8
from wechat_sender import Sender

sender = Sender(token='test')

sender.send('hello world!')
在別的python 文件中,我們只需要創建一個Sender() 對象,然後調用Sender.send()方法,即可對我們設定好的消息接收者發送消息。
Sender()在創建的時候可以通過特定的參數設定,比如這裡使用了 token 用於避免多個listen 導致sender 混淆。還可以在sender中設置receiver 從listen 中選取需要接收消息的對象。
1.6 wxpy 在監控模塊的代碼實現
微信登陸模塊:
from wechat_sender import *
from wxpy import *

bot = Bot(qr_path="qr.png")

group = bot.groups().search('監控報警')[0]

print("微信登陸成功!進行監控報警功能!")
print(group)

#
listen(bot, token='test', receivers=[group])
業務處理模塊:
import redis
from wechat_sender import *

sender = Sender(token='test', receivers='監控報警')

while true:
# do anything
        sender.send(message=data)
# do anything


p.unsubscribe('cardniu-monitor')
print('取消訂閱')
2、Python-Redis
這一模塊我們將簡單描述一下python 對於Redis 的支持,首先我們需要安裝python-redis相關模塊:
2.1 Python-redis安裝
- 下載壓縮包:哆啦A夢的任意門
- 解壓進入 Redis 目錄
- 命令行執行: python setup.py install
2.2 Python 簡單操作Redis
由於Python 操作Redis 並不是我們這裡的主要內容,所以這裡簡單的過一下Python 對Redis 的支持。
import redis

r = redis.Redis(host='ip', port=6379, db=15, password='****')

r.set('name', 'Jaycekon')

value = r.get('name')

print(value)
2.3 Redis的發佈訂閱模式
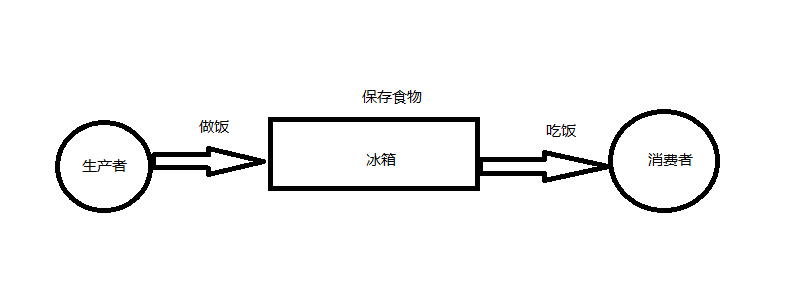
在為大家講解Redis 的發佈訂閱模式前,先為大家科普一下生產者消費者模式:
大家來領略一下我的靈魂畫圖,生產者消費者的核心思想是通過一個冰箱來進行解耦,就是我們的廚師不需要出廚房,顧客也不需要去廚房拿飯吃。通過一個冰箱來進行中間的解耦合。

下麵是我們通過python 實現的一個生產者消費者模式,廚師不停的做飯,顧客不停的吃。。大家相互不影響。
from threading import Thread

queues = queue.Queue(10)


class Producer(Thread):
    def run(self):
        while True:
            elem = random.randrange(9)
            queues.put(elem)
            print("廚師 {} 做了 {} 飯 --- 還剩 {} 飯沒賣完".format(self.name, elem, queues.qsize()))
            time.sleep(random.random())


class Consumer(Thread):
    def run(self):
        while True:
            elem = queues.get()
            print("吃貨{} 吃了 {} 飯 --- 還有 {} 飯可以吃".format(self.name, elem, queues.qsize()))
            time.sleep(random.random())


def main():
    for i in range(3):
        p = Producer()
        p.start()
    for i in range(2):
        c = Consumer()
        c.start()


if __name__ == '__main__':
    main()
再來說一下為什麼使用到Redis 的發佈訂閱模式。
Redis在當前程式中,主要擔當了一個消息隊列的角色,我們並沒有使用目前較為熱門的RabbitMq,ActiveMq來消息隊列進行解耦。主要原因在於我們的服務不大,消息量也比較小,因此在不影響程式的架構基礎上,採用了Redis 作為消息隊列。
消息隊列的關鍵點在於,當生產者發佈消息後,要確保消費者能夠快速的接收消息。發佈訂閱模式能夠很好的幫我們解決,當有消息到達的時候,程式馬上能夠做出響應操作。
Redis消息發佈:
import redis

pool = redis.ConnectionPool(host='ip', port=6379, db=4, password='****')
r = redis.StrictRedis(connection_pool=pool)
while True:
    inputs = input("publish:")
    r.publish('spub', inputs)
    if inputs == 'over':
        print('停止發佈')
        break
Redis消息訂閱:
import redis
pool = redis.ConnectionPool(host='ip', port=6379, db=4, password='***')
r = redis.StrictRedis(connection_pool=pool)
p = r.pubsub()
p.subscribe('cardniu-monitor')
for item in p.listen():
    print(item)
    if item['type'] == 'message':
        data = item['data']
        print("消息隊列中接收到信息:", data)if item['data'] == 'over':
            break
p.unsubscribe('cardniu-monitor')
print('取消訂閱')
2.4 wxpy+Redis 實現監控系統的消費者
最終,在python 這邊實現的監控系統消費者如下:
微信登陸模塊:
from wechat_sender import *
from wxpy import *

bot = Bot(qr_path="qr.png")

group = bot.groups().search('監控報警')[0]

print("微信登陸成功!進行監控報警功能!")
print(group)

#
listen(bot, token='test', receivers=[group])
Redis消息訂閱模塊:
import redis
from wechat_sender import *

sender = Sender(token='test', receivers='監控報警')

pool = redis.ConnectionPool(host='10.201.3.18', port=6379, db=4, password='kntest%pw_@dk2')
r = redis.StrictRedis(connection_pool=pool)
p = r.pubsub()
p.subscribe('cardniu-monitor')
for item in p.listen():
    print(item)
    if item['type'] == 'message':
        data = item['data']
        print("消息隊列中接收到信息:", data)

        sender.send(message=data)
        if item['data'] == 'over':
            break
p.unsubscribe('cardniu-monitor')
print('取消訂閱')
3、Java-Redis
最後,在生產者這塊,即是我們監控系統的核心部分,當我們的Java系統出現異常時,我們即可向Redis發送消息,最後由消費者那一邊完成消息的發送。
在下麵會跟大家簡單講解一下生產者這邊的代碼,但是由於代碼設計公司內容,因此不做過多的描述。
Spring-redis.xml

<?xml version="1.0" encoding="UTF-8"?>
<beans xmlns="http://www.springframework.org/schema/beans"
    xmlns:xsi="http://www.w3.org/2001/XMLSchema-instance" xmlns:context="http://www.springframework.org/schema/context"
    xmlns:util="http://www.springframework.org/schema/util" xmlns:aop="http://www.springframework.org/schema/aop"
    xsi:schemaLocation="
        http://www.springframework.org/schema/beans
        http://www.springframework.org/schema/beans/spring-beans-3.1.xsd
        http://www.springframework.org/schema/context
        http://www.springframework.org/schema/context/spring-context-3.1.xsd
        http://www.springframework.org/schema/util
        http://www.springframework.org/schema/util/spring-util-3.1.xsd
        http://www.springframework.org/schema/aop
        http://www.springframework.org/schema/aop/spring-aop-3.1.xsd">

    <!-- redis連接池的配置 -->
    <bean id="jedisPoolConfig" class="redis.clients.jedis.JedisPoolConfig">
        <property name="maxTotal" value="${redis.pool.maxTotal}" />
        <property name="maxIdle" value="${redis.pool.maxIdle}" />
        <property name="minIdle" value="${redis.pool.minIdle}" />
        <property name="maxWaitMillis" value="${redis.pool.maxWaitMillis}" />
        <property name="testOnBorrow" value="${redis.pool.testOnBorrow}" />
        <property name="testOnReturn" value="${redis.pool.testOnReturn}" />
    </bean>

    <bean id="sentinelJedisPool" class="redis.clients.jedis.JedisSentinelPool">
        <constructor-arg index="0" value="${redis.sentinel.masterName}" />
        <constructor-arg index="1"
            value="#{'${redis.sentinels}'.split(',')}" />
        <constructor-arg index="2" ref="jedisPoolConfig" />
        <constructor-arg index="3" value="${redis.sentinel.timeout}"
            type="int" />
        <constructor-arg index="4" value="${redis.sentinel.password}" />
        <constructor-arg index="5" value="${redis.sentinel.database}"
            type="int" />
    </bean>
</beans>
View Code
JedisUtils.java

    @Autowired
    private JedisSentinelPool jedisPool;

    @PostConstruct
    private void init() throws Exception {
        /* 緩存初始化 */
        JedisUtils.setJedisPool(jedisPool);
    }

public static void setJedisPool(Pool<Jedis> jedisPool) throws Exception {
        JedisCache.jedisPool = jedisPool;
        Jedis jedis = null;
        try {
            jedis = jedisPool.getResource();
            isInitSuc = true;
            logger.info("redis start success!");
        } catch (Exception e) {
            if (null != jedis)
                jedisPool.returnBrokenResource(jedis);
            logger.error("redis start exception!!!error:{}", e.getMessage(), e);
            if (e instanceof redis.clients.jedis.exceptions.JedisConnectionException) {
                throw e;
            }
        } finally {
            if (null != jedis)
                jedisPool.returnResource(jedis);
        }
    }


public static Long publish(String chanel, String value) {
        Jedis jedis = null;
        try {
            jedis = jedisPool.getResource();
            return jedis.publish(chanel,value);
        } catch (Exception e) {
            if (null != jedis) {
                jedisPool.returnBrokenResource(jedis);
                jedis = null;
            }
            logger.error("redis exception:{}", e.getMessage(), e);
            return 0L;
        } finally {
            if (null != jedis)
                jedisPool.returnResource(jedis);

        }
    }
View Code
NoticeTask.java
@Scheduled(cron = "*/5 * *  * * ? ")
    public void runMonitor() {
        try {

            List<T> notices;
            List<EbankNotice> result;
            while ((notices = QueueHolder.noticeBlockingQueue.take()) != null) { //消費
                if (notices.isEmpty()) {
                    continue;
                }
                result = service.calculateNotice(notices);
                result.forEach(notice -> {
                    JedisUtils.publish("cardniu-monitor", notice.getTitle() + "," +
                            DateUtils.format(notice.getPostTime(), "yyyy-MM-dd hh:mm:ss") + "," + notice.getLinkAddress());
                });
            }
        } catch (InterruptedException e) {
            logger.error("發送郵件定時任務異常,{}", e.getMessage(), e);
        }
    }
4、總結
這個項目的核心在於wxpy 的運用,以及生產者消費者的設計思想。語言的話,核心的python這一塊的wxpy,在生產者這邊,無論是其他的什麼語言,都可以作為我們的生產者。
項目github地址:https://github.com/jaycekon/WxpyDemo
希望各位喜歡的朋友可以fork 或者start一下~~~~~
參考:
wxpy API:http://wxpy.readthedocs.io/zh/latest/messages.html
wechat_sender Api:https://pypi.python.org/pypi/wechat-sender/0.1.3
python-redis :https://pypi.python.org/pypi/redis
Java-Redis:http://docs.spring.io/spring-data/redis/docs/2.0.0.M4/reference/html/


