【原】AFNetworking源碼閱讀(五) 本文轉載請註明出處 —— polobymulberry-博客園 1. 前言 上一篇中提及到了Multipart Request的構建方法- [AFHTTPRequestSerializer multipartFormRequestWithMethod:U
【原】AFNetworking源碼閱讀(五)
本文轉載請註明出處 —— polobymulberry-博客園
1. 前言
上一篇中提及到了Multipart Request的構建方法- [AFHTTPRequestSerializer multipartFormRequestWithMethod:URLString:parameters:constructingBodyWithBlock:error:],不過並沒有深入研究,部分函數也只是簡單地一筆帶過。所以本篇文章從此入手,一方面把Multipart協議問題解決掉,另一方面就此把AFURLRequestSerialization文件遺留問題解決了。
除了AFURLRequestSerialization的分析,這一篇還會介紹AFURLResponseSerialization。
2. 詳解AFNetworking中的Multipart協議
前面我們簡單介紹了Multipart協議的結構,並舉了個例子:
--${bound} // 該bound表示pdf的文件名
Content-Disposition: form-data; name="Filename"

HTTP.pdf
--${bound} // 該bound表示pdf的文件內容
Content-Disposition: form-data; name="file000"; filename="HTTP協議詳解.pdf"
Content-Type: application/octet-stream

%PDF-1.5
file content
%%EOF

--${bound} // 該bound表示字元串
Content-Disposition: form-data; name="Upload"

Submit Query
--${bound}—// 表示body結束了
我們這次換個思路來學習AFNetworking中處理multipart格式的代碼。我們先來解決做什麼,再看源碼中的怎麼做。
首先,不管我們做什麼,最終都是為了產生一個request。我們都知道request是由三個部分組成的:①請求行(request-line) ②請求頭(headers) ③請求體(request body)。下麵我就這三個方面逐一攻破。
2.1 構建multipart請求行
這個沒啥好說的,就是POST。
2.2 構建multipart請求頭
multipart說白了和普通request大部分都很類似,所以普通request請求頭的構造方法它也受用。而普通request的請求頭構造方式有兩個地方:
- - [AFHTTPRequestSerializer init]
- - [AFURLRequestSerialization requestWithMethod:URLString:parameters:error:]前面介紹過了
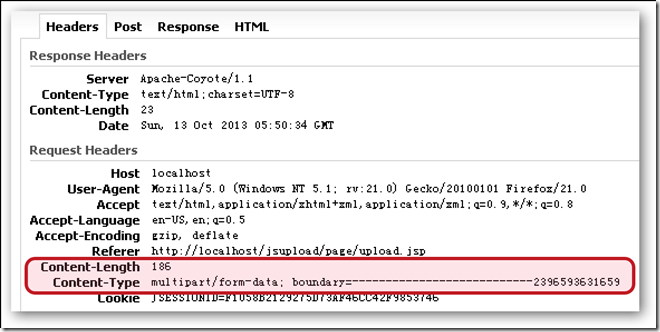
multipart除了使用普通協議請求頭的構建方法。還會在- [AFStreamingMultipartFormData requestByFinalizingMultipartFormData]構建自己獨有的請求頭。
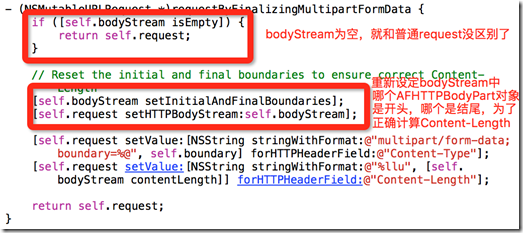
可以看到上面紅框中的代碼就是用來構建上上面那張圖的紅框中的請求頭。其中我們註意到這兩個變數:
@property (nonatomic, copy) NSString *boundary;    // multipart協議中的分割符
@property (readwrite, nonatomic, strong) AFMultipartBodyStream *bodyStream;    // 代表了消息體
既然已經提到了boundary,此處就把他就地解決吧。至於bodyStream後面介紹消息體時候詳解。
boundary的構建方式
boundary是用來分割不同數據內容的,其實就是上面舉的那個例子中的${bound}。我們註意到boundary需要處理以下幾個情況:
- 創建boundary字元串
此處AFNetworking自定義了個函數創建boundary字元串。
static NSString * AFCreateMultipartFormBoundary() {
    // 使用兩個十六進位隨機數拼接在Boundary後面來表示分隔符
    return [NSString stringWithFormat:@"Boundary+%08X%08X", arc4random(), arc4random()];
}
- 如果是開頭分隔符的,那麼只需在分隔符結尾加一個換行符
static inline NSString * AFMultipartFormInitialBoundary(NSString *boundary) {
    return [NSString stringWithFormat:@"--%@%@", boundary, kAFMultipartFormCRLF];
}
- 如果是中間部分分隔符,那麼需要分隔符前面和結尾都加換行符
static inline NSString * AFMultipartFormEncapsulationBoundary(NSString *boundary) {
    return [NSString stringWithFormat:@"%@--%@%@", kAFMultipartFormCRLF, boundary, kAFMultipartFormCRLF];
}
- 如果是末尾,還得使用--分隔符--作為請求體的結束標誌
static inline NSString * AFMultipartFormFinalBoundary(NSString *boundary) {
    return [NSString stringWithFormat:@"%@--%@--%@", kAFMultipartFormCRLF, boundary, kAFMultipartFormCRLF];
}
講boundary有什麼用呢?除了設置Content-Type外,在設置Content-Length時使用的[self.bodyStream contentLength]中會使用到boundary的這些相關函數:
// AFMultipartBodyStream函數
// 計算上面那個bodyStream的總長度作為Content-Length
- (unsigned long long)contentLength {
    unsigned long long length = 0;
    // 註意bodyStream是由多個AFHTTPBodyPart對象組成的,比如上面那個例子就是有三個對象組成
    for (AFHTTPBodyPart *bodyPart in self.HTTPBodyParts) {
        length += [bodyPart contentLength];
    }

    return length;
}

// AFHTTPBodyPart函數
// 計算上面每個AFHTTPBodyPart對象的長度
// 使用AFHTTPBodyPart中hasInitialBoundary和hasFinalBoundary屬性表示開頭bodyPart和結尾bodyPart
- (unsigned long long)contentLength {
    unsigned long long length = 0;
    // 需要拼接上分割符
    NSData *encapsulationBoundaryData = [([self hasInitialBoundary] ? AFMultipartFormInitialBoundary(self.boundary) : AFMultipartFormEncapsulationBoundary(self.boundary)) dataUsingEncoding:self.stringEncoding];
    length += [encapsulationBoundaryData length];
    // 每個AFHTTPBodyPart對象中還有Content-Disposition等header-使用stringForHeader獲取
    NSData *headersData = [[self stringForHeaders] dataUsingEncoding:self.stringEncoding];
    length += [headersData length];
    // 加上每個AFHTTPBodyPart對象具體的數據(比如文件內容)長度
    length += _bodyContentLength;
    // 如果是最後一個AFHTTPBodyPart,還需要加上“--分隔符--”的長度
    NSData *closingBoundaryData = ([self hasFinalBoundary] ? [AFMultipartFormFinalBoundary(self.boundary) dataUsingEncoding:self.stringEncoding] : [NSData data]);
    length += [closingBoundaryData length];

    return length;
}
2.3 構建multipart請求體(bodyStream)
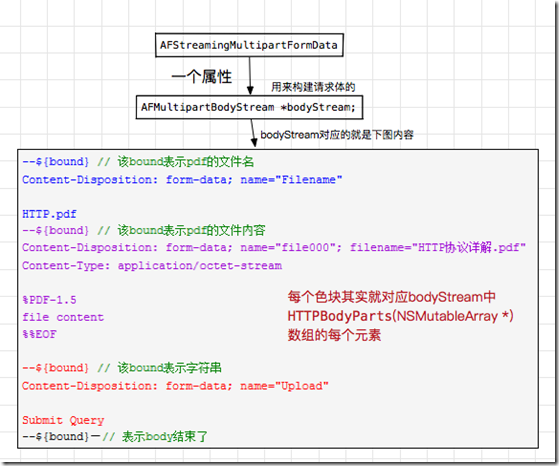
至於setInitialAndFinalBoundaries函數,其實就是為了後面設置Content-Length做下預處理,使用這裡不贅述了。我們把目光放在bodyStream的具體構建上。事實上對於bodyStream的構建就是對AFStreamingMultipartFormData對象的處理,比如函數- [AFHTTPRequestSerializer multipartFormRequestWithMethod:URLString:parameters:constructingBodyWithBlock:error:]的那個formData就是一個AFStreamingMultipartFormData對象,下麵我簡單示意下AFStreamingMultipartFormData的結構:
結合上圖,我們就可以大膽推測,AFStreamingMultipartFormData類中的appendPart*函數最終落腳點就是給bodyStream中HTTPBodyParts添加一個AFHTTPBodyPart對象(HTTPBodyParts數組中的元素)。
註意這些appendPart*函數的主要區別在於數據的來源:
| (BOOL) - appendPartWithFileURL:name:error: | 根據文件位置構造數據源,使用文件類型名作為mimeType |
| (BOOL) - appendPartWithFileURL:name:fileName:mimeType:error: | 根據文件位置構造數據源,需要提供mimeType |
| (void) - appendPartWithInputStream:name:fileName:length:mimeType: | 直接使用NSInputStream作為數據源 |
| (void) - appendPartWithFileData:name:fileName:mimeType: | 使用NSData作為數據源 |
| (void) - appendPartWithFormData:name: | 使用NSData作為數據源,NSData並不是一個文件,可能只是一個字元串 |
這些函數的實現步驟基本都是一致的,都是新建一個AFHTTPBodyPart對象bodyPart,然後給bodyPart設置各種參數,其中比較重要的參數是headers和body這兩個。最後使用appendHTTPBodyPart:方法,將bodyPart添加到bodyStream的HTTPBodyParts上。
這些函數實現沒什麼難度,大家可以自行研究。提兩個稍微要註意的地方:
- appendPartWithFileURL:函數會首先檢查fileURL是否可用,使用[fileURL isFileURL]檢查文件位置格式是否正確。使用[fileURL checkResourceIsReachableAndReturnError:error]來檢查該文件是否存在,是否能獲取到。最後使用NSFileManager獲取到文件attributes,並判斷attributes是否存在。另外註意到此處直接使用的是fileURL作為AFHTTPBodyPart對象的body屬性。
- appendPartWithFileData:和appendPartWithFormData:兩個函數實現中,最後使用的是appendPartWithHeaders:構建AFHTTPBodyPart對象,詳見代碼。
2.4 另一種構建multipart request的方法-requestWithMultipartFormRequest:writingStreamContentsToFile:completionHandler:
我們先來看看這個函數的註釋:
/**
 將原來request中的HTTPBodyStream內容非同步寫入到指定文件中,隨後調用completionHandler處理。最後返回新的request。

 @param request multipart形式的request,其中HTTPBodyStream屬性不能為nil
 @param fileURL multipart request中的HTTPBodyStream內容寫入的文件位置
 @param handler 用於處理的block

 @discussion NSURLSessionTask中有一個bug,當HTTP body的內容是來自NSStream的時候,request無法發送Content-Length到伺服器端,此問題在Amazon S3的Web服務中尤為顯著。作為一個解決方案,該函數的request參數使用的是multipartFormRequestWithMethod:URLString:parameters:constructingBodyWithBlock:error:構建出的request,或者其他HTTPBodyStream屬性不為空的request。接著將HTTPBodyStream的內容先寫到指定的文件中,再返回一個原來那個request的拷貝,其中該拷貝的HTTPBodyStream屬性值要置為空。至此,可以使用AFURLSessionManager -uploadTaskWithRequest:fromFile:progress:completionHandler:函數構建一個上傳任務,或者將文件內容轉變為NSData類型,並且指定給新request的HTTPBody屬性。

 @see https://github.com/AFNetworking/AFNetworking/issues/1398
 */
- (NSMutableURLRequest *)requestWithMultipartFormRequest:(NSURLRequest *)request
                             writingStreamContentsToFile:(NSURL *)fileURL
                                       completionHandler:(nullable void (^)(NSError * _Nullable error))handler;
知道這個函數是做什麼之後,那麼它的實現就相對容易理解了:
- (NSMutableURLRequest *)requestWithMultipartFormRequest:(NSURLRequest *)request
                             writingStreamContentsToFile:(NSURL *)fileURL
                                       completionHandler:(void (^)(NSError *error))handler
{
    NSParameterAssert(request.HTTPBodyStream); // 原先request的HTTPBodyStream不能為空
    NSParameterAssert([fileURL isFileURL]); // 文件路徑要合法

    NSInputStream *inputStream = request.HTTPBodyStream;
    // 使用outputStream將HTTPBodyStream的內容寫入到路徑為fileURL的文件中
    NSOutputStream *outputStream = [[NSOutputStream alloc] initWithURL:fileURL append:NO];
    __block NSError *error = nil;
    // 非同步執行寫入操作
    dispatch_async(dispatch_get_global_queue(DISPATCH_QUEUE_PRIORITY_DEFAULT, 0), ^{
        // 指定在當前RunLoop中(currentRunLoop)運行inputStreamm/outputStream,意味著在currentRunLoop中處理流操作
        [inputStream scheduleInRunLoop:[NSRunLoop currentRunLoop] forMode:NSDefaultRunLoopMode];
        [outputStream scheduleInRunLoop:[NSRunLoop currentRunLoop] forMode:NSDefaultRunLoopMode];
        // 打開
        [inputStream open];
        [outputStream open];

        while ([inputStream hasBytesAvailable] && [outputStream hasSpaceAvailable]) {
            uint8_t buffer[1024];
            // 每次從inputStream中讀取最多1024bytes大小的數據,放在buffer中,給outputStream寫入file
            NSInteger bytesRead = [inputStream read:buffer maxLength:1024];
            // 出現streamError或者bytesRead小於0都表示讀取出錯
            if (inputStream.streamError || bytesRead < 0) {
                error = inputStream.streamError;
                break;
            }
            // 將上面讀取的buffer寫入到outputStream中,即寫入文件
            NSInteger bytesWritten = [outputStream write:buffer maxLength:(NSUInteger)bytesRead];
            // 出現streamError或者bytesWritten小於0都表示寫入出錯
            if (outputStream.streamError || bytesWritten < 0) {
                error = outputStream.streamError;
                break;
            }
            // 表示讀取寫入完成
            if (bytesRead == 0 && bytesWritten == 0) {
                break;
            }
        }

        [outputStream close];
        [inputStream close];
        // 回到主進程執行handler
        if (handler) {
            dispatch_async(dispatch_get_main_queue(), ^{
                handler(error);
            });
        }
    });
    // 獲取到新的request,並將新的request的HTTPBodyStream置為空
    NSMutableURLRequest *mutableRequest = [request mutableCopy];
    mutableRequest.HTTPBodyStream = nil;

    return mutableRequest;
}
上面函數中稍微陌生一點的就是- [AFMultipartBodyStream read:maxLength:]和- [NSOutputStream write:maxLength:],由於後者只是簡單地將前者讀出的數據寫到文件中,所以真正的難點還是在- [AFMultipartBodyStream read:maxLength:]函數。
- [AFMultipartBodyStream read:maxLength:]函數深入進去還是很多問題要解決的。不過我們先來看看其實現的方式:
- (NSInteger)read:(uint8_t *)buffer
        maxLength:(NSUInteger)length
{  // 輸入流關閉狀態,無法讀取
    if ([self streamStatus] == NSStreamStatusClosed) {
        return 0;
    }

    NSInteger totalNumberOfBytesRead = 0;

#pragma clang diagnostic push
#pragma clang diagnostic ignored "-Wgnu"
    // 一般來說都是直接讀取length長度的數據,但是考慮到最後一次需要讀出的數據長度(self.numberOfBytesInPacket)一般是小於length
    // 所以此處使用了MIN(length, self.numberOfBytesInPacket)
    while ((NSUInteger)totalNumberOfBytesRead < MIN(length, self.numberOfBytesInPacket)) {
        // 類似於我們構建request的逆向過程,我們對於HTTPBodyStream的讀取也是分成一個一個AFHTTPBodyPart來的
        // 如果當前AFHTTPBodyPart對象讀取完成,那麼就使用enumerator讀取下一個AFHTTPBodyPart
        if (!self.currentHTTPBodyPart || ![self.currentHTTPBodyPart hasBytesAvailable]) {
            if (!(self.currentHTTPBodyPart = [self.HTTPBodyPartEnumerator nextObject])) {
                break;
            }
        } else {
            // 讀取當前AFHTTPBodyPart對象
            NSUInteger maxLength = MIN(length, self.numberOfBytesInPacket) - (NSUInteger)totalNumberOfBytesRead;
            // 使用的是AFHTTPBodyPart的read:maxLength:函數
            NSInteger numberOfBytesRead = [self.currentHTTPBodyPart read:&buffer[totalNumberOfBytesRead] maxLength:maxLength];
            // 讀取出錯
            if (numberOfBytesRead == -1) {
                self.streamError = self.currentHTTPBodyPart.inputStream.streamError;
                break;
            } else {
                // totalNumberOfBytesRead表示目前已經讀取的位元組數,可以作為讀取後的數據放置於buffer的起始位置,如buffer[totalNumberOfBytesRead]
                totalNumberOfBytesRead += numberOfBytesRead;

                if (self.delay > 0.0f) {
                    [NSThread sleepForTimeInterval:self.delay];
                }
            }
        }
    }
#pragma clang diagnostic pop

    return totalNumberOfBytesRead;
}
對於單個AFHTTPBodyPart的讀取函數- [read:maxLength:]:
- (NSInteger)read:(uint8_t *)buffer
        maxLength:(NSUInteger)length
{
    NSInteger totalNumberOfBytesRead = 0;
    // 使用分隔符將對應bodyPart數據封裝起來
    if (_phase == AFEncapsulationBoundaryPhase) {
        NSData *encapsulationBoundaryData = [([self hasInitialBoundary] ? AFMultipartFormInitialBoundary(self.boundary) : AFMultipartFormEncapsulationBoundary(self.boundary)) dataUsingEncoding:self.stringEncoding];
        totalNumberOfBytesRead += [self readData:encapsulationBoundaryData intoBuffer:&buffer[totalNumberOfBytesRead] maxLength:(length - (NSUInteger)totalNumberOfBytesRead)];
    }
    // 如果讀取到的是bodyPart對應的header部分,那麼使用stringForHeaders獲取到對應header,並讀取到buffer中
    if (_phase == AFHeaderPhase) {
        NSData *headersData = [[self stringForHeaders] dataUsingEncoding:self.stringEncoding];
        totalNumberOfBytesRead += [self readData:headersData intoBuffer:&buffer[totalNumberOfBytesRead] maxLength:(length - (NSUInteger)totalNumberOfBytesRead)];
    }
    // 如果讀取到的是bodyPart的內容主體,即inputStream,那麼就直接使用inputStream寫入數據到buffer中
    if (_phase == AFBodyPhase) {
        NSInteger numberOfBytesRead = 0;
        // 使用系統自帶的NSInputStream的read:maxLength:函數讀取
        numberOfBytesRead = [self.inputStream read:&buffer[totalNumberOfBytesRead] maxLength:(length - (NSUInteger)totalNumberOfBytesRead)];
        if (numberOfBytesRead == -1) {
            return -1;
        } else {
            totalNumberOfBytesRead += numberOfBytesRead;
            // 如果內容主體都讀取完了,那麼很有可能下一次讀取的就是下一個bodyPart的header
            // 所以此處要調用transitionToNextPhase,調整對應_phase
            if ([self.inputStream streamStatus] >= NSStreamStatusAtEnd) {
                [self transitionToNextPhase];
            }
        }
    }
    // 如果是最後一個AFHTTPBodyPart對象,那麼就需要添加在末尾”--分隔符--"
    if (_phase == AFFinalBoundaryPhase) {
        NSData *closingBoundaryData = ([self hasFinalBoundary] ? [AFMultipartFormFinalBoundary(self.boundary) dataUsingEncoding:self.stringEncoding] : [NSData data]);
        totalNumberOfBytesRead += [self readData:closingBoundaryData intoBuffer:&buffer[totalNumberOfBytesRead] maxLength:(length - (NSUInteger)totalNumberOfBytesRead)];
    }

    return totalNumberOfBytesRead;
}

// 上面那個函數中大量使用了read:intoBuffer:maxLength:函數
// 這裡我們將read:intoBuffer:maxLength:理解成一種將NSData類型的data轉化為(uint8_t *)類型的buffer的手段,核心是使用了NSData的getBytes:range:函數
- (NSInteger)readData:(NSData *)data
           intoBuffer:(uint8_t *)buffer
            maxLength:(NSUInteger)length
{
#pragma clang diagnostic push
#pragma clang diagnostic ignored "-Wgnu"
    // 求取range,需要考慮文件末尾比maxLength會小的情況
    NSRange range = NSMakeRange((NSUInteger)_phaseReadOffset, MIN([data length] - ((NSUInteger)_phaseReadOffset), length));
    // 核心:NSData *---->uint8_t*
    [data getBytes:buffer range:range];
#pragma clang diagnostic pop

    _phaseReadOffset += range.length;
    // 讀取完成就更新_phase的狀態
    if (((NSUInteger)_phaseReadOffset) >= [data length]) {
        [self transitionToNextPhase];
    }

    return (NSInteger)range.length;
}
另外,具體的_phase狀態轉換,大家參考transitionToNextPhase函數,不是很難,此處就不贅述了。
3. AFJSONRequestSerializer和AFPropertyListRequestSerializer
這兩個類都是繼承自AFHTTPRequestSerializer,和父類不同的是:
- AFJSONRequestSerializer給參數(parameters)編碼時使用的是系統自帶的- [NSJSONSerialization dataWithJSONObject:options:error:]方法,另外Content-Type設定的是”application/json”。json格式我想大家都很熟悉了,就不贅述了。
- AFPropertyListRequestSerializer給參數(parameters)編碼時使用的是系統自帶的- [NSPropertyListSerialization dataWithPropertyList:format:options:error:]方法,另外Content-Type設定的是”application/x-plist”。此處比AFJSONRequestSerializer多了一個format參數,具體的format形式有以下幾種:
- 1. OpenStep
- 2. XML(常用)
- 3. BinaryFormat
4. AFURLResponseSerialization
還記得我們在說AFURLSessionManager的時候,在NSURLSessionTaskDelegate中的- URLSession:task:didCompeleteWithErrror這個代理方法中提到過:
responseObject = [manager.responseSerializer responseObjectForResponse:task.response data:data error:&serializationError];
responseObjectForResponse:函數就是為了將返回的data轉化為用戶所需的格式,比如如果你的responseSerializer是AFJSONResponseSerializer的對象,那麼解析出來的data就是JSON格式。
我們先來看看AFURLResponseSerialization這個文件中類的大概結構:
簡單講一下這個結構,比如說我現在想自定義一個ResponseSerializer,名叫AFCustomResponseSerializer,繼承自AFHTTPResponseSerializer。
@interface AFCustomResponseSerializer : AFHTTPResponseSerializer
那麼AFCustomResponseSerializer需要實現AFURLResponseSerialization協議的responseObjectForResponse:方法。此方法就是將data轉化你定義的格式。可能你還需要實現你自己的serializer方法,併在init中定義自己的acceptableContentTypes。我們接下來就先看AFHTTPResponseSerializer這個父類,然後逐個看看AFHTTPResponseSerializer這些個子類。
4.1 AFHTTPResponseSerializer
註意到AFHTTPResponseSerializer實現的responseObjectForResponse:函數,只是簡單調用了validateResponse:這個函數,而且validateResponse:中並沒有對data做任何改變,也就是說父類AFHTTPResponseSerializer中的responseObjectForResponse:返回的就是最原始的data。對於data的處理,就交給了各個子類具體實現。
這裡主要提及的就是validResponse:這個函數,挺重要的,主要是判斷返回的response是否可用。有用的話,才會做下一步操作。
- (BOOL)validateResponse:(NSHTTPURLResponse *)response
                    data:(NSData *)data
                   error:(NSError * __autoreleasing *)error
{
    // 初始response是可用的,不過下麵還需要要過三關斬六將
    BOOL responseIsValid = YES;
    NSError *validationError = nil;
   // 簡單的為空判斷和類型判斷,註意如果response為空或類型不對,反而responseValid為YES
    if (response && [response isKindOfClass:[NSHTTPURLResponse class]]) {
        // 如果response對應的mimeType不被這個ResponseSerializer所接受,那麼就認為Response不可用
        if (self.acceptableContentTypes && ![self.acceptableContentTypes containsObject:[response MIMEType]]) {
            // 會返回unacceptable content-type的信息,並將錯誤信息記錄在了mutableUserInfo中
            if ([data length] > 0 && [response URL]) {
                NSMutableDictionary *mutableUserInfo = [@{
                                                          NSLocalizedDescriptionKey: [NSString stringWithFormat:NSLocalizedStringFromTable(@"Request failed: unacceptable content-type: %@", @"AFNetworking", nil), [response MIMEType]],
                                                          NSURLErrorFailingURLErrorKey:[response URL],
                                                          AFNetworkingOperationFailingURLResponseErrorKey: response,
                                                        } mutableCopy];
                if (data) {
                    mutableUserInfo[AFNetworkingOperationFailingURLResponseDataErrorKey] = data;
                }
                // 利用mutableUserInfo構建一個NSError對象
                validationError = AFErrorWithUnderlyingError([NSError errorWithDomain:AFURLResponseSerializationErrorDomain code:NSURLErrorCannotDecodeContentData userInfo:mutableUserInfo], validationError);
            }

            responseIsValid = NO;
        }
        // 判斷返回的statusCode是否被允許
        if (self.acceptableStatusCodes && ![self.acceptableStatusCodes containsIndex:(NSUInteger)response.statusCode] && [response URL]) {
            NSMutableDictionary *mutableUserInfo = [@{
                                               NSLocalizedDescriptionKey: [NSString stringWithFormat:NSLocalizedStringFromTable(@"Request failed: %@ (%ld)", @"AFNetworking", nil), [NSHTTPURLResponse localizedStringForStatusCode:response.statusCode], (long)response.statusCode],
                                               NSURLErrorFailingURLErrorKey:[response URL],
                                               AFNetworkingOperationFailingURLResponseErrorKey: response,
                                       } mutableCopy];

            if (data) {
                mutableUserInfo[AFNetworkingOperationFailingURLResponseDataErrorKey] = data;
            }

            validationError = AFErrorWithUnderlyingError([NSError errorWithDomain:AFURLResponseSerializationErrorDomain code:NSURLErrorBadServerResponse userInfo:mutableUserInfo], validationError);

            responseIsValid = NO;
        }
    }
    // 將error設置為validationError
    if (error && !responseIsValid) {
        *error = validationError;
    }

    return responseIsValid;
}
4.2 AFJSONResponseSerializer
AFJSONResponseSerializer接受的content-type有@"application/json", @"text/json", @"text/javascript"。
再讓我們看看responseObjectForResponse:data:error:的實現:
- (id)responseObjectForResponse:(NSURLResponse *)response
                           data:(NSData *)data
                          error:(NSError *__autoreleasing *)error
{
    // 判斷當前response是否有效
    if (![self validateResponse:(NSHTTPURLResponse *)response data:data error:error]) {
        // 還記得validateResponse:中如果content-type不滿足,那麼產生的validationError就是Domain為AFURLResponseSerializationErrorDomain,code為NSURLErrorCannotDecodeContentData
        if (!error || AFErrorOrUnderlyingErrorHasCodeInDomain(*error, NSURLErrorCannotDecodeContentData, AFURLResponseSerializationErrorDomain)) {
            // 因為不支持這個content-type,所以不用解析了,直接返回nil
            return nil;
        }
    }

    id responseObject = nil;
    NSError *serializationError = nil;
    // 對於'head :ok',Rails返回的是一個空格 (這是Safari上的一個bug),並且這樣的JSON格式不會被NSJSONSerialization解析。
    // See https://github.com/rails/rails/issues/1742
    // 如果是單個空格,就不解析
    BOOL isSpace = [data isEqualToData:[NSData dataWithBytes:" " length:1]];
    if (data.length > 0 && !isSpace) {
        // 使用系統自帶的NSJSONSerialization來解析NSData數據
        responseObject = [NSJSONSerialization JSONObjectWithData:data options:self.readingOptions error:&serializationError];
    } else {
        return nil;
    }
    // 如果需要移除JSON數據中對應value為空(nil或NSNull)的key,那麼就使用AFJSONObjectByRemovingKeysWithNullValues函數
    // AFJSONObjectByRemovingKeysWithNullValues通過遞歸的方法,把JSON中NSDictionary的數據(不包括NSArray)中的對應value為空的key移除
    if (self.removesKeysWithNullValues && responseObject) {
        responseObject = AFJSONObjectByRemovingKeysWithNullValues(responseObject, self.readingOptions);
    }

    if (error) {
        // 如果serializationError不為空,那麼最終的error其實就是serializationError
        *error = AFErrorWithUnderlyingError(serializationError, *error);
    }

    return responseObject;
}
4.3 AFXMLParserResponseSerializer
AFXMLParserResponseSerializer接受的content-type有@"application/xml", @"text/xml"。
再讓我們看看responseObjectForResponse:data:error:的實現:
- (id)responseObjectForResponse:(NSHTTPURLResponse *)response
                           data:(NSData *)data
                          error:(NSError *__autoreleasing *)error
{
    if (![self validateResponse:(NSHTTPURLResponse *)response data:data error:error]) {
        // 如果不支持該content-type
        if (!error || AFErrorOrUnderlyingErrorHasCodeInDomain(*error, NSURLErrorCannotDecodeContentData, AFURLResponseSerializationErrorDomain)) {
            return nil;
        }
    }
    // 使用NSXMLParser解析NSData數據
    return [[NSXMLParser alloc] initWithData:data];
}
至於下麵的AFXMLDocumentResponseSerializer,那是MAC上所用到的,這裡不贅述了。
4.4 AFPropertyListResponseSerializer
AFPropertyListResponseSerializer接受的content-type有@"application/x-plist"。
再讓我們看看responseObjectForResponse:data:error:的實現:
- (id)responseObjectForResponse:(NSURLResponse *)response
                           data:(NSData *)data
                          error:(NSError *__autoreleasing *)error
{
    if (![self validateResponse:(NSHTTPURLResponse *)response data:data error:error]) {
        // 如果不支持該content-type,返回nil
        if (!error || AFErrorOrUnderlyingErrorHasCodeInDomain(*error, NSURLErrorCannotDecodeContentData, AFURLResponseSerializationErrorDomain)) {
            return nil;
        }
    }

    id responseObject;
    NSError *serializationError = nil;
    // 使用NSPropertyListSerialization來解析NSData數據
    if (data) {
        responseObject = [NSPropertyListSerialization propertyListWithData:data options:self.readOptions format:NULL error:&serializationError];
    }
    // 如果serializationError不為空,那麼最終的error其實就是serializationError
    if (error) {
        *error = AFErrorWithUnderlyingError(serializationError, *error);
    }

    return responseObject;
}
4.5 AFImageResponseSerializer
AFImageResponseSerializer接受的content-type有@"image/tiff", @"image/jpeg", @"image/gif", @"image/png", @"image/ico", @"image/x-icon", @"image/bmp", @"image/x-bmp", @"image/x-xbitmap", @"image/x-win-bitmap"。
再讓我們看看responseObjectForResponse:data:error:的實現:
- (id)responseObjectForResponse:(NSURLResponse *)response
                           data:(NSData *)data
                          error:(NSError *__autoreleasing *)error
{
    if (![self validateResponse:(NSHTTPURLResponse *)response data:data error:error]) {
        // 如果不支持該content-type,返回nil
        if (!error || AFErrorOrUnderlyingErrorHasCodeInDomain(*error, NSURLErrorCannotDecodeContentData, AFURLResponseSerializationErrorDomain)) {
            return nil;
        }
    }

#if TARGET_OS_IOS || TARGET_OS_TV || TARGET_OS_WATCH
    // iOS和TV平臺預設automaticallyInflatesResponseImage為YES
    // 下麵的NSData轉圖片的方法,之前SDWebImage分析過,就不贅述了
    // 感興趣的話可以查看【原】SDWebImage源碼閱讀(四)
    if (self.automaticallyInflatesResponseImage) {
        return AFInflatedImageFromResponseWithDataAtScale((NSHTTPURLResponse *)response, data, self.imageScale);
    } else {
        return AFImageWithDataAtScale(data, self.imageScale);
    }
#else
    // 只關心iOS
    // Ensure that the image is set to it's correct pixel width and height
    NSBitmapImageRep *bitimage = [[NSBitmapImageRep alloc] initWithData:data];
    NSImage *image = [[NSImage alloc] initWithSize:NSMakeSize([bitimage pixelsWide], [bitimage pixelsHigh])];
    [image addRepresentation:bitimage];

    return image;
#endif

    return nil;
}
4.6 AFCompoundResponseSerializer
該類裡面有一個成員屬性為
@property (readwrite, nonatomic, copy) NSArray *responseSerializers;
可見AFCompoundResponseSerializer是表示一組Serializer的集合,不信,你可以看它的responseObjectForResponse:data:error:函數實現:
- (id)responseObjectForResponse:(NSURLResponse *)response
                           data:(NSData *)data
                          error:(NSError *__autoreleasing *)error
{
    // 可能確實不能確定返回的responsed的content-type,此時可以使用AFCompoundResponseSerializer
// 總會找到合適的Serializer
    for (id <AFURLResponseSerialization> serializer in self.responseSerializers) {
        if (![serializer isKindOfClass:[AFHTTPResponseSerializer class]]) {
            continue;
        }

        NSError *serializerError = nil;
        id responseObject = [serializer responseObjectForResponse:response data:data error:&serializerError];
        // 終於遍歷到合適的Serializer
        if (responseObject) {
            if (error) {
                *error = AFErrorWithUnderlyingError(serializerError, *error);
            }

            return responseObject;
        }
    }

    return [super responseObjectForResponse:response data:data error:error];
}


