
部署環境:VM虛擬機 操作系統:CentOS-6.8-x64 IP地址:192.168.31.91Mysql資料庫版本:5.6.34 Cmake軟體包版本:3.5.2Nginx軟體包版本:1.10.2 PHP軟體包版本:5.6.30 依賴軟體包版本:libiconv-1.14.tar.gz 免費開源 ...
部署環境:VM虛擬機 操作系統:CentOS-6.8-x64 IP地址:192.168.31.91
Mysql資料庫版本:5.6.34 Cmake軟體包版本:3.5.2
Nginx軟體包版本:1.10.2 PHP軟體包版本:5.6.30 依賴軟體包版本:libiconv-1.14.tar.gz
免費開源博客軟體包版本:wordpress-4.7.2-zh_CN.tar.gz
作者:惟凈(劉琪)
軟體下載地址:http://pan.baidu.com/s/1jIQEwdg
[root@master-01 ~]# setenforce 0
[root@master-01 ~]# /etc/init.d/iptables stop
[root@master-01 ~]# yum groupinstall "開發工具" -y
[root@master-01 ~]# yum install vim wget pcre pcre-devel openssl openssl-devel -y
開始安裝Nginx --->
[root@master-01 Nginx]# tar xvzf nginx-1.10.2.tar.gz
[root@master-01 Nginx]# cd nginx-1.10.2
[root@master-01 nginx-1.10.2]# useradd nginx -s /sbin/nologin -M
[root@master-01 nginx-1.10.2]# ./configure --user=nginx --group=nginx --prefix=/usr/local/nginx-1.10.2 --with-http_stub_status_module --with-http_ssl_module && make && make install
[root@master-01 nginx-1.10.2]# ln -s /usr/local/nginx-1.10.2/ /usr/local/nginx
[root@master-01 nginx-1.10.2]# cp /usr/local/nginx/conf/nginx.conf /usr/local/nginx/conf/nginx.conf.bck
[root@master-01 nginx-1.10.2]# /usr/local/nginx/sbin/nginx
[root@master-01 nginx-1.10.2]# netstat -tnlp | grep :80
tcp 0 0 0.0.0.0:80 0.0.0.0:* LISTEN 6338/nginx
開始安裝Mysql --->
[root@master-01 Mysql]# tar xvzf cmake-3.5.2.tar.gz
[root@master-01 Mysql]# cd cmake-3.5.2
[root@master-01 cmake-3.5.2]# yum install ncurses-devel -y
[root@master-01 cmake-3.5.2]# ./configure --prefix=/usr/local/cmake && make && make install
[root@master-01 Mysql]# tar xvzf mysql-5.6.34.tar.gz
[root@master-01 Mysql]# cd mysql-5.6.34
[root@master-01 Mysql]# cd mysql-5.6.34
[root@master-01 mysql-5.6.34]# /usr/local/cmake/bin/cmake \
> -DCMAKE_INSTALL_PREFIX=/usr/local/mysql \
> -DMYSQL_DATADIR=/usr/local/mysql/data \
> -DSYSCONFDIR=/etc \
> -DWITH_READLINE=1 \
> -DMYSQL_TCP_PORT=3306 \
> -DMYSQL_UNIX_ADDR=/tmp/mysql.sock \
> -DENABLED_LOCAL_INFILE=1 \
> -DEXTRA_CHARSETS=all \
> -DDEFAULT_CHARSET=utf8 \
> -DDEFAULT_COLLATION=utf8_general_ci
[root@master-01 mysql-5.6.34]# make && make install
[root@master-01 mysql-5.6.34]# rpm -qa | grep mysql
mysql-libs-5.1.73-7.el6.x86_64
[root@master-01 mysql-5.6.34]# yum remove mysql-libs-5.1.73-7.el6.x86_64 -y
重點說明:如果rpm -qa沒有檢測出“mysql-libs-5.1.73-7.el6.x86_64”這個包?就不用執行yum remove這條命令啦!
[root@master-01 mysql-5.6.34]# useradd -M -u 27 -s /sbin/nologin mysql
[root@master-01 mysql-5.6.34]# groupmod -g 27 mysql
[root@master-01 mysql-5.6.34]# chown mysql.mysql -R /usr/local/mysql/
[root@master-01 mysql-5.6.34]# echo '#Mysql-5.6.34' >> /etc/profile
[root@master-01 mysql-5.6.34]# echo 'export PATH=$PATH:/usr/local/mysql/bin' >> /etc/profile
[root@master-01 mysql-5.6.34]# source /etc/profile
[root@master-01 mysql-5.6.34]# cp /usr/local/mysql/support-files/mysql.server /etc/init.d/mysqld
[root@master-01 mysql-5.6.34]# chmod +x /etc/init.d/mysqld
[root@master-01 mysql-5.6.34]# chkconfig --add mysqld
[root@master-01 mysql-5.6.34]# chkconfig --list mysqld
mysqld 0:關閉 1:關閉 2:啟用 3:啟用 4:啟用 5:啟用 6:關閉
[root@master-01 mysql-5.6.34]# chown mysql.mysql -R /usr/local/mysql/data/
[root@master-01 mysql]# cd /usr/local/mysql/
[root@master-01 mysql]# pwd
/usr/local/mysql
[root@master-01 mysql-5.6.34]# ./scripts/mysql_install_db --user=mysql
[root@master-01 mysql]# service mysqld start
Starting MySQL. SUCCESS!
[root@master-01 mysql]# /usr/local/mysql/bin/mysqladmin -u root password "123456"
Warning: Using a password on the command line interface can be insecure.
[root@master-01 mysql]# /usr/local/mysql/bin/mysql -u root -p123456
Warning: Using a password on the command line interface can be insecure.
Welcome to the MySQL monitor. Commands end with ; or \g.
Your MySQL connection id is 2
Server version: 5.6.34 Source distribution
Copyright (c) 2000, 2016, Oracle and/or its affiliates. All rights reserved.
Oracle is a registered trademark of Oracle Corporation and/or its
affiliates. Other names may be trademarks of their respective
owners.
Type 'help;' or '\h' for help. Type '\c' to clear the current input statement.
mysql> exit
Bye
[root@master-01 mysql]# netstat -tnalp | grep :80
tcp 0 0 0.0.0.0:80 0.0.0.0:* LISTEN 6338/nginx
[root@master-01 mysql]# netstat -tnalp | grep :3306
tcp 0 0 :::3306 :::* LISTEN 29405/mysqld
開始安裝PHP --->
[root@master-01 mysql]# yum install zlib-devel libxml2-devel libjpeg-devel libjpeg-turbo-turbo-devel libiconv-devel freetype-devel libpng-devel gd-devel libcurl-devel libxslt-devel -y
[root@master-01 PHP]# tar xvzf libiconv-1.14.tar.gz
[root@master-01 libiconv-1.14]# ./configure --prefix=/usr/local/libiconv && make && make install
[root@master-01 libiconv-1.14]# wget -O /etc/yum.repos.d/epel.repo http://mirrors.aliyun.com/repo/epel-6.repo
重點解釋:安裝epel-6.repo擴展Yum源,如果不執行這條命令?下麵所有Yum安裝都會失敗!
[root@master-01 libiconv-1.14]# yum install libmcrypt-devel mhash mcrypt -y
[root@master-01 PHP]# tar xvzf php-5.6.30.tar.gz
[root@master-01 PHP]# cd php-5.6.30
[root@master-01 php-5.6.30]# pwd
/usr/local/src/PHP/php-5.6.30
[root@master-01 php-5.6.30]# ./configure \
> --prefix=/usr/local/php-5.6.30 \
> --with-mysql=/usr/local/mysql/ \
> --with-iconv-dir=/usr/local/libiconv \
> --with-freetype-dir \
> --with-jpeg-dir \
> --with-zlib \
> --with-png-dir \
> --with-libxml-dir=/usr \
> --enable-xml \
> --disable-rpath \
> --enable-bcmath \
> --enable-shmop \
> --enable-sysvsem \
> --enable-inline-optimization \
> --with-curl \
> --enable-mbregex \
> --enable-fpm \
> --enable-mbstring \
> --with-mcrypt \
> --with-gd \
> --enable-gd-native-ttf \
> --with-openssl \
> --with-mhash \
> --enable-pcntl \
> --enable-sockets \
> --with-xmlrpc \
> --enable-soap \
> --enable-short-tags \
> --enable-static \
> --with-xsl \
> --enable-opcache=no \
> --with-fpm-user=nginx \
> --with-fpm-group=nginx \
> --enable-ftp
[root@master-01 php-5.6.30]# ln -s /usr/local/mysql/lib/libmysqlclient.so.18 /usr/lib64/
[root@master-01 php-5.6.30]# touch ext/phar/phar.phar
[root@master-01 php-5.6.30]# make && make install
[root@master-01 php-5.6.30]# ln -s /usr/local/php-5.6.30/ /usr/local/php
[root@master-01 php-5.6.30]# cp php.ini-production /usr/local/php-5.6.30/lib/php.ini
[root@master-01 php-5.6.30]# cd /usr/local/php/etc/
[root@master-01 etc]# pwd
/usr/local/php/etc
[root@master-01 etc]# cp php-fpm.conf.default php-fpm.conf
[root@master-01 etc]# /usr/local/php/sbin/php-fpm
[root@master-01 etc]# ps aux | grep php-fpm
root 28621 0.0 0.2 223092 4548 ? Ss 20:01 0:00 php-fpm: master process (/usr/local/php-5.6.30/etc/php-fpm.conf)
nginx 28622 0.0 0.2 223092 4264 ? S 20:01 0:00 php-fpm: pool www
nginx 28623 0.0 0.2 223092 4264 ? S 20:01 0:00 php-fpm: pool www
root 28625 0.0 0.0 103324 892 pts/0 S+ 20:01 0:00 grep php-fpm
[root@master-01 etc]# netstat -tanlp | grep :9000
tcp 0 0 127.0.0.1:9000 0.0.0.0:* LISTEN 28621/php-fpm
配置Nginx --->
[root@master-01 etc]# vim /usr/local/nginx/conf/nginx.conf
worker_processes 1;
error_log logs/error.log;
events {
worker_connections 1024;
}
http {
include mime.types;
default_type application/octet-stream;
log_format main '$remote_addr - $remote_user [$time_local] "$request"'
'$status $body_bytes_sent "http_referer"'
'"$http_user_agent" "$http_x_forwarded_for"';
sendfile on;
keepalive_timeout 65;
include extra/blog.conf;
}

[root@master-01 etc]# cd /usr/local/nginx/conf/
[root@master-01 conf]# mkdir extra
[root@master-01 conf]# pwd
/usr/local/nginx/conf
[root@master-01 conf]# cd extra/
[root@master-01 extra]# vim blog.conf
server {
listen 80;
server_name blog.liuqi.org;
location / {
root html/blog;
index index.html index.htm;
}
location ~ .*\.(php|php5)?$ {
root html/blog;
fastcgi_pass 127.0.0.1:9000;
fastcgi_index index.php;
include fastcgi.conf;
}
}
[root@master-01 extra]# /usr/local/nginx/sbin/nginx -t
nginx: the configuration file /usr/local/nginx-1.10.2/conf/nginx.conf syntax is ok
nginx: configuration file /usr/local/nginx-1.10.2/conf/nginx.conf test is successful
[root@master-01 html]# mkdir blog
[root@master-01 html]# cd blog/
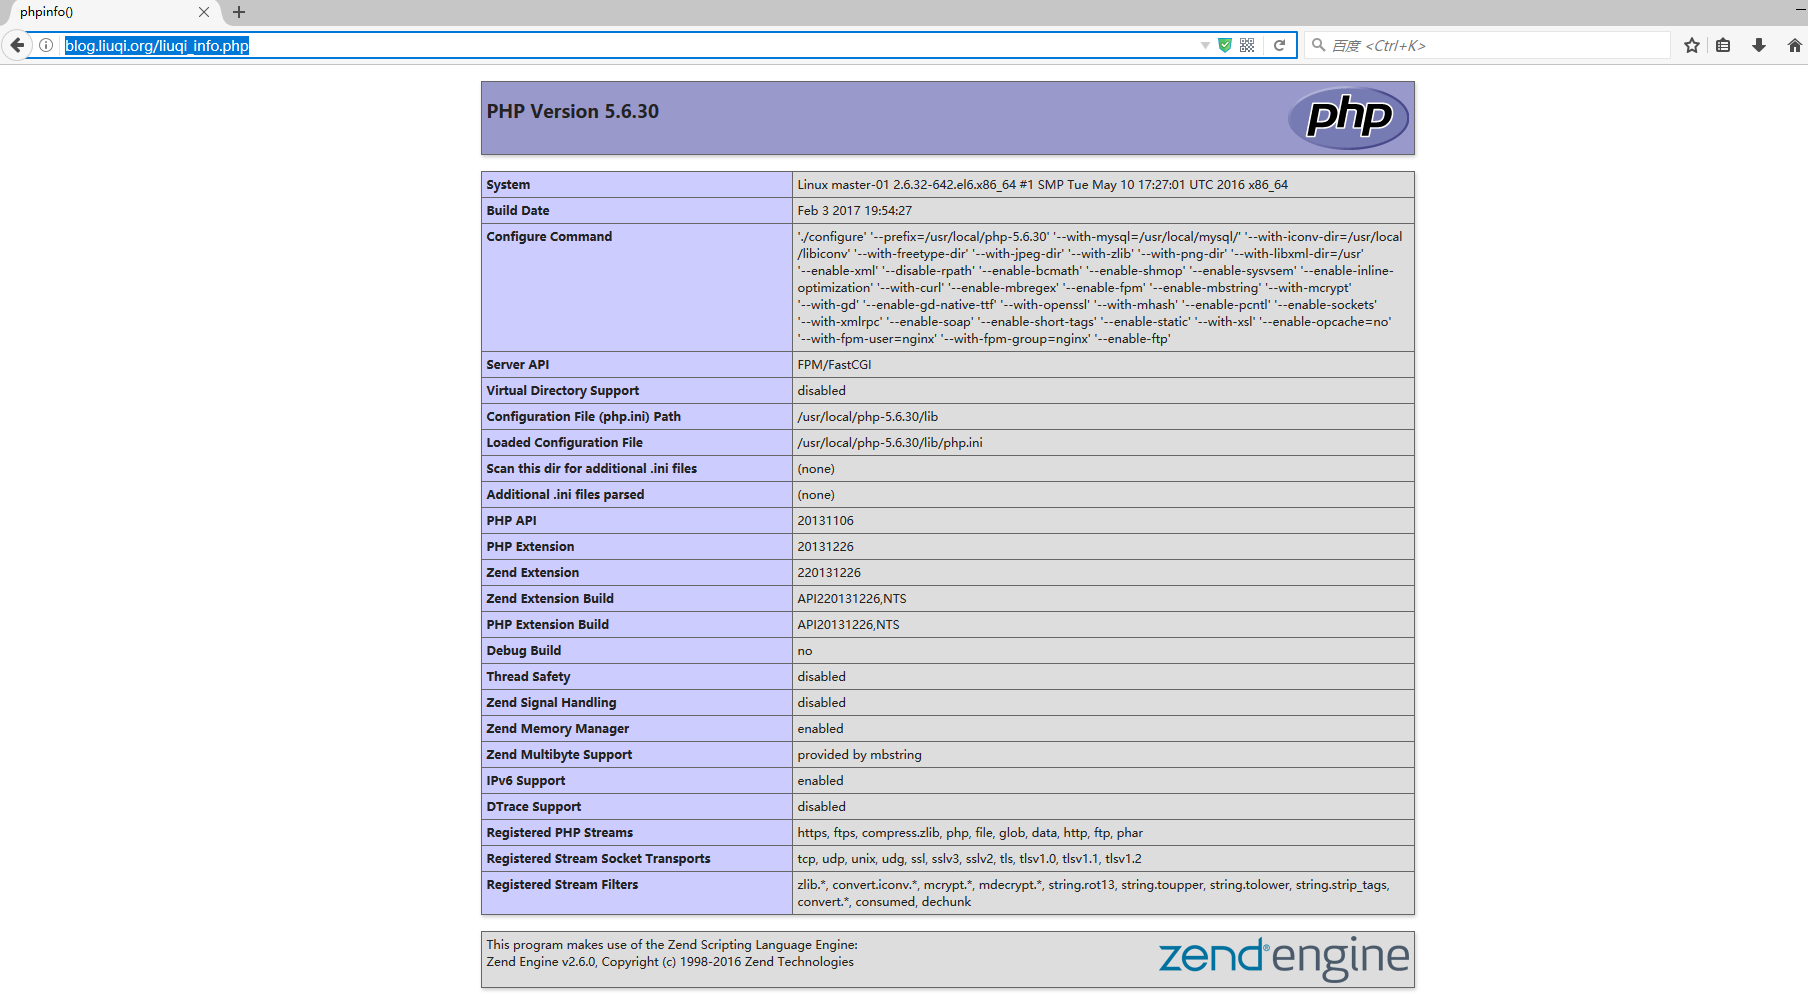
[root@master-01 blog]# touch liuqi_info.php
[root@master-01 blog]# echo "<?php phpinfo();?>" > liuqi_info.php
[root@master-01 blog]# pwd
/usr/local/nginx/html/blog
[root@master-01 blog]# /usr/local/nginx/sbin/nginx -s reload
在Windows客戶端上打開Hosts文件
C:\Windows\System32\drivers\etc\hosts
192.168.31.91 blog.liuqi.org ---> 把這一行寫入文件的尾處!保存退出!
在瀏覽器上輸入:http://blog.liuqi.org/liuqi_info.php
[root@master-01 blog]# netstat -tnalp | grep :80
tcp 0 0 0.0.0.0:80 0.0.0.0:* LISTEN 6338/nginx
[root@master-01 blog]# netstat -tnalp | grep :9000
tcp 0 0 127.0.0.1:9000 0.0.0.0:* LISTEN 28621/php-fpm
[root@master-01 blog]# netstat -tnalp | grep :3306
tcp 0 0 :::3306 :::* LISTEN 29405/mysqld
配置Mysql資料庫 --->
[root@master-01 blog]# /usr/local/mysql/bin/mysql -u root -p123456
mysql> create database wordpress;
Query OK, 1 row affected (0.00 sec)
mysql> show databases like 'wordpress';
+----------------------+
| Database (wordpress) |
+----------------------+
| wordpress |
+----------------------+
1 row in set (0.00 sec)
mysql> grant all on wordpress.* to wordpress@'localhost' identified by '123456';
Query OK, 0 rows affected (0.00 sec)
mysql> grant all on wordpress.* to wordpress@'192.168.1.%' identified by '123456';
Query OK, 0 rows affected (0.00 sec)
mysql> flush privileges;
Query OK, 0 rows affected (0.00 sec)
mysql> show grants for wordpress@'localhost';
+------------------------------------------------------------------------------------------------------------------+
| Grants for wordpress@localhost |
+------------------------------------------------------------------------------------------------------------------+
| GRANT USAGE ON *.* TO 'wordpress'@'localhost' IDENTIFIED BY PASSWORD '*6BB4837EB74329105EE4568DDA7DC67ED2CA2AD9' |
| GRANT ALL PRIVILEGES ON `wordpress`.* TO 'wordpress'@'localhost' |
+------------------------------------------------------------------------------------------------------------------+
2 rows in set (0.00 sec)
mysql> select user,host from mysql.user;
+-----------+-------------+
| user | host |
+-----------+-------------+
| root | 127.0.0.1 |
| wordpress | 192.168.1.% |
| root | ::1 |
| | localhost |
| root | localhost |
| wordpress | localhost |
| | master-01 |
| root | master-01 |
+-----------+-------------+
8 rows in set (0.00 sec)
mysql> quit
Bye
[root@master-01 blog]# cd /usr/local/nginx/conf/extra/
[root@master-01 extra]# pwd
/usr/local/nginx/conf/extra
[root@master-01 src]# cp wordpress-4.7.2-zh_CN.tar.gz /usr/local/nginx/html/blog/
[root@master-01 src]# cd /usr/local/nginx/html/blog/
[root@master-01 blog]# tar xvzf wordpress-4.7.2-zh_CN.tar.gz
配置Nginx --->
[root@master-01 wordpress]# vim /usr/local/nginx/conf/extra/blog.conf
server {
listen 80;
server_name blog.liuqi.org;
location / {
root html/blog;
index index.php index.html index.htm;
}
location ~ .*\.(php|php5)?$ {
root html/blog;
fastcgi_pass 127.0.0.1:9000;
fastcgi_index index.php;
include fastcgi.conf;
}
}
[root@master-01 wordpress]# /usr/local/nginx/sbin/nginx -s reload
[root@master-01 blog]# service mysqld restart
Shutting down MySQL.. SUCCESS!
Starting MySQL. SUCCESS!
[root@master-01 blog]# rm -rf liuqi_info.php
[root@master-01 blog]# mv wordpress/* .
重點解釋:這步很關鍵!如果不執行“mv wordpress/* .”?Blog博客平臺會安裝失敗!
[root@master-01 blog]# /bin/mv wordpress-4.7.2-zh_CN.tar.gz /usr/local/src/
[root@master-01 blog]# chown -R nginx.nginx /usr/local/nginx/html/blog/
[root@master-01 blog]# /usr/local/nginx/sbin/nginx -s reload
在瀏覽器上輸入:http://blog.liuqi.org


