
前言: 本文為個人學習react-router的總結。包括路由基礎配置,跳轉,許可權管理,組件與路由配置的關係,代碼分割。歡迎交流指導。 一、路由基礎 1.路由配置 & 顯示路由組件的view(類比angular的ui-view) 路由配置:路由匹配的規則 view:放置路由組件的地方(URL匹配了, ...
前言:
本文為個人學習react-router的總結。包括路由基礎配置,跳轉,許可權管理,組件與路由配置的關係,代碼分割。歡迎交流指導。
一、路由基礎
1.路由配置 & 顯示路由組件的view(類比angular的ui-view)
路由配置:路由匹配的規則
render((
    <Router history={ hashHistory }>
        <Route path="/" component={ App }>
            <Route path="select" component={ Select }></Route>
            <Route path="found" component={ Found }></Route>
            <Route path="follow" component={ Follow }></Route>
            <Route path="my" component={ My }>
                <Route path=":myname" component={ MyName }></Route>
                <Route path="mysex" component={ MySex }></Route>
            </Route>
        </Route>
    </Router>
), document.getElementById('root'));
view:放置路由組件的地方(URL匹配了,然後對應的組件應該放到什麼地方去),
每一個Route都只是一個組件,子路由就是 this.props.children 裡面的組件,Route通過匹配URL決定顯示哪一個子路由
class App extends PureComponent {
    render() {
        return (
            <div>
                <GlobalNav />
                { this.props.children } { /* this.props.children 是被嵌套在App的組件,相當於放子路由的View*/}
            </div>
        )
    }
}
二、預設路由(IndexRoute )
組件<App /> 的匹配路徑是 ‘/', 有四個子路由,當前路由只是'/',那麼<App />應該顯示什麼頁面呢?
這裡給與IndexRoute組件 -- 若希望直接使用4個其中一個則使用IndexRedirect
render((
    <Router history={ hashHistory }>
        <Route path="/" component={ App }>
            <IndexRoute component={ IndexApp } />
            <Route path="select" component={ Select }></Route>
            <Route path="found" component={ Found }></Route>
            <Route path="follow" component={ Follow }></Route>
            <Route path="my" component={ My }>
                <Route path=":myname" component={ MyName }></Route>
                <Route path="mysex" component={ MySex }></Route>
            </Route>
        </Route>
    </Router>
), document.getElementById('root'));
如果不使用IndexRoute組件,也還有一種投機取巧的方法,直接在 App組件中,使用 {this.props.children || <IndexApp />} ,在ui展示的層面上修改this.props.children為undefined的情況。
缺點:這種形式,沒有參與到路由機制中,onEnter,onLeave 等HOOK都無法使用
三、路由跳轉
1. IndexLink & Link (active狀態之爭)
倘若有如下兩個鏈接,正好URL是'/my/mioawwwww', 兩個路由都匹配的了,那麼就是兩個都是active狀態(相應地添加activeStyle,activeClassName的樣式)
<Link to="/my" >Mypage</Link>
<Link to="/my/:myname" >myname</Link>
若你只想為 <Link to="/my/:myname" >myname</Link> 這一個按鈕添加active樣式,就可以為 <Link to="/my" >Mypage</Link> 使用IndexLink
<IndexLink to="/my" >Mypage</IndexLink>
<Link to="/my/:myname" >myname</Link>
IndexLink是補充Link的,只要URL完整匹配'/my'的時候才會激活active狀態
2.跳轉參數 to
2.1:通過 to=’xx/xx' 直接跳轉 <Link to={`/my/${myname}/info`}>check my info</Link>
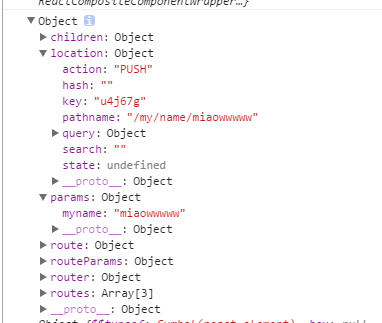
2.2:to=對象,帶參數跳轉(pathname, query, hash, state(額外數據)),註意:這些參數都被存放到this.props.location中
<li><Link to={{pathname:"/select", hash:'#ahash', query:{foo: 'bar', boo:'boz'}, state:{data:'miao'} }} activeClassName="GlobalNav-active">精選</Link></li>
2.3:to=函數,註冊到路由跳轉事件中,每一次路由變化,都會執行該函數,並經最新的location作為參數
<Link to={location => ({ ...location, query: { name: 'ryan' } })}>
  Hello
</Link>
2.4:不使用Link,在函數內直接操作router
舊版本:由於router只用的context傳遞路由信息,因此每一個組件都可以輕易的通過this.context.router獲取路由
新版本:router被放置在this.props中,通過this.props.router可以獲取路由
註意:push與replace的區別,一個是添加,一個是替換,歷史記錄中被替換的已經不存在了,所以瀏覽器回退不到替換前的頁面。
    changeRouter = () => {
        console.log(this.props)
        // this.props.router.push('/follow');
        // this.props.router.push({
        //     pathname:'/follow',
        //     state:{name:'xxx'},
        //     query: {foo: 'bar'}
        // })

        // this.props.router.replace('/follow');
        this.props.router.replace({
            pathname: '/follow',
            query: {foo:'bar'}
        })
    }
四、重定向
<Redirect>:重定向到同等級的其他路由
<Redirect from="name/xxx" to='mysex' />
render((
    <Router history={ browserHistory }>
        <Route path="/" component={ App }>
            <IndexRoute component={ IndexApp } />
            <Route path="select" component={ Select }></Route>
            <Route path="found" component={ Found } onEnter={onEnterHook} onLeave={onLeaveHook}></Route>
            <Route path="follow" component={ Follow }>
            </Route>
            <Route path="my" component={ My } >
                <Redirect from="name/xxx" to='mysex' />

                <Route path="name/:myname" component={ MyName }>
                    <Route path="info" component={ MyInfo } ></Route>
                </Route>
                <Route path="mysex" component={ MySex } />
            </Route>
            <Redirect from="*" to='/' />
        </Route>
    </Router>
), document.getElementById('root'));
<IndexRedirect>:從父路由的目錄開始重定向
<Route path="/" component={App}>
  <IndexRedirect to="/welcome" />
  <Route path="welcome" component={Welcome} />
  <Route path="about" component={About} />
</Route>
五、路由機制的許可權
1.onEnter
const onEnterHook = (nextState, replace /*,cb*//*若添加cb參數,鉤子變成非同步執行,cb返回之前,將發生阻塞*/) => {
    console.log('onenter', nextState);
    // replace // 是router.replace(),若訪問者沒有許可權,則引導到其他頁面
}
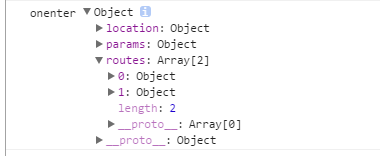
nextState的屬性
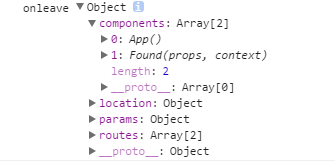
2.onLeave:與onEnter類似,nextState屬性不同
3.onChange(prevState, nextState, replace, callback?) ,用於子路由,
進入該路由的某個子路由是觸發,或者改變query,hash
一旦添加onChange屬性,則子路由通過onChangeHook決定,Link不起作用
六、組件與路由的一一對應關係,按需載入組件
<Route path="follow" component={ Follow }></Route> // this.props.children;
<Route path="follow" component={ {main:Follow, sidebar: Sidebar} }></Route> // const { main, sidebar } = this.props;
非同步載入組件,使用(需要加上 require.ensure([], (require) => {}) 實現代碼分割
getComponent(nextState, callback) && getComponents(nextState, callback)
cb(err, component)
  getComponent(nextState, cb) {
    require.ensure([], (require) => {
      cb(null, require('./components/Calendar'))
    })
  }
七、每一個Route組件的屬性
八、另一種路由配置的方式
const selectRouter = {
    path:'select',
    component: Select
}
const foundRouter = {
    path:'found',
    component: Found
}
const myRouter = {
    path:'my',
    getComponent(nextState,cb) {
        cb(null, My)
    }
}
// import Follow from './components/Follow.js';
const followRouter = {
    path:'follow',
    getComponent(nextState,cb) {
        require.ensure([], (require) => {
            cb(null, require('./components/Follow'))
        })
    }
    // getComponent(nextState, cb) {
    //     cb(null, Follow)
    // }
}
const rootRouter = {
    path: '/',
    component: App,
    // indexRoute: {component:IndexApp},
    childRoutes: [
        selectRouter,
        foundRouter,
        followRouter,
        // require('./components/Follow.index'),
        myRouter
        ]
}
// const rootRouter = {
//     path: '/',
//     component: App,
//     getIndexRoute(partialNextState, cb) {
//         cb(null,  {compoment:IndexApp});
//     },
//     getChildRoutes(location, cb) {
//         cb(null, [
//             selectRouter,
//             foundRouter,
//             followRouter,
//             myRouter
//         ])
//     }
// }
render(
    <Router history={browserHistory} routes={rootRouter} />,
    document.getElementById('root')
)
代碼分割的註意事項:
1. require.ensure中分割的組件,需要使用module.export 暴露出來
module.exports = xxx; //可獲取xxx組件
export default xxx // 不可獲取xxx組件
2. getComponent,getComponents,getIndexRoute,getChildRoutes只是實現了非同步載入,要實現代碼分割還是要使用require.ensure


