
NFS介紹 什麼是NFS? NFS是Network File System的縮寫,即網路文件系統。它的主要功能是通過網路(一般是區域網)讓不同的主機系統之間可以共用文件或目錄。NFS客戶端(一般為應用伺服器,例如web)可以通過掛載(mount)的方式將NFS服務端共用的數據目錄掛載到NFS客戶端本... ...

NFS介紹
什麼是NFS?
NFS是Network File System的縮寫,即網路文件系統。它的主要功能是通過網路(一般是區域網)讓不同的主機系統之間可以共用文件或目錄。NFS客戶端(一般為應用伺服器,例如web)可以通過掛載(mount)的方式將NFS服務端共用的數據目錄掛載到NFS客戶端本地系統中(就是某一個掛載點下)。從NFS客戶端的機器本地看,NFS服務端共用的目錄就好像是客戶自己的磁碟分區或者目錄一樣,而實際上確是遠端的NFS服務端的目錄。
NFS網路文件系統類似windows系統的網路共用、安全功能、網路驅動器映射,這也和linux系統里的samba服務類似。應用於互聯網中小型集群架構後端作為數據共用,如果是大型網站,那麼有可能還會用到更複雜的分散式文件系統,例如Moosefs(mfs)、glusterfs、FastDFS。
NFS在企業中的應用場景
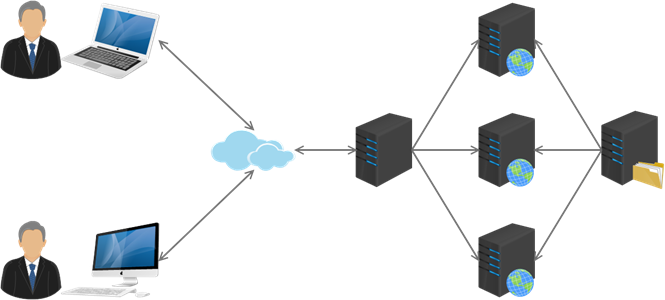
在企業集群架構的工作場景中,NFS網路文件系統一般被用來存儲共用視頻、圖片、附件等靜態資源文件。一般是把網站用戶上傳的文件都放在NFS共用里,例如,BBS產品的圖片、附件、頭像,註意網站BBS程式不要放在NFS共用里,然後前端所有的節點訪問存儲服務之一,特別是中小網站公司應用頻率更高。
NFS流程圖
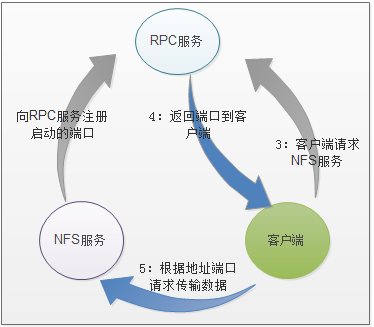
NFS原理圖
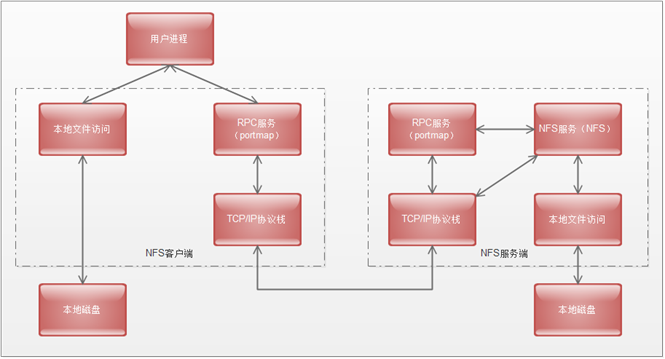
NFS的RPC服務,在CentOS5.x下名稱為portmap,在CentOS6.x下名稱為rpcbind。
NFS服務端部署環境準備
NFS服務部署伺服器準備
伺服器系統 | 角色 | ip |
CentOS 6.6 x86_64 | NFS服務端(nfs-server) | 自定義 |
CentOS 6.6 x86_64 | NFS客戶端(nfs-client1) | 自定義 |
CentOS 6.6 x86_64 | NFS客戶端(nfs-client2) | 自定義 |
NFS SERVER端設置
NFS軟體列表
部署NFS服務,需要安裝下麵的軟體包:
nfs-utils:這個NFS服務主程式包括rpc.nfsd、rpc.mountd兩個daemons和相關文檔說明及執行命令文件等。
rpcbind:CentOS 6.x下麵RPC的主程式(CentOS 5.x下麵的portmap)
NFS可以被視為一個RPC程式,在啟動任何一個RPC程式之前,需要做好埠映射工作,這個映射工作就是由rpcbind服務來完成的。因此,必須先啟動rpcbind服務。
CentOS 6.6預設沒有安裝NFS軟體包(CentOS 5預設已經安裝)。
- [root@web-lnmp01 ~]# yum install nfs-utils rpcbind -y
- [root@web-lamp01 ~]# rpm -qa nfs-utils rpcbind
- [root@web-lnmp01 ~]# rpm -qa nfs-utils rpcbind
- nfs-utils-1.2.3-70.el6_8.2.x86_64 #這個包在5.8為portmap
- rpcbind-0.2.0-12.el6.x86_64
出現兩個軟體包,表示NFS服務端軟體安裝完畢。
啟動NFS相關服務
- [root@nfs-server ~]# /etc/init.d/rpcbind status #查看rpcbind服務
- rpcbind is stopped
- [root@nfs-server ~]# /etc/init.d/rpcbind start #啟動rpcbind服務
- Starting rpcbind: [ OK ]
- [root@nfs-server ~]# /etc/init.d/rpcbind status
- rpcbind (pid 26101) is running...
- [root@nfs-server ~]# lsof -i:111 #rpcbind服務埠111
- COMMAND PID USER FD TYPE DEVICE SIZE/OFF NODE NAME
- rpcbind 26101 rpc 6u IPv4 28829 0t0 UDP *:sunrpc
- rpcbind 26101 rpc 8u IPv4 28832 0t0 TCP *:sunrpc (LISTEN)
- rpcbind 26101 rpc 9u IPv6 28834 0t0 UDP *:sunrpc
- rpcbind 26101 rpc 11u IPv6 28837 0t0 TCP *:sunrpc (LISTEN)
- [root@nfs-server ~]# netstat -lntup|grep rpcbind
- tcp 0 0 0.0.0.0:111 0.0.0.0:* LISTEN 26101/rpcbind
- tcp 0 0 :::111 :::* LISTEN 26101/rpcbind
- udp 0 0 0.0.0.0:836 0.0.0.0:* 26101/rpcbind
- udp 0 0 0.0.0.0:111 0.0.0.0:* 26101/rpcbind
- udp 0 0 :::836 :::* 26101/rpcbind
- udp 0 0 :::111 :::* 26101/rpcbind
- [root@nfs-server ~]# chkconfig --list|grep rpcbind
- rpcbind 0:off 1:off 2:on 3:on 4:on 5:on 6:off
- [root@nfs-server ~]# rpcinfo -p localhost
- program vers proto port service
- 100000 4 tcp 111 portmapper
- 100000 3 tcp 111 portmapper
- 100000 2 tcp 111 portmapper
- 100000 4 udp 111 portmapper
- 100000 3 udp 111 portmapper
- 100000 2 udp 111 portmapper
- [root@nfs-server ~]# /etc/init.d/nfs status #查看nfs服務
- rpc.svcgssd is stopped
- rpc.mountd is stopped
- nfsd is stopped
- rpc.rquotad is stopped
- [root@nfs-server ~]# /etc/init.d/nfs start #啟動nfs服務
- Starting NFS services: [ OK ]
- Starting NFS quotas: [ OK ]
- Starting NFS mountd: [ OK ]
- Starting NFS daemon: [ OK ]
- Starting RPC idmapd: [ OK ]
- [root@nfs-server ~]# /etc/init.d/nfs status
- rpc.svcgssd is stopped
- rpc.mountd (pid 26225) is running...
- nfsd (pid 26241 26240 26239 26238 26237 26236 26235 26234) is running...
- rpc.rquotad (pid 26220) is running...
- [root@nfs-server ~]# netstat -lntup|grep 2049 #nfs服務埠2049
- tcp 0 0 0.0.0.0:2049 0.0.0.0:* LISTEN -
- tcp 0 0 :::2049 :::* LISTEN -
- udp 0 0 0.0.0.0:2049 0.0.0.0:* -
- udp 0 0 :::2049 :::* -
- [root@nfs-server ~]# rpcinfo -p localhost
- program vers proto port service
- 100000 4 tcp 111 portmapper
- 100000 3 tcp 111 portmapper
- 100000 2 tcp 111 portmapper
- 100000 4 udp 111 portmapper
- 100000 3 udp 111 portmapper
- 100000 2 udp 111 portmapper
- 100011 1 udp 875 rquotad
- 100011 2 udp 875 rquotad
- 100011 1 tcp 875 rquotad
- 100011 2 tcp 875 rquotad
- 100005 1 udp 56844 mountd
- 100005 1 tcp 49326 mountd
- 100005 2 udp 47287 mountd
- 100005 2 tcp 47817 mountd
- 100005 3 udp 56317 mountd
- 100005 3 tcp 47741 mountd
- 100003 2 tcp 2049 nfs
- 100003 3 tcp 2049 nfs
- 100003 4 tcp 2049 nfs
- 100227 2 tcp 2049 nfs_acl
- 100227 3 tcp 2049 nfs_acl
- 100003 2 udp 2049 nfs
- 100003 3 udp 2049 nfs
- 100003 4 udp 2049 nfs
- 100227 2 udp 2049 nfs_acl
- 100227 3 udp 2049 nfs_acl
- 100021 1 udp 45085 nlockmgr
- 100021 3 udp 45085 nlockmgr
- 100021 4 udp 45085 nlockmgr
- 100021 1 tcp 42582 nlockmgr
- 100021 3 tcp 42582 nlockmgr
- 100021 4 tcp 42582 nlockmgr
- [root@nfs-server ~]# chkconfig --list nfs
- nfs 0:off 1:off 2:off 3:off 4:off 5:off 6:off
- [root@nfs-server ~]# chkconfig nfs on #nfs添加開機自啟動
- [root@nfs-server ~]# chkconfig --list nfs
- nfs 0:off 1:off 2:on 3:on 4:on 5:on 6:off
- [root@nfs-server ~]# less /etc/init.d/rpcbind
- #! /bin/sh
- #
- # rpcbind Start/Stop RPCbind
- #
- # chkconfig: 2345 13 87 #開機啟動順序
- [root@nfs-server ~]# less /etc/init.d/nfs
- #!/bin/sh
- #
- # nfs This shell script takes care of starting and stopping
- # the NFS services.
- #
- # chkconfig: - 30 60 #開機啟動順序
工作中推薦使用/etc/rc.local進行服務的啟動,不推薦使用chkconfig,目的是為了方便管理。
- [root@nfs-server ~]# ps -ef|egrep "rpc|nfs"
- rpc 26101 1 0 09:45 ? 00:00:00 rpcbind
- root 26211 2 0 09:52 ? 00:00:00 [rpciod/0]
- root 26220 1 0 09:52 ? 00:00:00 rpc.rquotad #磁碟配額進程
- root 26225 1 0 09:52 ? 00:00:00 rpc.mountd #許可權管理驗證
- root 26232 2 0 09:52 ? 00:00:00 [nfsd4]
- root 26233 2 0 09:52 ? 00:00:00 [nfsd4_callbacks]
- root 26234 2 0 09:52 ? 00:00:00 [nfsd] #NFS主進程
- root 26235 2 0 09:52 ? 00:00:00 [nfsd]
- root 26236 2 0 09:52 ? 00:00:00 [nfsd]
- root 26237 2 0 09:52 ? 00:00:00 [nfsd]
- root 26238 2 0 09:52 ? 00:00:00 [nfsd]
- root 26239 2 0 09:52 ? 00:00:00 [nfsd]
- root 26240 2 0 09:52 ? 00:00:00 [nfsd]
- root 26241 2 0 09:52 ? 00:00:00 [nfsd]
- root 26268 1 0 09:52 ? 00:00:00 rpc.idmapd
- root 26418 1023 0 10:41 pts/0 00:00:00 egrep rpc|nfs
配置NFS服務端
NFS服務的預設配置文件路徑為:/etc/exports,並且預設是空的。
- [root@nfs-server ~]# ls -l /etc/exports
- -rw-r--r--. 1 root root 0 Jan 12 2010 /etc/exports
exports配置文件格式
/etc/exports文件配置格式
NFS 共用目錄 NFS客戶端地址1(參數1,參數2,參數3…) 客戶端地址1(參數1,參數2,參數3…)
NFS 共用目錄 NFS客戶端地址(參數1,參數2…)
- [root@nfs-server ~]# cat /etc/exports
- /data 192.168.31.*(rw,sync)
- [root@nfs-server ~]# /etc/init.d/nfs reload
- exportfs: Failed to stat /data: No such file or directory #/data目錄不存在
- [root@nfs-server ~]# mkdir /data
- [root@nfs-server ~]# /etc/init.d/nfs reload #exports -r
- [root@nfs-server ~]# showmount -e 127.0.0.1
- Export list for 127.0.0.1:
- /data 192.168.31.* #共用目錄
- [root@nfs-server ~]# mount -t nfs 192.168.31.129:/data /mnt #掛載
- [root@nfs-server ~]# df -h
- Filesystem Size Used Avail Use% Mounted on
- /dev/sda3 7.1G 1.5G 5.3G 21% /
- tmpfs 497M 0 497M 0% /dev/shm
- /dev/sda1 190M 27M 153M 15% /boot
- 192.168.31.129:/data 7.1G 1.5G 5.3G 21% /mnt #掛載成功
- [root@nfs-server ~]# touch /data/oldboy.txt
- [root@nfs-server ~]# ls /mnt
- oldboy.txt
- [root@nfs-server ~]# touch /mnt/test.txt
- touch: cannot touch `/mnt/test.txt': Permission denied #無許可權
客戶端配置
啟動rpcbind
- [root@web-lamp01 ~]# /etc/init.d/rpcbind start
- Starting rpcbind: [ OK ]
- [root@web-lamp01 ~]# /etc/init.d/rpcbind status
- rpcbind (pid 26272) is running...
- [root@web-lamp01 ~]# cat /etc/rc.local
- #啟動rpcbind
- /etc/init.d/rpcbind start
- [root@web-lamp01 ~]# showmount -e 192.168.31.129
- Export list for 192.168.31.129:
- /data 192.168.31.*
- [root@web-lamp01 ~]# mount -t nfs 192.168.31.129:/data /mnt
- [root@web-lamp01 ~]# df -h
- Filesystem Size Used Avail Use% Mounted on
- /dev/sda3 7.1G 1.5G 5.3G 21% /
- tmpfs 497M 0 497M 0% /dev/shm
- /dev/sda1 190M 27M 153M 16% /boot
- 192.168.31.129:/data 7.1G 1.5G 5.3G 21% /mnt
- [root@web-lamp01 ~]# ls /mnt
- oldboy.txt
在服務端刪除/data中的文件/oldboy.txt,然後在客戶端進行查看,文件已經不存在。
無法寫入是因為許可權的問題,解決辦法如下。
- [root@nfs-server ~]# cat /var/lib/nfs/etab
- /data 192.168.31.*(rw,sync,wdelay,hide,nocrossmnt,secure,root_squash,no_all_squash,no_subtree_check,secure_locks,acl,anonuid=65534,anongid=65534,sec=sys,rw,root_squash,no_all_squash) #nfs的由65534進行管理
- [root@nfs-server ~]# cat /etc/exports
- /data 192.168.31.*(rw,sync)
- [root@nfs-server ~]# ls -ld /data
- drwxr-xr-x 2 root root 4096 Jan 19 11:36 /data #/data的屬主是root
- [root@nfs-server ~]# grep 65534 /etc/passwd #查看65534的用戶名
- nfsnobody:x:65534:65534:Anonymous NFS User:/var/lib/nfs:/sbin/nologin
- [root@nfs-server ~]# chown -R nfsnobody /data #更改/data屬主
- [root@nfs-server ~]# ls -ld /data
- drwxr-xr-x 2 nfsnobody root 4096 Jan 19 11:36 /data
- [root@nfs-server ~]# cd /mnt
- [root@nfs-server mnt]# pwd
- /mnt
- [root@nfs-server mnt]# ls
- [root@nfs-server mnt]# touch test.txt #服務端創建
- [root@nfs-server mnt]# ls
- test.txt
- [root@web-lamp01 mnt]# touch test2.txt #客戶端創建
- [root@web-lamp01 mnt]# ls
- test2.txt test.txt
客戶端設置開機自動掛載
- [root@web-lamp01 mnt]# cat /etc/rc.local
- #!/bin/sh
- #
- # This script will be executed *after* all the other init scripts.
- # You can put your own initialization stuff in here if you don't
- # want to do the full Sys V style init stuff.
- touch /var/lock/subsys/local
- #啟動rpcbind
- /etc/init.d/rpcbind start
- #掛載nfs /data
- /bin/mount -t nfs 192.168.31.129:/data /mnt
同樣配置另外一臺客戶端。
故障排查
1、首先確認NFS服務端配置和服務是否正常。
- [root@nfs-server ~]# showmount -e localhost
- Export list for localhost:
- /data 192.168.31.*
最好服務端自己掛載自己看看是否成功。
- [root@nfs-server ~]# mount -t nfs 192.168.31.129:/data /mnt
- [root@nfs-server ~]# df -h
- Filesystem Size Used Avail Use% Mounted on
- /dev/sda3 7.1G 1.4G 5.4G 21% /
- tmpfs 497M 0 497M 0% /dev/shm
- /dev/sda1 190M 27M 153M 15% /boot
- 192.168.31.129:/data 7.1G 1.4G 5.4G 21% /mnt
這一步主要是檢查服務端的NFS服務是不是正常的。
2、確認NFS客戶端showmount是否正常。
- [root@web-lamp01 ~]# showmount -e 192.168.31.129
- Export list for 192.168.31.129:
- /data 192.168.31.*
如果有問題進行下麵排查。
1)ping NFS服務端IP檢查
- [root@web-lamp01 ~]# ping 192.168.31.129
- PING 192.168.31.129 (192.168.31.129) 56(84) bytes of data.
- 64 bytes from 192.168.31.129: icmp_seq=1 ttl=64 time=1.40 ms
- 64 bytes from 192.168.31.129: icmp_seq=2 ttl=64 time=0.392 ms
2)telnet NFS服務端IP埠檢查
- [root@web-lamp01 ~]# telnet 192.168.31.129 111
- Trying 192.168.31.129...
- Connected to 192.168.31.129.
- Escape character is '^]'.
如果出現No route to host很有可能是服務端防火牆引起。
此外,還需要註意服務端RPC服務啟動順序問題。
/etc/init.d/rpcbind start
rpcinfo -p localhost
/etc/init.d/nfs start
rpcinfo -p localhost
NFS配置參數許可權
NFS配置文件許可權參數說明
NFS伺服器端的許可權設置,即/etc/exports文件配置格式中小括弧的參數。
- [root@nfs-server ~]# cat /etc/exports
- /data 192.168.31.*(rw,sync)
參數名稱 | 參數用途 |
rw | read-write,表示可讀寫許可權* |
ro | read-only,表示只讀許可權 |
sync | 請求或寫入數據時,數據同步寫入到NFS Server的硬碟後才返回。數據安全不會丟,缺點,性能下降。 |
async | 請求或寫入數據是,先返回請求,再將數據寫入到記憶體緩存和硬碟中,即非同步寫入數據。此參數可以提升NFS性能,但是會降低數據的安全。因此,一般情況下建議不用,如果NFS處於瓶頸狀態,並且運行數據丟失的話可以打開此參數提升NFS性能。寫入時數據會先寫到記憶體緩衝區,等硬碟有空檔再寫入磁碟,這樣可以提升寫入效率,風險若伺服器宕機或不正常關機,會損失緩衝區中未寫入磁碟的數據(解決辦法:伺服器主板電池或加UPS不間斷電源)。(電商秒殺是非同步) |
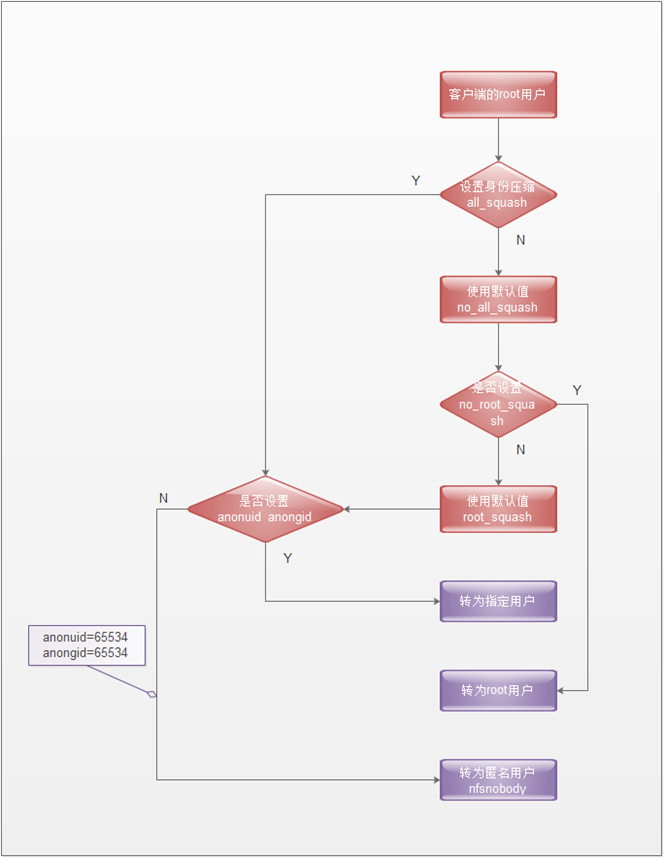
no_root_squash | 訪問NFS Server共用目錄的用戶如果是root的話,它對該共用目錄具有root許可權。這個配置原本為無盤客戶端準備的。用戶應避免使用。 |
root_squash | 對於訪問NFS Server共用目錄的用戶如果是root的話,則它的許可權將被壓縮成匿名用戶,同時它的UID和GID通常會變成nfsnobody賬號身份 |
all_squash | 不管訪問NFS Server共用目錄的用戶身份如何,它的許可權都被壓縮成匿名用戶,同時它的UID和GID都會變成nfsnobody賬號身份。在早期多個NFS客戶端同時讀寫NFS Server數據時,這個參數很有用。* |
anonuid | 參數以anon*開頭即值anonymous匿名用戶,這個用戶的UID設置值通常為nfsnobody的UID值,當然我們也可以自行設置這個UID值。但是,UID必須存在於/etc/passwd中。在多個NFS Clients時,如多台web server共用一個NFS目錄時,通過這個參數可以使得不同的NFS Clients寫入的數據對所有NFS Clients保持同樣的用戶許可權,即為配置的匿名UID對應用戶許可權,這個參數很有用。* |
anongid | 同anonuid,區別是把uid(用戶id)換成gid(組id)。 |
推薦使用配置。
- [root@nfs-server ~]# cat /etc/exports
- /data 192.168.31.0/24(rw,sync,all_squash)
- [root@nfs-server ~]# exportfs -rv
- exporting 192.168.31.0/24:/data
NFS服務總結
使得NFS Client端可寫的服務端配置條件
當多個NFS客戶端以NFS方式寫入修改伺服器端的文件系統時,需要具有以下許可權:
1、NFS伺服器/etc/exports設置需要開放可寫入的許可權,即服務端的共用許可權。
2、NFS伺服器實際要共用的NFS目錄許可權具有可寫入w的許可權,即服務端本地目錄的安全許可權。
3、每台機器都對應存在和nfs預設配置UID的相同UID65534的nfsnobody用戶(確保所有客戶端的訪問許可權統一,否則每個機器需要同時建立相同UID的用戶,並覆蓋NFS的預設配置)。
當滿足三個條件,多個NFS客戶端才能具有互相寫入,互相修改其他主機寫入文件的許可權。
NFS服務重要文件說明
/etc/exports
NFS服務主配置文件,配置NFS具體共用服務的地點,預設內容為空,以行為單位。
- [root@nfs-server ~]# cat /etc/exports
- /data 192.168.31.0/24(rw,sync,all_squash)
/usr/sbin/exportfs
NFS服務的管理命令。例如,可以載入NFS配置生效,還可以直接配置NFS共用目錄,即無需配置/etc/exports實現共用。
- [root@nfs-server ~]# exportfs –rv #載入配置生效,等價於重啟/etc/init.d/nfs reload
- exporting 192.168.31.0/24:/data
exportfs不但可以載入配置生效,也可以通過命令直接共用目錄。越過/etc/exports,但重啟失效。
/usr/sbin/showmount
常用在客戶端,查看NFS配置及掛載結果的命令。配置nfsserver,分別在服務端以及客戶端查看掛載情況。
/var/lib/nfs/etab
NFS配置文件的完整參數設定的文件(有很多沒有配置但是預設就有的NFS參數)。
- [root@nfs-server ~]# cat /var/lib/nfs/etab
- /data 192.168.31.0/24(rw,sync,wdelay,hide,nocrossmnt,secure,root_squash,all_squash,no_subtree_check,secure_locks,acl,anonuid=65534,anongid=65534,sec=sys,rw,root_squash,all_squash)
/proc/mounts
客戶端掛載參數
- [root@web-lamp01 ~]# cat /proc/mounts
- rootfs / rootfs rw 0 0
- proc /proc proc rw,relatime 0 0
- sysfs /sys sysfs rw,relatime 0 0
- devtmpfs /dev devtmpfs rw,relatime,size=496952k,nr_inodes=124238,mode=755 0 0
- devpts /dev/pts devpts rw,relatime,gid=5,mode=620,ptmxmode=000 0 0
- tmpfs /dev/shm tmpfs rw,relatime 0 0
- /dev/sda3 / ext4 rw,relatime,barrier=1,data=ordered 0 0
- /proc/bus/usb /proc/bus/usb usbfs rw,relatime 0 0
- /dev/sda1 /boot ext4 rw,relatime,barrier=1,data=ordered 0 0
- none /proc/sys/fs/binfmt_misc binfmt_misc rw,relatime 0 0
- sunrpc /var/lib/nfs/rpc_pipefs rpc_pipefs rw,relatime 0 0
- 192.168.31.129:/data/ /mnt nfs4 rw,relatime,vers=4,rsize=131072,wsize=131072,namlen=255,hard,proto=tcp,port=0,timeo=600,retrans=2,sec=sys,clientaddr=192.168.31.130,minorversion=0,local_lock=none,addr=192.168.31.129 0 0
NFS客戶端mount掛載命令
NFS客戶端掛載的命令
掛載命令 | 掛載的格式類型 | NFS伺服器提供的共用目錄 | NFS客戶端要掛載的目錄 |
mount | -t nfs | 192.168.31.129:/data | /mnt(必須存在) |
完整掛載命令為:mount -t nfs 192.168.31.129:/data /mnt | |||
執行掛載的過程
- [root@web-lamp01 ~]# showmount -e 192.168.31.129 #掛載前先檢查有許可權需要掛載的信息是否能夠掛載
- Export list for 192.168.31.129:
- /data 192.168.31.0/24 #可以清晰的看到共用了/data目錄
- [root@web-lamp01 ~]# mount -t nfs 192.168.31.129:/data /mnt #執行掛載命令
- [root@web-lamp01 ~]# df –h #查看掛載後的結果
- Filesystem Size Used Avail Use% Mounted on
- /dev/sda3 7.1G 1.4G 5.4G 21% /
- tmpfs 497M 0 497M 0% /dev/shm
- /dev/sda1 190M 27M 153M 16% /boot
- 192.168.31.129:/data 7.1G 1.4G 5.4G 21% /mnt
- [root@web-lamp01 ~]# mount #查看掛載後的結果
- /dev/sda3 on / type ext4 (rw)
- proc on /proc type proc (rw)
- sysfs on /sys type sysfs (rw)
- devpts on /dev/pts type devpts (rw,gid=5,mode=620)
- tmpfs on /dev/shm type tmpfs (rw)
- /dev/sda1 on /boot type ext4 (rw)
- none on /proc/sys/fs/binfmt_misc type binfmt_misc (rw)
- sunrpc on /var/lib/nfs/rpc_pipefs type rpc_pipefs (rw)
- 192.168.31.129:/data on /mnt type nfs (rw,vers=4,addr=192.168.31.129,clientaddr=192.168.31.130)
- [root@web-lamp01 ~]# grep mnt /proc/mounts #查看掛載後的結果
- 192.168.31.129:/data/ /mnt nfs4 rw,relatime,vers=4,rsize=131072,wsize=131072,namlen=255,hard,proto=tcp,port=0,timeo=600,retrans=2,sec=sys,clientaddr=192.168.31.130,minorversion=0,local_lock=none,addr=192.168.31.129 0 0
NFS客戶端mount掛載深入
NFS客戶端mount掛載參數說明
在NFS服務端可以通過cat /var/lib/nfs/etab查看NFS服務端配置的參數細節。
在NFS客戶端可以通過cat /proc/mounts查看mount的掛載參數細節。
NFS Client mount掛載參數列表
參數 | 參數功能 | 預設參數 |
fg bg | 當在客戶端執行掛載時,可選擇是前臺fg還是在後臺bg執行。若在前臺執行,則mount會持續嘗試掛載,直到成功或掛載時間超時為止,若在後臺執行,則mount會在後臺持續多次進行mount,而不會影響到前臺的其它程式操作。如果網路聯機不穩定,或是伺服器常常需要開關機,建議使用bg比較好。 | fg |
soft hard | 當NFS Client以soft掛載Server後,若網路或Server出現問題,造成Client和Server無法傳輸資料時,Client會一直嘗試到timeout後顯示錯誤並且停止嘗試。若使用soft mount的話,可能會在timeout出現時造成資料丟失,一般不建議使用。 若用hard模式掛載硬碟時,剛好和soft相反,此時Client會一直嘗試連線到Server,若Server有回應就繼續剛纔的操作,若沒有回應NFS Client會一直嘗試,此時無法umount或kill,所以常常會配合intr使用。 | hard |
intr | 當使用hard掛載的資源timeout後,若有指定intr參數,可以在timeout後把它中斷掉,這避免出問題時系統整個被NFS鎖死。 | 無 |
rsize wsize | 讀出(rsize)與寫入(wrize)的區塊大小(block size),這個設置值可以影響客戶端與服務端傳輸數據的緩衝存儲量,一般來說,如果在區域網內(LAN),並且客戶端與服務端都具有足夠的記憶體,這個值可以設置大一點(65535bytes),提升緩衝區塊將可提升NFS文件系統的傳輸能力。但設置的值也不能太大,最好是實現網路能夠傳輸的最大值為限。 | CentOS 5:預設1024 CentOS 6:預設131072 |
proto=udp | 使用UDP協議來傳輸資料,在LAN中會有比較好的性能。若要跨越Internet的話,使用proto=tcp多傳輸的數據會有比較好的糾錯能力 | proto=tcp |
man nfs查看上述信息。
優化:
- [root@web-lamp01 ~]# mount -t nfs -o bg,hard,intr,rsize=131072,wsize=131072 192.168.31.129:/data /mnt
下麵是mount -o參數對應的選項列表
參數 | 參數意義 | 預設值 |
suid nosuid | 當掛載的文件系統上有任何SUID的程式時,只要使用nosuid就能夠取消設置SUID的功能。 | suid |
rw ro | 可以指定文件系統是只讀ro或可寫rw | rw |
dev nodev | 是否可以保留裝置文件的特殊功能,一般來說只有/dev才有特殊的裝置,因此可以選擇nodev | dev |
exec noexec | 是否具有執行文件的許可權,如果想要掛載的僅僅是普通資源數據區(例如圖片、附件),可以選擇noexec | exec |
user nouser | 是否允許用戶進行文件的掛載與卸載功能,如果要保護文件系統,最好不要提供用戶選擇掛載與卸載 | nouser |
auto noauto | 這個auto指的是"mount -a"時會不會被掛載的項目,如果不需要這個分區隨時被掛載,可設置為noauto | auto |
NFS客戶端mount掛載優化
在企業工作場景,一般來說,NFS伺服器共用的只是普通靜態數據(圖片、附件、視頻),不需要執行suid、exec等許可權,掛載的這類文件系統只能作為數據存取之用,無法執行程式,對於客戶端來講增加了安全性。例如,很多木馬篡改站點文件都是由上傳入口上傳的程式到存儲目錄,然後執行的。
因此在掛載的時候用下麵的命令很有必要。
mount安全掛載參數
mount -t nfs -o nosuid,noexec,nodev,rw 192.168.31.129:/data /mnt
通過mount -o指定掛載參數和在/etc/fstab里指定掛載參數效果是一樣的。
mount掛載性能優化參數選項
1、禁止更新目錄及文件時間戳掛載
mount -t nfs -o noatime,nodiratime 192.168.31.129:/data /mnt
2、安全加優化的掛載方式
mount -t nfs -o nosuid,noexec,nodev,noatime,nodiratime,intr,rsize=131072,wsize=131072 192.168.31.129:/data /mnt
3、預設的掛載方式(推薦)
mount -t nfs 192.168.31.129:/data /mnt
如果是本地文件系統
mount /dev/sdb1 /mnt -o defaults,async,noatime,data=writeback,barrier=0
NFS服務內核優化
優化選項說明:
1、/proc/sys/net/core/rmem_default
該文件指定了接收套接字緩衝區大小的缺失值(以位元組為單位),預設設置:124928。
2、/proc/sys/net/core/rmem_max
該文件指定了接收套接字緩衝區大小的最大值(以位元組為單位),預設設置:124928。
3、/proc/sys/net/core/wmem_default
該文件指定了發送套接字緩衝區大小的缺失值(以位元組為單位),預設設置:124928。
4、/proc/sys/net/core/wmem_max
該文件指定了發送套接字緩衝區大小的最大值(以位元組為單位),預設設置:124928。
上述文件對應的具體內核優化命令:
- cat >>/etc/sysctl.conf<<EOF
- net.core.wmem_default=8388608
- net.core.wmem_max=16777216
- net.core.rmem_datault=8388608
- net.core.rmem_max=16777216
- EOF
- sysctl -p
企業場景NFS共用存儲優化小結
1、硬體:sas、ssd硬碟,買多塊,raid0、raid10。網卡吞吐量要大,至少千兆
2、NFS伺服器端配置:/data
192.168.31.0/24(rw,sync,all_squash,anonuid=65534,anongid=65534)
3、NFS客戶端掛載:rsize、wsize、noatime、nodirtime、nosuid、noexec、soft(hard、intr)
mount -t nfs -o nosuid,noexec,nodev,noatime,rsize=131072,wsize=131072 192.168.31.129:/data /mnt
mount -t nfs -o noatime,nodiratime,rsize=131072,wsize=131072 192.168.31.129:/data /mnt
mount -t nfs -o noatime,nodiratime 192.168.31.129:/data /mnt
4、有關NFS服務的所有伺服器內核優化
- cat >>/etc/sysctl.conf<<EOF
- net.core.wmem_default=8388608
- net.core.wmem_max=16777216
- net.core.rmem_datault=8388608
- net.core.rmem_max=16777216
- EOF
- sysctl -p
<

