
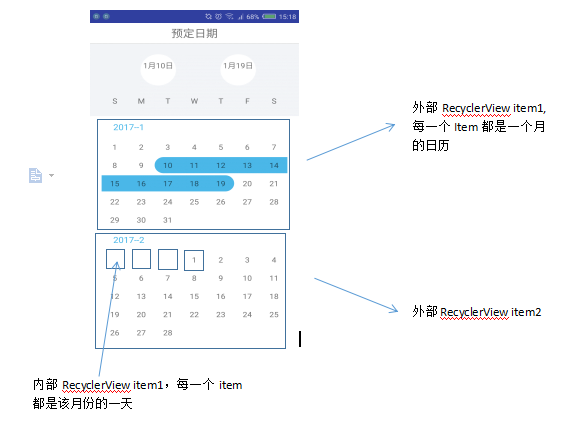
先看需求效果圖: 幾個需求點: 1、顯示當月以及下個月的日曆 (可自行拓展更多月份) 2、首次點擊選擇“開始日期”,再次點擊選擇"結束日期" (1)、如果“開始日期” “結束日期” 相同 (2)、如果“開始日期” “結束日期” 不同,且“結束日期” 晚於 “開始日期” (3)、如果“結束日期” 早於 ...
先看需求效果圖:
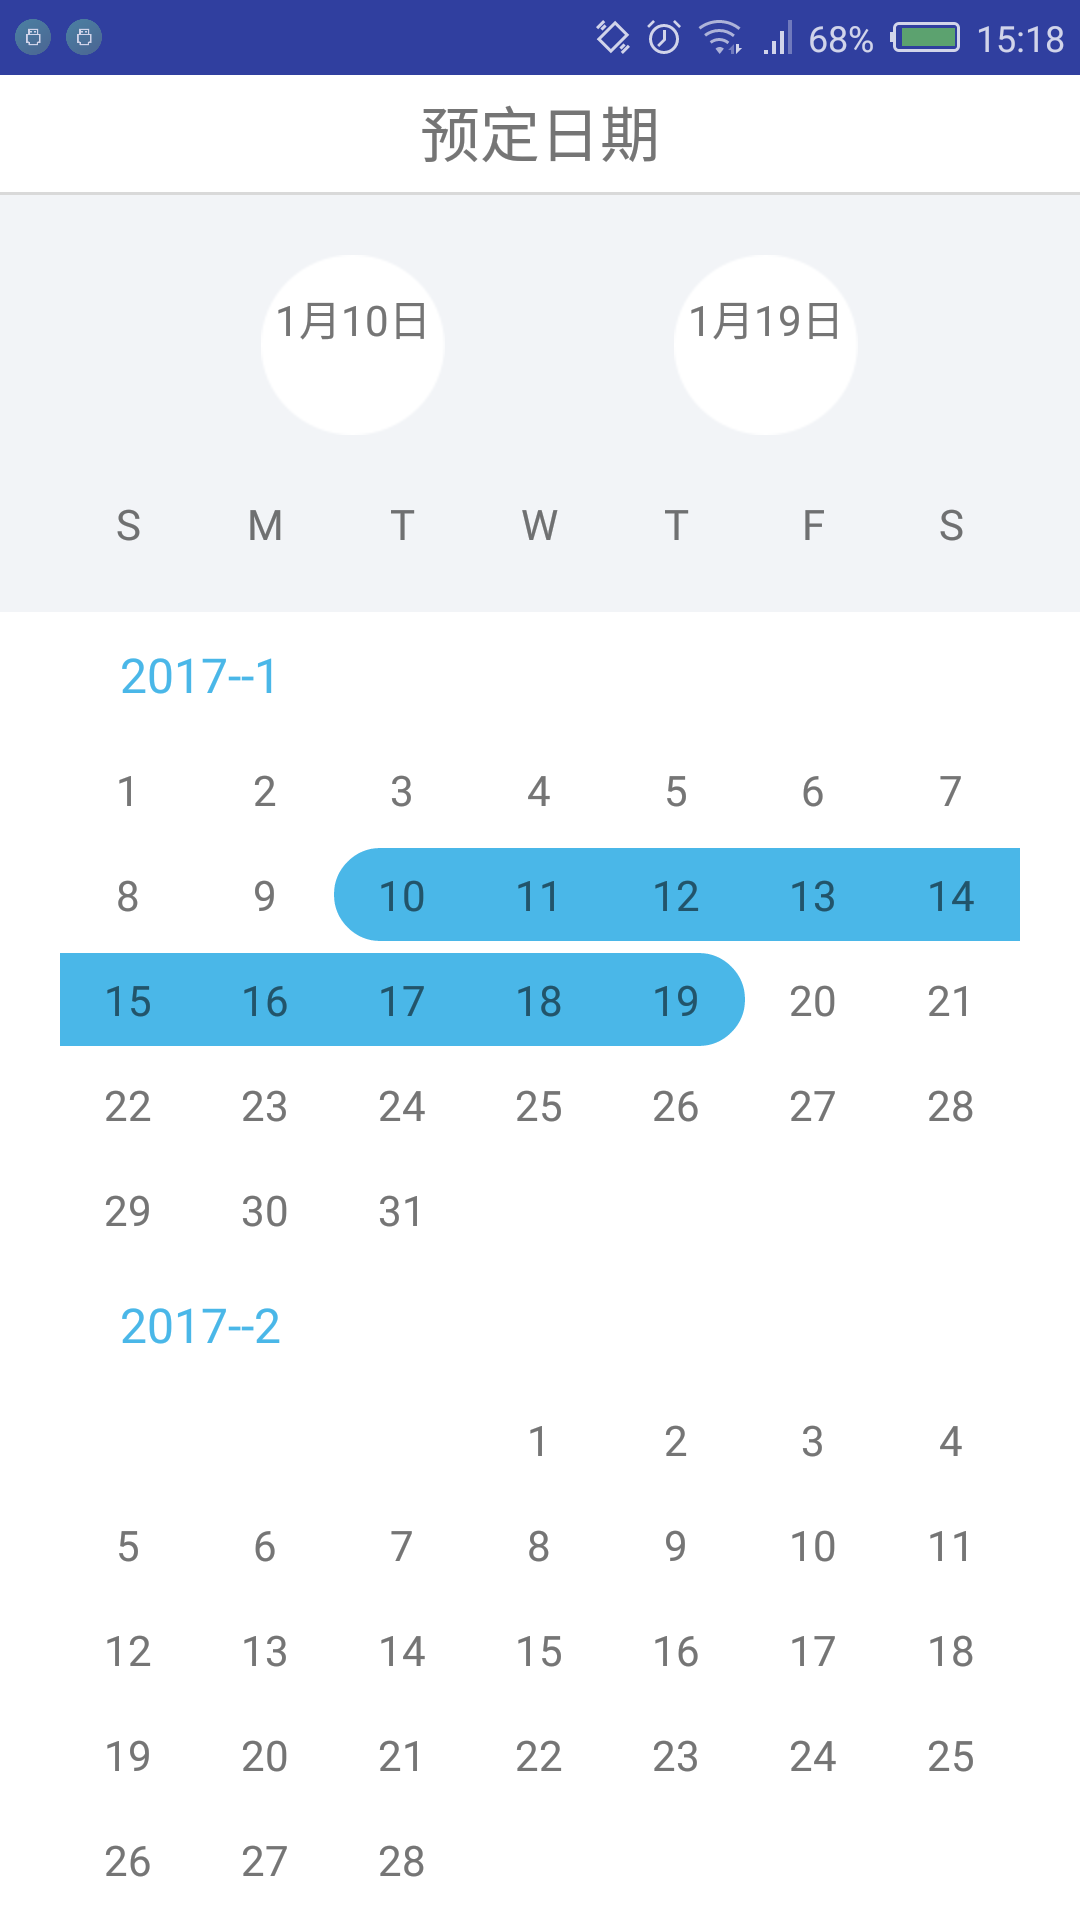
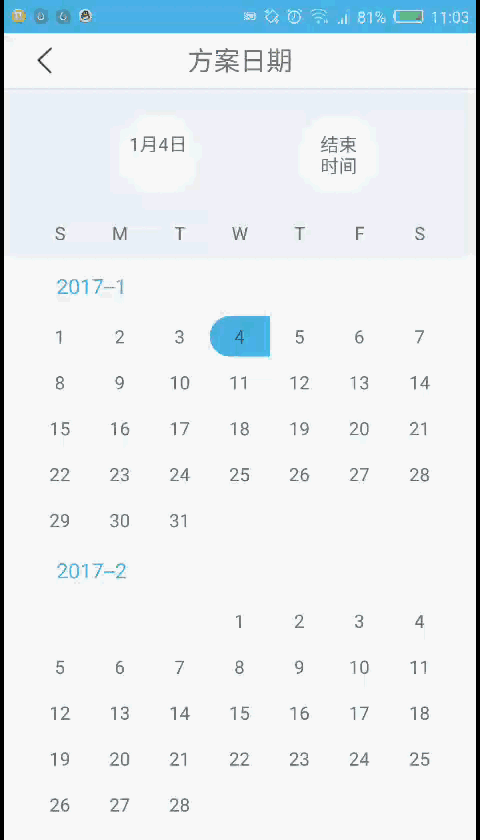
幾個需求點:
1、顯示當月以及下個月的日曆 (可自行拓展更多月份)
2、首次點擊選擇“開始日期”,再次點擊選擇"結束日期"
(1)、如果“開始日期” “結束日期” 相同 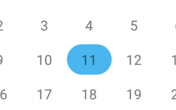
(2)、如果“開始日期” “結束日期” 不同,且“結束日期” 晚於 “開始日期” 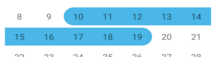
(3)、如果“結束日期” 早於 “開始日期” ,重置當前 日期 為 “開始日期”
3、選擇的“開始日期” “結束日期” 顯示在 
難點:
1、 獲取當月以及下個月的日曆,一個月多少天,每天星期幾
2、 判斷每個日子的點 與 “開始日期” “結束日期” 的關係,用於顯示背景色
技術儲備:
1、淺談RecyclerView(完美替代ListView,GridView)
-----------------------------------------------------------------------------------------------------------------------
實現思路:
1、一個外部RecyclerView 用於顯示 日曆,每一個item 都用於顯示一個月的日曆 ,下麵都稱為 外部RecyclerView
2、外部RecyclerView的每一個Item 內再用一個RecyclerView顯示該月的所有日期,每一天都是一個item ,下麵都稱為 內部RecyclerView
3、點擊內部RecyclerView的item 日期,添加監聽事件,根據是否開始、結束、中間日期來顯示 相應的選中背景
代碼實現:
1、代碼框架總覽

2、實體類
(1)、月份類,外部RecyclerView的數據源實體類


/**
 * Created by xqx on 2017/1/17.
 * 代表日曆上的每一個月份
 */
public class MonthTimeEntity {

    private int year;         //該月份 屬於哪一年
    private int month;        // 該月 是哪一個月份

    public MonthTimeEntity(int year, int month) {
        this.year = year;
        this.month = month;
    }

    public int getYear() {
        return year;
    }

    public void setYear(int year) {
        this.year = year;
    }

    public int getMonth() {
        return month;
    }

    public void setMonth(int month) {
        this.month = month;
    }
}
MonthTimeEntity.java
(2)、日期類,內部RecyclerView的數據源實體類
/**
 * Created by xqx on 2017/1/17.
 * 日曆中每一個月中的 每一個天數
 */
public class DayTimeEntity {
    private int day ;           //日期,幾號
    private int month;           //屬於的月份
    private int year;           //屬於的年份

    private int monthPosition;    //屬於的月份位置,註意是該日期屬於的月份在外層列表中的position,不是月份
    private int dayPosition;      //屬於的日期位置,註意是該日期在每個月(內層列表)中的位置

    public DayTimeEntity(int day, int month, int year, int monthPosition) {
        this.day = day;
        this.month = month;
        this.year = year;
        this.monthPosition = monthPosition;
    }


    public int getDay() {
        return day;
    }

    public void setDay(int day) {
        this.day = day;
    }

    public int getMonth() {
        return month;
    }

    public void setMonth(int month) {
        this.month = month;
    }

    public int getYear() {
        return year;
    }

    public void setYear(int year) {

        this.year = year;
    }

    public int getMonthPosition() {
        return monthPosition;
    }

    public void setMonthPosition(int monthPosition) {
        this.monthPosition = monthPosition;
    }

    public int getDayPosition() {
        return dayPosition;
    }

    public void setDayPosition(int dayPosition) {
        this.dayPosition = dayPosition;
    }


}
DayTimeEntity.java
(3)、更新類,用於選擇 “開始日期”、“結束日期”之後的刷新適配器操作
/**
 * Created by xqx on 2017/1/17.
 * 用於EventBus發送消息
 */
public class UpdataCalendar {
}
UpdataCalendar.java
3、主要實現
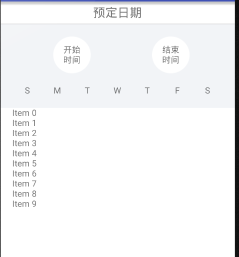
(1)、主界面佈局
上面就是普通的佈局形式,日曆用一個RecyclerView顯示,這個列表的每一個item都用於顯示一個月份的所有天數
<?xml version="1.0" encoding="utf-8"?>
<LinearLayout xmlns:android="http://schemas.android.com/apk/res/android"
    xmlns:tools="http://schemas.android.com/tools"
    android:layout_width="match_parent"
    android:layout_height="match_parent"
    android:orientation="vertical"
    >

    <!--標題欄-->
    <RelativeLayout
        android:layout_width="match_parent"
        android:layout_height="wrap_content"
        android:padding="6dp"
        android:background="@color/white"
        >


        <!--標題-->
        <TextView
            android:layout_width="wrap_content"
            android:layout_height="wrap_content"
            android:text="預定日期"
            android:layout_centerInParent="true"
            android:textSize="20sp"
            />
    </RelativeLayout>

    <ImageView
        android:layout_width="match_parent"
        android:layout_height="1dp"
        android:background="#d9d9d9"
        />

    <RelativeLayout
        android:layout_width="match_parent"
        android:layout_height="wrap_content"
        android:background="#f2f4f7"
        android:paddingTop="20dp"
        >
        <TextView
            android:id="@+id/plan_time_txt_start"
            android:layout_width="wrap_content"
            android:layout_height="wrap_content"
            android:text="開始\n時間"
            android:layout_alignParentTop="true"
            android:layout_alignParentLeft="true"
            android:layout_alignParentStart="true"
            android:layout_marginLeft="87dp"
            android:layout_marginStart="87dp"
            android:background="@mipmap/bg_white_circle"
            android:gravity="center"
            />
        <TextView
            android:id="@+id/plan_time_txt_stop"
            android:layout_width="wrap_content"
            android:layout_height="wrap_content"
            android:text="結束\n時間"
            android:layout_alignParentTop="true"
            android:layout_alignParentRight="true"
            android:layout_alignParentEnd="true"
            android:layout_marginRight="74dp"
            android:layout_marginEnd="74dp"
            android:background="@mipmap/bg_white_circle"
            android:gravity="center"/>
    </RelativeLayout>
    <LinearLayout
        android:layout_width="match_parent"
        android:layout_height="wrap_content"
        android:orientation="horizontal"
        android:background="#f2f4f7"
        android:paddingTop="20dp"
        android:paddingBottom="20dp"
        android:paddingLeft="20dp"
        android:paddingRight="20dp"
        >
        <TextView
            android:layout_width="0dp"
            android:layout_height="wrap_content"
            android:layout_weight="1"
            android:text="S"
            android:gravity="center"
            />

        <TextView
            android:layout_width="0dp"
            android:layout_height="wrap_content"
            android:layout_weight="1"
            android:text="M"
            android:gravity="center"
            />
        <TextView
            android:layout_width="0dp"
            android:layout_height="wrap_content"
            android:layout_weight="1"
            android:text="T"
            android:gravity="center"
            />
        <TextView
            android:layout_width="0dp"
            android:layout_height="wrap_content"
            android:layout_weight="1"
            android:text="W"
            android:gravity="center"
            />
        <TextView
            android:layout_width="0dp"
            android:layout_height="wrap_content"
            android:layout_weight="1"
            android:text="T"
            android:gravity="center"
            />
        <TextView
            android:layout_width="0dp"
            android:layout_height="wrap_content"
            android:layout_weight="1"
            android:text="F"
            android:gravity="center"

            />
        <TextView
            android:layout_width="0dp"
            android:layout_height="wrap_content"
            android:layout_weight="1"
            android:text="S"
            android:gravity="center"
            />
    </LinearLayout>
    <android.support.v7.widget.RecyclerView
        android:id="@+id/plan_time_calender"
        android:layout_width="match_parent"
        android:layout_height="match_parent"
        android:background="@color/white"
        android:paddingLeft="20dp"
        android:paddingRight="20dp"
        >

    </android.support.v7.widget.RecyclerView>
</LinearLayout>
acticity_main.xml
(2)、日曆外部RecyclerView的ViewHolder類,可以看出外層RecyclerView 的 item 只需要一個TextView顯示幾年幾月 和 一個RecyclerView顯示該月的天數即可
import android.content.Context;
import android.support.v7.widget.GridLayoutManager;
import android.support.v7.widget.RecyclerView;
import android.view.View;
import android.widget.TextView;


/**
 * Created by xqxon 2017/1/17.
 */
public class MonthTimeViewHolder extends RecyclerView.ViewHolder{

    public TextView plan_time_txt_month;                         //文本 2018-1
    public RecyclerView plan_time_recycler_content ;            //月份裡面詳細日期的列表
    public Context context;                                        //上下文

    public MonthTimeViewHolder(View itemView, Context context) {
        super(itemView);
        this.context = context;
        plan_time_recycler_content = (RecyclerView) itemView.findViewById(R.id.plan_time_recycler_content);
        plan_time_txt_month = (TextView) itemView.findViewById(R.id.plan_time_txt_month);

        RecyclerView.LayoutManager layoutManager =
                new GridLayoutManager(context,
                        7,  // 每行顯示item項數目
                        GridLayoutManager.VERTICAL, //水平排列
                        false
                );

        plan_time_recycler_content.setLayoutManager(layoutManager);
    }
}
MonthTimeViewHolder
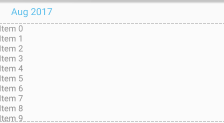
(3)、日曆外部RecyclerView的item 佈局文件
<?xml version="1.0" encoding="utf-8"?>
<LinearLayout xmlns:android="http://schemas.android.com/apk/res/android"
    android:orientation="vertical"
    android:layout_width="match_parent"
    android:layout_height="wrap_content">

    <TextView
        android:id="@+id/plan_time_txt_month"
        android:layout_width="wrap_content"
        android:layout_height="wrap_content"
        android:textColor="@color/blue"
        android:textSize="16sp"
        android:text="Aug 2017"
        android:layout_marginTop="10dp"
        android:layout_marginLeft="20dp"
        android:layout_marginBottom="10dp"
        />

    <android.support.v7.widget.RecyclerView
        android:id="@+id/plan_time_recycler_content"
        android:layout_width="match_parent"
        android:layout_height="wrap_content"
        >
    </android.support.v7.widget.RecyclerView>
</LinearLayout>
item_recycler_timeplan
(4)、Activity
public class MonthTimeActivity extends Activity {

    private ImageButton back;
    private TextView startTime;          //開始時間
    private TextView stopTime;           //結束時間

    private RecyclerView reycycler;
    private MonthTimeAdapter adapter;
    private ArrayList<MonthTimeEntity> datas;


    public static DayTimeEntity startDay;
    public static DayTimeEntity stopDay;
    @Override
    protected void onCreate(Bundle savedInstanceState) {
        super.onCreate(savedInstanceState);
        setContentView(R.layout.activity_main);

        initView();
        initData();

        EventBus.getDefault().register(this);


    }

    private void initData() {
        startDay = new DayTimeEntity(0,0,0,0);
        stopDay = new DayTimeEntity(-1,-1,-1,-1);
        datas = new ArrayList<>();

        Calendar c = Calendar.getInstance();
        int year = c.get(Calendar.YEAR);
        int month = c.get(Calendar.MONTH)+1;

        c.add(Calendar.MONTH,1);
        int nextYear = c.get(Calendar.YEAR);
        int nextMonth = c.get(Calendar.MONTH)+1;

        datas.add(new MonthTimeEntity(year,month));                //當前月份
        datas.add(new MonthTimeEntity(nextYear,nextMonth));        //下個月
        adapter = new MonthTimeAdapter(datas, MonthTimeActivity.this);
        reycycler.setAdapter(adapter);

    }

    private void initView() {
        startTime = (TextView) findViewById(R.id.plan_time_txt_start);
        stopTime = (TextView) findViewById(R.id.plan_time_txt_stop);

        reycycler = (RecyclerView) findViewById(R.id.plan_time_calender);
        LinearLayoutManager layoutManager =
                new LinearLayoutManager(this,   // 上下文
                        LinearLayout.VERTICAL,  //垂直佈局,
                        false);

        reycycler.setLayoutManager(layoutManager);
    }

    public void onEventMainThread(UpdataCalendar event) {
        adapter.notifyDataSetChanged();
        startTime.setText(startDay.getMonth()+"月"+startDay.getDay()+"日"+"\n");
        if (stopDay.getDay() == -1) {
            stopTime.setText("結束"+"\n"+"時間");
        }else{
            stopTime.setText(stopDay.getMonth() + "月" + stopDay.getDay() + "日" + "\n");
        }
    }

    @Override
    protected void onDestroy() {
        super.onDestroy();
        EventBus.getDefault().unregister(this);
    }
}
MonthTimeActivity.java
幾個核心點:
1、 兩個靜態變數的類 用於標記 開始日期和結束日期,和每個日子進行對比,顯示不同的背景色
 public static DayTimeEntity startDay;     //開始日期
 public static DayTimeEntity stopDay;   //結束日期
2、數據源的初始化
   private void initData() {
        startDay = new DayTimeEntity(0,0,0,0);
        stopDay = new DayTimeEntity(-1,-1,-1,-1);      //註意這裡參數都為 -1  不是隨便設的 ,後面會用到
        datas = new ArrayList<>();

        Calendar c = Calendar.getInstance();
        int year = c.get(Calendar.YEAR);
        int month = c.get(Calendar.MONTH)+1;           // 獲得當前月份的信息, 屬於哪一年,哪一月

        c.add(Calendar.MONTH,1);
        int nextYear = c.get(Calendar.YEAR);
        int nextMonth = c.get(Calendar.MONTH)+1;       // 獲得當前月份的下一個月份的信息, 屬於哪一年,哪一月。  可以以此類推  不限制於 2個月份

        datas.add(new MonthTimeEntity(year,month));                //當前月份的對象  ,對象里信息  包括:哪一年,哪一月
        datas.add(new MonthTimeEntity(nextYear,nextMonth));        //下個月份的對象
        adapter = new MonthTimeAdapter(datas, MonthTimeActivity.this);
        reycycler.setAdapter(adapter);

    }
(5)、日曆外部RecyclerView的適配器Adapter
/**
 * Created by xqx on 2017/1/17.
 */
public class MonthTimeAdapter extends RecyclerView.Adapter<MonthTimeViewHolder>{

    private ArrayList<MonthTimeEntity> datas;
    private Context context;

    public MonthTimeAdapter(ArrayList<MonthTimeEntity> datas, Context context) {
        this.datas = datas;
        this.context = context;
    }


    @Override
    public MonthTimeViewHolder onCreateViewHolder(ViewGroup parent, int viewType) {
        MonthTimeViewHolder ret = null;
        // 不需要檢查是否復用,因為只要進入此方法,必然沒有復用
        // 因為RecyclerView 通過Holder檢查復用
        View v = LayoutInflater.from(context).inflate(R.layout.item_recycler_timeplan, parent, false);
        ret = new MonthTimeViewHolder(v,context);
        return ret;
    }

    @Override
    public void onBindViewHolder(MonthTimeViewHolder holder, int position) {
        MonthTimeEntity monthTimeEntity = datas.get(position);
        holder.plan_time_txt_month.setText(monthTimeEntity.getYear()+"--"+ monthTimeEntity.getMonth());  //顯示 幾年--幾月
        //得到該月份的第一天
        Calendar calendar = Calendar.getInstance();
        calendar.set(Calendar.YEAR, monthTimeEntity.getYear());          //指定年份
        calendar.set(Calendar.MONTH, monthTimeEntity.getMonth() - 1);        //指定月份 Java月份從0開始算
        calendar.set(Calendar.DAY_OF_MONTH,1);                           // 指定天數 ,這三行是為了得到 這一年這一月的第一天

        int dayOfWeek = calendar.get(Calendar.DAY_OF_WEEK);             //得到該月份第一天 是星期幾
        ArrayList<DayTimeEntity> days = new ArrayList<DayTimeEntity>();
        for (int i = 0; i < dayOfWeek-1; i++) {                          //
            days.add(new DayTimeEntity(0, monthTimeEntity.getMonth(), monthTimeEntity.getYear(),position));
        }
        calendar.add(Calendar.MONTH, 1);// 加一個月,變為下月的1號
        calendar.add(Calendar.DATE, -1);// 減去一天,變為當月最後一天
        for (int i = 1; i <= calendar.get(Calendar.DAY_OF_MONTH); i++) {     //添加 該月份的天數   一號 到 該月的最後一天
            days.add(new DayTimeEntity(i, monthTimeEntity.getMonth(), monthTimeEntity.getYear(),position));
        }

        DayTimeAdapter adapter = new DayTimeAdapter(days,context);
        holder.plan_time_recycler_content.setAdapter(adapter);

    }

    @Override
    public int getItemCount() {
        int ret = 0;
        if (datas!=null){
            ret = datas.size();
        }
        return ret;
    }
}
MonthTimeAdapter.java
核心代碼:
      //得到該月份的第一天
        Calendar calendar = Calendar.getInstance();
        calendar.set(Calendar.YEAR, monthTimeEntity.getYear());          //指定年份
        calendar.set(Calendar.MONTH, monthTimeEntity.getMonth() - 1);        //指定月份 Java月份從0開始算
        calendar.set(Calendar.DAY_OF_MONTH,1);                           // 指定天數 ,這三行是為了得到 這一年這一月的第一天

        int dayOfWeek = calendar.get(Calendar.DAY_OF_WEEK);             //得到該月份第一天 是星期幾
     for (int i = 0; i < dayOfWeek-1; i++) {                          //
            days.add(new DayTimeEntity(0, monthTimeEntity.getMonth(), monthTimeEntity.getYear(),position));   //填充空白天數
        }
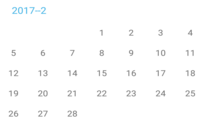
目的是實現 :比如第一天是星期3 ,那麼日曆上 星期日,星期一,星期二的位置 要為空白
意味著一個天數的item getDay() == 0 ,說明這天是空白天數
        calendar.add(Calendar.MONTH, 1);// 加一個月,變為下月的1號
        calendar.add(Calendar.DATE, -1);// 減去一天,變為當月最後一天
        for (int i = 1; i <= calendar.get(Calendar.DAY_OF_MONTH); i++) {     // 添加 該月份的天數   一號 到 該月的最後一天
            days.add(new DayTimeEntity(i, monthTimeEntity.getMonth(), monthTimeEntity.getYear(),position));
        }
目的是實現:得到該月份的最後一天是幾號,然後從1號到最後一天都作為數據源添加到內部的recyclerview中。
以上是外層Recyclerview(每一個Item是一個月份)的相關代碼
-------------------------------------------------------------------------------------------------
(6) 外部RecyclerView的 Item中的內部RecyclerView ,每一個item都是該月份的一天
item佈局: 就只有一個textview ,用於顯示 幾號
<?xml version="1.0" encoding="utf-8"?>
<LinearLayout xmlns:android="http://schemas.android.com/apk/res/android"
    android:orientation="vertical"
    android:layout_width="match_parent"
    android:layout_height="wrap_content"
    android:layout_marginTop="2dp"
    android:layout_marginBottom="2dp"
    android:paddingTop="6dp"
    android:paddingBottom="6dp"
    android:id="@+id/select_ly_day"
    >

    <TextView
        android:id="@+id/select_txt_day"
        android:layout_width="wrap_content"
        android:layout_height="wrap_content"
        android:text=""
        android:layout_gravity="center"
        android:gravity="center"
        />

</LinearLayout>
item_recycler_selectday.xml
(7)內部RecyclerView的ViewHolder
**
 * Created by xqx on 2017/1/17.
 *
 */
public class DayTimeViewHolder extends RecyclerView.ViewHolder{

    public TextView select_txt_day;      //日期文本
    public LinearLayout select_ly_day;       //父容器 , 用於點擊日期

    public DayTimeViewHolder(View itemView) {
        super(itemView);
        select_ly_day = (LinearLayout) itemView.findViewById(R.id.select_ly_day);
        select_txt_day = (TextView) itemView.findViewById(R.id.select_txt_day);
    }
}
DayTimeViewHolder.java
(8)內部RecyclerView的適配器Adapter
package com.maiji.calendardemo.selectTime;

import android.content.Context;
import android.support.v7.widget.RecyclerView;
import android.view.LayoutInflater;
import android.view.View;
import android.view.ViewGroup;

import com.maiji.calendardemo.MonthTimeActivity;
import com.maiji.calendardemo.R;
import com.maiji.calendardemo.entity.DayTimeEntity;
import com.maiji.calendardemo.entity.UpdataCalendar;

import java.util.ArrayList;

import de.greenrobot.event.EventBus;


