首先說明一下,即使不熟悉fis3,閱讀文本應該也會有所收穫。 本文以fis-parser-imweb-tplv2插件為模板插件,目的不在於使用哪個模板,而是組件可視化的實現思路,不必擔心。 先說說模板插件 首先說明一下,我們的項目使用的fis3自帶的mod.js做模塊化開發。 fis-parser- ...
首先說明一下,即使不熟悉fis3,閱讀文本應該也會有所收穫。
本文以fis-parser-imweb-tplv2插件為模板插件,目的不在於使用哪個模板,而是組件可視化的實現思路,不必擔心。
先說說模板插件
首先說明一下,我們的項目使用的fis3自帶的mod.js做模塊化開發。
fis-parser-imweb-tplv2插件是同事在imweb待著的時候寫的。模板使用和jsp寫法一致,文件類型為tpl類型
<div class="tips">
    <em>
      <i class="triangle"></i>
      <a class="close" href="javascript:void(0)" title="關閉"></a>
    </em>
    <strong><%=content%></strong>
    <a href=<%=linkUrl%> title=<%=linkTxt%> target="<%=target%>"> <%=linkTxt%> ></a>
</div>
實現源碼也比較簡單易懂。fis3的配置
    .match(/\/(.+)\.tpl$/, { // js 模版一律用 .tpl 作為尾碼
        isMod: true,
        rExt: 'js',
        id: '$1.tpl',
        url: '$0.tpl',
        moduleId: '$1.tpl',
        release: '$0.tpl', // 發佈的後的文件名,避免和同目錄下的 js 衝突
        parser: fis.plugin('imweb-tplv2')
    })
最終生成的模塊化的.tpl.js文件如下
define('common/module/rightsideBar/rightsideBar.tpl', function(require, exports, module) {
return function (it, opt) {
it = it || {};
with(it) {
var _$out_= [];
_$out_.push('<div class="right-sidebar"><a href="javascript:void(0)" class="right-sidebar-unregistered-close"></a><a id="rsidereg" href="/register.html?channel=pcgwzc3" class="right-sidebar-unregistered" style="visibility:', (isLogin ?'hidden' :'visible'), '"><span class="right-sidebar-unregistered-content"></span></a><a href="http://wpa.b.qq.com/cgi/wpa.php?ln=2&uin=4008225538" class="right-sidebar-item right-sidebar-item3" target="_blank"><span class="right-sidebar-item1-content"></span></a><a href="javascript:void(0)" class="right-sidebar-item right-sidebar-item2"><span class="right-sidebar-item2-content"></span><div class="right-sidebar-item-tip--code"> <img src="', '/static/pc-dev/common/module/topBar/top_wx.png', '"> <i class="right-sidebar-item-tip--code-tri"><i></i></i></div></a><a href="javascript:void(0)" class="right-sidebar-item right-sidebar-item3"><span class="right-sidebar-item3-content"></span><div class="right-sidebar-item-tip--code"> <img src="', '/static/pc-dev/common/module/topBar/top_app.png', '"> <i class="right-sidebar-item-tip--code-tri"><i></i></i></div></a><a href="javascript:void(0)" id="rjsq" class="right-sidebar-item right-sidebar-item4" target="_blank"><span class="right-sidebar-item4-content"></span></a><a href="javascript:window.scrollTo(0,0)" class="right-sidebar-item right-sidebar-item5" style="display: none;"><span class="right-sidebar-item5-content"></span></a></div>');
return _$out_.join('');
}
}
});
fis3打包前和打包後的文件結構更改

使用也比較簡單
var tpl_rightsideBar = require('rightsideBar.tpl');
tpl_rightsideBar(opt);//opt是需要傳遞進去的對象。詳細查看rightsideBar.tpl.js的源碼對應的it參數
當然,我們封裝一個組件不可能直接去使用這個tpl。而是提供一個外部組件函數,然後傳遞參數到這個組件函數中,組件函數不僅渲染頁面(即插入組件dom),還處理相關的邏輯。如上面的rightsideBar.js就是為外部提供一個組件函數。rightsideBar組件比較簡單,只需要傳遞一個父節點即可,不需要其他外部數據來做處理。部分源碼
/**
 * @author chua
 * @date 2016-5-9
 * @description 首頁右側導航欄組件,依賴模版 rightsideBar.tpl,rightsideBar.scss;

 * @實例化:rightsideBar = new rightsideBar(dom, datas);
 * @param dom {Dom} 為頭部組件父級節點,將根據情況append模版,生成頭部節點;
 * @param datas {json} 初始化組件的數據,數據格式如下
 */

/*
 * @require './rightsideBar.scss';
 */
var tpl_rightsideBar = require('./rightsideBar.tpl');
function rightsideBar(cont,opt) {
    this.cont = $(cont);
    this.opt = opt;
    this.init();
};
rightsideBar.prototype.renderHTML = function() {
    //渲染前處理...
    this.cont.empty().append(tpl_rightsideBar(this.opt));
};
rightsideBar.prototype.bindEvent = function() {
    //綁定事件
    this.cont.on('click', '.xxx', function() {
        //處理內容...
    });
};
rightsideBar.prototype.init = function() {
    this.renderHTML();
    this.bindEvent();
}
return rightsideBar;
rightsideBar.js會被當做模塊來編譯(我們在fis-conf.js中配置的),最終編譯出來後外面會被define包裹。
define('common/module/rightsideBar/rightsideBar', function(require, exports, module) {
    //代碼正文
    ...

  rightsideBar.prototype.init = function() {
      this.renderHTML();
      this.bindEvent();
  }

  return rightsideBar;

});
使用方法也比較簡單
       html:
       <div class="js-rightsideBar"></div>

      js:
      var rightsideBar = require('/common/module/rightsideBar/rightsideBar.js');
      new rightsideBar($('.js-rightsideBar'));
而我們的所有組件都放在一個組件文件夾module中,每一個組件一個文件夾(當然頁可以是多個類似的組件放在一起,公用資源),文件夾下麵放置所有這個組件相關的資源。如上圖rightsideBar這個組件。
那麼如何做組件可視化?有幾個過程是必須要做的
1.需要遍歷module中所有的組件(即遍歷每一個組件下麵的.js文件,一個組件文件夾下有多個js文件,表明這個組件文件夾下有多個組件,只是為了公用組件資源才放在了同一個組件下),提取出其中的使用樣例(從註釋代碼中提取,所以必須要規定這段demo代碼的規則)。
2.必須在每一個組件的註釋中寫demo代碼。
3.將提取的demo代碼寫入指定的組件可視化文件中,隨fis編譯成目標文件(最終在網上打開這個文件就能預覽各個組件的demo了)。
在上面的基礎上,改如何實現組價的可視化?
第一階段的組件可視化
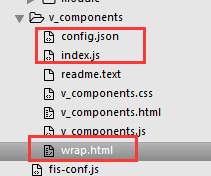
第一階段的組件可視化使用node+fis的方式實現。原理是在fis編譯之前使用node執行一個腳本,這個腳本完成遍歷組件、提取demo代碼、生成組件可視化目標文件。然後在使用fis編譯打包,啟動服務後在網上訪問即可。之所以第一階段這麼做的原因有兩點:鄙人比較熟悉node但是對fis插件編寫不太熟悉,不敢確定使用fis插件方式是否可行;其次上頭希望能在短期內能看到一定效果。先看一下工程結構目錄,v_components文件夾里包含了所有用來生成組件可視化文件的工具文件,node執行腳本為index.js

工程源文件點擊這裡
實現步驟:
1.規定文件註釋代碼中"@example"和"@example end"之間的字元串被認為是組件demo代碼。
/**
   * @author chua
   * @date 2016-5-9
   * @description 首頁右側導航欄組件,依賴模版 rightsideBar.tpl,rightsideBar.scss;基於jQuery和jquery.cookie.js

   * @實例化:rightsideBar = new rightsideBar(dom, datas);
   * @param dom {Dom} 為頭部組件父級節點,將根據情況append模版,生成頭部節點;
   * @param datas {json} 初始化組件的數據,數據格式如下

   *
   * @example
       html:
       <div class="js-rightsideBar"></div>

      js:
       var rightsideBar = require('/common/module/rightsideBar/rightsideBar.js');
      new rightsideBar($('.js-rightsideBar'));

      @example end
   */
其中html:後面跟著的是html代碼,js:後面跟著的是js執行代碼。註意不要出現不符合代碼格式的字元,"html:"、"js:"分別為html代碼段和js代碼段開始的標誌。其後的代碼分別要嚴格按照html和js的格式要求書寫
2.為了簡化和配置更加靈活。我添加了config.json和wrap.html兩個文件來配合主文件index.js文件。

其中index.js文件作用是作為node腳本運行,最終生成最新的v_components.html。v_components.css和v_components.js是給v_component.html使用的,畢竟組件可視化需要一些展示和交互
config.json的作用是希望能夠配置組件的一些屬性,讓其更靈活,移植性更加。目前只支持一個配置:組件的目錄 (建議使用相對路徑,否則在index.js中可能找不到)
{
    "modulePath": "../common/module/"
}
warp.html是用來生成v_components.html的模板文件。裡面包含了v_components.html文件需要的樣式文件和腳本文件。這個文件也是根據實際情況配置
<!DOCTYPE html>
<html>
<head>
    <title>組件可視化</title>
    <link rel="import" href="/common/html/meta.html?__inline">
    <link rel="stylesheet" type="text/css" href="/common/css/common.scss" />
    <link rel="stylesheet" type="text/css" href="v_components.css" />
    <script type="text/javascript" src="/common/dep/mod.js" data-loader></script>
    <script type="text/javascript" src="/common/dep/jquery.js" data-loader></script>
    <script type="text/javascript" src="/common/js/common.js" data-loader></script>
    <script type="text/javascript" src="v_components.js" data-loader></script>
</head>
<body>
</body>
</html>
3.主程式index.js讀取配置文件config.json中配置的組件目錄遍歷每一個組件(裡面的js文件),提取註釋中的demo代碼,以wrap.html為模板,將html代碼插入為節點,將js腳本插入到script節點中。

var fs = require('fs');
...
var writerStream = fs.createWriteStream('v_components.html');
var regs = {
    'wraphtml': /^([\s\S]*<(body)>[\s\S]*)(<\/\2>[\s\S]*)$/,
    //懶惰匹配到第一個*/
    'example': /\/\*\*([\s\S]*)@example[\s\S]*?html:([\s\S]*?)js:([\s\S]*?)@example end([\s|\S]*?)\*\//,//懶惰匹配第一個*/
    ...
};

fs.readFile('config.json', function(err, data){
    ...
    root = obj.modulePath;
    if(datas){
        loopModule();
    }
})
fs.readFile('wrap.html', function(err, data){
    ...
    datas = data.toString();
    if(root){
        loopModule();
    }
});
//遍歷所有模塊文件
function loopModule(){
    fs.readdir(root, function(err, ffiles){
        ...
        //遍歷所有組件
        ffiles.forEach(function(ffile){
            ...
            fs.readdir(root + ffile, function (err, files){
                ...
                files.forEach(function(file){//處理每一個模塊文件中的模塊並找到組件主文件(js文件)
                    if(regs.jsfile.test(file)){
                        ...
                        fs.readFile(pa, function(err, data){
                            ...
                            if(match = data.toString().match(regs.example)){//匹配demo代碼段
                                //截取相關信息並添加相關節點
                                ...
                                innerRightT += '<div class="right-side-top-item' + (count == 0? ' visible': '') + '" data-mod="'+ file +'">' + match[2] + '</div>';
                                innerJs += match[3] + ";";//js腳本都放在innerJs中
                                count++;
                            }

                            if(subModLeng == 0){//處理完所有子模塊才能說明處理完了整個模塊文件夾
                                unDomoduleLength--;
                            }
                            if(unDomoduleLength == 0){//處理完所有的模塊後,最後寫入文件
                                var innerBody = warpText(innerLeftWrap, innerLeft)
                                    + warpText(innerRightWrap, warpText(innerRightTWrap, innerRightT) + warpText(innerRightBWrap, innerRightB))
                                    + warpText(jsWrap, innerJs);

                                //使用utf8編碼寫入數據
                                writerStream.write(datas.replace(regs.wraphtml, '$1' + innerBody + '$3'), 'UTF8');
                                //標記文件結尾
                                writerStream.end();
                            }
                        });
                    }

                })
            });
        })
    })
}
//用數組wrapArr包裹inner並返回包裹結果
function warpText(wrapArr, inner){...}
//將str字元串轉換成HTML格式
function transToHtml(str){...}
View Code
最終在v_components目錄下執行:node index
生成v_components.html文件
在pc目錄下fis3編譯:fis3 release dev
在和pc同級的目錄下麵生成pc-dev文件夾
在pc-dev目錄下執行:node server
打開瀏覽器訪問:http://localhost:3000/v_components/v_components.html

左側是所有的組件的列表,點擊之能看到每一個組件的展示效果。我很醜,但是我很有內涵
第二階段的組件可視化——fis3插件
之前說過要將組件可視化做成fis插件,隨fis編譯一起編譯打包,不用在手動執行node生成相應文件。主要面臨的問題是:如何讓組件更加通用?這裡面幾個需要考慮的點
1.如何從組件代碼的註釋中提取出demo代碼段。
這裡我使用了下麵的正則來匹配
/\/\*\*([\s\S]*)@example[\s\S]*?(html:([\s\S]*?)js:([\s\S]*?))@example end([\s|\S]*?)\*\//,//懶惰匹配第一個*/
匹配文件註釋中‘@example’和‘@example end’之間的代碼。如
/**
   * @example
       html:
       <div class="js-rightsideBar"></div>

      js:
       var rightsideBar = require('/common/module/rightsideBar/rightsideBar.js');
      new rightsideBar($('.js-rightsideBar'));

      @example end
   */
這個部分本來想做成可以配置的,但是覺得沒有太大的意義,就預設使用這個正則來匹配組件中的demo代碼。
2.插件需要那些參數,是的插件更加靈活
下麵是最終確定下來的參數(路徑都配置絕對路徑)
            wrap: '/v_components/wrap.html',//組件可視化原型文件,用來包裹組件可視化代碼
            url: '/v_components.html', //目標文件
            COMPath: '/common/module',//組件集合目錄
            moduleListInstead: 'instead of modules',//使用模塊列表節點替換當前文本
            moduleViewInstead: 'instead of view htmls',//使用模塊視圖列表節點替換當前文本
            moduleCommentsInstead: 'instead of commnets',//使用模塊註釋列表節點替換當前文本
            moduleJsInstead: 'instead of js'//使用js腳本節點替換當前文本
當前文件的目錄結構

其中wrap對應的文件wrap.html作用非常重要。後面四個參數moduleXXXInstead對應的值必須在wrap.html中能夠找到,然後使用插件拼裝好的數據來替換他。wrap.html源碼如下
<!DOCTYPE html>
<html>
<head>
    <title>組件可視化</title>
    ...
</head>
<body>
<div class="left-side">instead of modules</div>
<div class="right-side">
    <div class="right-side-top">instead of view htmls</div>
    <div class="right-side-bottom">instead of commnets</div>
</div>
...
<script type="text/javascript">instead of js</script>
</body>
</html>
最終執行fis後上面黑色粗體文字全部被替換

<!DOCTYPE html> <html> <head> <title>組件可視化</title> ... </head> <body> <div class="left-side"><div data-mod="financialsBar">financialsBar</div><div data-mod="financialsSmlBar">financialsSmlBar</div><div data-mod="rightsideBar">rightsideBar</div></div> <div class="right-side"> <div class="right-side-top"><div data-mod="financialsBar"> <!-- 新手 --> <div class="js-financialsBar1"></div> <!-- 活期 --> <div class="js-financialsBar2"></div> <!-- 定期 --> <div class="js-financialsBar3"></div> </div><div data-mod="financialsSmlBar"> <!-- 定期理財 --> <div class="js-financialsSmlBar1"></div> <!-- 債權轉讓 --> <div class="js-financialsSmlBar2"></div> </div><div data-mod="rightsideBar"> <div class="js-rightsideBar"></div> </div></div> <div class="right-side-bottom"><div data-mod="financialsBar"><div >樣例:<div>html:<br> <!-- 新手 --><br> <div class="js-financialsBar1"></div><br> <!-- 活期 --><br> <div class="js-financialsBar2"></div......</div> </div> ... <script type="text/javascript">var financialsBar = require('common/module/financialsBar/financialsBar'); new financialsBar($('.js-financialsBar1'), { "type": "novice", "bdid": 1, "name": "農優寶A1231213", "title": "新手專享", "term": 1, "annualrate": 0.09, "interestRaise": 0.005, "surplusAmount": 30000, "projectScale": 50000, "status": "RZZ", "packStatus": "QGZ", "releaseDate": 425132121, "nowDate": 45641231321, "surplusBuyCount":1, 'productType': 'NYB', 'delayTime': 0 }); ... </script> </body> </html>View Code
來自相同的組件的DOM節點的屬性值data-mod相同。
fis-conf.js的配置片段
    .match('::package', {
        prepackager: fis.plugin('component-preview',{
            wrap: '/v_components/wrap.html',//組件可視化原型文件,用來包裹組件可視化代碼
            url: '/v_components.html', //目標文件
            COMPath: '/common/module',//組件集合目錄
            moduleListInstead: 'instead of modules',//使用模塊列表節點替換當前文本
            moduleViewInstead: 'instead of view htmls',//使用模塊視圖列表節點替換當前文本
            moduleCommentsInstead: 'instead of commnets',//使用模塊註釋列表節點替換當前文本
            moduleJsInstead: 'instead of js'//使用js腳本節點替換當前文本
        })
    })
更詳細的demo查看fis3_component_preview_demo
最終效果同第一階段的組件可視化效果一樣
實現原理:

完整的插件源碼查看fis3-prepackager-component-preview
如果覺得本文不錯,請點擊右下方【推薦】!


