原文網址: http://www.cnblogs.com/csdev Networkcomms 是一款C# 語言編寫的TCP/UDP通信框架 作者是英國人 以前是收費的 目前作者已經開源 開源地址是:https://github.com/MarcFletcher/NetworkComms.Net 使 ...
原文網址: http://www.cnblogs.com/csdev
Networkcomms 是一款C# 語言編寫的TCP/UDP通信框架 作者是英國人 以前是收費的 目前作者已經開源 開源地址是:https://github.com/MarcFletcher/NetworkComms.Net
使用networkcomms框架通信時,客戶端發送消息,伺服器端回覆消息。
在介紹開源的.net通信框架NetworkComms 一文中,我們介紹瞭如何從客戶端發送字元串給伺服器端,以及如何從伺服器端接收發回來的字元串。
本文介紹一下,如何發送自定義的類數據給伺服器端,和如何獲取從服務端返回的數據。
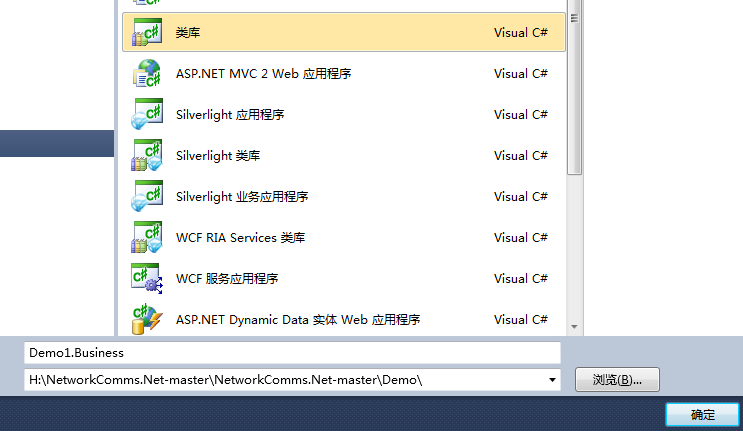
新建一個類庫


添加對Protobuf.dll的引用,這個文件中在MarcF-networkcomms.net-8e01e19f827f\packages\protobuf-net.2.0.0.668\lib相關文件夾中
添加這個引用,是因為通信時,使用了Protobuf進行序列化

添加2個可以序列化的類


using System;
using System.Collections.Generic;
using System.Linq;
using System.Text;
using ProtoBuf;

namespace Demo1.Business
{
    [ProtoContract]
    public class ResMessage
    {
        public ResMessage()
        { }

        [ProtoMember(1)]
        public string Message { get; set; }


    }
}
View Code

using System;
using System.Collections.Generic;
using System.Linq;
using System.Text;
using ProtoBuf;

namespace Demo1.Business
{
    [ProtoContract]
    public class User
    {
        public User()
        { }

        [ProtoMember(1)]
        public string UserID { get; set; }

        [ProtoMember(2)]
        public string Name { get; set; }

    }
}
View Code
在Demo1.Client 和Demo1.Server中添加對Demo1.Business類的引用

客戶端:

客戶端代碼:
 User theUser = new User();
            theUser.UserID = txtName.Text.Trim();
            theUser.Name = txtPsw.Text.Trim();

            ResMessage res = newTcpConnection.SendReceiveObject<User, ResMessage>("UserLong", "ResLogin", 5000, theUser);

            if (res.Message == "驗證成功")
            {
                MessageBox.Show("用戶驗證成功");
            }
            else
            {
                MessageBox.Show(res.Message);
            }
伺服器端代碼:
using System;
using System.Collections.Generic;
using System.ComponentModel;
using System.Data;
using System.Drawing;
using System.Linq;
using System.Text;
using System.Windows.Forms;
using NetworkCommsDotNet.Connections;
using NetworkCommsDotNet;
using NetworkCommsDotNet.DPSBase;
using NetworkCommsDotNet.Tools;
using NetworkCommsDotNet.Connections.TCP;
using System.Net;
using Demo1.Business;

namespace Demo1.Server
{
    public partial class Form1 : Form
    {
        public Form1()
        {
            InitializeComponent();
        }

        private void button1_Click(object sender, EventArgs e)
        {
            //IP地址和埠
            IPEndPoint thePoint = new IPEndPoint(IPAddress.Parse(txtIP.Text), int.Parse(txtPort.Text));
            //開始監聽此IP和埠  使用TCP協議
            Connection.StartListening(ConnectionType.TCP, thePoint);

            NetworkComms.AppendGlobalIncomingPacketHandler<string>("GetName", IncomingMsgHandle);

            NetworkComms.AppendGlobalIncomingPacketHandler<User>("UserLong", IncoingHandleLogin);


            button1.Text = "已經開始監聽";
        }

        private void IncomingMsgHandle(PacketHeader header, Connection connection, string msg)
        {
            try
            {
                string resMsg = "";

                if (msg == "星期一")
                    resMsg = "Monday";
                else if (msg == "星期二")
                    resMsg = "Tuesday";
                else if (msg == "星期三")
                    resMsg = "Wednesday";
                else if (msg == "星期四")
                    resMsg = "Thursday";
                else if (msg == "星期五")
                    resMsg = "Friday";
                else if (msg == "星期六")
                    resMsg = "Saturday";
                else if (msg == "星期日")
                    resMsg = "Sunday";


                connection.SendObject("ResName", resMsg);
            }
            catch (Exception ex)
            {

            }
        }

        private void IncoingHandleLogin(PacketHeader header, Connection connection, User theUser)
        {
            ResMessage  msg=new ResMessage ();

            if (theUser.UserID == "1000" && theUser.Name == "張三")

                msg.Message = "登錄成功";
            else
                msg.Message = "用戶不存在";

            connection.SendObject("ResLogin", msg);
        }
    }
}


這樣使用protobuf進行序列化的通信就完成了。因為neworkcomms預設使用protobuf進行通信,所以其他無需額外設置。如果使用其他序列化器,也可以很方便的設置。
原文地址 www.cnblogs.com/csdev
源碼:http://pan.baidu.com/s/1dFNrMtN


