原文: Jetpack架構組件學習(5)——Hilt 註入框架使用-Stars-One的雜貨小窩 本篇需要有Kotlin基礎知識,否則可能閱讀本篇會有所困難! 介紹說明 實際上,郭霖那篇文章已經講得比較明白了(具體參考鏈接都貼在下文了),這裡簡單總結下: 如果按照之前我們的MVC寫法,我們可以直接在 ...
本篇需要有Kotlin基礎知識,否則可能閱讀本篇會有所困難!
介紹說明
實際上,郭霖那篇文章已經講得比較明白了(具體參考鏈接都貼在下文了),這裡簡單總結下:
如果按照之前我們的MVC寫法,我們可以直接在activity中發起網路請求,但發起網路請求我們需要調用一個Api對象的具體方法,而Api對象只能在activity中進行創建
這裡activity和api對象實際上就是耦合關係,從客觀上講,我們activity不應該去負責創建一個api對象
所以使用註入框架,相當於有了個中間人幫activity處理,至於是中間人直接找到api對象,或者是中間人進行創建api對象,activity都不關心,activity只知道去找中間人就能幫得到一個api對象
優點
學習之後,目前感覺到的優點:
- 可能大型項目,多module那種比較適合
- MMVM/MVI架構的app也比較適合
- 註入介面,方便不同邏輯實現
可能就是介面註入可能有些用處,比如上面例子,假設我們網路框架剛開始用的是okhttp,但後期可能又會變更其他框架,我們可以考慮封裝一個通用介面,然後使用依賴註入,後期更換其他網路框架只需要實現介面的對應方法即可
依賴註入比較針對是MVVM/MVI架構的app,傳統mvc結構,我直接一個單例object,也可以解決問題,好像也沒啥必要?
網上大多數說的都是解耦,方便後續測試,問題是我都不怎麼寫測試用例,實在無法感受到具體好處就是
總之,目前學習這個只是因為很多開源項目都開始用上了,學了這個發現大概才能看得懂哈哈,也順手做下記錄了
基本使用
1.依賴引入
註: 下麵我使用的是ksl的gradle腳本
項目的build.kts文件
buildscript {
    ...
    dependencies {
        ...
        classpath 'com.google.dagger:hilt-android-gradle-plugin:2.48.1'
    }
}
在app模塊里的build.kts加上插件和依賴
plugins {
    id("com.android.application")
    id("kotlin-kapt") // kotlin-kapt 插件
    id("dagger.hilt.android.plugin") // Hilt 插件
}

dependencies {
	implementation("com.google.dagger:hilt-android:2.48.1")
	kapt("com.google.dagger:hilt-compiler:2.48.1")
}

//還有記得有下麵此數據配置,不過一般都預設有
android{
	compileOptions {
		sourceCompatibility = JavaVersion.VERSION_1_8
		targetCompatibility = JavaVersion.VERSION_1_8
	}
}
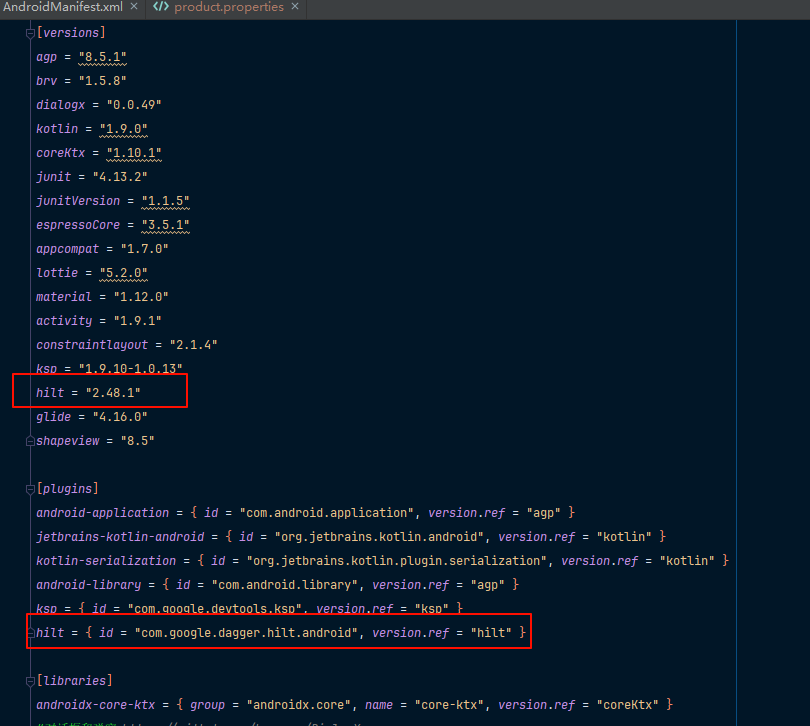
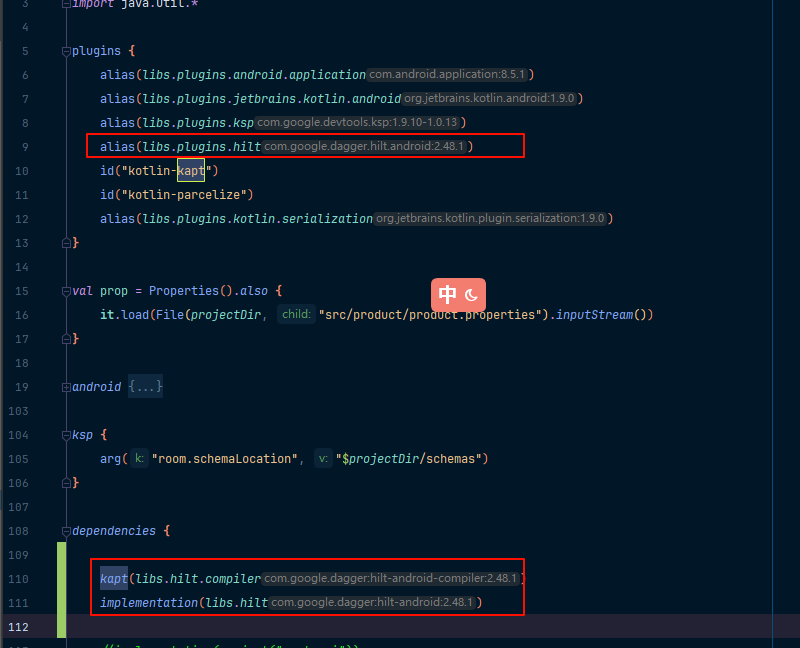
我這裡直接新版本as創建的新項目,已經使用了toml+ksl的方式,貼下圖參考下:
toml:

build.gradle.kt

app里的build.gradle.kt

這裡有個坑:
就是ksp和kapt一起使用會導致編譯失敗,得設置插件不傳遞,及上面的build.gradle.kt截圖
2.application上加註解
@HiltAndroidApp
class MyApplication:Application() {
    override fun onCreate() {
        super.onCreate()
		//...
    }
}
註意在清單文件中使用
MyApplication對象哦!
<application
	android:name=".MyApplication"
	//省略其他...
/>
3.註入對象
class MyApi @Inject constructor(){
	fun sendApi(){

	}
}


@AndroidEntryPoint
class MainActivity : AppCompatActivity() {

	/**
	 * 這裡不能是private,且是懶載入的方式
	 */
	@Inject
	lateinit var api: MyApi

    override fun onCreate(savedInstanceState: Bundle?) {
        super.onCreate(savedInstanceState)
        setContentView(R.layout.activity_main)
    }
}
補充說明
我們註意到上面出現了3個註解
@HiltAndroidApp在application上使用@AndroidEntryPoint在activity等類上使用此註解,下麵有補充說明@Inject用來註入對象及標識需要註入實體
其中@HiltAndroidApp是在application中使用的,而
hilt有以下入口點:
- Application
- Activity
- Fragment
- View
- Service
- BroadcastReceiver
也就是說,我們使用依賴註入功能只能在這幾個類中
對於application,我們使用@HiltAndroidApp註解,這步是必須的,否則依賴註入不會生效!
而另外的@AndroidEntryPoint註解,在哪裡你需要使用到@Inject註入對象,則需要將當前類標明上註解@AndroidEntryPoint,(如上個步驟中的代碼示例)
進階使用
1.帶參實體註入
給之前的MyApi添加個新的構造參數
class MyApi @Inject constructor(val client:Client){
    fun sendApi(){

    }
}

class Client @Inject constructor(){
    fun config() {

    }
}
總結: 需要依賴註入的實體,如果有其他參數,則保證其他參數實體也是有依賴註入即可
上面的MyApi,也可以寫成下麵這樣:
class MyApi @Inject constructor(){
	@Inject
    lateinit var client: Client

    fun sendApi(){

    }
}
2.介面類型註入
import dagger.Binds
import dagger.Module
import dagger.hilt.InstallIn
import dagger.hilt.android.components.ActivityComponent
import javax.inject.Inject


interface ClientInterface{
    fun config()
}

class MyClient @Inject constructor():ClientInterface{
    override fun config() {
        Log.d("ttt", "myclient config ")
    }
}

class MyApi @Inject constructor(){

    @Inject
    lateinit var clientInterface: ClientInterface

    fun sendApi(){
        clientInterface.config()
        Log.d("ttt", "send api")
    }
}

@Module
@InstallIn(ActivityComponent::class)
abstract class ClientModule {
    @Binds
    abstract fun createClient(myClient: MyClient): ClientInterface

}
上面定義一個ClientInterface介面,我們要註入一個此介面實現類MyClient
得多加一個ClientModule類,依賴註入的時候會通過此類中的對應方法createClient來註入
這裡類和方法名都是可以隨意,不過方法里的參數就是你要註入的介面實現類,返回則是介面類,還要註意該類是抽象類!
關於@InstallIn註解,在下麵章節會再次講解,這裡先跳過,先這樣使用即可
PS:當然這裡可以也可以不是介面類型,改成抽象類應該也是可以的!
3.相同類型不同實例註入
在上面介面類型註入的代碼上加入一個新的類進行註入
class MyTwoClient @Inject constructor():ClientInterface{
    override fun config() {
        Log.d("ttt", "mytwoclient config ")
    }
}

@Module
@InstallIn(ActivityComponent::class)
abstract class ClientModule {
    @BindMyClient
    @Binds
    abstract fun createClient(myClient: MyClient): ClientInterface


	/**
	 * 註意這個方法名不能與上面createClient相同,否則編譯會失敗!
	 */
    @BindMyTwoClient
    @Binds
    abstract fun createTwoClient(myClient: MyTwoClient): ClientInterface
}

@Qualifier
@Retention(AnnotationRetention.BINARY)
annotation class BindMyClient

@Qualifier
@Retention(AnnotationRetention.BINARY)
annotation class BindMyTwoClient
修改要註入對象的地方:
class MyApi @Inject constructor(){

	/**
	 * 這裡使用@BindMyTwoClient來標明我們要註入MyTwoClient實例
	 */
    @BindMyTwoClient
    @Inject
    lateinit var clientInterface: ClientInterface

    fun sendApi(){
        clientInterface.config()
        Log.d("ttt", "send api")
    }
}
4.外部第三方實體註入
這裡說的第三方,指的是第三方庫,由於庫里基本封裝好了,代碼修改不像上面那麼自由,可能還沒有構造方法,那我們應該如何實現註入?
這裡是使用@Provides註解來實現
import dagger.Module
import dagger.Provides
import dagger.hilt.InstallIn
import dagger.hilt.android.components.ActivityComponent
import javax.inject.Inject
import javax.inject.Qualifier

class MyApi @Inject constructor(){

	/**
	 * 指定MyClient,依賴註入最終會調用後面createNClient()方法生成對象
	 */
    @Inject
    lateinit var clientInterface: MyClient

    fun sendApi(){
        Log.d("ttt", "send api")
    }
}

class MyClient {
    fun config() {
        Log.d("ttt", "myclient config ")
    }
}

@Module
@InstallIn(ActivityComponent::class)
class ClientModule {
    @Provides
    fun createNClient(): MyClient{
		//這裡方便延時,我直接通過創建一個實例了
        return MyClient()
    }
}
和上面介面類型註入不同,需要註意以下幾點:
- ClientModule這個類不是抽象類了
@Provides註解的那個方法,也不是抽象方法,且不用@Inject註解標明
或者方法還能加個參數(依賴其他類):
@Module
@InstallIn(ActivityComponent::class)
class ClientModule {
    @Provides
    fun createNClient(): MyClient{
        return MyClient()
    }

	/**
	 * myClient這個也會被自動註入上面我們的那個返回數據
	 */
    @Provides
    fun createNewApi(myClient: MyClient): MyNewApi{
        return MyNewApi(myClient)
    }

}

class MyNewApi(myClient: MyClient)
組件和組件作用域
介紹
上面有個@InstallIn,翻譯就是安裝到的意思
@InstallIn(ActivityComponent::class): 就是把這個模塊安裝到 Activity 組件當中;
如果我們在Service中使用@Inject註入,則編譯時就會提示出錯,原因是ActivityComponent已經限定只能在activity里使用
當然,除了ActivityComponent這個組件,我們還有其他的組件可用,如下表
| Android 類 | 組件 | 作用域 |
|---|---|---|
| Application | SingletonComponent | @Singleton |
| Activity | ActivityRetainedComponent | @ActivityRetainedScoped |
| ViewModel | ViewModelComponent | @ViewModelScoped |
| Activity | ActivityComponent | @ActivityScoped |
| Fragment | FragmentComponent | @FragmentScoped |
| View | ViewComponent | @ViewScoped |
| 帶有 @WithFragmentBindings 註解的 View | ViewWithFragmentComponent | @ViewScoped |
| Service | ServiceComponent | @ServiceScoped |
@Singleton被它修飾的構造函數或是函數,返回的始終是同一個實例@ActivityRetainedScoped被它修飾的構造函數或是函數,在Activity的重建前後返回同一實例@ActivityScoped被它修飾的構造函數或是函數,在同一個Activity對象里,返回的都是同一實例@ViewModelScoped被它修飾的構造函數或是函數,與ViewModel規則一致
組件的生命周期
| 生成的組件 | 創建時機 | 銷毀時機 |
|---|---|---|
| SingletonComponent | Application#onCreate() | Application 已銷毀 |
| ActivityRetainedComponent | Activity#onCreate() | Activity#onDestroy() |
| ViewModelComponent | ViewModel 已創建 | ViewModel 已銷毀 |
| ActivityComponent | Activity#onCreate() | Activity#onDestroy() |
| FragmentComponent | Fragment#onAttach() | Fragment#onDestroy() |
| ViewComponent | View#super() | View 已銷毀 |
| ViewWithFragmentComponent | View#super() | View 已銷毀 |
| ServiceComponent | Service#onCreate() | Service#onDestroy() |
依賴註入實現單例
一般情況下,我們的api全局應該是單例模式,所以上面的可以改成下麵代碼:
@Module
@InstallIn(SingletonComponent::class)
class ClientModule {

    @Singleton
    @Provides
    fun createNClient(): MyClient{
        return MyClient()
    }
}
上面的@Singleton這個是不可省略的,省略了相當於你使用的預設的組件,相當於每次註入都是新創建實例了!
然後需要註意的是,下麵幾個錯誤的寫法:
@Module
@InstallIn(SingletonComponent::class)
class ClientModule {

    @ActivityScoped //錯誤,與當前組件的作用域不一致
    @Provides
    fun createNClient(): MyClient{
        return MyClient()
    }
}

@Module
@InstallIn(ActivityComponent::class)
class ClientModule {

    @Singleton //錯誤,與當前組件的作用域不一致
    @Provides
    fun createNClient(): MyClient{
        return MyClient()
    }
}
組件作用域除了在module里使用,還可以修飾構造函數
@ActivityScoped
class Hardware @Inject constructor(){
    fun printName() {
        println("I'm fish")
    }
}
表示Hardware在同個Activity,只會有一個實例
組件的層次
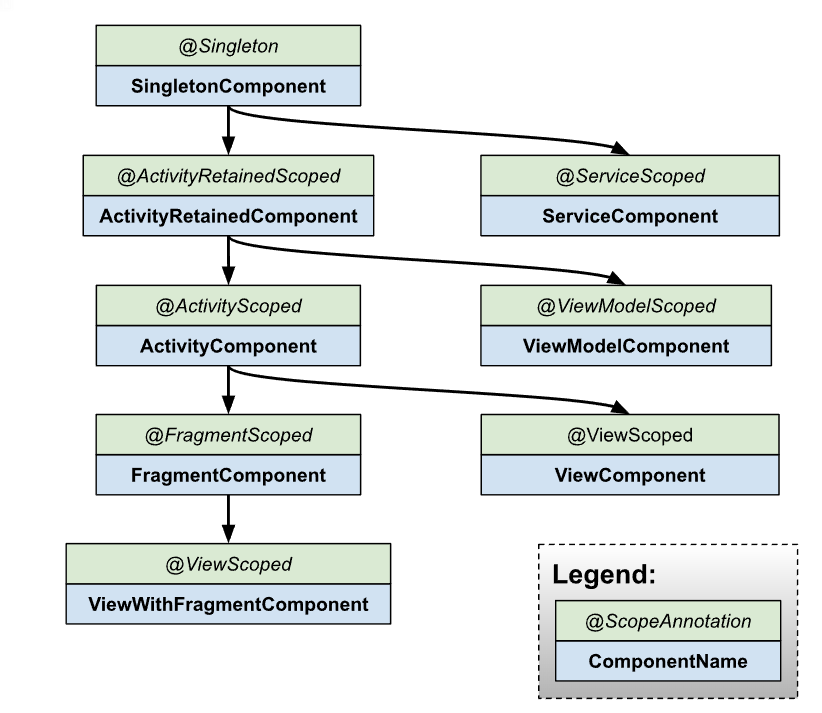
組件有層次的使用,比如上面的全局的api,我們可以在其他地方組件作用域進行註入或者Activity,fragment中使用註入,如下代碼:
@Module
@InstallIn(SingletonComponent::class)
class ClientModule {

    @Singleton
    @Provides
    fun createNClient(): MyClient{
        return MyClient()
    }
}

@ActivityScoped
class MyNewApi @Inject constructor(myClient: MyClient)
具體的關係結構層次如下圖所示:

註入application或Activity
當我們構造函數需要傳遞application或Activity的時候,可以使用@ApplicationContext 和 @ActivityContext 限定符。
如下麵代碼:
class AnalyticsServiceImpl @Inject constructor(
  @ApplicationContext context: Context
) : AnalyticsService { ... }

// The Application binding is available without qualifiers.
class AnalyticsServiceImpl @Inject constructor(
  application: Application
) : AnalyticsService { ... }

class AnalyticsAdapter @Inject constructor(
  @ActivityContext context: Context
) { ... }

// The Activity binding is available without qualifiers.
class AnalyticsAdapter @Inject constructor(
  activity: FragmentActivity
) { ... }
特殊用法
似乎是自定義入口類,然後給application實現一個擴展方法
@Module
@InstallIn(SingletonComponent::class)
object PlayServiceModule {
fun Application.playerController(): PlayerController {
return accessEntryPoint<PlayerControllerEntryPoint>().playerController()
}
@EntryPoint
@InstallIn(SingletonComponent::class)
interface PlayerControllerEntryPoint {
fun playerController(): PlayerController
}
}
與ViewModel聯用
為ViewModel添加 @HiltViewModel 註解,併在 ViewModel 對象的構造函數中使用 @Inject 註解
@HiltViewModel
class ExampleViewModel @Inject constructor(
  private val savedStateHandle: SavedStateHandle,
  private val repository: ExampleRepository
) : ViewModel() {
  ...
}
然後,帶有 @AndroidEntryPoint 註解的 activity 或 fragment 可以使用 ViewModelProvider 或 by viewModels() KTX 擴展照常獲取 ViewModel 實例:
@AndroidEntryPoint
class ExampleActivity : AppCompatActivity() {
  private val exampleViewModel: ExampleViewModel by viewModels()
  ...
}
參考
- Jetpack新成員,一篇文章帶你玩轉Hilt和依賴註入 - 掘金
- 玩轉Jetpack依賴註入框架——Hilt - 掘金
- Android使用Hilt依賴註入,讓人看不懂你代碼 - 掘金
- 使用 Hilt 實現依賴項註入 | Android Developers
提問之前,請先看提問須知 點擊右側圖標發起提問
 TornadoFx學習交流群:1071184701


