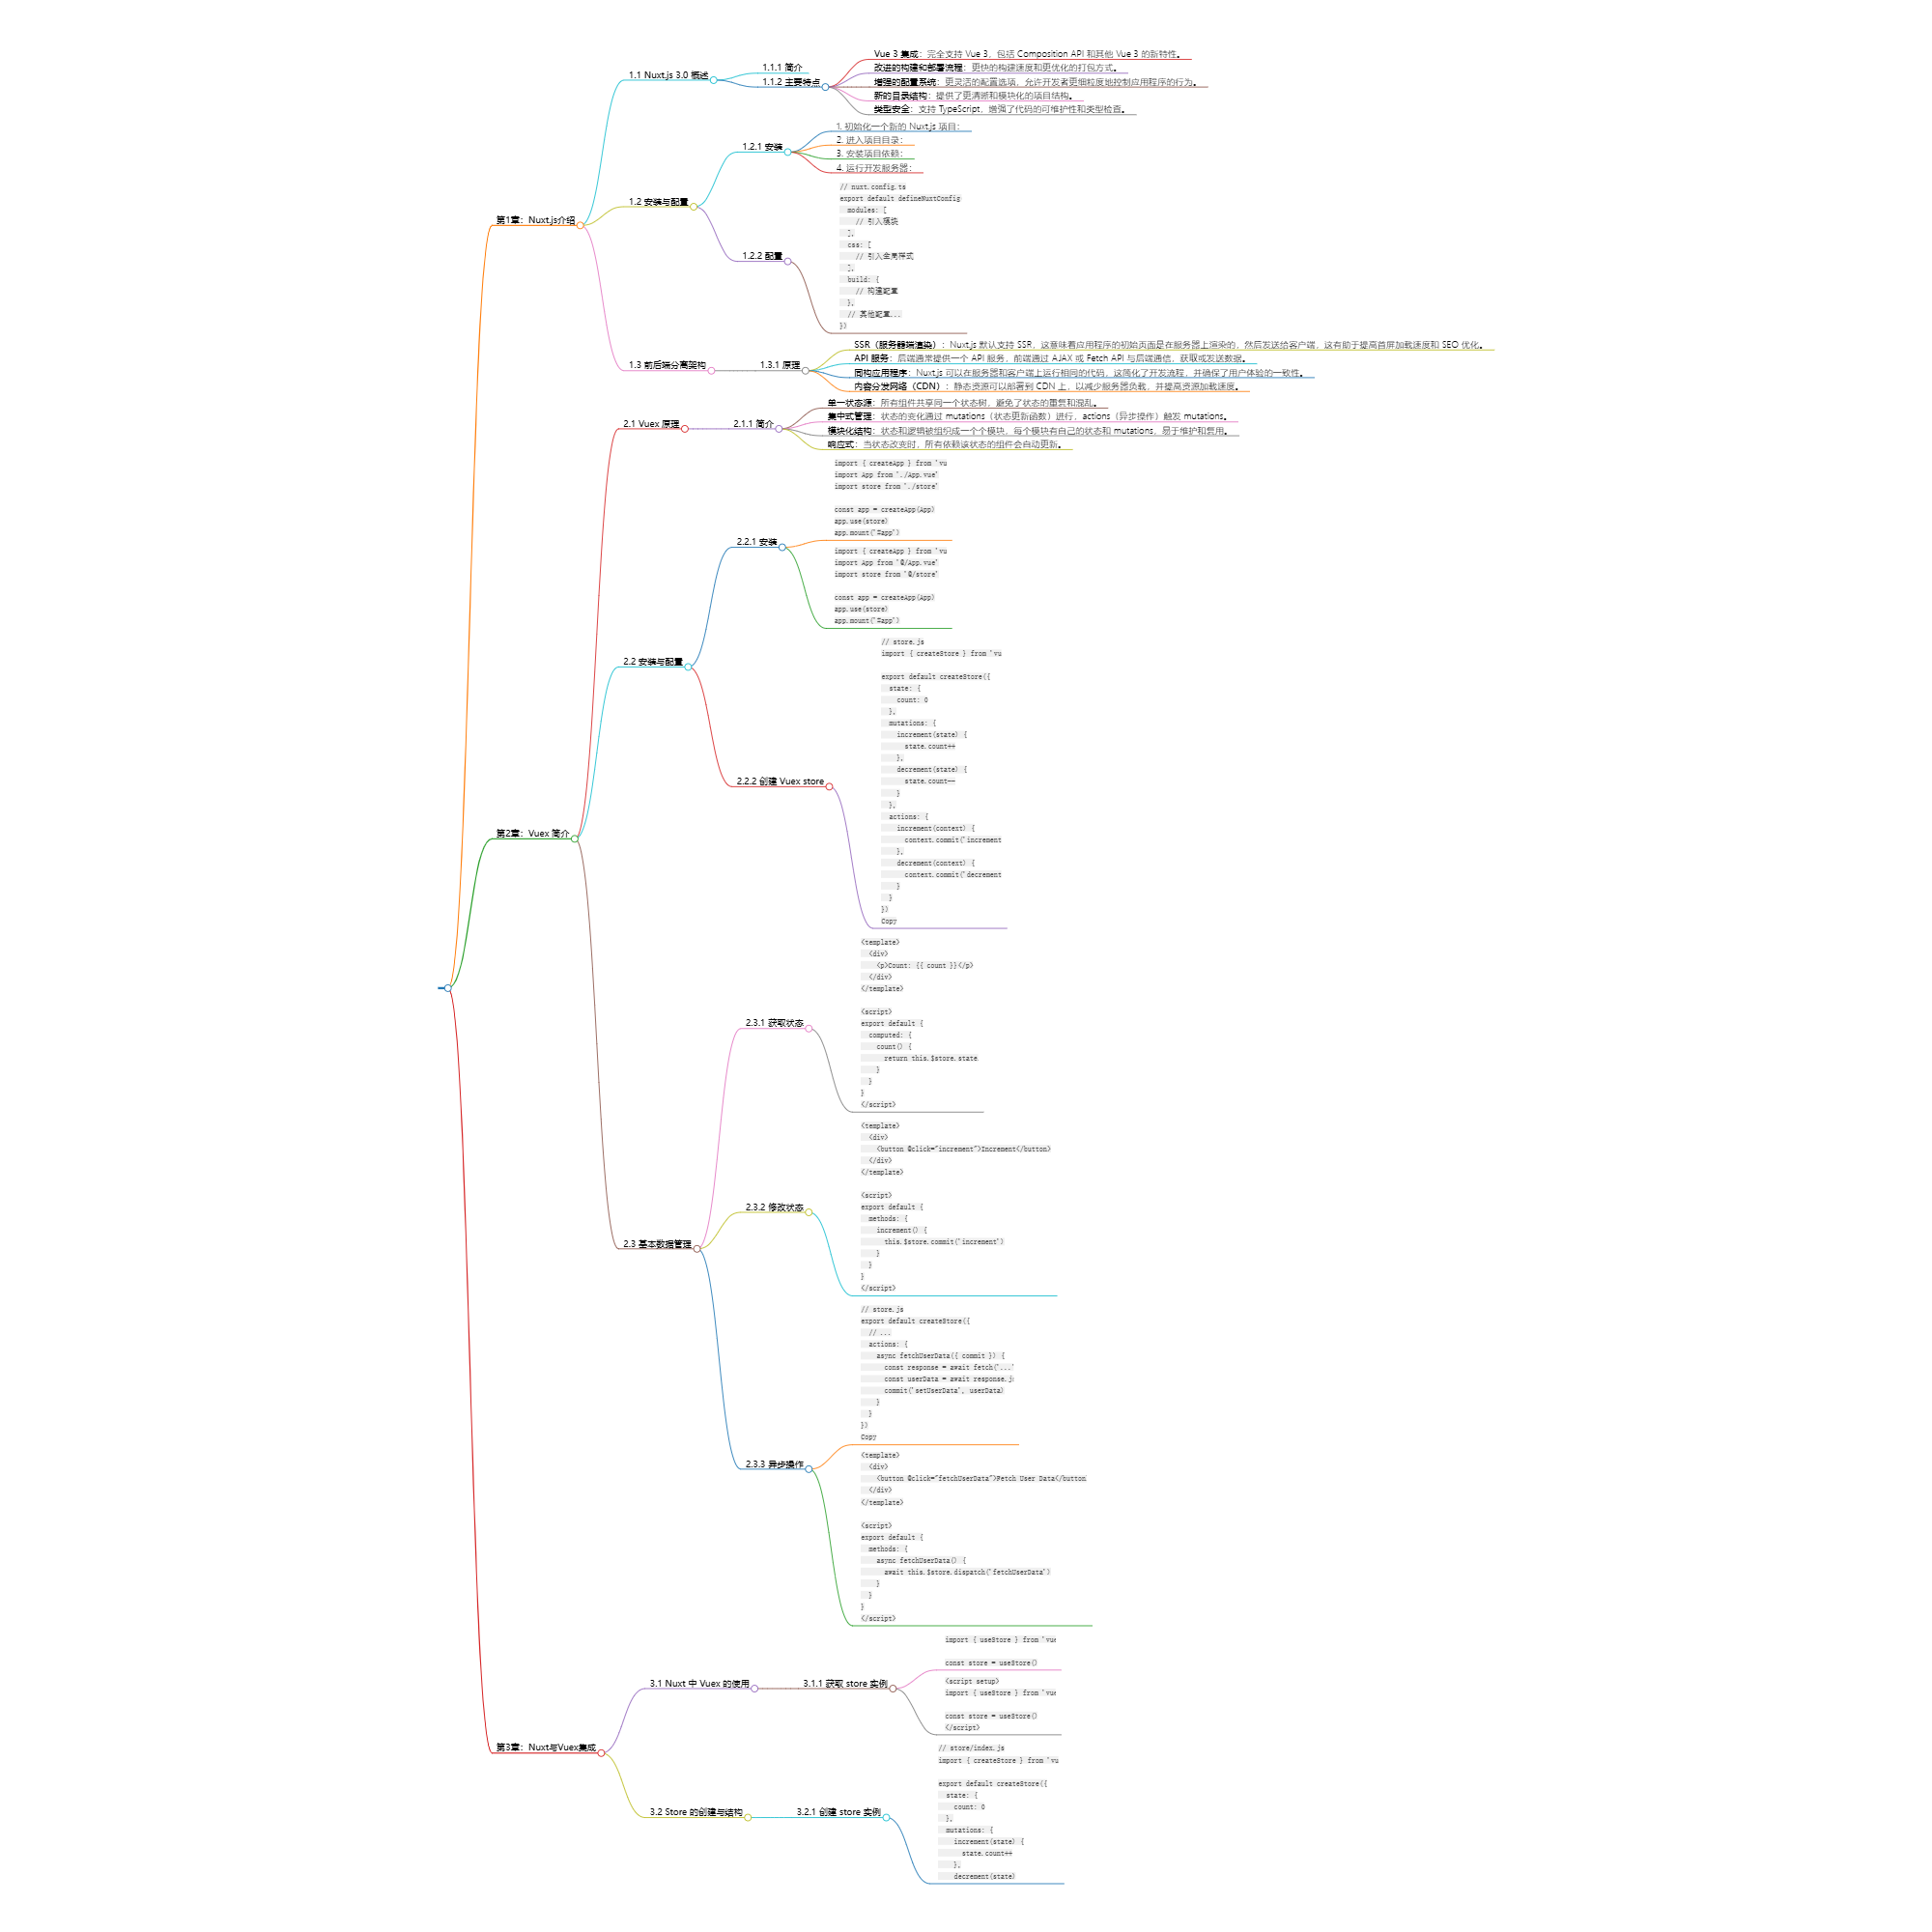
摘要:該文指南詳述了Nuxt 3的概況與安裝,聚焦於在Nuxt 3框架下運用Vuex進行高效的狀態管理,涵蓋基礎配置、模塊化實踐至高階策略,助力開發者構建高性能前後端分離應用。 ...
title: 掌握 Nuxt 3 中的狀態管理:實踐指南
date: 2024/6/22
updated: 2024/6/22
author: cmdragon
excerpt:
摘要:該文指南詳述了Nuxt 3的概況與安裝,聚焦於在Nuxt 3框架下運用Vuex進行高效的狀態管理,涵蓋基礎配置、模塊化實踐至高階策略,助力開發者構建高性能前後端分離應用。
categories:
- 前端開發
tags:
- Nuxt 3
- Vuex
- 狀態管理
- 前後端分離
- 模塊化
- TypeScript
- Web開發


第1章:Nuxt 3 簡介
1.1 Nuxt.js 3.0概述
Nuxt.js 是一個基於 Vue.js 的伺服器端渲染(SSR)框架,它為開發者提供了一個優雅的架構,用於創建服務端渲染的Vue應用。Nuxt.js 3.0 是該框架的下一代版本,它建立在 Vue 3 的基礎上,利用 Vue 3 的 Composition API 提供更強大的功能和更靈活的開發體驗。
Nuxt 3.0 的主要特點包括:
- Vue 3 集成:完全支持 Vue 3,包括 Composition API 和其他 Vue 3 的新特性。
- 改進的構建和部署流程:更快的構建速度和更優化的打包方式。
- 增強的配置系統:更靈活的配置選項,允許開發者更細粒度地控制應用的行為。
- 新的目錄結構:提供了更清晰和模塊化的項目結構。
- 類型安全:支持 TypeScript,增強了代碼的可維護性和類型檢查。
1.2 安裝與配置
在開始使用 Nuxt 3 之前,確保你的開發環境中已經安裝了 Node.js(推薦版本為 LTS)。以下是在項目中安裝 Nuxt 3 的步驟:
-
初始化一個新的 Nuxt 3 項目:
npx nuxi init my-nuxt3-project
-
進入項目目錄:
cd my-nuxt3-project
-
安裝項目依賴:
npm install
-
運行開發伺服器:
npm run dev
預設情況下,Nuxt 3 會監聽 http://localhost:3000 地址。
對於配置,Nuxt 3 提供了 nuxt.config.ts(或 .js)文件,你可以在這裡定製應用的配置,例如:
// nuxt.config.ts
export default defineNuxtConfig({
  modules: [
    // 引入模塊
  ],
  css: [
    // 引入全局樣式
  ],
  build: {
    // 構建配置
  },
  // 其他配置...
})
1.3 前後端分離架構
Nuxt.js 作為一個SSR框架,天然支持前後端分離的架構。在這種架構中,前端負責用戶界面和交互,而後端負責數據處理和業務邏輯。以下是前後端分離架構的幾個關鍵點:
- SSR(伺服器端渲染):Nuxt.js 預設支持SSR,這意味著應用的初始頁面是在伺服器上渲染的,然後發送給客戶端,這有助於提高首屏載入速度和SEO優化。
- API服務:後端通常提供一個API服務,前端通過AJAX或Fetch API與後端通信,獲取或發送數據。
- 同構應用:Nuxt.js 可以在伺服器和客戶端上運行相同的代碼,這簡化了開發流程,並確保了用戶體驗的一致性。
- 內容分髮網絡(CDN):靜態資源可以部署到CDN上,以減少伺服器負載,並提高資源載入速度。
通過使用 Nuxt.js 3,開發者可以更加便捷地構建符合現代Web應用要求的前後端分離架構。
第2章:Vuex簡介
2.1 Vuex原理
Vuex 是一個專為 Vue.js 應用程式設計的狀態管理模式,它提供了一種集中式存儲應用狀態的方式,使得狀態能夠以模塊化和可預測的方式進行管理。Vuex 的核心原理是:
- 單一狀態源:所有組件共用同一個狀態樹,避免了狀態的重覆和混亂。
- 集中式管理:狀態的變化通過 mutations(狀態更新函數)進行,actions(非同步操作)觸發 mutations。
- 模塊化結構:狀態和邏輯被組織成一個個模塊,每個模塊有自己的狀態和 mutations,易於維護和復用。
- 響應式:當狀態改變時,所有依賴該狀態的組件會自動更新。
2.2 安裝與配置
安裝 Vuex 通常是在項目的 main.js 或 nuxt.config.js 中進行,如果你使用 Nuxt.js,可以在 nuxt.config.js 中添加:
import { createApp } from 'vue'
import App from './App.vue'
import store from './store'

const app = createApp(App)
app.use(store)
app.mount('#app')
對於 Nuxt 3,你可以在 nuxt.config.ts 中導入並使用:
import { createApp } from 'vue'
import App from '@/App.vue'
import store from '@/store'

const app = createApp(App)
app.use(store)
app.mount('#app')
2.3 基本數據管理
2.3.1 創建Vuex store
首先,創建一個名為 store.js 或 store.ts 的文件,定義你的狀態(state)和動作(mutations):
// store.js
import { createStore } from 'vuex'

export default createStore({
  state: {
    count: 0
  },
  mutations: {
    increment(state) {
      state.count++
    },
    decrement(state) {
      state.count--
    }
  },
  actions: {
    increment(context) {
      context.commit('increment')
    },
    decrement(context) {
      context.commit('decrement')
    }
  }
})
2.3.2 在組件中使用Vuex
在組件中,你可以通過 this.$store 訪問 store,並通過 this.$store.dispatch 調用 actions:
<template>
  <div>
    <button @click="increment">Increment</button>
    <p>Count: {{ count }}</p>
  </div>
</template>

<script>
export default {
  computed: {
    count() {
      return this.$store.state.count
    }
  },
  methods: {
    increment() {
      this.$store.dispatch('increment')
    }
  }
}
</script>
通過以上步驟,你已經設置了基本的 Vuex 狀態管理,所有的組件都可以通過 store 來共用和管理數據。
第3章:Nuxt 3與Vuex集成
3.1 Nuxt中Vuex的使用
在 Nuxt 3 中使用 Vuex 與在 Vue 中使用類似,只有一些細微差別。在 Nuxt 3 中,你可以在 composables 或 setup 函數中直接使用 useStore 函數來獲取 store 實例。
首先,在你的項目中創建一個名為 store 的文件夾,併在其中創建一個名為 index.js 或 index.ts 的文件,用於存放你的 Vuex store。
3.2 Store的創建與結構
在 store/index.js 中創建一個 Vuex store 實例:
// store/index.js
import { createStore } from 'vuex'

export default createStore({
  state: {
    count: 0
  },
  mutations: {
    increment(state) {
      state.count++
    },
    decrement(state) {
      state.count--
    }
  },
  actions: {
    increment(context) {
      context.commit('increment')
    },
    decrement(context) {
      context.commit('decrement')
    }
  }
})
3.3 mutations和actions
在 Nuxt 3 中,你可以在組件中使用 useStore 函數來獲取 store 實例,並使用 mutations 和 actions:
<template>
  <div>
    <button @click="increment">Increment</button>
    <p>Count: {{ count }}</p>
  </div>
</template>

<script setup>
import { useStore } from 'vuex'

const store = useStore()

const count = computed(() => store.state.count)

function increment() {
  store.dispatch('increment')
}
</script>
在這個示例中,我們使用 useStore 函數獲取了 store 實例,並使用 computed 函數獲取了狀態 count。當點擊按鈕時,調用 store.dispatch('increment') 來觸發 increment action。
在 Nuxt 3 中,你可以使用 useStore 函數來獲取 store 實例,併在組件中使用 mutations 和 actions。這種方式更加簡單和直觀,並且可以更好地與 Composition API 集成。
第4章:狀態管理最佳實踐
4.1 分模塊管理
為了保持代碼的可維護性和組織性,將 Vuex store 分模塊管理是一個好習慣。創建多個小的 store 文件,每個文件專註於處理特定領域的數據。例如,你可以有 userStore.js、productStore.js 等。
// userStore.js
export const state = () => ({
  isLoggedIn: false,
  userId: null
})

export const mutations = {
  login(state, payload) {
    state.isLoggedIn = payload.isLoggedIn
    state.userId = payload.userId
  },
  logout(state) {
    state.isLoggedIn = false
    state.userId = null
  }
}

// productStore.js
export const state = () => ({
  products: []
})

export const mutations = {
  addProduct(state, product) {
    state.products.push(product)
  },
  removeProduct(state, productId) {
    state.products = state.products.filter(product => product.id !== productId)
  }
}
4.2 使用類型安全
使用 TypeScript 或 Flow 可以為 Vuex store 的狀態、mutations 和 actions 提供類型安全。這有助於在編譯時發現潛在的錯誤。
// 使用TypeScript
import { StoreModule } from 'vuex'

type UserState = {
  isLoggedIn: boolean
  userId: number | null
}

type ProductState = {
  products: Product[]
}

type RootState = {
  user: UserState
  product: ProductState
}

const userModule: StoreModule<UserState> = {
  state,
  mutations
}

const productModule: StoreModule<ProductState> = {
  state,
  mutations
}

// 在store/index.ts中導入併合並模塊
const store = createStore({
  modules: {
    user: userModule,
    product: productModule
  }
})
4.3 使用插件與中間件
- 插件:Vuex 提供了插件機制,可以用來共用通用的功能,如日誌記錄、狀態檢查等。例如,
vuex-router-sync可以自動同步路由變化到 store。 - 中間件:在 mutations 或 actions 中使用
context對象,可以添加全局的中間件,如在每次修改 state 時執行某些操作。
// 添加全局中間件
import createLogger from 'vuex-log'

const store = createStore({
  // ...
  middleware: [createLogger()]
})
4.4 子組件狀態通信
子組件可以通過 store.dispatch 或 store.commit 與父組件或全局 store 通信。如果需要在子組件之間共用狀態,可以考慮使用自定義事件或者 Vuex 的 mapState 和 mapActions。
// 子組件
<template>
  <button @click="incrementChild">Increment Child</button>
</template>

<script setup>
import { useStore } from 'vuex'

const store = useStore()
const count = store.state.count // 使用mapState獲取狀態

function incrementChild() {
  store.dispatch('increment') // 使用store.dispatch調用action
}
</script>
通過這些最佳實踐,你可以更好地管理 Nuxt 3 中的狀態,提高代碼的可讀性和可維護性。
第5章:Vuex 狀態管理進階
第6章:Vuex 3.x 新特性
第7章:Vuex ORM 與 Nuxt
第8章:Redux 與 Nuxt 的對比
第9章:其他狀態管理庫
第10章:實戰項目
餘下文章內容請點擊跳轉至 個人博客頁面 或者 掃碼關註或者微信搜一搜:編程智域 前端至全棧交流與成長,閱讀完整的文章:掌握 Nuxt 3 中的狀態管理:實踐指南 | cmdragon's Blog
- Nuxt 3組件開發與管理 | cmdragon's Blog
- Nuxt.js 深入淺出:目錄結構與文件組織詳解 | cmdragon’s Blog**
- 友情鏈接 | cmdragon’s Blog**
- 安裝 Nuxt.js 的步驟和註意事項 | cmdragon’s Blog**
- 探索Web Components | cmdragon’s Blog**
- Vue微前端架構與Qiankun實踐理論指南 | cmdragon’s Blog**
- Vue 3深度探索:自定義渲染器與服務端渲染 | cmdragon’s Blog**
- Tailwind CSS 響應式設計實戰指南 | cmdragon’s Blog**
- Tailwind CSS 實戰指南:快速構建響應式網頁設計 | cmdragon’s Blog**
- Vue 3與ESLint、Prettier:構建規範化的前端開發環境 | cmdragon’s Blog**
- Vue TypeScript 實戰:掌握靜態類型編程 | cmdragon’s Blog**
- Nuxt 3 路由系統詳解:配置與實踐指南 | cmdragon's Blog


