1. Spring 對於事務上的應用的詳細說明 @目錄1. Spring 對於事務上的應用的詳細說明每博一文案2. 事務概述3. 引入事務場景3.1 第一步:準備資料庫表3.2 第二步:創建包結構3.3 第三步:準備對應資料庫映射的 Bean 類3.4 第四步:編寫持久層3.5 第五步:編寫業務層3 ...
1. Spring 對於事務上的應用的詳細說明
@
目錄- 1. Spring 對於事務上的應用的詳細說明
- 每博一文案
- 2. 事務概述
- 3. 引入事務場景
- 4. 運用 Spring 進行事務處理
- 5. 事務的全註解式開發
- 6. 聲明式事務之XML實現方式
- 7. 總結:
- 8. 最後:
每博一文案
Give a perfect shot and go babe
別浪費 腐蝕所有虛偽
Crazy voices echoed in my head
想逃離 所有苦痛傷悲
把所有不良糟糕習慣全部戒除後
歷經過無數次重擊卻依然抬起頭
看見你失望落寞神情繼而開始自我反思
感謝你們沒放棄 握住我的手
Hold my hand
是時候開始飛行獨立
Hold my hand
遵循前行者留的足跡
穿越過流言沙漠
忍受著漠視爆破
不管有任何warning依然升空永不墜落
If U 期待著勝利 存在的痕跡
歇斯底裡 奢望著黎明 拒絕別的爭議
從未放棄 在亂戰後的廢墟找尋記憶
終歸在最泥濘的 溝壑里看到墮落距離
不管孤註還是繼續 依靠信念維持秩序
努力探路哪怕崎嶇 聽著嘲弄不發一語
抓住機遇的followers 終將忘記了浮誇
尋找著真理看向前方
繼續下一段的journey
They don't know the feel
真理在乾涸的沙漠降落
該執著尋覓綠洲  燃起希望那團聖火
就算落寞 卻記起 尊嚴不再 需要沉默
習慣墮落 在沉著里 選擇假裝 還是過錯
你還坐在小時候的篝火旁
看天上的月亮還是那個模樣
北斗星在指著你的前方
在夜裡你也不會失去你的方向
不會再度感到迷茫
湖面倒映著天空是你心中的夢想
丟棄內心不安的彷徨
不會在任何寂靜夜裡孤單幻想流浪
你還坐在小時候的篝火旁(Give a perfect shot and go babe)
看天上的月亮還是那個模樣(別浪費)
北斗星在指著你的前方(腐蝕所有虛偽)
在夜裡你也不會失去你的方向
不會再度感到迷茫(Crazy voices echoed in my head)
湖面倒映著天空是你心中的夢想(想逃離)
丟棄內心不安的彷徨
不會在任何寂靜夜裡孤單幻想流浪
								—————— 《篝火旁(再啟程)》
2. 事務概述
什麼是事務
在一個業務流程當中,通常需要多條DML(insert delete update) 語句共同聯合才能完成,這多條DML語句必須同時成功,或者同時失敗,這樣才能保證數據的安全。
多條DML要麼同時成功,要麼同時失敗,這叫做事務。事務(Transaction)
事務的四個處理過程:
- 第一步:開啟事務(start transaction)
- 第二步:執行核心業務代碼
- 第三步:提交事務(如果核心業務處理過程中沒有出現異常)(commit transaction)
- 第四步:回滾事務(如果核心業務處理過程中出現異常)(rollback transaction)
事務的四個特性:
- 原子性:事務是最小的工作單元,不可再分
- 一致性:事務要求要麼同時成功,要麼同時失敗,事務前和事務後的總量不變
- 隔離性:事務和事務之間因為有隔離性,才可以保證互不幹擾
- 持久性:持久性是事務結束的標誌。
3. 引入事務場景
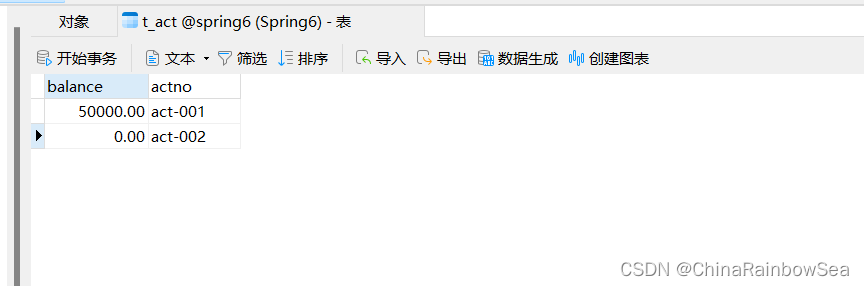
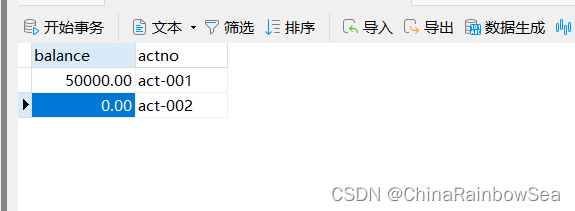
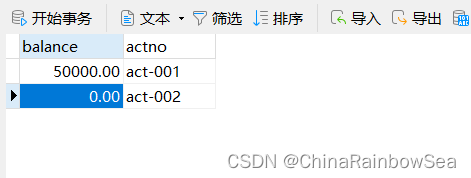
以銀行賬戶轉賬為例學習事務,兩個賬戶 act-001 和 act-002 。act-002 賬戶轉賬 10000,必須同時成功,或者同時失敗,(一個減成功,一個加成功,這兩條update 語句必須同時成功,或同時失敗。)連接資料庫的技術採用Spring 框架的JdbcTemplate.
首先我在pom.xml 當中先配置對應項目模塊需要依賴的 jar包。
<?xml version="1.0" encoding="UTF-8"?>
<project xmlns="http://maven.apache.org/POM/4.0.0"
         xmlns:xsi="http://www.w3.org/2001/XMLSchema-instance"
         xsi:schemaLocation="http://maven.apache.org/POM/4.0.0 http://maven.apache.org/xsd/maven-4.0.0.xsd">
    <modelVersion>4.0.0</modelVersion>

    <groupId>org.example</groupId>
    <artifactId>spring6-013-tx-bank</artifactId>
    <version>1.0-SNAPSHOT</version>
    <packaging>jar</packaging>

    <properties>
        <maven.compiler.source>17</maven.compiler.source>
        <maven.compiler.target>17</maven.compiler.target>
    </properties>


    <repositories>
<!--        spring 的版本倉庫-->
        <repository>
            <id>repository.spring.milestone</id>
            <name>Spring Milestone Repository</name>
            <url>https://repo.spring.io/milestone</url>
        </repository>
    </repositories>


    <dependencies>
        <!--        spring context 依賴-->
        <dependency>
            <groupId>org.springframework</groupId>
            <artifactId>spring-context</artifactId>
            <version>6.0.11</version>
        </dependency>


        <!--        spring aspects -->
        <dependency>
            <groupId>org.springframework</groupId>
            <artifactId>spring-aop</artifactId>
            <version>6.0.11</version>
        </dependency>
        <!--spring jdbc-->
        <dependency>
            <groupId>org.springframework</groupId>
            <artifactId>spring-jdbc</artifactId>
            <version>6.0.11</version>
        </dependency>

        <!--spring aspects依賴-->
        <dependency>
            <groupId>org.springframework</groupId>
            <artifactId>spring-aspects</artifactId>
            <version>6.0.11</version>
        </dependency>

        <!--mysql驅動-->
        <dependency>
            <groupId>mysql</groupId>
            <artifactId>mysql-connector-java</artifactId>
            <version>8.0.30</version>
        </dependency>

        <!--德魯伊連接池-->
        <dependency>
            <groupId>com.alibaba</groupId>
            <artifactId>druid</artifactId>
            <version>1.2.13</version>
        </dependency>

        <!--@Resource註解-->
        <dependency>
            <groupId>jakarta.annotation</groupId>
            <artifactId>jakarta.annotation-api</artifactId>
            <version>2.1.1</version>
        </dependency>

        <!-- junit4 -->
        <dependency>
            <groupId>junit</groupId>
            <artifactId>junit</artifactId>
            <version>4.13.2</version>
            <scope>test</scope>
        </dependency>

        <dependency>
            <groupId>org.apache.logging.log4j</groupId>
            <artifactId>log4j-core</artifactId>
            <version>2.19.0</version>
        </dependency>
        <dependency>
            <groupId>org.apache.logging.log4j</groupId>
            <artifactId>log4j-slf4j2-impl</artifactId>
            <version>2.19.0</version>
        </dependency>
    </dependencies>
</project>
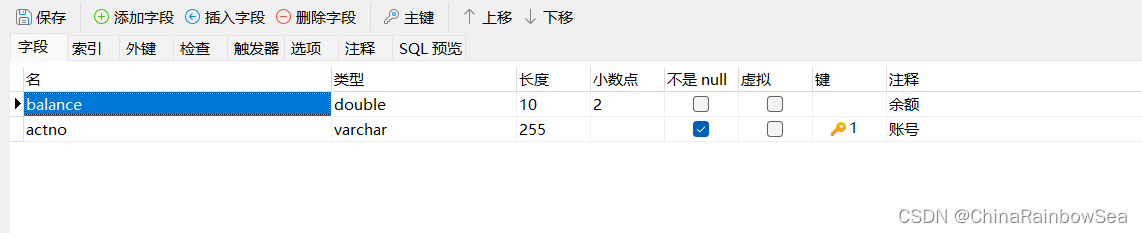
3.1 第一步:準備資料庫表
3.2 第二步:創建包結構
com.powernode.bank.pojo
com.powernode.bank.service
com.powernode.bank.service.impl
com.powernode.bank.dao
com.powernode.bank.dao.impl

3.3 第三步:準備對應資料庫映射的 Bean 類
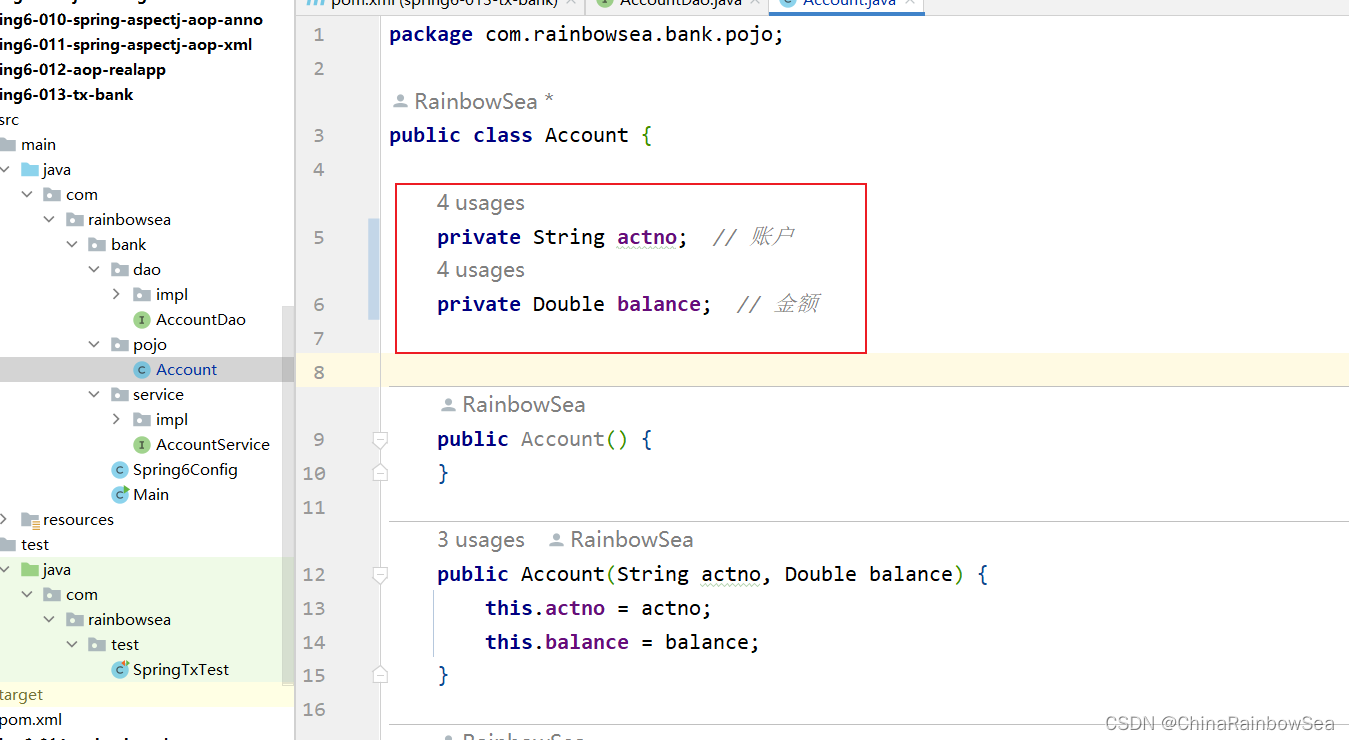
package com.rainbowsea.bank.pojo;

public class Account {

    private String actno;  // 賬戶
    private Double balance;  // 金額


    public Account() {
    }

    public Account(String actno, Double balance) {
        this.actno = actno;
        this.balance = balance;
    }

    @Override
    public String toString() {
        return "Account{" +
                "actno='" + actno + '\'' +
                ", balance=" + balance +
                '}';
    }


    public String getActno() {
        return actno;
    }

    public void setActno(String actno) {
        this.actno = actno;
    }

    public Double getBalance() {
        return balance;
    }

    public void setBalance(Double balance) {
        this.balance = balance;
    }
}
3.4 第四步:編寫持久層
首先定義規範,持久層的規範,通過介面(interface) 來定義約束。
轉賬:首先我們需要查詢對應賬戶上是否有該滿足的餘額;如果夠,我們就需要更新數據(修改數據);所以定義兩個方法就行:根據賬戶查詢,根據賬戶修改
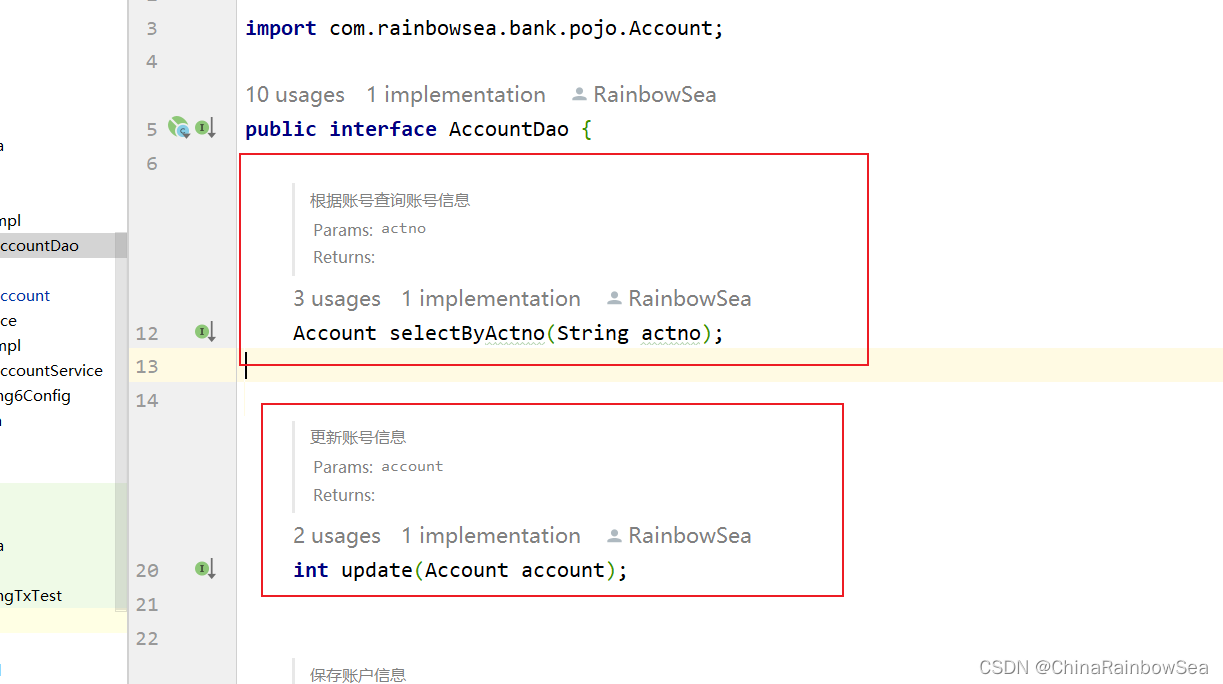
package com.rainbowsea.bank.dao;

import com.rainbowsea.bank.pojo.Account;

public interface AccountDao {

    /**
     * 根據賬號查詢賬號信息
     * @param actno
     * @return
     */
    Account selectByActno(String actno);


    /**
     * 更新賬號信息
     * @param account
     * @return
     */
    int update(Account account);


}
根據該介面,編寫對應持久層的實現類
package com.rainbowsea.bank.dao.impl;

import com.rainbowsea.bank.dao.AccountDao;
import com.rainbowsea.bank.pojo.Account;
import jakarta.annotation.Resource;
import org.springframework.jdbc.core.BeanPropertyRowMapper;
import org.springframework.jdbc.core.JdbcTemplate;
import org.springframework.stereotype.Repository;


@Repository(value = "accountDaoImpl")  // 交給 spring 管理
public class AccountDaoImpl implements AccountDao {


    @Resource(name = "jdbcTemplate")  // jdbcTemplate 內置的對象,resource 根據名稱進行 set 註入賦值
    private JdbcTemplate jdbcTemplate;


    @Override
    public Account selectByActno(String actno) {

        String sql = "select actno,balance from t_act where actno = ?";

        // 查詢
        Account account = jdbcTemplate.queryForObject(sql, new BeanPropertyRowMapper<>(Account.class), actno);

        return account;
    }

    @Override
    public int update(Account account) {
        String sql = "update t_act set balance = ? where actno = ?";
        int count = jdbcTemplate.update(sql, account.getBalance(), account.getActno());
        return count;
    }
}
3.5 第五步:編寫業務層
首先定義規範,業務層的規範,通過介面(interface) 來定義約束。
定義一個進行轉賬操作的業務
package com.rainbowsea.bank.service;
import com.rainbowsea.bank.pojo.Account;
/**
* 業務介面
* 事務就是在這個介面下控制的
*/
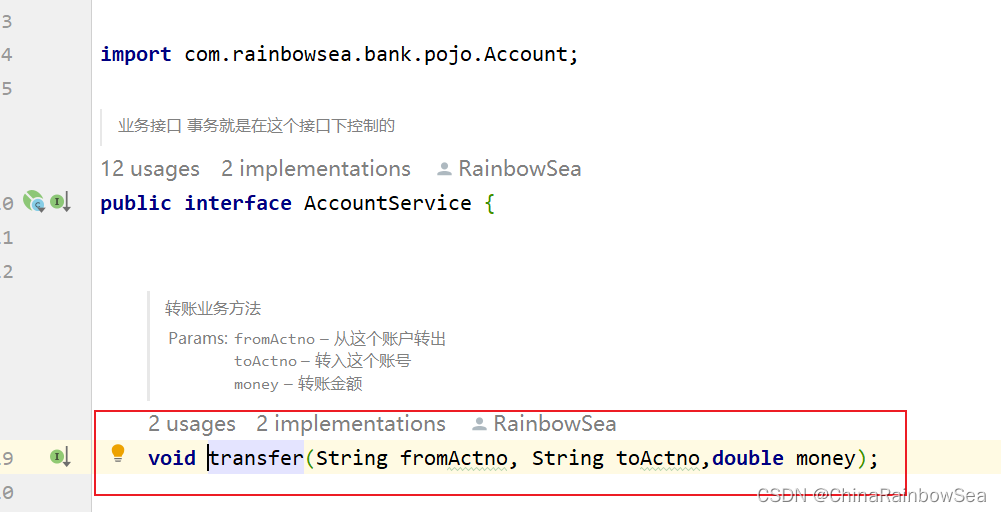
public interface AccountService {
/**
* 轉賬業務方法
* @param fromActno 從這個賬戶轉出
* @param toActno 轉入這個賬號
* @param money 轉賬金額
*/
void transfer(String fromActno, String toActno,double money);
}
根據該介面,編寫對應業務層的實現類。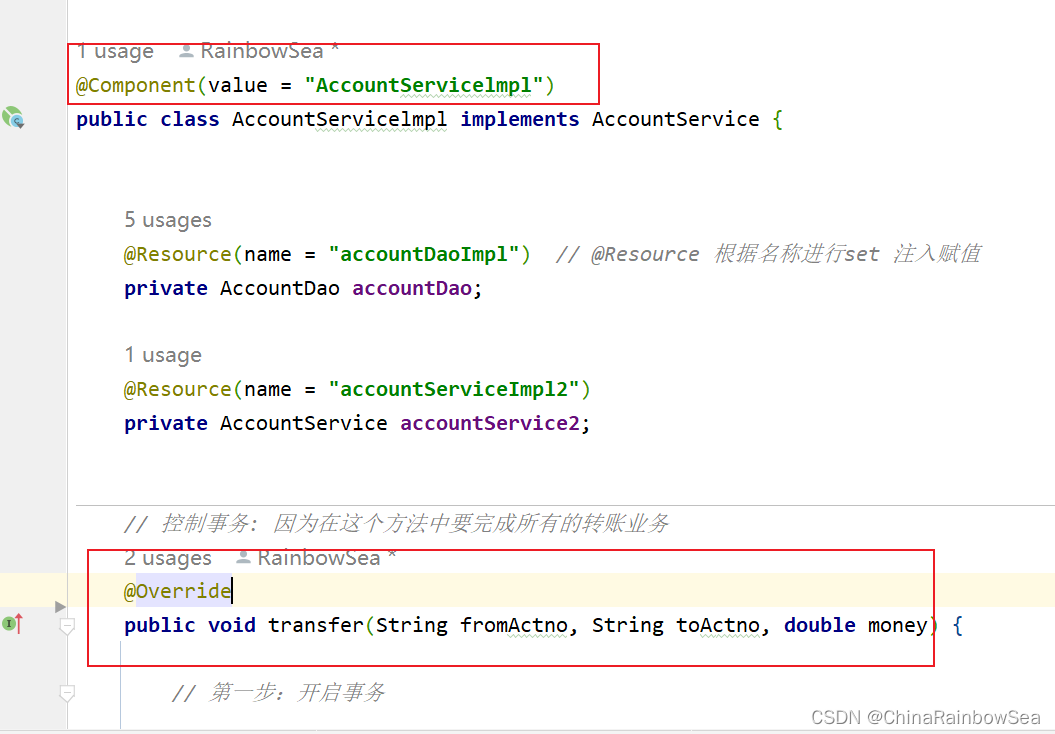
package com.rainbowsea.bank.service.impl;
import com.rainbowsea.bank.dao.AccountDao;
import com.rainbowsea.bank.pojo.Account;
import com.rainbowsea.bank.service.AccountService;
import jakarta.annotation.Resource;
import org.springframework.stereotype.Component;
import org.springframework.transaction.annotation.Isolation;
import org.springframework.transaction.annotation.Propagation;
import org.springframework.transaction.annotation.Transactional;
@Component(value = "AccountServicelmpl")
public class AccountServicelmpl implements AccountService {
@Resource(name = "accountDaoImpl") // @Resource 根據名稱進行set 註入賦值
private AccountDao accountDao;
// 控制事務: 因為在這個方法中要完成所有的轉賬業務
@Override
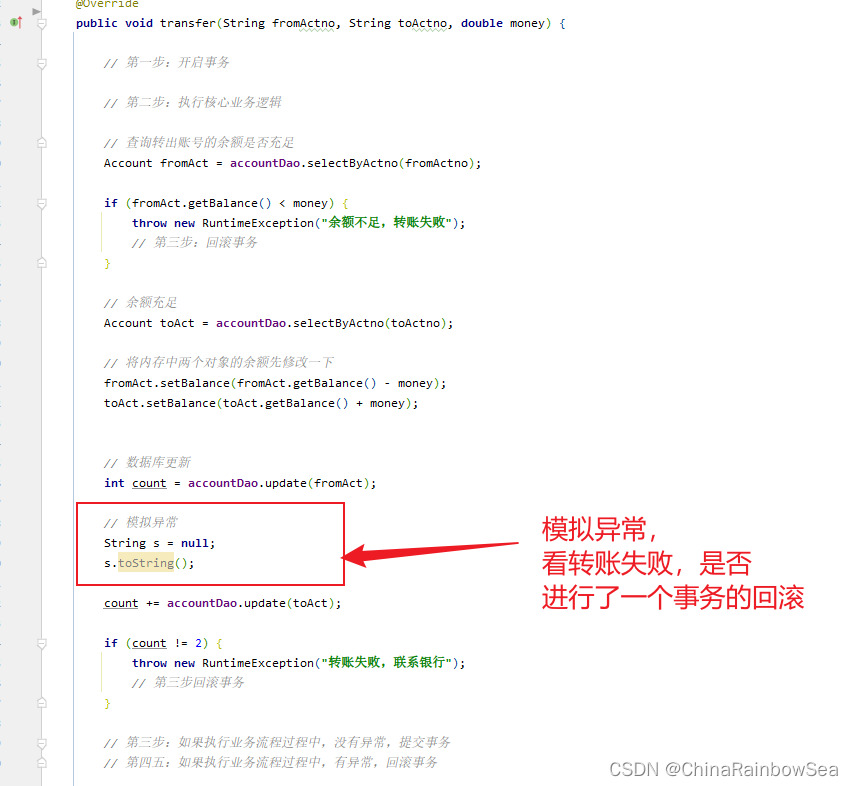
public void transfer(String fromActno, String toActno, double money) {
// 第一步:開啟事務
// 第二步:執行核心業務邏輯
// 查詢轉出賬號的餘額是否充足
Account fromAct = accountDao.selectByActno(fromActno);
if (fromAct.getBalance() < money) {
throw new RuntimeException("餘額不足,轉賬失敗");
// 第三步:回滾事務
}
// 餘額充足
Account toAct = accountDao.selectByActno(toActno);
// 將記憶體中兩個對象的餘額先修改一下
fromAct.setBalance(fromAct.getBalance() - money);
toAct.setBalance(toAct.getBalance() + money);
// 資料庫更新
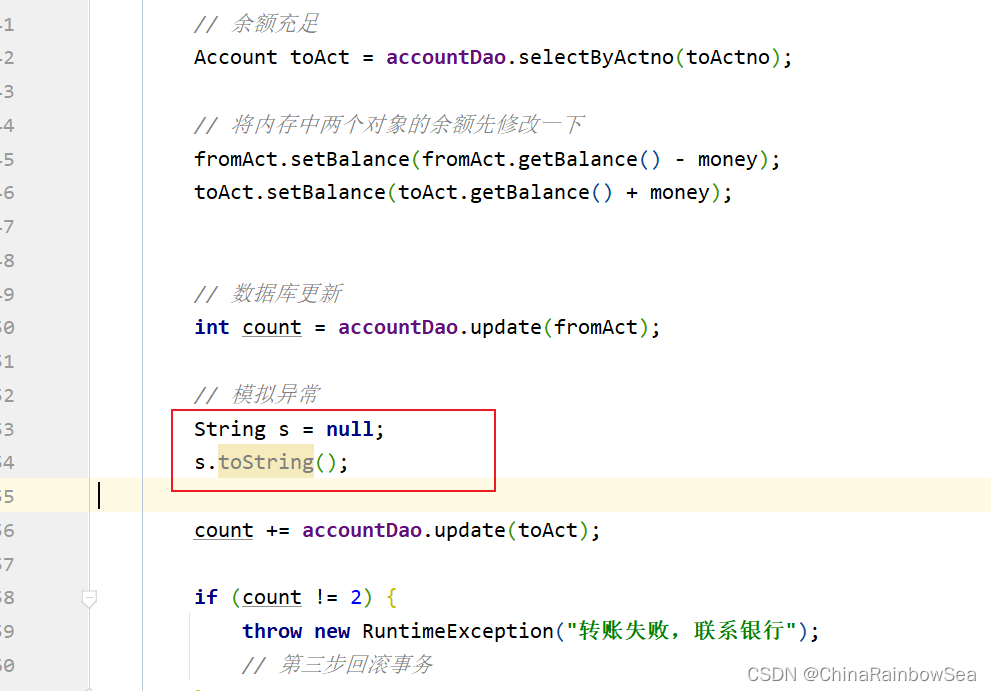
int count = accountDao.update(fromAct);
// 模擬異常
String s = null;
s.toString();
count += accountDao.update(toAct);
if (count != 2) {
throw new RuntimeException("轉賬失敗,聯繫銀行");
// 第三步回滾事務
}
// 第三步:如果執行業務流程過程中,沒有異常,提交事務
// 第四五:如果執行業務流程過程中,有異常,回滾事務
}
}
3.6 第六步:編寫Spring 配置文件
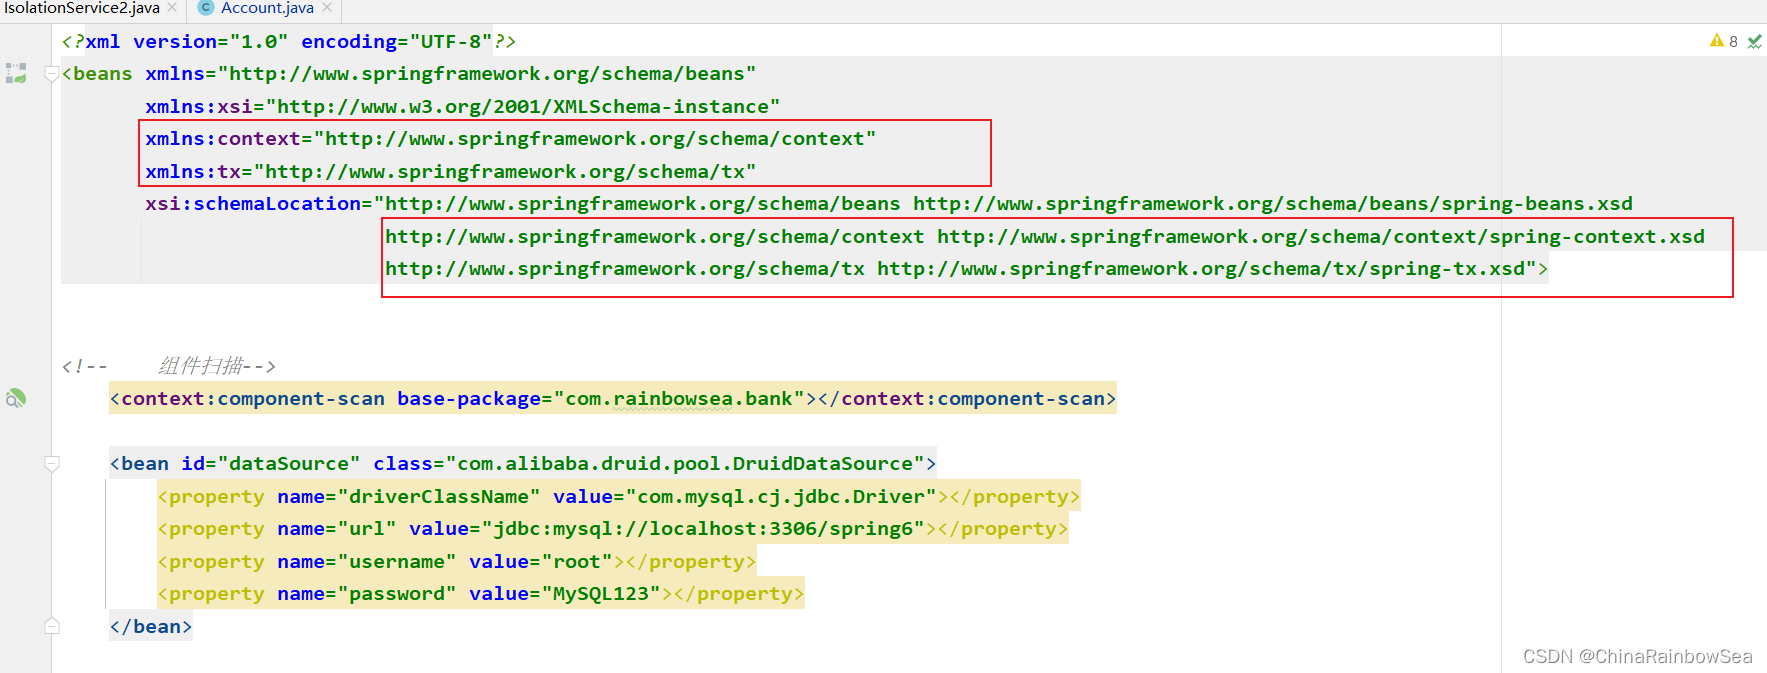
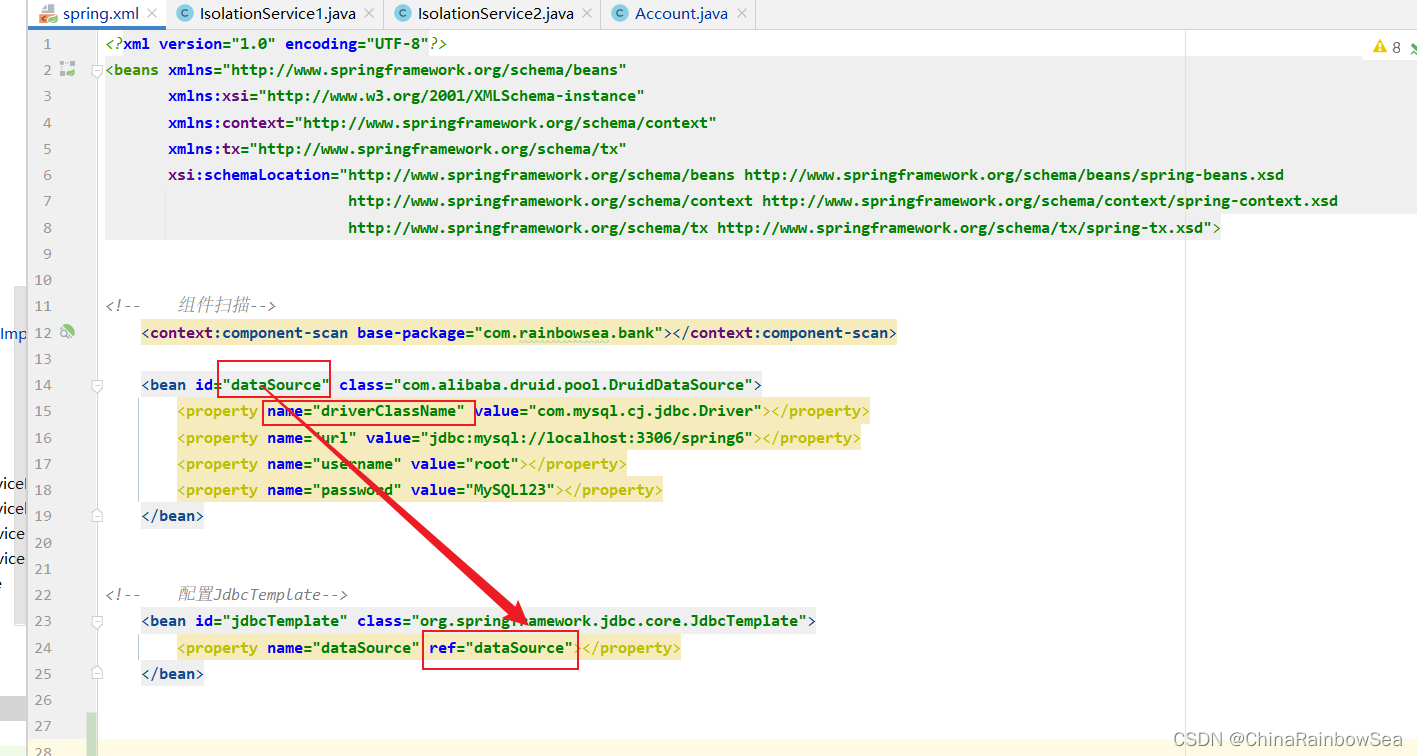
<?xml version="1.0" encoding="UTF-8"?>
<beans xmlns="http://www.springframework.org/schema/beans"
       xmlns:xsi="http://www.w3.org/2001/XMLSchema-instance"
       xmlns:context="http://www.springframework.org/schema/context"
       xmlns:tx="http://www.springframework.org/schema/tx"
       xsi:schemaLocation="http://www.springframework.org/schema/beans http://www.springframework.org/schema/beans/spring-beans.xsd
                           http://www.springframework.org/schema/context http://www.springframework.org/schema/context/spring-context.xsd
                           http://www.springframework.org/schema/tx http://www.springframework.org/schema/tx/spring-tx.xsd">


<!--    組件掃描-->
    <context:component-scan base-package="com.rainbowsea.bank"></context:component-scan>

    <bean id="dataSource" class="com.alibaba.druid.pool.DruidDataSource">
        <property name="driverClassName" value="com.mysql.cj.jdbc.Driver"></property>
        <property name="url" value="jdbc:mysql://localhost:3306/spring6"></property>
        <property name="username" value="root"></property>
        <property name="password" value="MySQL123"></property>
    </bean>


<!--    配置JdbcTemplate-->
    <bean id="jdbcTemplate" class="org.springframework.jdbc.core.JdbcTemplate">
        <property name="dataSource" ref="dataSource"></property>
    </bean>
</beans>
3.7 第七步:編寫表示層(測試程式)
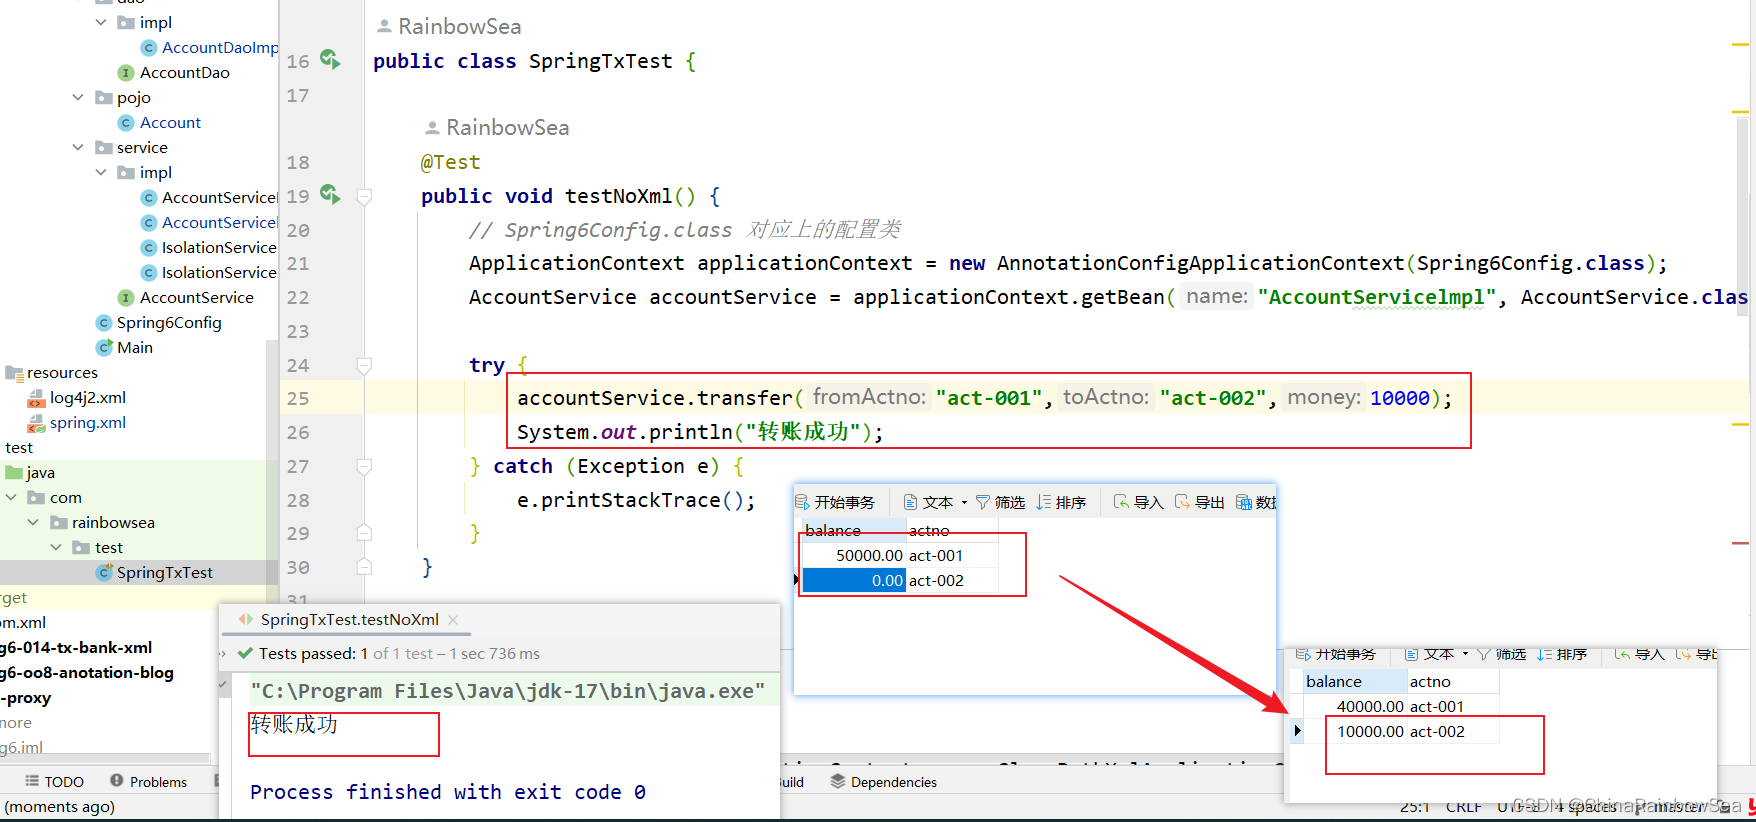
public class SpringTxTest {

    @Test
    public void testNoXml() {
        // Spring6Config.class 對應上的配置類
        ApplicationContext applicationContext = new AnnotationConfigApplicationContext(Spring6Config.class);
        AccountService accountService = applicationContext.getBean("AccountServicelmpl", AccountService.class);

        try {
            accountService.transfer("act-001","act-002",10000);
            System.out.println("轉賬成功");
        } catch (Exception e) {
            e.printStackTrace();
        }
    }
}
3.8 第八步:模擬異常,測試
通過在 AccountServicelmpl 業務層模擬,null 指針異常,看轉賬是否成功。

public class SpringTxTest {

    @Test
    public void testNoXml() {
        // Spring6Config.class 對應上的配置類
        ApplicationContext applicationContext = new AnnotationConfigApplicationContext(Spring6Config.class);
        AccountService accountService = applicationContext.getBean("AccountServicelmpl", AccountService.class);

        try {
            accountService.transfer("act-001","act-002",10000);
            System.out.println("轉賬成功");
        } catch (Exception e) {
            e.printStackTrace();
        }
    }
}
4. 運用 Spring 進行事務處理
4.1 Spring 實現事務的兩種方式:
編程式事務:
- 通過編寫代碼的方式來實現事務的管理。
聲明式事務:
- 基於註解方式
- 基於XML配置方式
4.2 Spring 事務管理API
Spring 對事務的管理底層實現方式是基於 AOP實現的,採用 AOP的方式進行了封裝,所以Spring 專門針對事務開發了一套API,API的核心介面如下:
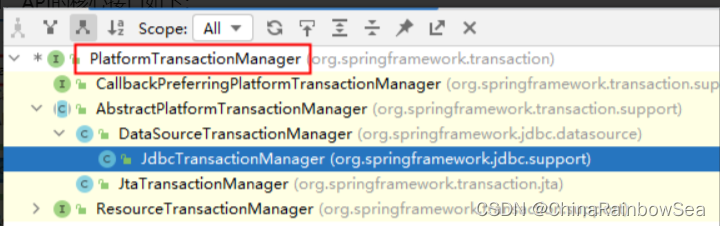
PlatformTransactionManager介面:spring 事務管理器的核心介面,在Spring6中它有兩個實現:
DataSourceTransactionManager:支持JdbcTemplate、MyBatis、Hibernate等事務管理。
JtaTransactionManager:支持分散式事務管理。
如果要在Spring6中使用 JdbcTemplate,就要使用 DataSourceTransactionManager 來管理事務。(Spring 內置寫好了,可以直接用)
4.3 聲明事務在“註解實現方式”
第一步:在spring.xml 配置文件中配置事務管理器。
配置事務管理器,需要根據對應數據源裡面的賬戶密碼等信息,管理連接資料庫,從而開啟事務(開啟事務,提交事務,回滾事務)等操作
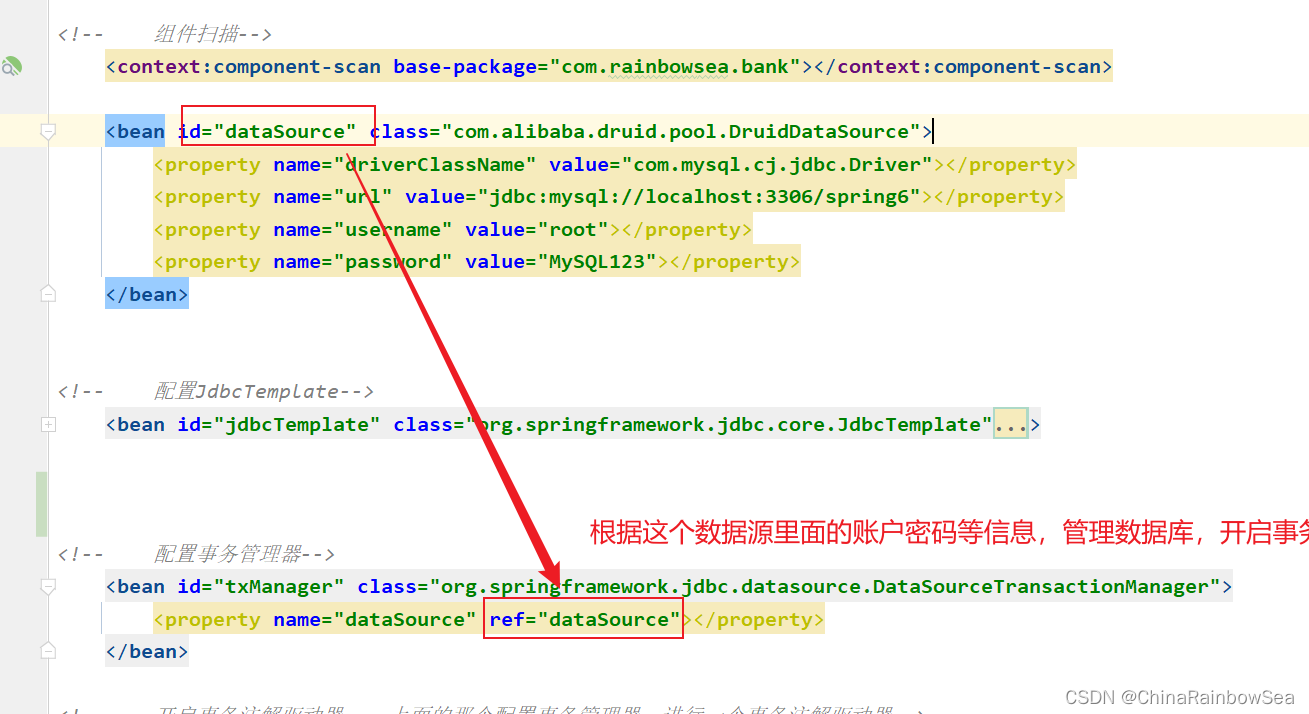
 <bean id="dataSource" class="com.alibaba.druid.pool.DruidDataSource">
        <property name="driverClassName" value="com.mysql.cj.jdbc.Driver"></property>
        <property name="url" value="jdbc:mysql://localhost:3306/spring6"></property>
        <property name="username" value="root"></property>
        <property name="password" value="MySQL123"></property>
    </bean>


<!--    配置JdbcTemplate-->
    <bean id="jdbcTemplate" class="org.springframework.jdbc.core.JdbcTemplate">
        <property name="dataSource" ref="dataSource"></property>
    </bean>
第二步: 在spring配置文件中引入tx命名空間。

<?xml version="1.0" encoding="UTF-8"?>
<beans xmlns="http://www.springframework.org/schema/beans"
       xmlns:xsi="http://www.w3.org/2001/XMLSchema-instance"
       xmlns:context="http://www.springframework.org/schema/context"
       xmlns:tx="http://www.springframework.org/schema/tx"
       xsi:schemaLocation="http://www.springframework.org/schema/beans http://www.springframework.org/schema/beans/spring-beans.xsd
                           http://www.springframework.org/schema/context http://www.springframework.org/schema/context/spring-context.xsd
                           http://www.springframework.org/schema/tx http://www.springframework.org/schema/tx/spring-tx.xsd">

</beans>
第三步:在 spring.xml 配置文件中配置“事務註解驅動器”,開始註解的方式控制事務。
是通過上面配置的 事務管理器 進行一個事務註解驅動器的 開啟 。因為該事務管理器當中存儲著對應資料庫的賬戶和密碼等信息(數據源)
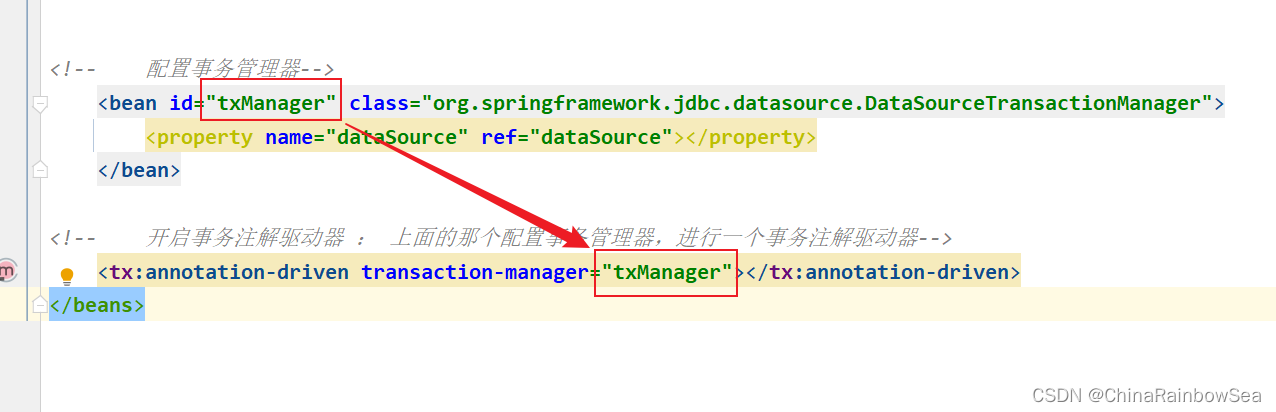
<!--    配置事務管理器-->
    <bean id="txManager" class="org.springframework.jdbc.datasource.DataSourceTransactionManager">
        <property name="dataSource" ref="dataSource"></property>
    </bean>

<!--    開啟事務註解驅動器 : 上面的那個配置事務管理器,進行一個事務註解驅動器-->
    <tx:annotation-driven transaction-manager="txManager"></tx:annotation-driven>
完整的 spring.xml 配置信息如下:

<?xml version="1.0" encoding="UTF-8"?>
<beans xmlns="http://www.springframework.org/schema/beans"
       xmlns:xsi="http://www.w3.org/2001/XMLSchema-instance"
       xmlns:context="http://www.springframework.org/schema/context"
       xmlns:tx="http://www.springframework.org/schema/tx"
       xsi:schemaLocation="http://www.springframework.org/schema/beans http://www.springframework.org/schema/beans/spring-beans.xsd
                           http://www.springframework.org/schema/context http://www.springframework.org/schema/context/spring-context.xsd
                           http://www.springframework.org/schema/tx http://www.springframework.org/schema/tx/spring-tx.xsd">


<!--    組件掃描-->
    <context:component-scan base-package="com.rainbowsea.bank"></context:component-scan>

    <bean id="dataSource" class="com.alibaba.druid.pool.DruidDataSource">
        <property name="driverClassName" value="com.mysql.cj.jdbc.Driver"></property>
        <property name="url" value="jdbc:mysql://localhost:3306/spring6"></property>
        <property name="username" value="root"></property>
        <property name="password" value="MySQL123"></property>
    </bean>


<!--    配置JdbcTemplate-->
    <bean id="jdbcTemplate" class="org.springframework.jdbc.core.JdbcTemplate">
        <property name="dataSource" ref="dataSource"></property>
    </bean>


<!--    配置事務管理器-->
    <bean id="txManager" class="org.springframework.jdbc.datasource.DataSourceTransactionManager">
        <property name="dataSource" ref="dataSource"></property>
    </bean>

<!--    開啟事務註解驅動器 : 上面的那個配置事務管理器,進行一個事務註解驅動器-->
    <tx:annotation-driven transaction-manager="txManager"></tx:annotation-driven>
</beans>
第四步:在service類上或方法上添加@Transactional註解
- 在類上添加該@Transactional 註解,則表示該類中所有的方法都有事務了(都進行了事務上的控制,回滾了)
- 在某個方法上添加@Transactional註解,則表示只有這個方法使用了事務(進行了事務上的控制,回滾)其他的方法,並沒有進行事務上的控制。
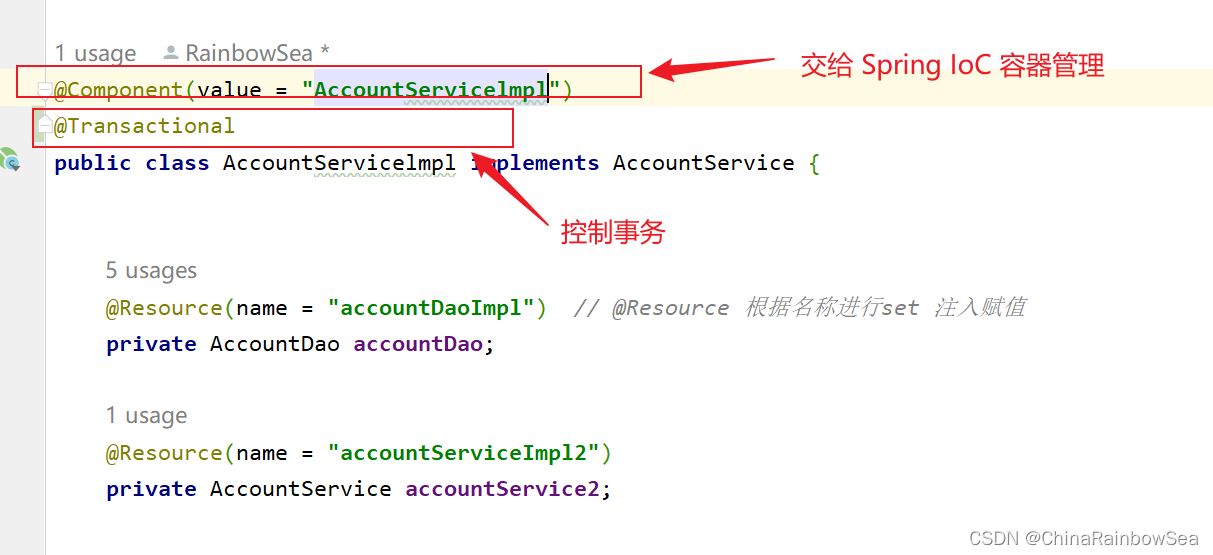
一般加入了事務的同時,也需要交給Spring IOC 容器進行管理 。
package com.rainbowsea.bank.service.impl;
import com.rainbowsea.bank.dao.AccountDao;
import com.rainbowsea.bank.pojo.Account;
import com.rainbowsea.bank.service.AccountService;
import jakarta.annotation.Resource;
import org.springframework.stereotype.Component;
import org.springframework.transaction.annotation.Isolation;
import org.springframework.transaction.annotation.Propagation;
import org.springframework.transaction.annotation.Transactional;
@Component(value = "AccountServicelmpl")
@Transactional
public class AccountServicelmpl implements AccountService {
@Resource(name = "accountDaoImpl") // @Resource 根據名稱進行set 註入賦值
private AccountDao accountDao;
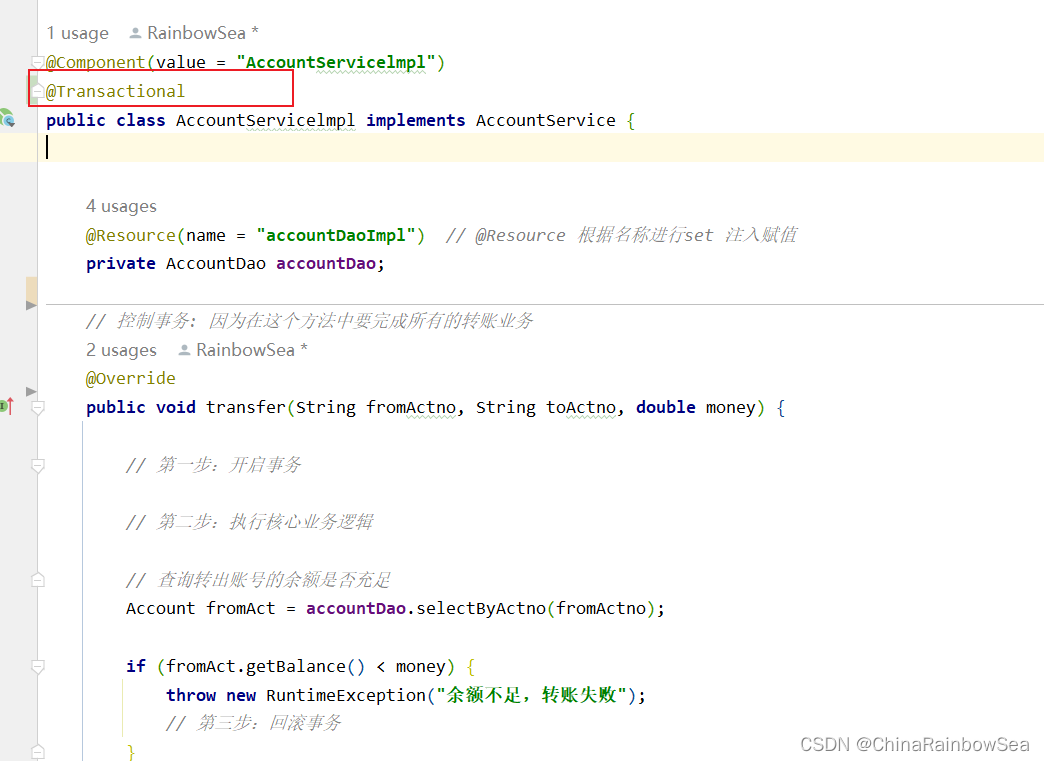
// 控制事務: 因為在這個方法中要完成所有的轉賬業務
@Override
public void transfer(String fromActno, String toActno, double money) {
// 第一步:開啟事務
// 第二步:執行核心業務邏輯
// 查詢轉出賬號的餘額是否充足
Account fromAct = accountDao.selectByActno(fromActno);
if (fromAct.getBalance() < money) {
throw new RuntimeException("餘額不足,轉賬失敗");
// 第三步:回滾事務
}
// 餘額充足
Account toAct = accountDao.selectByActno(toActno);
// 將記憶體中兩個對象的餘額先修改一下
fromAct.setBalance(fromAct.getBalance() - money);
toAct.setBalance(toAct.getBalance() + money);
// 資料庫更新
int count = accountDao.update(fromAct);
// 模擬異常
String s = null;
s.toString();
count += accountDao.update(toAct);
if (count != 2) {
throw new RuntimeException("轉賬失敗,聯繫銀行");
// 第三步回滾事務
}
// 第三步:如果執行業務流程過程中,沒有異常,提交事務
// 第四五:如果執行業務流程過程中,有異常,回滾事務
}
}
運行測試:
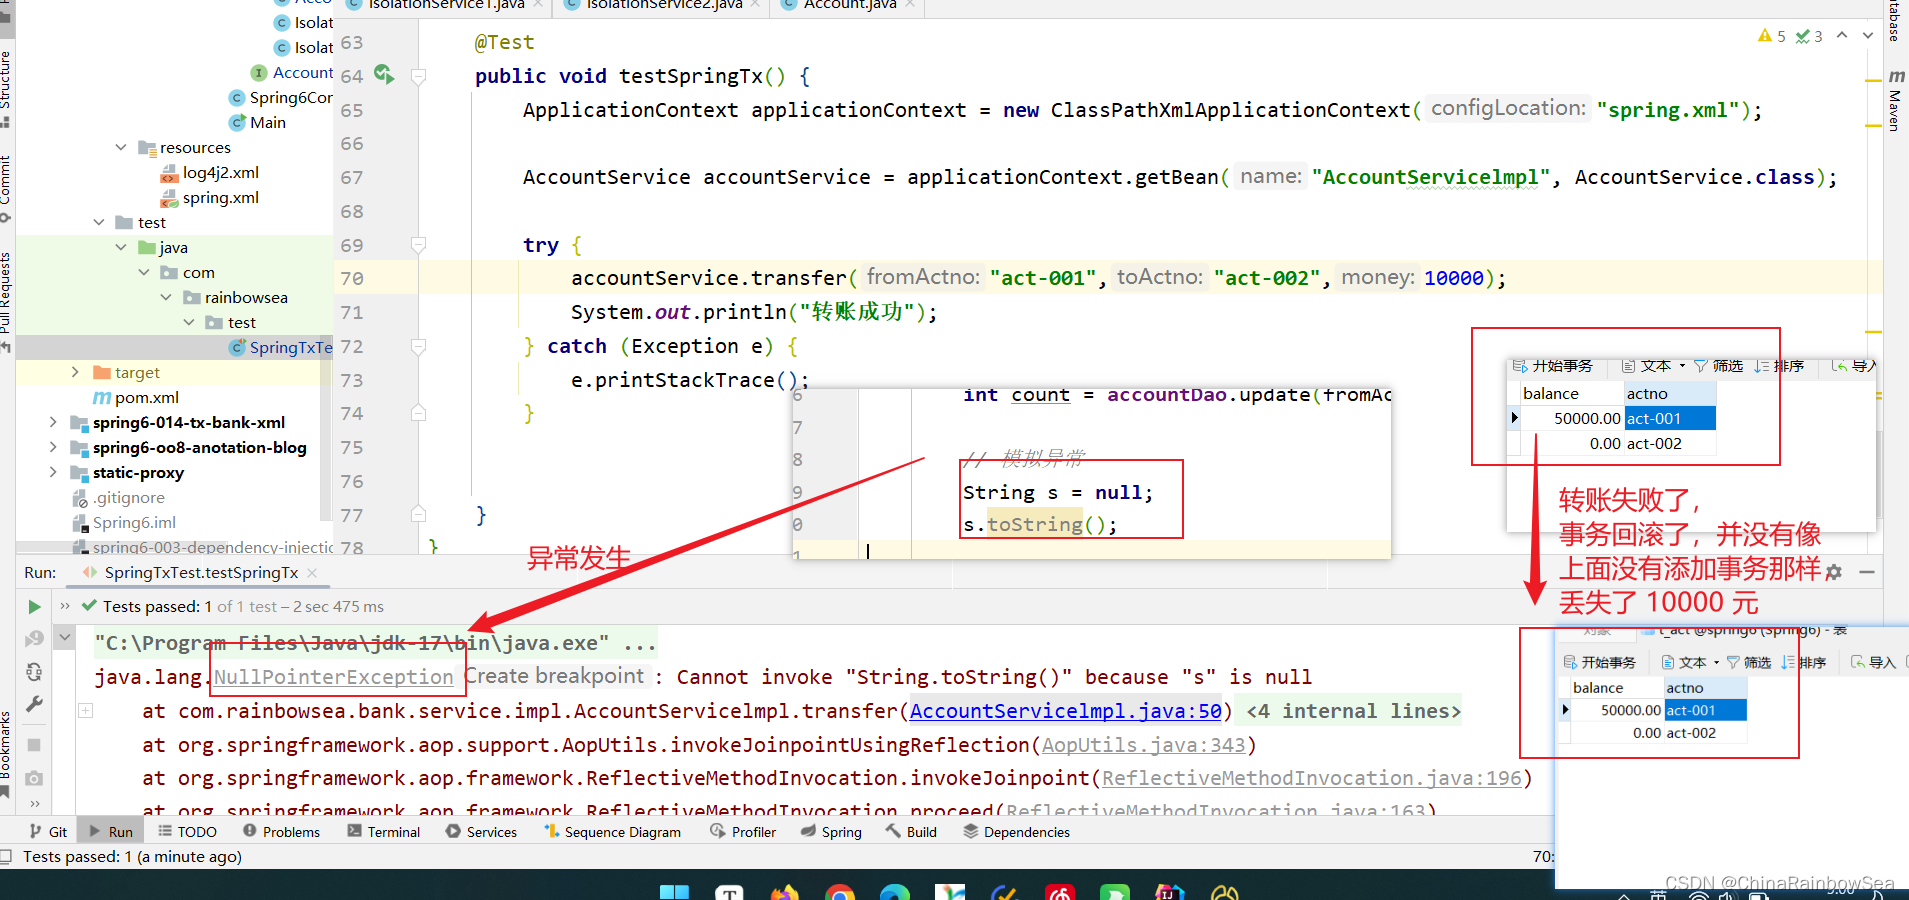
雖然出現異常了,再次查看資料庫表中數據:通過測試,發現數據沒有變化,事務起作用了。
 @Test
    public void testSpringTx() {
        ApplicationContext applicationContext = new ClassPathXmlApplicationContext("spring.xml");

        AccountService accountService = applicationContext.getBean("AccountServicelmpl", AccountService.class);

        try {
            accountService.transfer("act-001","act-002",10000);
            System.out.println("轉賬成功");
        } catch (Exception e) {
            e.printStackTrace();
        }


    }
4.4 事務屬性
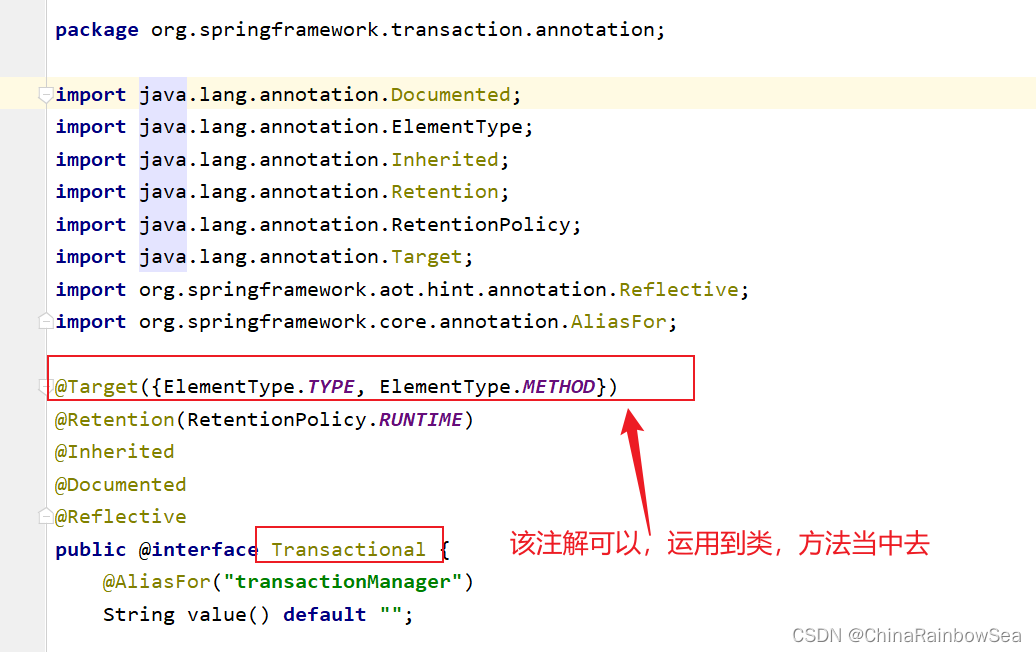
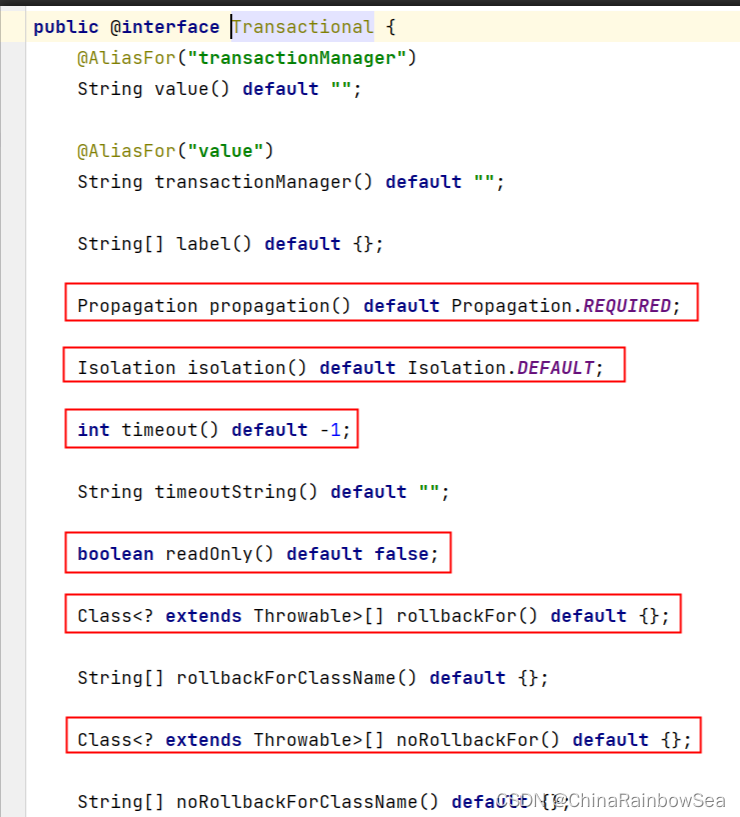
Spring 當中事務的屬性,其實就是:@Transactional 註解當中的屬性。
4.4.1 事務包括哪些:
//
// Source code recreated from a .class file by IntelliJ IDEA
// (powered by FernFlower decompiler)
//
package org.springframework.transaction.annotation;
import java.lang.annotation.Documented;
import java.lang.annotation.ElementType;
import java.lang.annotation.Inherited;
import java.lang.annotation.Retention;
import java.lang.annotation.RetentionPolicy;
import java.lang.annotation.Target;
import org.springframework.aot.hint.annotation.Reflective;
import org.springframework.core.annotation.AliasFor;
@Target({ElementType.TYPE, ElementType.METHOD})
@Retention(RetentionPolicy.RUNTIME)
@Inherited
@Documented
@Reflective
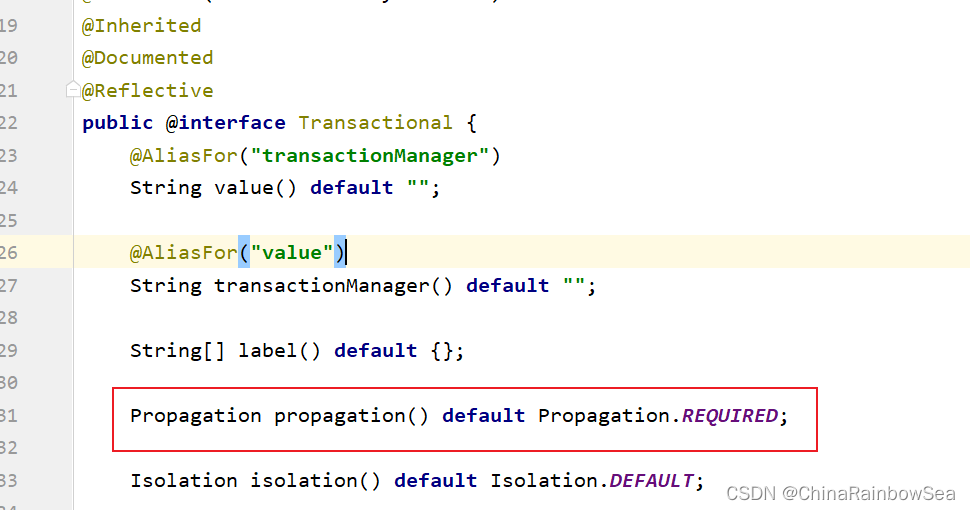
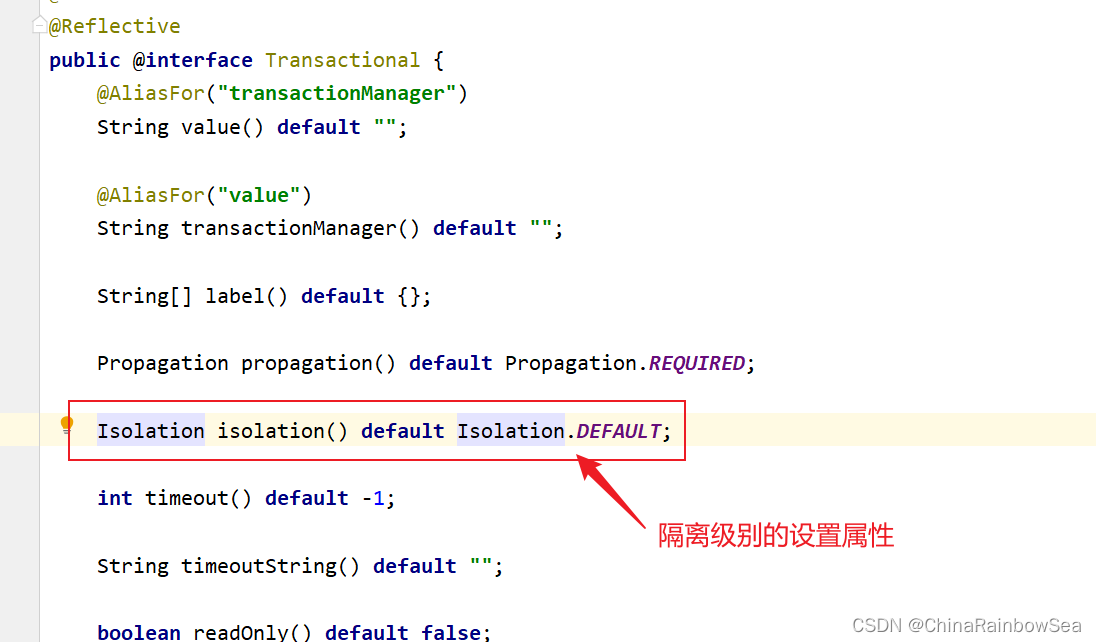
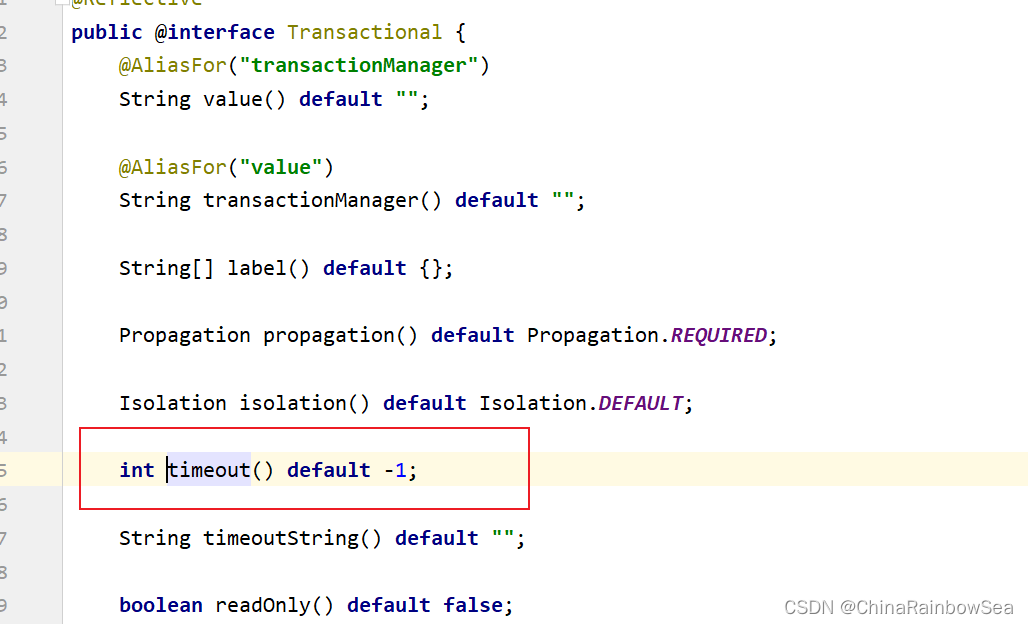
public @interface Transactional {
@AliasFor("transactionManager")
String value() default "";
@AliasFor("value")
String transactionManager() default "";
String[] label() default {};
Propagation propagation() default Propagation.REQUIRED;
Isolation isolation() default Isolation.DEFAULT;
int timeout() default -1;
String timeoutString() default "";
boolean readOnly() default false;
Class<? extends Throwable>[] rollbackFor() default {};
String[] rollbackForClassName() default {};
Class<? extends Throwable>[] noRollbackFor() default {};
String[] noRollbackForClassName() default {};
}
其中多個屬性,我們需要更加關註如下幾個重點屬性:
- 事務的傳播行為
- 事務的隔離級別
- 事務超時
- 只讀事務
- 設置出現哪些異常回滾事務
- 設置出現哪些異常不回滾事務
4.4.2 事務的傳播行為
什麼是事務的傳播行為?
在Service 類中有 A( ) 方法和B( ) 方法,A( ) 方法上有事務,B( ) 方法上也有事務。
當A( ) 方法執行過程中調用了B( ) 方法,事務是如何傳遞的?
是統一合併為一個事務里,
還是開啟一個新的事務?
上述操作就是事務傳播行為。
事務傳播行為在Spring 框架中被定義為枚舉類型:
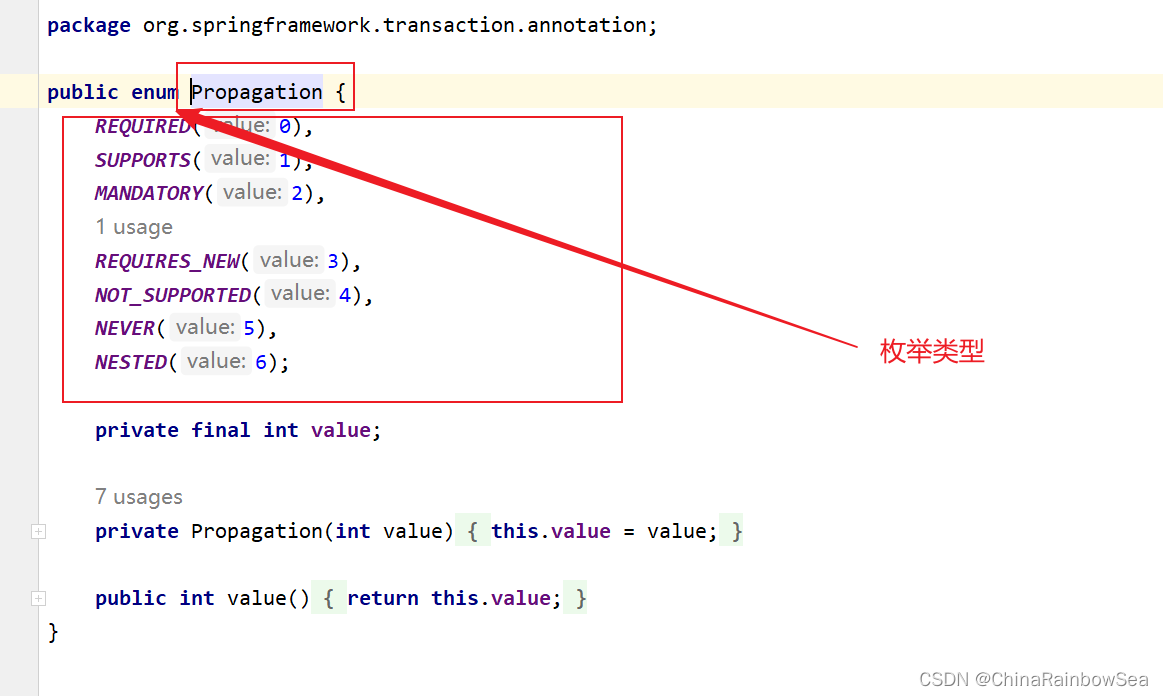
//
// Source code recreated from a .class file by IntelliJ IDEA
// (powered by FernFlower decompiler)
//

package org.springframework.transaction.annotation;

public enum Propagation {
    REQUIRED(0),
    SUPPORTS(1),
    MANDATORY(2),
    REQUIRES_NEW(3),
    NOT_SUPPORTED(4),
    NEVER(5),
    NESTED(6);

    private final int value;

    private Propagation(int value) {
        this.value = value;
    }

    public int value() {
        return this.value;
    }
}
一共有七種傳播行為:
- REQUIRED:支持當前事務,如果不存在就新建一個(預設)《沒有事務就新建,有就加入事務,簡單的說就是共用同一個事務處理》
- SUPPORTS:支持當前事務,如果當前沒有事務,就以非事務方式執行《有事務就加入,沒有就不管了》
- MANDATORY:必須運行在一個事務中,如果當前沒有事務正在發生,將拋出一個異常《有事務就加入事務,沒有就拋異常》
- REQUIRES_NEW:開啟一個新的事務,如果一個事務已經存在,則將這個存在的事務掛起。《不管有沒有,直接開啟一個新事務,開啟的事務和之前的事務不存在嵌套關係,之前的事務被掛起,簡單的說,就是不會共用一個事務,而是各自不同的DML生成不同的事務》
- NOT_SUPPORTED:以非事務方式運行,如果有事務存在,掛起事務《不支持事務,存在就掛起事務》
- NEVER:以非事務的方式運行,如果有事務存在,拋出異常《不支持事務,存在就拋異常》
- NESTED:如果當前正有一個事務在進行中,則該方法應當運行在一個嵌套式事務當中,被嵌套的事務可以獨立於外層事務,進行提交或回滾。如果外層事務不存在,行為就像REQUIRED一樣。《有事務的話,就在這個事務里,再嵌套一個完全獨立的事務,嵌套的事務可以獨立的提交和獨立的回滾。沒有事務就和 REQUIRED 一樣處理》
為了更好的直觀的觀察事務的傳播行為,這裡我們引入:集成Log4j2日誌框架,在日誌信息中可以看到更加詳細的信息。
首先在 pom.xml 配置文件當中引入 Log4j2 日誌框架的相關依賴
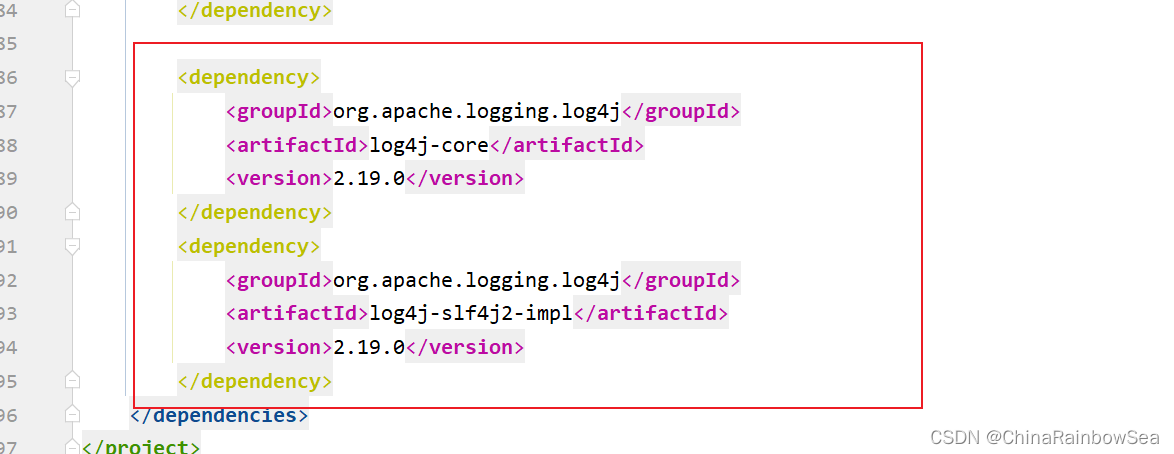
		<dependency>
            <groupId>org.apache.logging.log4j</groupId>
            <artifactId>log4j-core</artifactId>
            <version>2.19.0</version>
        </dependency>
        <dependency>
            <groupId>org.apache.logging.log4j</groupId>
            <artifactId>log4j-slf4j2-impl</artifactId>
            <version>2.19.0</version>
        </dependency>
完整的pom.xml 配置文件信息
<?xml version="1.0" encoding="UTF-8"?>
<project xmlns="http://maven.apache.org/POM/4.0.0"
         xmlns:xsi="http://www.w3.org/2001/XMLSchema-instance"
         xsi:schemaLocation="http://maven.apache.org/POM/4.0.0 http://maven.apache.org/xsd/maven-4.0.0.xsd">
    <modelVersion>4.0.0</modelVersion>

    <groupId>org.example</groupId>
    <artifactId>spring6-013-tx-bank</artifactId>
    <version>1.0-SNAPSHOT</version>
    <packaging>jar</packaging>

    <properties>
        <maven.compiler.source>17</maven.compiler.source>
        <maven.compiler.target>17</maven.compiler.target>
    </properties>


    <repositories>
<!--        spring 的版本倉庫-->
        <repository>
            <id>repository.spring.milestone</id>
            <name>Spring Milestone Repository</name>
            <url>https://repo.spring.io/milestone</url>
        </repository>
    </repositories>


    <dependencies>
        <!--        spring context 依賴-->
        <dependency>
            <groupId>org.springframework</groupId>
            <artifactId>spring-context</artifactId>
            <version>6.0.11</version>
        </dependency>


        <!--        spring aspects -->
        <dependency>
            <groupId>org.springframework</groupId>
            <artifactId>spring-aop</artifactId>
            <version>6.0.11</version>
        </dependency>
        <!--spring jdbc-->
        <dependency>
            <groupId>org.springframework</groupId>
            <artifactId>spring-jdbc</artifactId>
            <version>6.0.11</version>
        </dependency>

        <!--spring aspects依賴-->
        <dependency>
            <groupId>org.springframework</groupId>
            <artifactId>spring-aspects</artifactId>
            <version>6.0.11</version>
        </dependency>

        <!--mysql驅動-->
        <dependency>
            <groupId>mysql</groupId>
            <artifactId>mysql-connector-java</artifactId>
            <version>8.0.30</version>
        </dependency>

        <!--德魯伊連接池-->
        <dependency>
            <groupId>com.alibaba</groupId>
            <artifactId>druid</artifactId>
            <version>1.2.13</version>
        </dependency>

        <!--@Resource註解-->
        <dependency>
            <groupId>jakarta.annotation</groupId>
            <artifactId>jakarta.annotation-api</artifactId>
            <version>2.1.1</version>
        </dependency>

        <!-- junit4 -->
        <dependency>
            <groupId>junit</groupId>
            <artifactId>junit</artifactId>
            <version>4.13.2</version>
            <scope>test</scope>
        </dependency>

        <dependency>
            <groupId>org.apache.logging.log4j</groupId>
            <artifactId>log4j-core</artifactId>
            <version>2.19.0</version>
        </dependency>
        <dependency>
            <groupId>org.apache.logging.log4j</groupId>
            <artifactId>log4j-slf4j2-impl</artifactId>
            <version>2.19.0</version>
        </dependency>
    </dependencies>
</project>
在導入配置 Log4j2 的 資源上的配置,xml
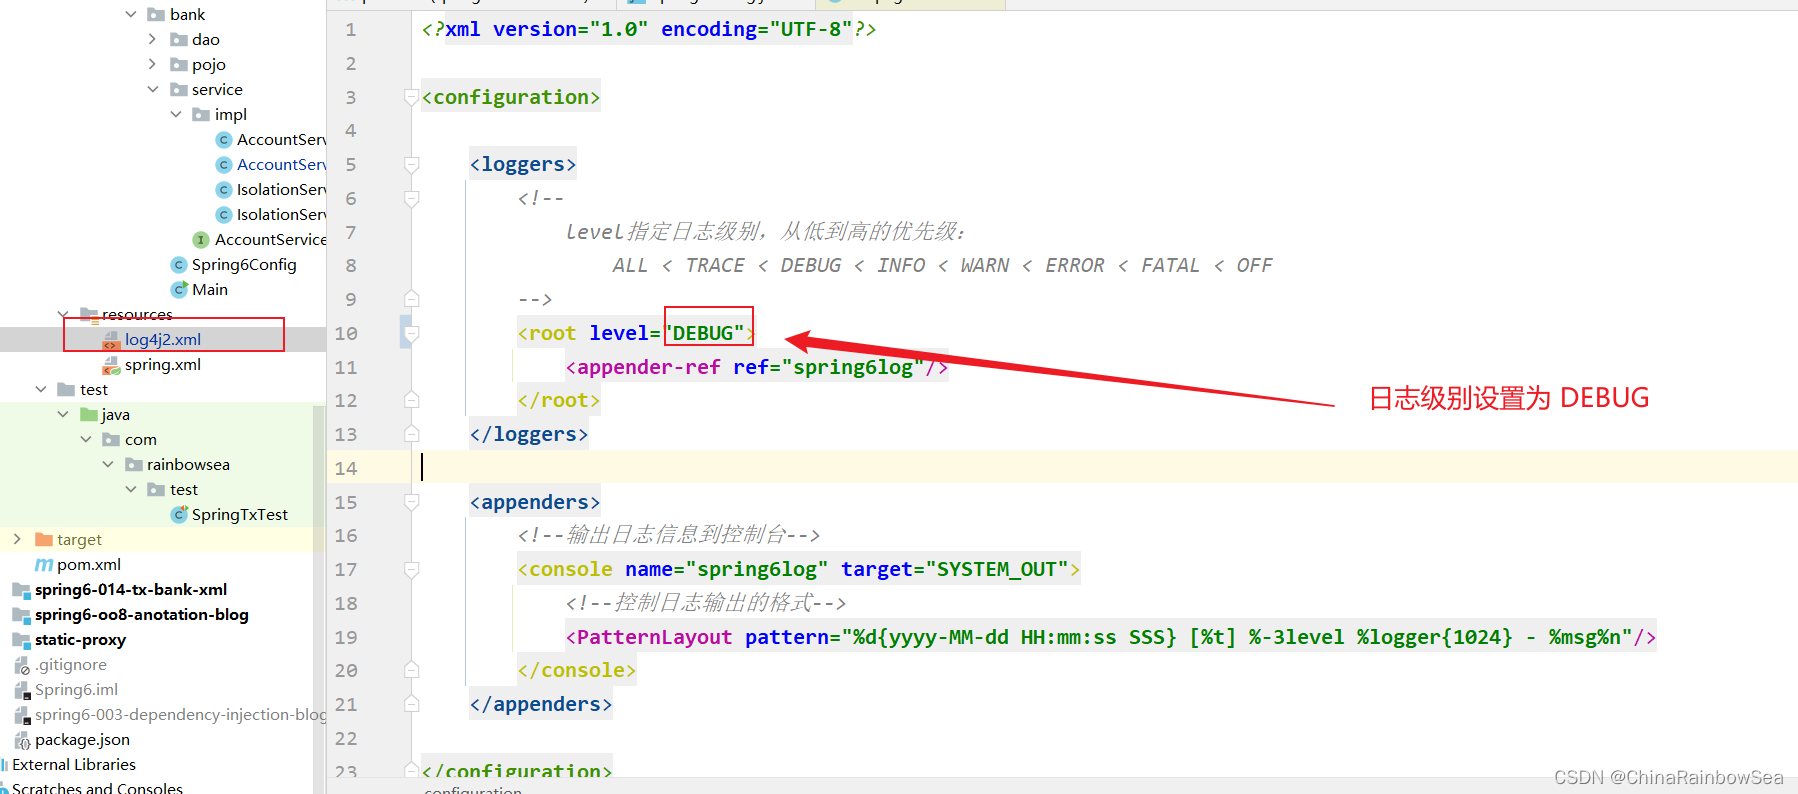
<?xml version="1.0" encoding="UTF-8"?>

<configuration>

    <loggers>
        <!--
            level指定日誌級別,從低到高的優先順序:
                ALL < TRACE < DEBUG < INFO < WARN < ERROR < FATAL < OFF
        -->
        <root level="DEBUG">
            <appender-ref ref="spring6log"/>
        </root>
    </loggers>

    <appenders>
        <!--輸出日誌信息到控制台-->
        <console name="spring6log" target="SYSTEM_OUT">
            <!--控制日誌輸出的格式-->
            <PatternLayout pattern="%d{yyyy-MM-dd HH:mm:ss SSS} [%t] %-3level %logger{1024} - %msg%n"/>
        </console>
    </appenders>

</configuration>
在代碼中設置事務的傳播行為:
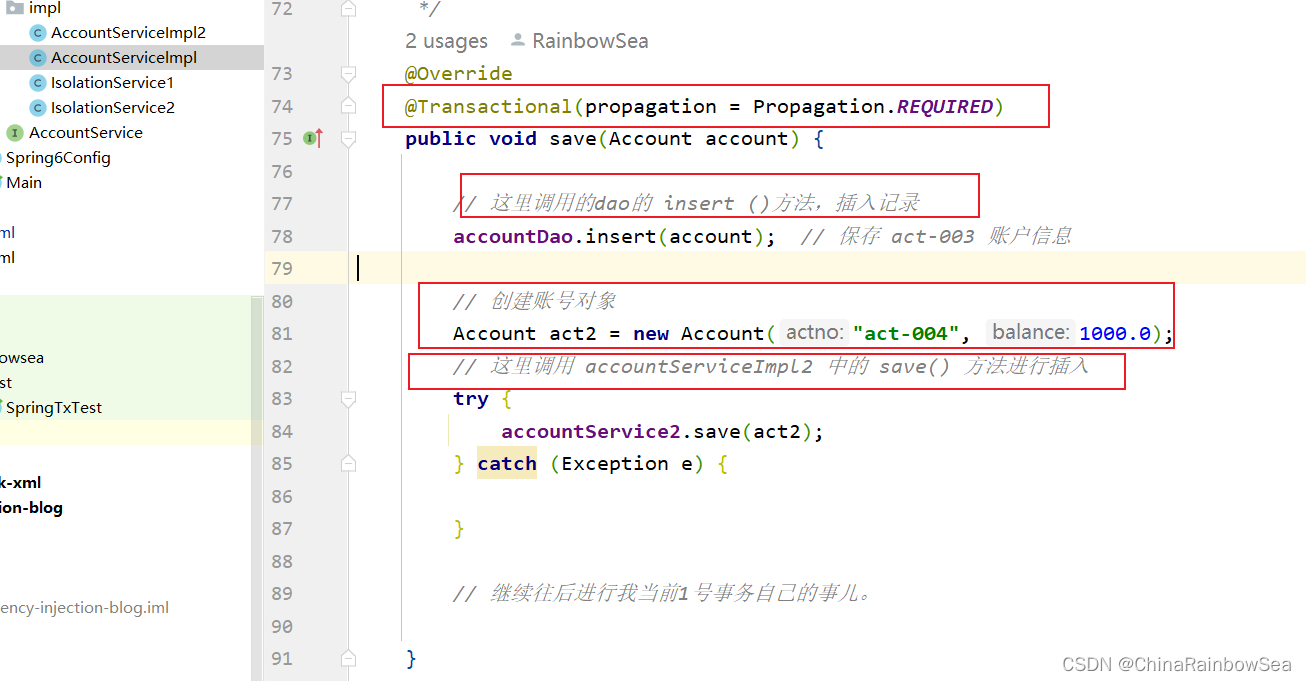
這裡,我們測試:REQUIRED:支持當前事務,如果不存在就新建一個(預設)《沒有事務就新建,有就加入事務,簡單的說就是共用同一個事務處理》
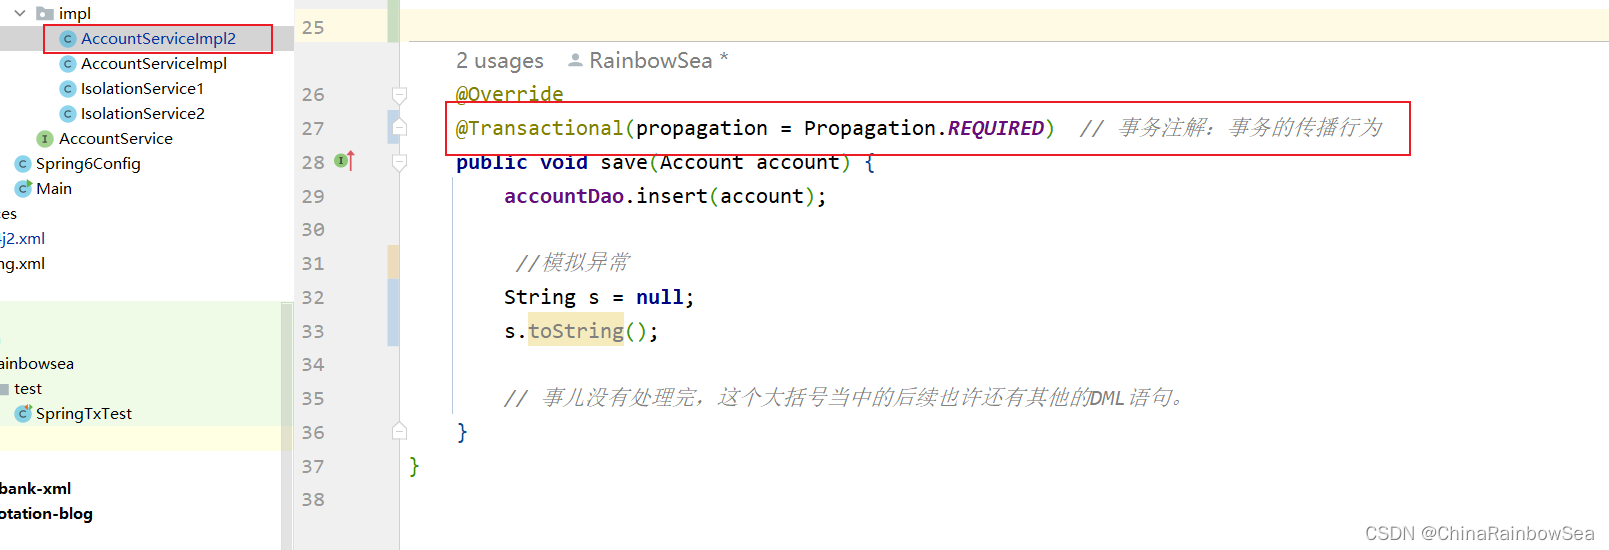
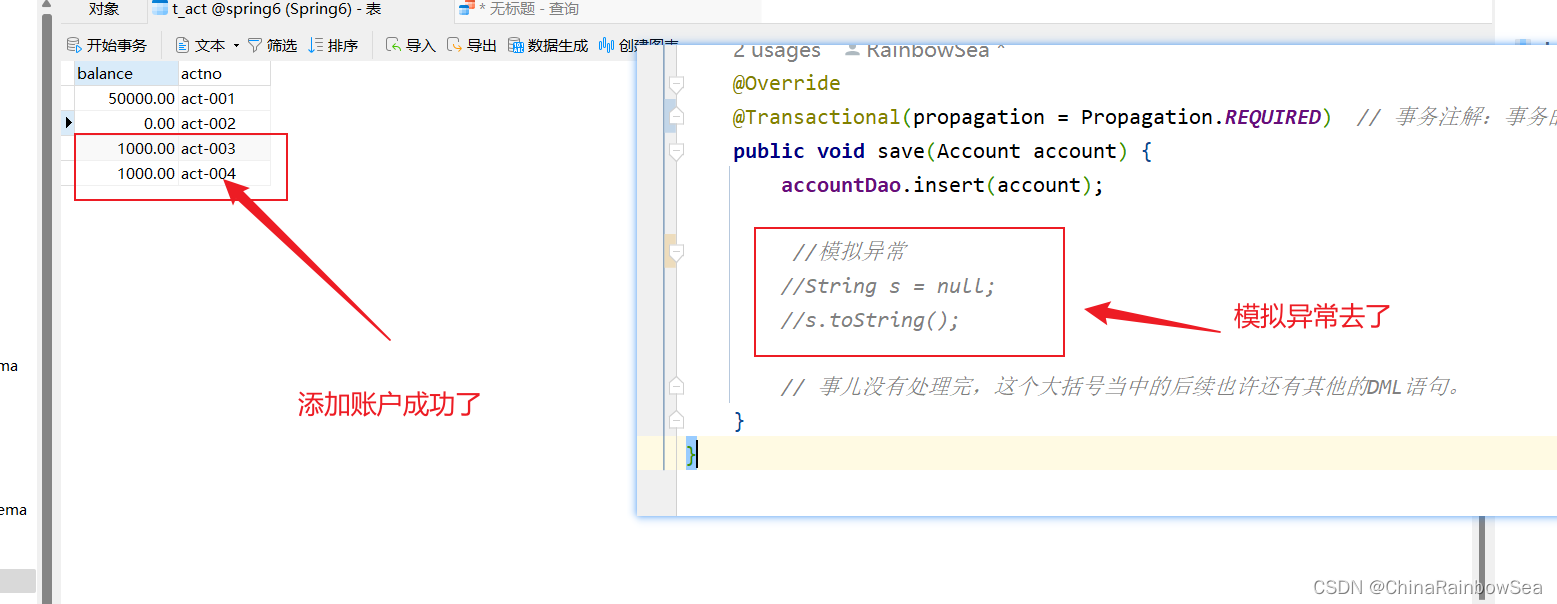
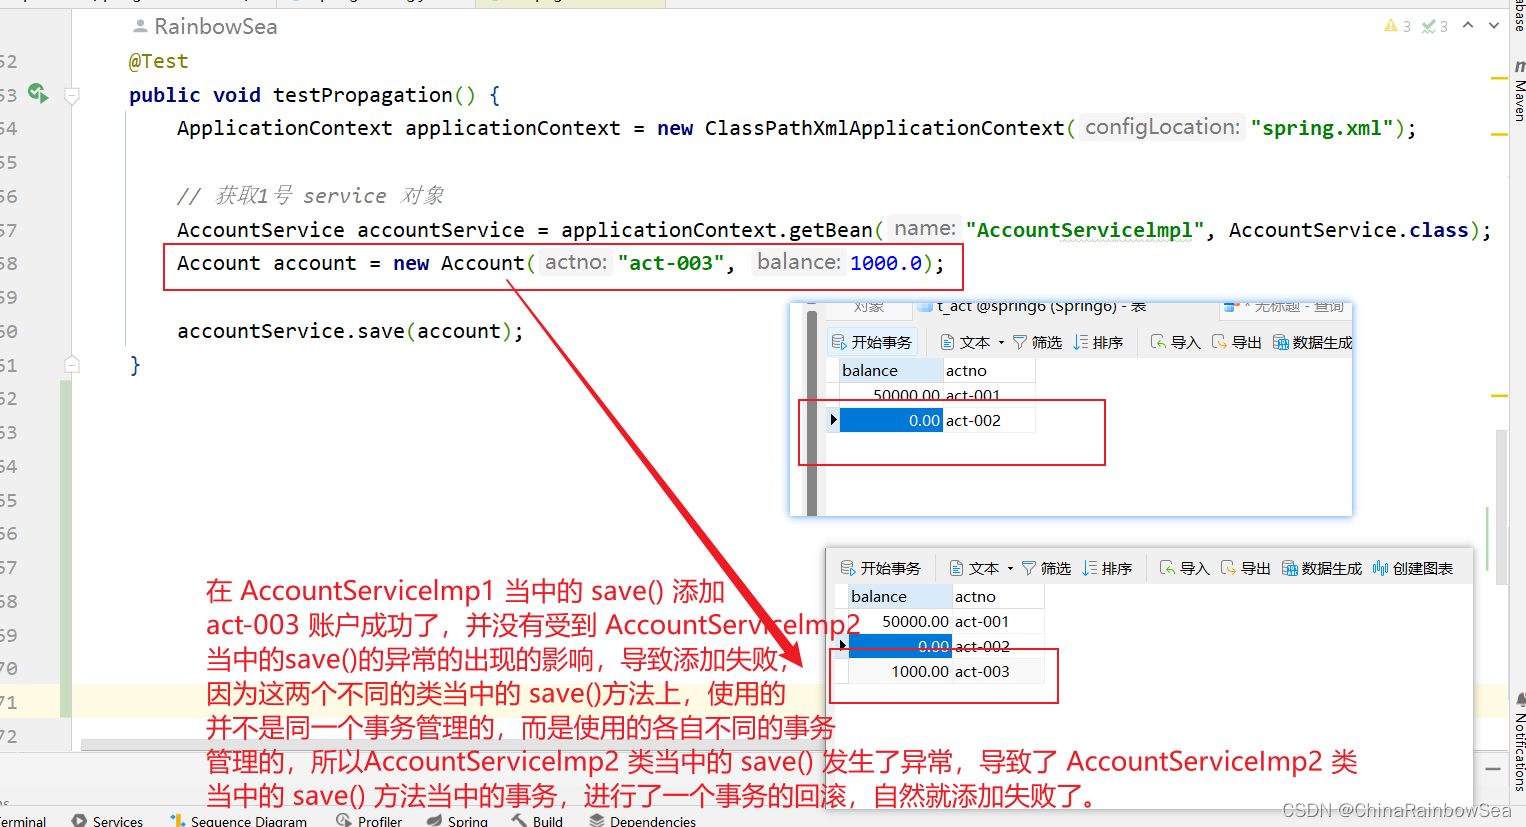
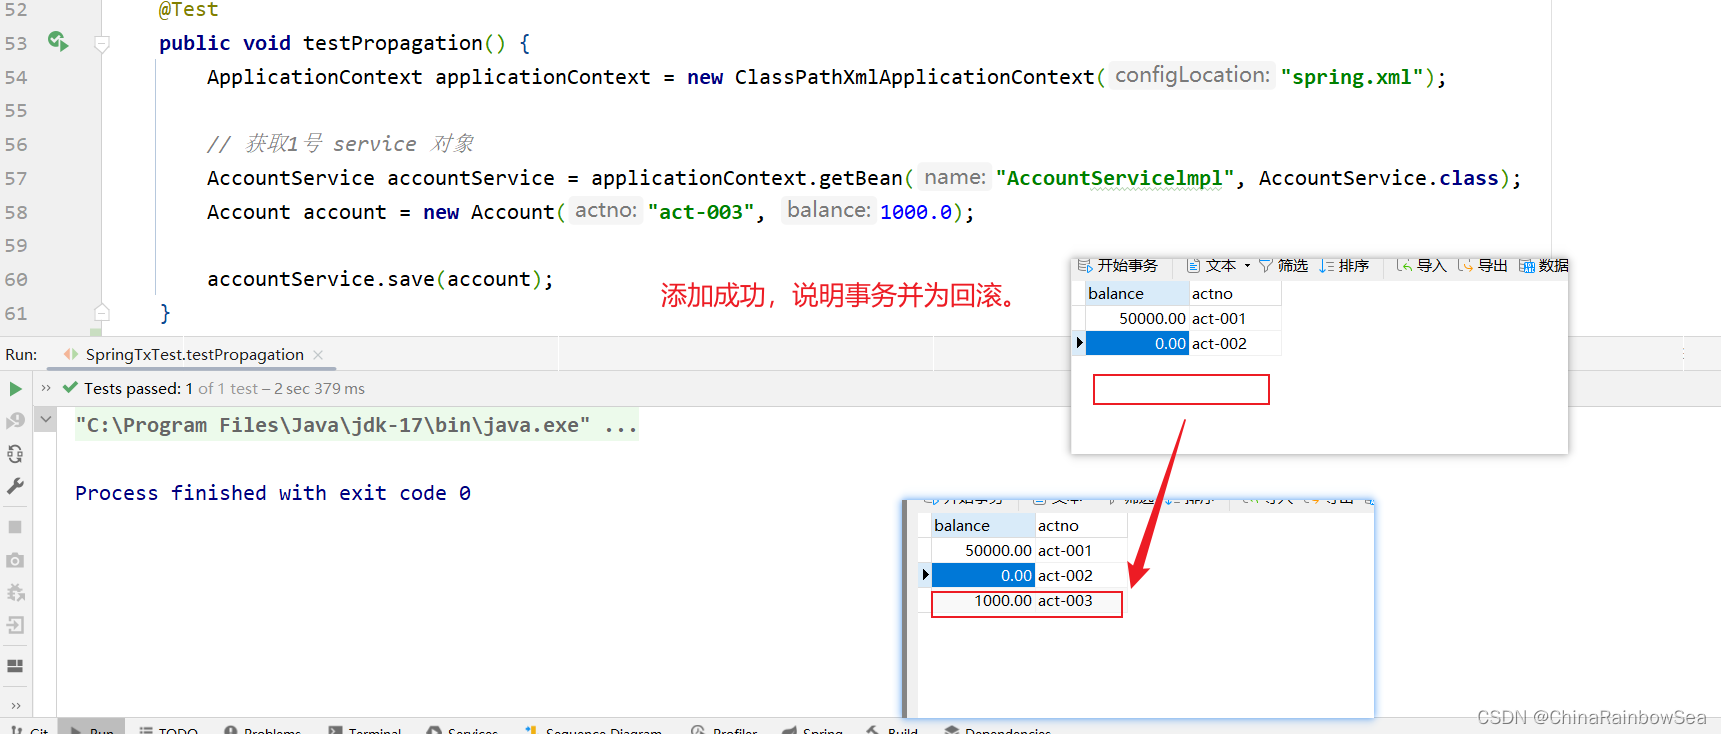
這裡我們測試,在 AccountServicelmpl 類當中的 save() 方法創建一個新的賬戶“"act-003", 1000.0”,然後在 AccountServicelmpl 類的 save() 方法當中,調用 AccountServicelmpl2類當中的 save( ) 方法,添加 "act-004", 1000.0 新的賬戶信息。
我們這裡添加兩個新的賬戶,一個是“act-003" 是 在AccountServicelmpl 類當中的 save() 方法 保存的,而另一個則是“act-004”賬戶是在,AccountServicelmpl2 類當中的 save() 方法保存的,同時在這個AccountServicelmpl2 類當中的 save() 方法,添加上異常,導致添加賬戶失敗,按照
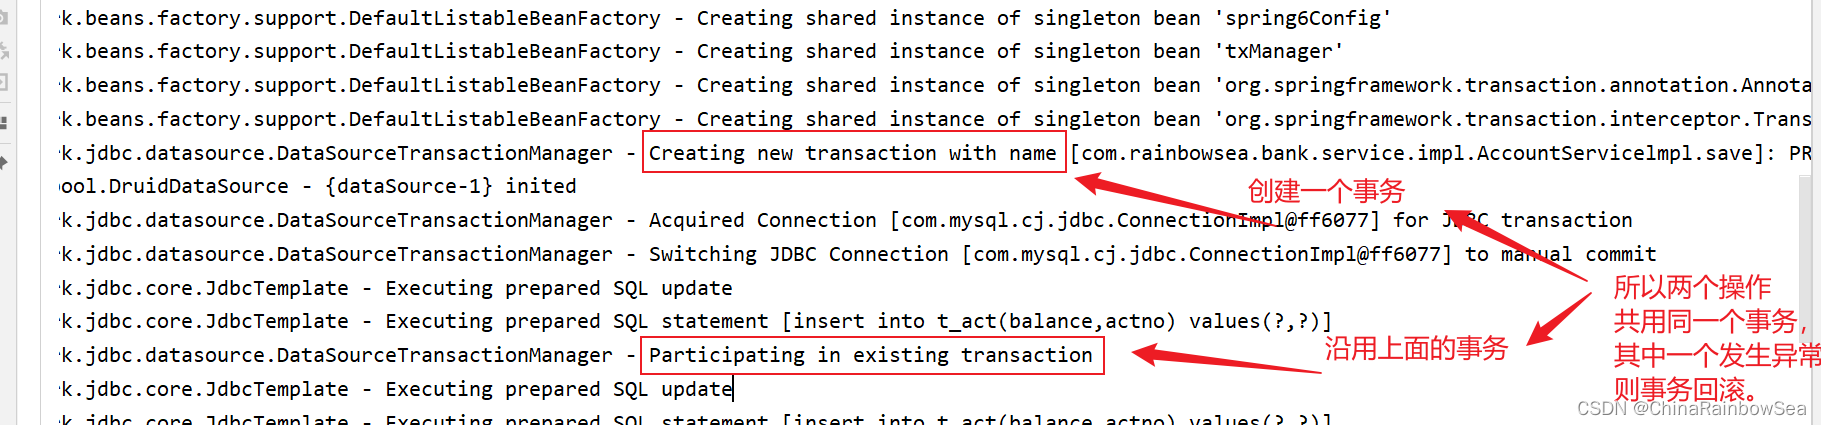
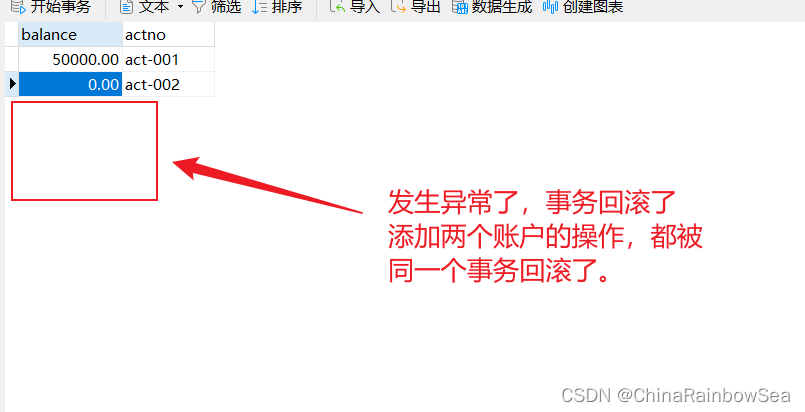
我們的REQUIRED:支持當前事務,如果不存在就新建一個(預設)《沒有事務就新建,有就加入事務,簡單的說就是共用同一個事務處理》 的特點,該兩個添加賬戶的操作,歸屬於同一個事務,其中一個添加賬戶信息失敗了,就全部失敗。事務發生回滾操作。
@Transactional(propagation = Propagation.REQUIRED)
package com.rainbowsea.bank.service.impl;
import com.rainbowsea.bank.dao.AccountDao;
import com.rainbowsea.bank.pojo.Account;
import com.rainbowsea.bank.service.AccountService;
import jakarta.annotation.Resource;
import org.springframework.stereotype.Component;
import org.springframework.transaction.annotation.Isolation;
import org.springframework.transaction.annotation.Propagation;
import org.springframework.transaction.annotation.Transactional;
@Component(value = "AccountServicelmpl")
public class AccountServicelmpl implements AccountService {
@Resource(name = "accountDaoImpl") // @Resource 根據名稱進行set 註入賦值
private AccountDao accountDao;
@Resource(name = "accountServiceImpl2")
private AccountService accountService2;
/**
* 保護賬號信息
*
* @param account
*/
@Override
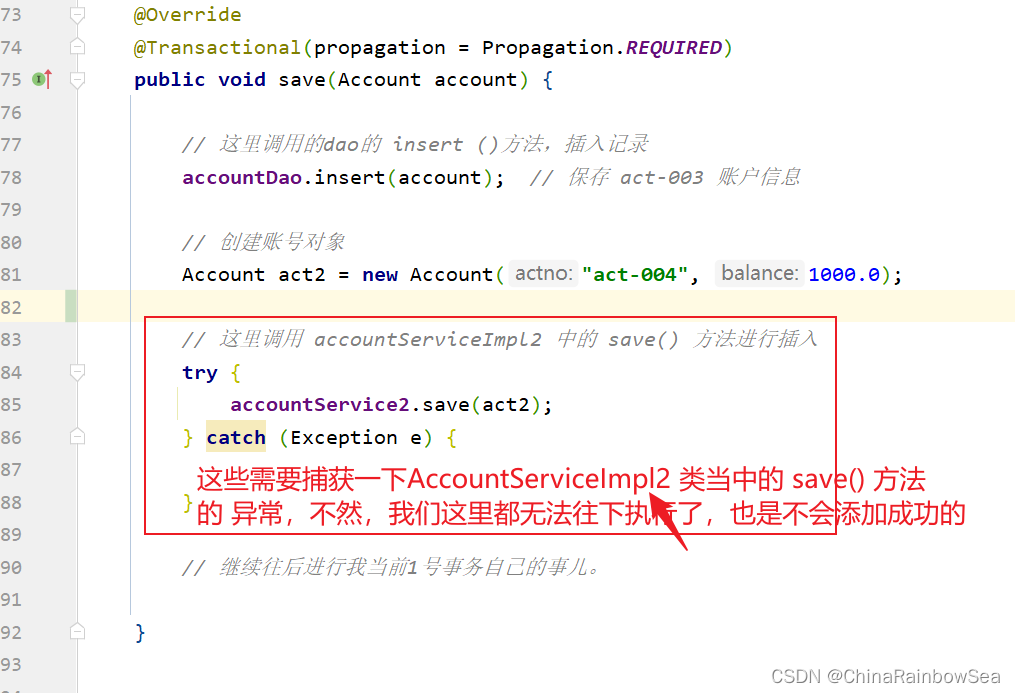
@Transactional(propagation = Propagation.REQUIRED)
public void save(Account account) {
// 這裡調用的dao的 insert ()方法,插入記錄
accountDao.insert(account); // 保存 act-003 賬戶信息
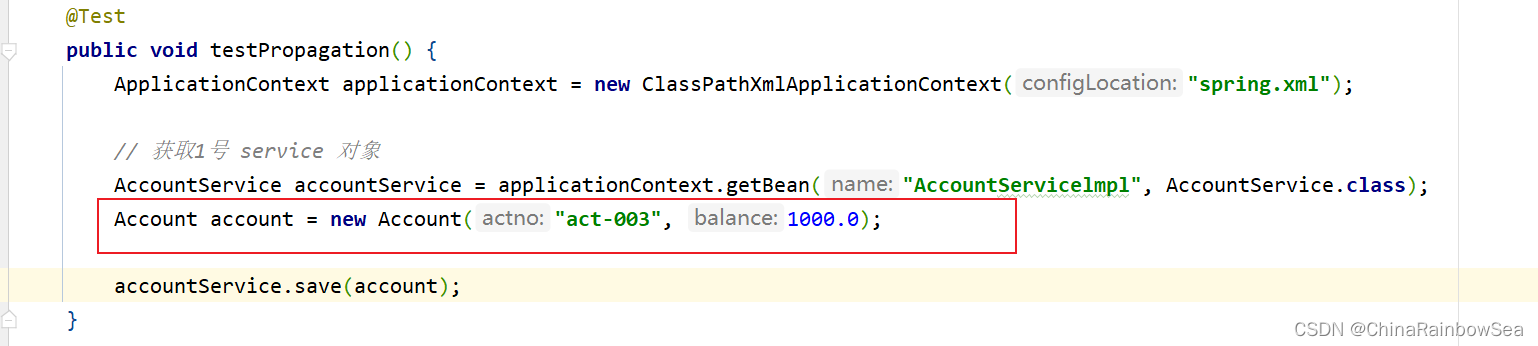
// 創建賬號對象
Account act2 = new Account("act-004", 1000.0);
// 這裡調用 accountServiceImpl2 中的 save() 方法進行插入
try {
accountService2.save(act2);
} catch (Exception e) {
}
// 繼續往後進行我當前1號事務自己的事兒。
}
}
package com.rainbowsea.bank.service.impl;

import com.rainbowsea.bank.dao.AccountDao;
import com.rainbowsea.bank.pojo.Account;
import com.rainbowsea.bank.service.AccountService;
import jakarta.annotation.Resource;
import org.springframework.stereotype.Service;
import org.springframework.transaction.annotation.Propagation;
import org.springframework.transaction.annotation.Transactional;


@Service(value = "accountServiceImpl2")  // 給Spring 管理起來
public class AccountServiceImpl2 implements AccountService {


    @Resource(name = "accountDaoImpl") // accountDaoImpl 已經交給Spring 管理,所以這裡可以直接用 @Resource 根據名稱set註入
    private AccountDao accountDao;

    @Override
    @Transactional(propagation = Propagation.REQUIRED)
    public void save(Account account) {
        accountDao.insert(account);

         //模擬異常
        String s = null;
        s.toString();

        // 事兒沒有處理完,這個大括弧當中的後續也許還有其他的DML語句。
    }
}
運行測試;
這裡我們再關閉異常,看看是否添加成功。
下麵我們再測試一個:REQUIRES_NEW:開啟一個新的事務,如果一個事務已經存在,則將這個存在的事務掛起。《不管有沒有,直接開啟一個新事務,開啟的事務和之前的事務不存在嵌套關係,之前的事務被掛起,簡單的說,就是不會共用一個事務,而是各自不同的DML生成不同的事務》 的傳播行為。各自用各自的事務。
這裡我們把添加的賬戶信息刪除一下,方便後續的操作。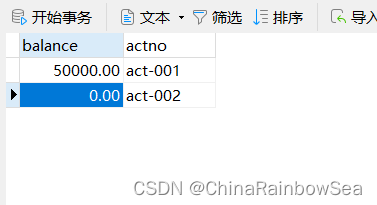
下麵我們將 AccountServicelmpl2 類當中的 save() 方法 上的事務傳播行為設置為:REQUIRES_NEW 進行測試,再次測試添加兩個賬戶信息的操作。
同樣開啟對 AccountServicelmpl 2 類當中的 save() 方法,添加上異常。
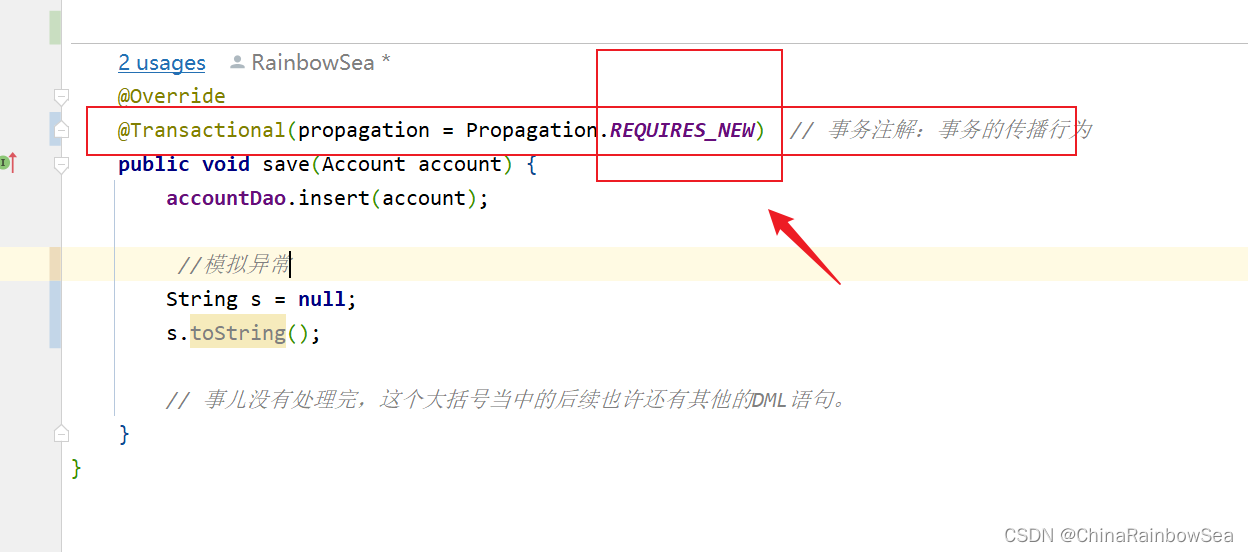
    @Override
    @Transactional(propagation = Propagation.REQUIRES_NEW)  // 事務註解:事務的傳播行為
    public void save(Account account) {
        accountDao.insert(account);

         //模擬異常
        String s = null;
        s.toString();

        // 事兒沒有處理完,這個大括弧當中的後續也許還有其他的DML語句。
    }
}
運行測試:
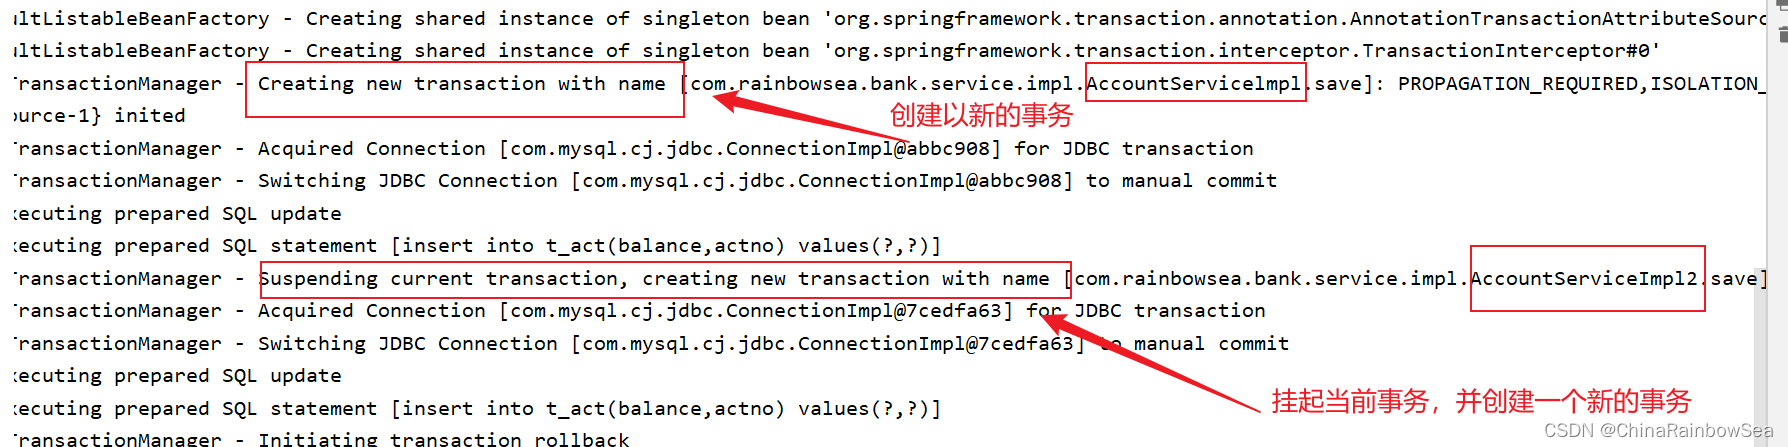
各自使用的是各自的事務進行了控制,不是同一個事務進行控制的 。
在 AccountServicelmp1 當中的 save() 添加
act-003 賬戶成功了,並沒有受到 AccountServicelmp2
當中的save()的異常的出現的影響,導致添加失敗,
因為這兩個不同的類當中的 save()方法上,使用的
並不是同一個事務管理的,而是使用的各自不同的事務
管理的,所以AccountServicelmp2 類當中的 save() 發生了異常,導致了 AccountServiceImp2 類
當中的 save() 方法當中的事務,進行了一個事務的回滾,自然就添加失敗了。
4.4.3 事務的隔離級別上的設置
事務的隔離級別類似於教室A和教室B之間的那道牆,隔離級別越高表示牆體越厚,隔音效果越好。資料庫中讀取數據存在的三大問題:
- 臟讀:讀取到沒有提交的資料庫的數據,叫做臟讀
- 不可重覆讀:在同一個事務當中,第一次和第二次讀取的數據不一樣。(併發,多線程就會涉及的不可重覆讀)
- 幻讀:讀到的數據是假的
事務的隔離級別包括四個級別:
讀未提交:READ_UNCOMMITTED
- 這種隔離級別,存在臟讀問題,所謂的臟讀(dirty read)表示能夠讀取到其它事務未提交的數據。
讀提交:READ_COMMITTED
- 解決了臟讀問題,其它事務提交之後才能讀到,但存在不可重覆讀問題(Oracel 預設)
可重覆讀:REPEATABLE_READ
- 解決了不可重覆度,可以達到可重覆讀效果,只要當前事務不結束,讀取到的數據一直都是一樣的。但存在幻讀 問題。MySQL預設 是個隔離級別
序列化:SERIALIZABLE
- 解決了幻讀問題,事務排序執行。但不支持併發。
| 隔離級別 | 臟讀 | 不可重覆讀 | 幻讀 |
|---|---|---|---|
| 讀未提交 | 有 | 有 | 有 |
| 讀提交 | 無 | 有 | 有 |
| 可重覆讀 | 無 | 無 | 有 |
| 序列化 | 無 | 無 | 無 |
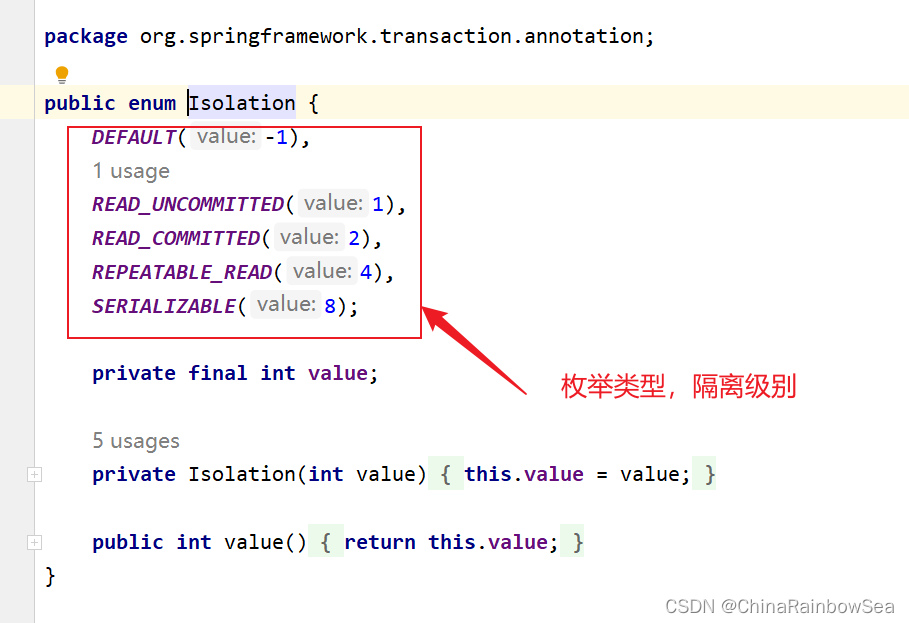
在Spring框架中隔離級別在spring中以枚舉類型存在:
//
// Source code recreated from a .class file by IntelliJ IDEA
// (powered by FernFlower decompiler)
//

package org.springframework.transaction.annotation;

public enum Isolation {
    DEFAULT(-1),
    READ_UNCOMMITTED(1),
    READ_COMMITTED(2),
    REPEATABLE_READ(4),
    SERIALIZABLE(8);

    private final int value;

    private Isolation(int value) {
        this.value = value;
    }

    public int value() {
        return this.value;
    }
}
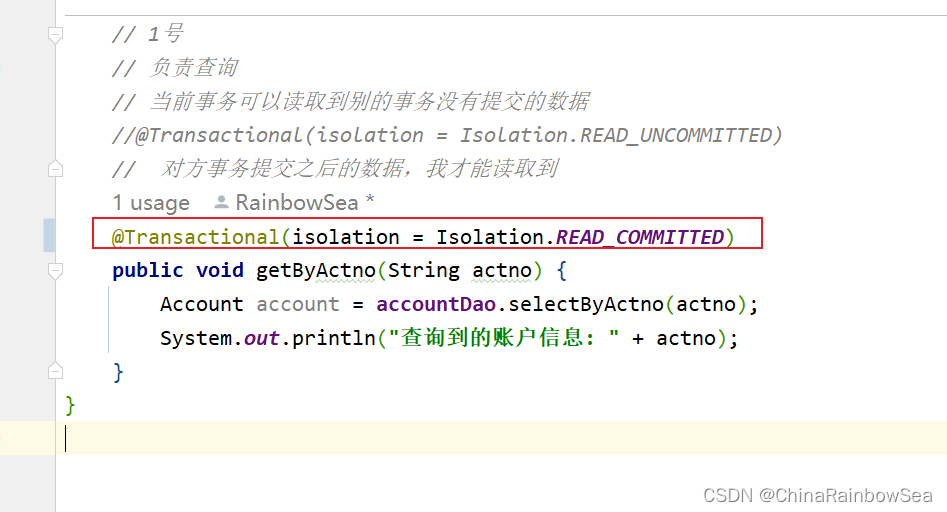
在Spring 當中事務的隔離級別上的設置,使用註解:
@Transactional(isolation = Isolation.READ_COMMITTED)
這裡我們測試:事務隔離級別:READ_UNCOMMITTED 和 READ_COMMITTED
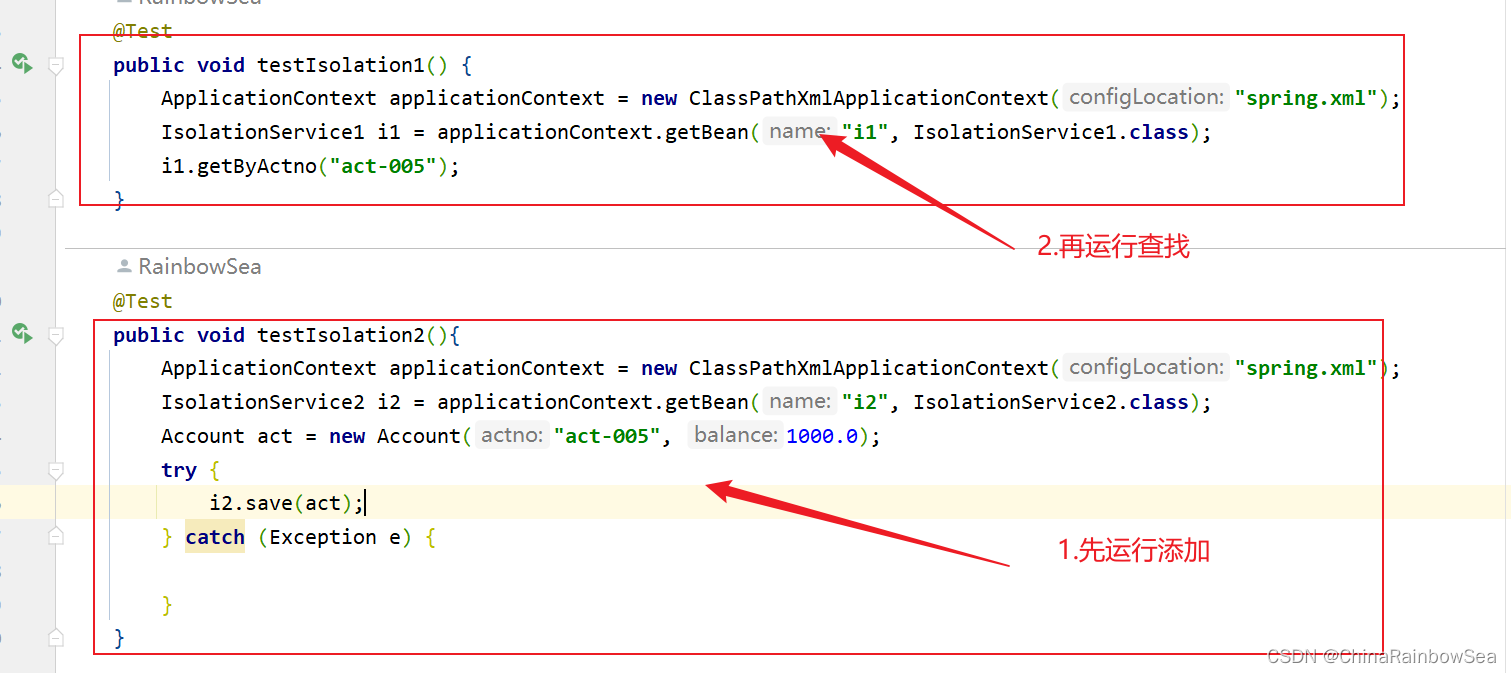
怎麼測試:一個service負責插入,一個service負責查詢。負責插入的service要模擬延遲。
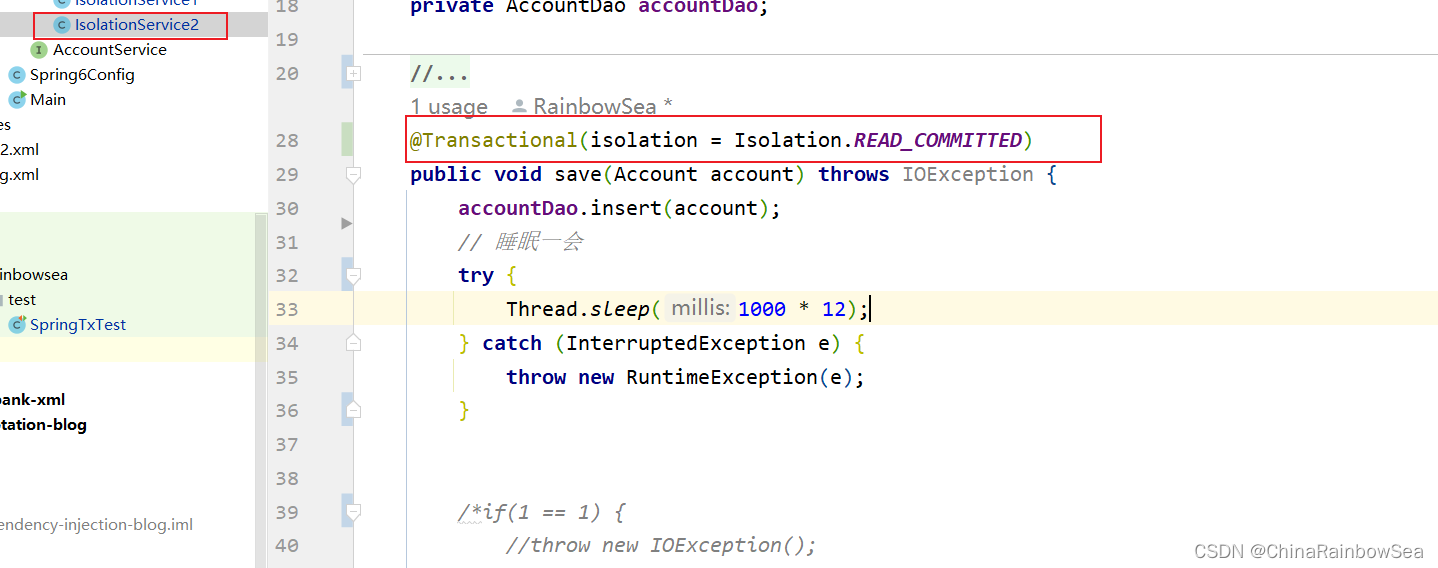
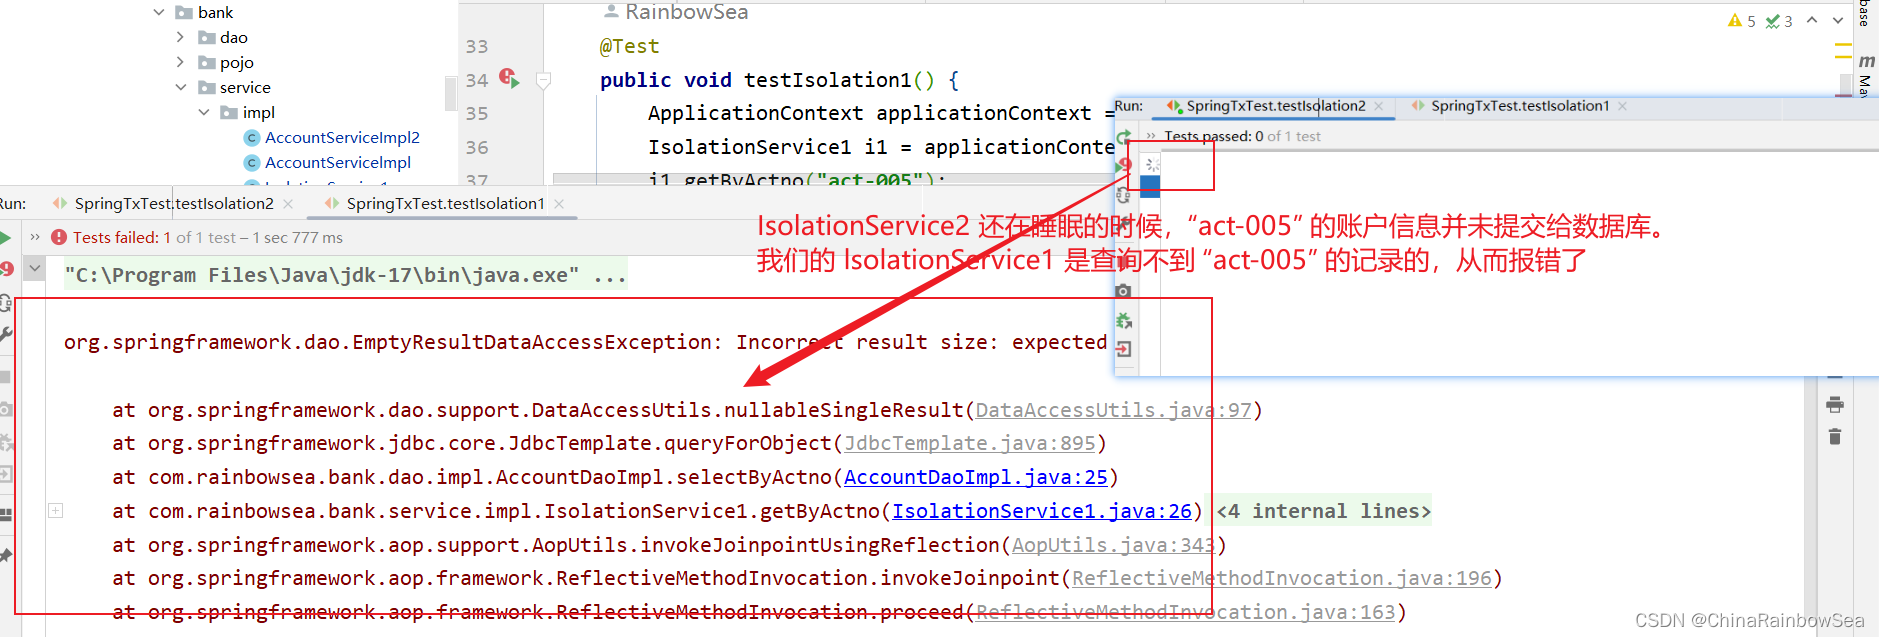
IsolationService2 類 save()方法負責,插入一個賬戶信息 ”act-005“,同時睡眠12秒中,當其還在睡眠當中時(沒有提交給資料庫,而是在記憶體當中)的時候,我們的IsolationService1 getByActno( ) 方法根據其插入的“act-005” 賬戶去查,這時候的 act-005 還在記憶體當中,我們並沒有提交給資料庫,看看能否查到?
package com.rainbowsea.bank.service.impl;
import com.rainbowsea.bank.dao.AccountDao;
import com.rainbowsea.bank.pojo.Account;
import jakarta.annotation.Resource;
import org.springframework.stereotype.Service;
import org.springframework.transaction.annotation.Transactional;
import java.io.IOException;
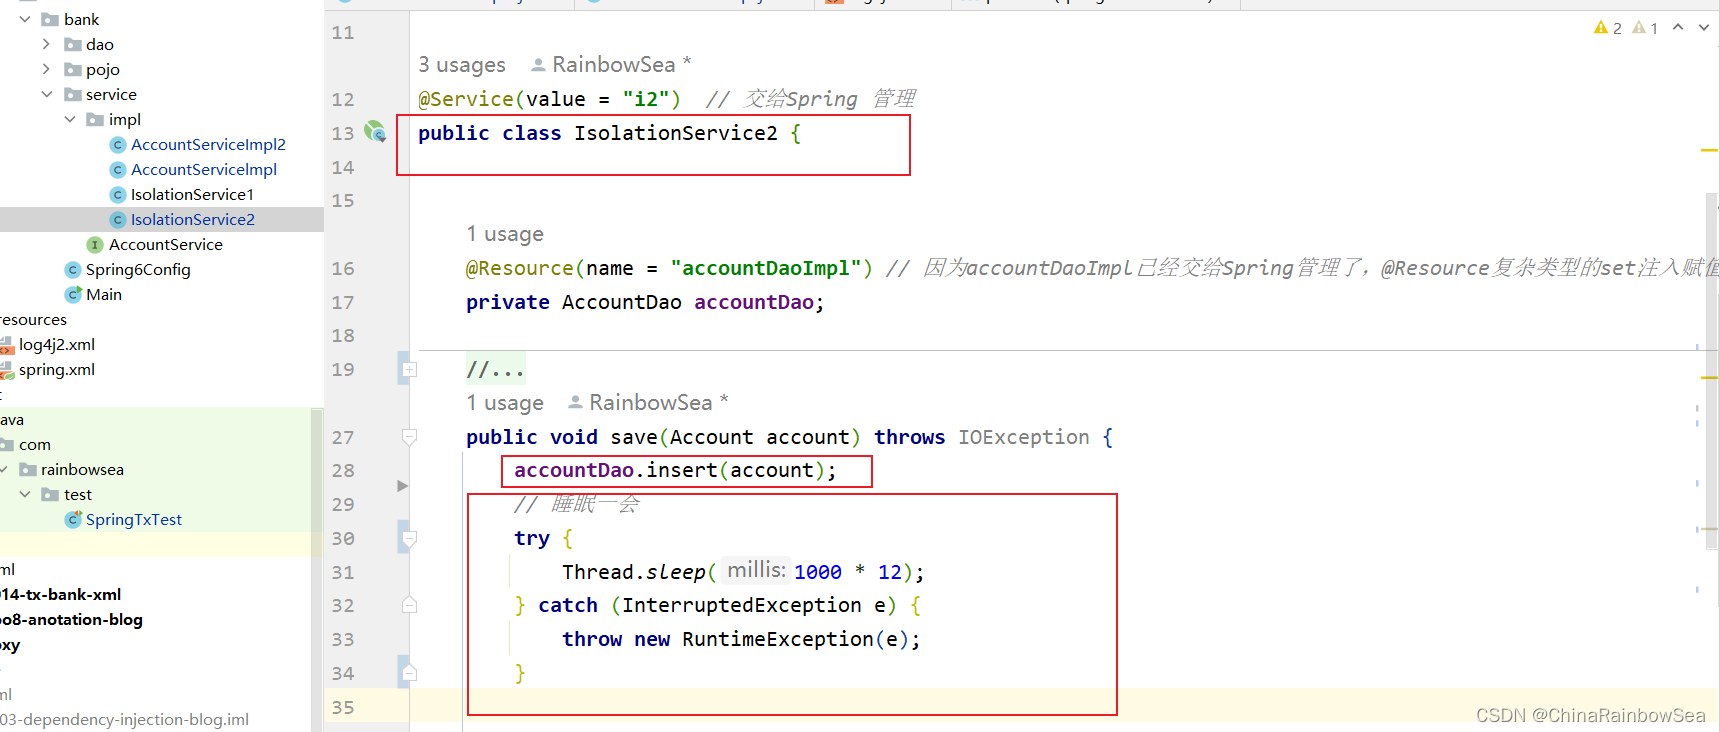
@Service(value = "i2") // 交給Spring 管理
public class IsolationService2 {
@Resource(name = "accountDaoImpl") // 因為accountDaoImpl已經交給Spring管理了,@Resource複雜類型的set註入賦值
private AccountDao accountDao;
// 2號
//負責insert
public void save(Account account) throws IOException {
accountDao.insert(account);
// 睡眠一會
try {
Thread.sleep(1000 * 12);
} catch (InterruptedException e) {
throw new RuntimeException(e);
}
}
}
package com.rainbowsea.bank.service.impl;
import com.rainbowsea.bank.dao.AccountDao;
import com.rainbowsea.bank.pojo.Account;
import jakarta.annotation.Resource;
import org.springframework.stereotype.Service;
import org.springframework.transaction.annotation.Isolation;
import org.springframework.transaction.annotation.Transactional;
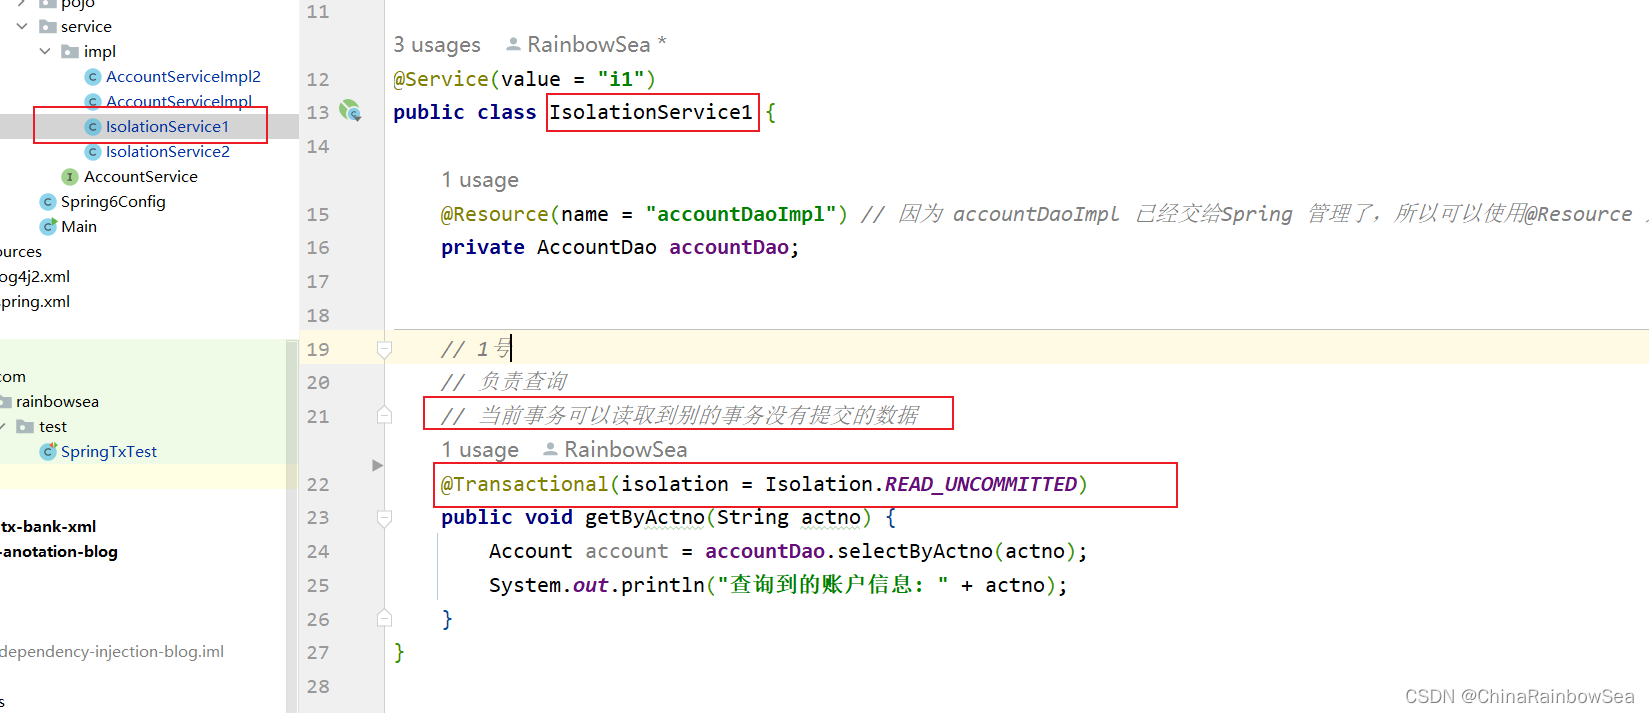
@Service(value = "i1")
public class IsolationService1 {
@Resource(name = "accountDaoImpl") // 因為 accountDaoImpl 已經交給Spring 管理了,所以可以使用@Resource 進行非簡單類型的賦值
private AccountDao accountDao;
// 1號
// 負責查詢
// 當前事務可以讀取到別的事務沒有提交的數據
@Transactional(isolation = Isolation.READ_UNCOMMITTED)
public void getByActno(String actno) {
Account account = accountDao.selectByActno(actno);
System.out.println("查詢到的賬戶信息: " + actno);
}
}
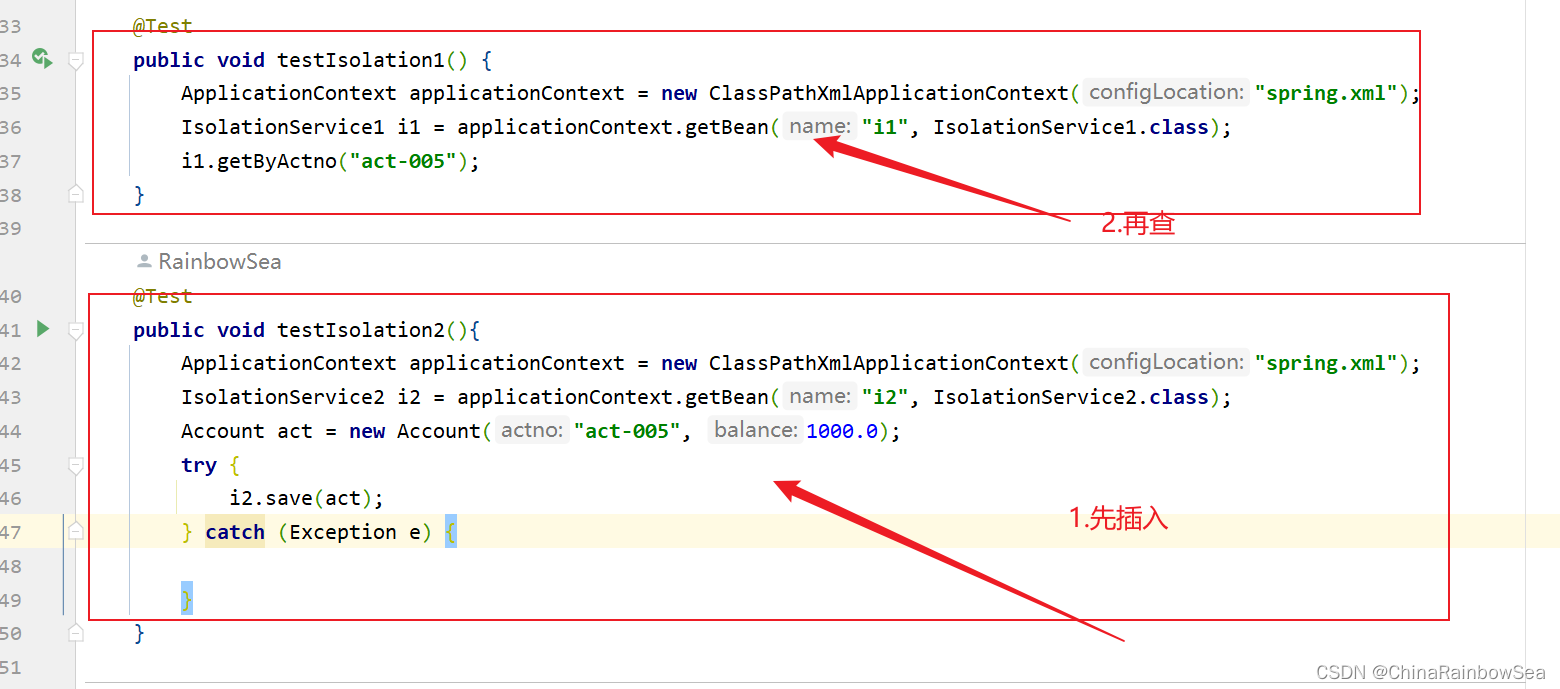
@Test
    public void testIsolation1() {
        ApplicationContext applicationContext = new ClassPathXmlApplicationContext("spring.xml");
        IsolationService1 i1 = applicationContext.getBean("i1", IsolationService1.class);
        i1.getByActno("act-005");
    }

    @Test
    public void testIsolation2(){
        ApplicationContext applicationContext = new ClassPathXmlApplicationContext("spring.xml");
        IsolationService2 i2 = applicationContext.getBean("i2", IsolationService2.class);
        Account act = new Account("act-005", 1000.0);
        try {
            i2.save(act);
        } catch (Exception e) {

        }
    }
運行結果:
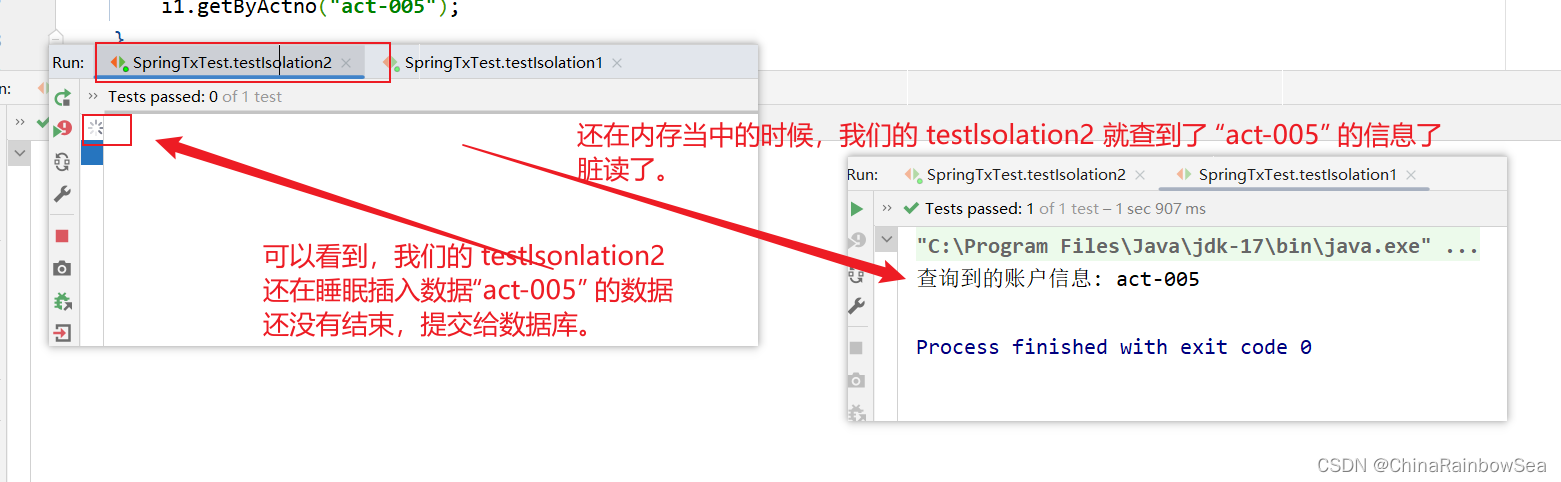
下麵我們將:其設置為:READ_COMMITTED,就無法臟讀了(無法讀取到記憶體當中的信息),只有當對方:對方事務提交之後的數據,我才能讀取到。
我們的IsolationService2 也要設置為:READ_COMMITTED,就無法臟讀了(無法讀取到記憶體當中的信息),只有當對方:對方事務提交之後的數據,我才能讀取到。
package com.rainbowsea.bank.service.impl;


import com.rainbowsea.bank.dao.AccountDao;
import com.rainbowsea.bank.pojo.Account;
import jakarta.annotation.Resource;
import org.springframework.stereotype.Service;
import org.springframework.transaction.annotation.Isolation;
import org.springframework.transaction.annotation.Transactional;

import java.io.IOException;

@Service(value = "i2")  // 交給Spring 管理
public class IsolationService2 {


    @Resource(name = "accountDaoImpl") // 因為accountDaoImpl已經交給Spring管理了,@Resource複雜類型的set註入賦值
    private AccountDao accountDao;

    // 2號
    //負責insert
    // 或者整個異常的子類異常,都不回滾,其他異常回滾
    @Transactional(isolation = Isolation.READ_COMMITTED)
    public void save(Account account) throws IOException {
        accountDao.insert(account);
        // 睡眠一會
        try {
            Thread.sleep(1000 * 12);
        } catch (InterruptedException e) {
            throw new RuntimeException(e);
        }。
    }


}
package com.rainbowsea.bank.service.impl;

import com.rainbowsea.bank.dao.AccountDao;
import com.rainbowsea.bank.pojo.Account;
import jakarta.annotation.Resource;

import org.springframework.stereotype.Service;
import org.springframework.transaction.annotation.Isolation;
import org.springframework.transaction.annotation.Transactional;


@Service(value = "i1")
public class IsolationService1 {

    @Resource(name = "accountDaoImpl") // 因為 accountDaoImpl 已經交給Spring 管理了,所以可以使用@Resource 進行非簡單類型的賦值
    private AccountDao accountDao;


    // 1號
    // 負責查詢
    // 當前事務可以讀取到別的事務沒有提交的數據
    //@Transactional(isolation = Isolation.READ_UNCOMMITTED)
    //  對方事務提交之後的數據,我才能讀取到
    @Transactional(isolation = Isolation.READ_COMMITTED)
    public void getByActno(String actno) {
        Account account = accountDao.selectByActno(actno);
        System.out.println("查詢到的賬戶信息: " + actno);
    }
}
同樣我們還是:插入 “act-005” 的賬戶信息,進行測試,看看還能不能查詢到結果了。
通過執行結果可以清晰的看出隔離級別不同,執行效果不同。
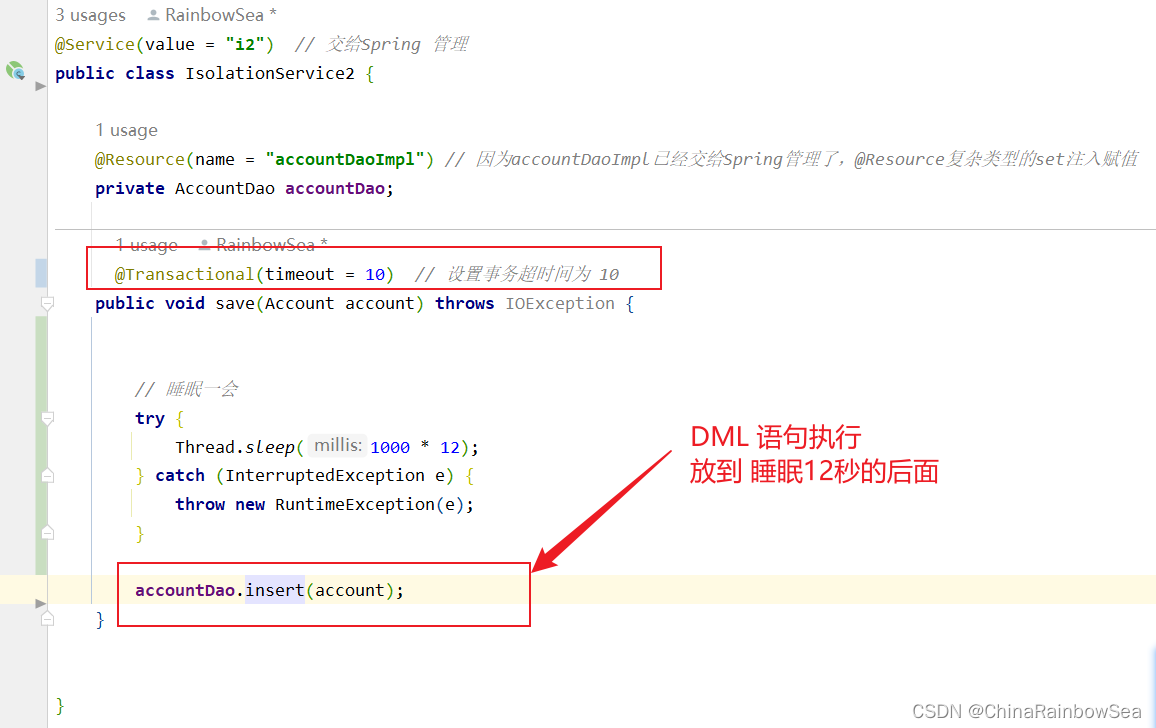
4.4.4 事務超時上的設置
在Spring框架的 @Transactional 註解 當中可以設置事務的超時時間:
@Transactional(timeout = 10)
// 表示設置事務的超時時間為:10秒
表示超過10秒如果該事務中所有的 DML語句還沒有執行完畢的話,最終結果會選擇回滾。
預設值為 -1;表示沒有時間限制。
註意這裡有個坑,事務的超時時間指的是哪段時間?
在當前事務當中,最後一條DML語句執行之前的時間。如果最後一條DML語句後面很多很多業務邏輯,這些業務代碼執行的時間是不被計入超時時間。
如下測試:
我們首先將 DML 語句放在 睡眠 12 秒之前,看看後面的業務處理時間,是否會被記錄到超時時間內,會(則超時了,事務會發生回滾);不會(則沒有超時,不計入後面的時間,事務不發生回滾)
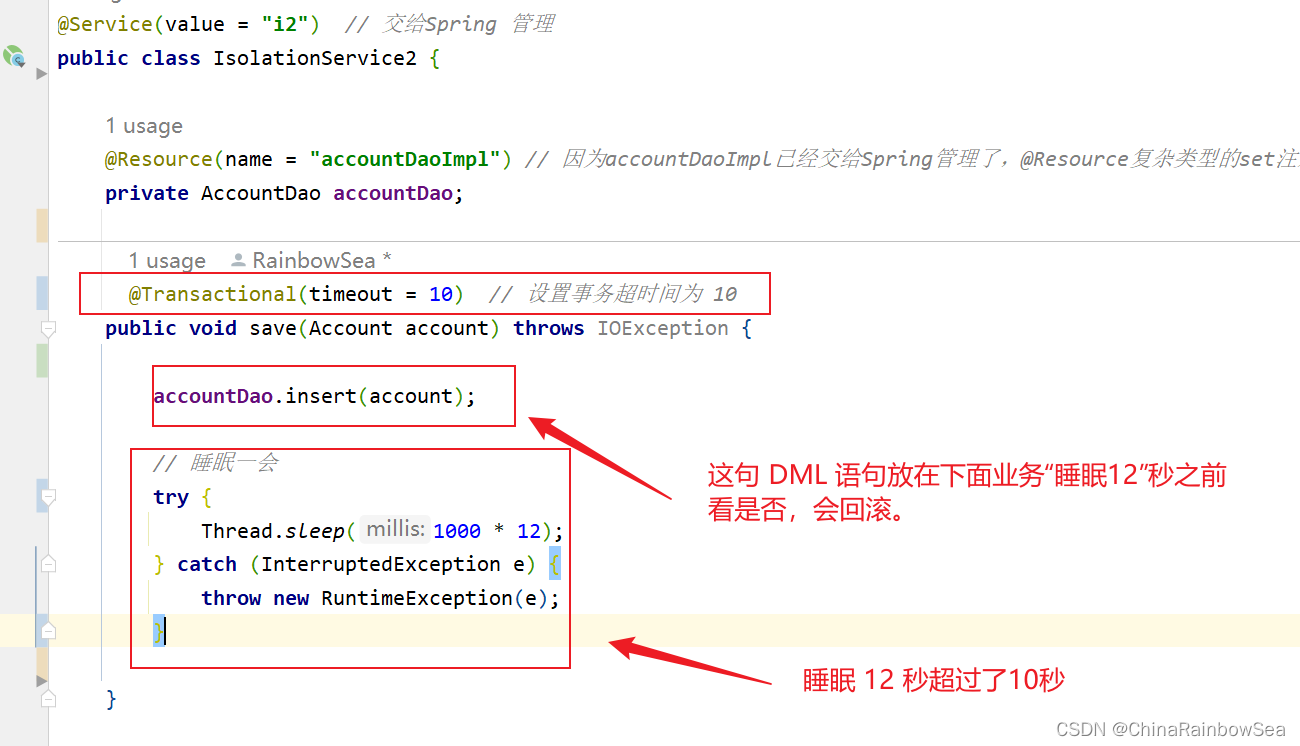
package com.rainbowsea.bank.service.impl;


import com.rainbowsea.bank.dao.AccountDao;
import com.rainbowsea.bank.pojo.Account;
import jakarta.annotation.Resource;
import org.springframework.stereotype.Service;
import org.springframework.transaction.annotation.Transactional;

import java.io.IOException;

@Service(value = "i2")  // 交給Spring 管理
public class IsolationService2 {

    @Resource(name = "accountDaoImpl") // 因為accountDaoImpl已經交給Spring管理了,@Resource複雜類型的set註入賦值
    private AccountDao accountDao;

      @Transactional(timeout = 10)  // 設置事務超時間為 10
    public void save(Account account) throws IOException {

        accountDao.insert(account);

        // 睡眠一會
        try {
            Thread.sleep(1000 * 12);
        } catch (InterruptedException e) {
            throw new RuntimeException(e);
        }

    }


}
下麵我們重新將該添加的“act-003” 的數據刪除了。
這次我們將 DML 語句放到 “睡眠 12秒”的最後面,看看事務是否會發生回滾