
目錄一、環境搭建1、關閉防火牆firewalld,selinux2、每台主機安裝MySQL二、基於GTID的主從複製1、修改/etc/my.cnf文件2、檢查GTID狀態3、配置主從複製4、從庫設置三、部署MHA1、準備環境(所有節點)2、部署管理節點(可以部署在任何機器上)3、配置ssh信任4、啟 ...
目錄
一、環境搭建
涉及主機
| 主機名 | IP地址 |
|---|---|
| db01(master) | 192.168.112.40 |
| db02(slave1) | 192.168.112.50 |
| db03(slave2) | 192.168.112.60 |
1、關閉防火牆firewalld,selinux
systemctl stop firewalld
systemctl disable firewalld
setenforce 0
sed -i 's/SELINUX=enforcing /SELINUX=disabled/g' /etc/selinux/config
2、每台主機安裝MySQL
#二進位安裝
wget https://downloads.mysql.com/archives/get/p/23/file/mysql-5.6.40-linux-glibc2.12-x86_64.tar.gz
tar xzvf mysql-5.6.40-linux-glibc2.12-x86_64.tar.gz
mkdir /application
mv mysql-5.6.40-linux-glibc2.12-x86_64 /application/mysql-5.6.40
ln -s /application/mysql-5.6.40/ /application/mysql
cd /application/mysql/support-files/
\cp my-default.cnf /etc/my.cnf
cp mysql.server /etc/init.d/mysqld
cd /application/mysql/scripts
useradd mysql -s /sbin/nologin -M
yum -y install autoconf
cd /application/mysql/scripts/
./mysql_install_db --user=mysql --basedir=/application/mysql --data=/application/mysql/data
echo 'export PATH="/application/mysql/bin:$PATH"' >> /etc/profile.d/mysql.sh
source /etc/profile
sed -i 's#/usr/local#/application#g' /etc/init.d/mysqld /application/mysql/bin/mysqld_safe
#指定MySQL安裝根目錄以及數據目錄
vim /etc/my.cnf
basedir = /application/mysql/
datadir = /application/mysql/data
#設置密碼
mysqladmin -uroot password '123'
二、基於GTID的主從複製
1、修改/etc/my.cnf文件
主庫
vim /etc/my.cnf
[mysqld]	#在mysqld標簽下配置
server_id=1
log_bin=mysql-bin	#開啟binlog日誌
skip-name-resolv	#跳過功能變數名稱解析
gtid_mode=ON
log_slave_updates	#開啟slave binlog同步
enforce_gtid_consistency	#不允許任何違反GTID一致性
[root@db01 ~]# /etc/init.d/mysqld restart	#重啟MySQL
所有主機
#創建主從複製用戶
mysql -uroot -p123	#登錄資料庫
grant replication slave on *.* to slave@'192.168.112.%' identified by '123';	#創建slave用戶
從庫
[root@db02 ~]# vim /etc/my.cnf

[mysqld]	#在mysqld標簽下配置
server_id=2	#主庫server-id為1,從庫必須大於1
log_bin=mysql-bin	#開啟binlog日誌
gtid_mode=ON
log_slave_updates	#開啟slave binlog同步
enforce_gtid_consistency	#不允許任何違反GTID一致性
[root@db02 ~]# /etc/init.d/mysqld restart	#重啟MySQL

[root@db03 ~]# vim /etc/my.cnf

[mysqld]	#在mysqld標簽下配置
server_id=3	#主庫server-id為1,從庫必須大於1
log_bin=mysql-bin	#開啟binlog日誌
gtid_mode=ON
log_slave_updates	#開啟slave binlog同步
enforce_gtid_consistency	#不允許任何違反GTID一致性
[root@db02 ~]# /etc/init.d/mysqld restart	#重啟MySQL
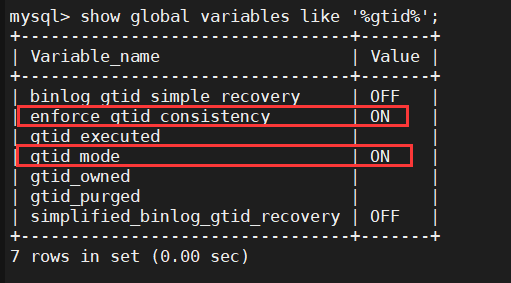
2、檢查GTID狀態
主庫上查看
show global variables like '%gtid%';
3、配置主從複製
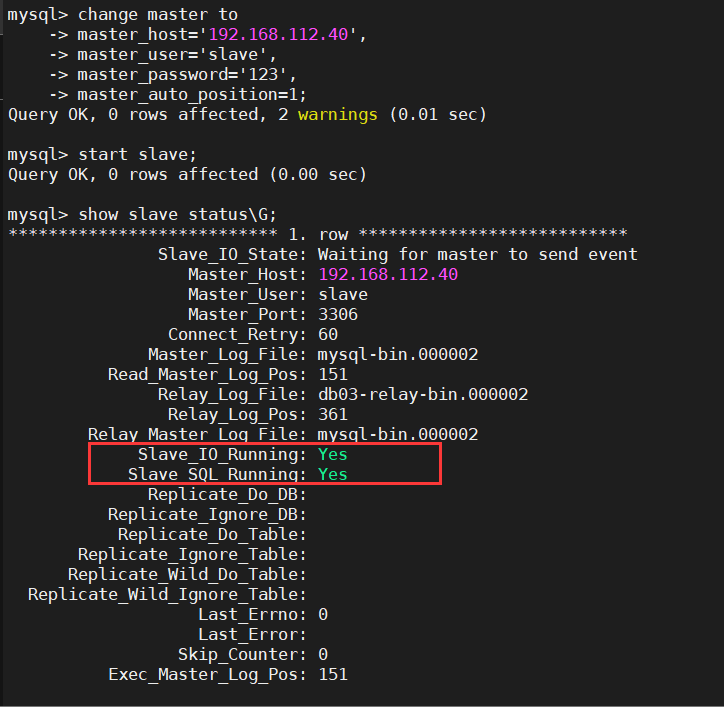
從庫配置
mysql> change master to
    -> master_host='192.168.112.40',
    -> master_user='slave',
    -> master_password='123',
    -> master_auto_position=1;

mysql> start slave;
mysql> show slave status\G;	#確保從庫的IO和SQL線程開啟Yes
4、從庫設置
mysql> set global relay_log_purge = 0;	#禁用自動刪除relay log 功能
mysql> set global read_only=1;	#設置從庫只讀
[root@mysql-db02 ~]# vim /etc/my.cnf
#編輯配置文件
[mysqld]
#在mysqld標簽下添加
relay_log_purge = 0
#禁用自動刪除relay log 永久生效
三、部署MHA
1、準備環境(所有節點)
#下載工具包
cd && wget https://download.s21i.faiusr.com/23126342/0/0/ABUIABBPGAAg3OHUiAYolpPt7AQ.zip?f=mysql-master-ha.zip&v=1628778716
#安裝依賴包
yum install -y perl-DBD-MySQL
yum install -y unzip
mv ABUIABBPGAAg3OHUiAYolpPt7AQ.zip\?f\=mysql-master-ha.zip master-ha.zip
unzip master-ha.zip
cd mysql-master-ha/
#安裝node包
rpm -ivh mha4mysql-node-0.56-0.el6.noarch.rpm
#登錄資料庫
mysql -uroot -p123
#添加MHA管理賬號
mysql> grant all privileges on *.* to mha@'192.168.112.%' identified by 'mha';
#查看賬號是否添加成功
mysql> select user,host,password from mysql.user;
#創建軟鏈接
ln -s /application/mysql/bin/mysqlbinlog /usr/bin/mysqlbinlog
ln -s /application/mysql/bin/mysql /usr/bin/mysql
2、部署管理節點(可以部署在任何機器上)
這裡選擇db03作為管理節點
[root@db03 ~]# yum install -y epel-release
#安裝manager依賴包
[root@db03 ~]# yum install -y perl-Config-Tiny epel-release perl-Log-Dispatch perl-Parallel-ForkManager perl-Time-HiRes
#安裝manager包
[root@db03 ~]# cd ~/mysql-master-ha/ && rpm -ivh mha4mysql-manager-0.56-0.el6.noarch.rpm
編輯manager節點配置文件
[root@db03 ~]# mkdir -p /etc/mha
[root@db03 ~]# mkdir -p /var/log/mha/app1
[root@db03 ~]# vim /etc/mha/app1.cnf
[server default]
manager_log=/var/log/mha/app1/manager.log
manager_workdir=/var/log/mha/app1
master_binlog_dir=/application/mysql/data
user=mha
password=mha
ping_interval=2
repl_password=123
repl_user=slave
ssh_user=root
[server1]
hostname=192.168.112.40
port=3306
[server2]
hostname=192.168.112.50
port=3306
candidate_master=1
check_repl_delay=0
[server3]
hostname=192.168.112.60
port=3306
3、配置ssh信任
#創建密鑰對
[root@db01 ~]# ssh-keygen -t dsa -P '' -f ~/.ssh/id_dsa >/dev/null 2>&1
#發送密鑰,包括自己
[root@db01 ~]# ssh-copy-id -i /root/.ssh/id_dsa.pub [email protected]
[root@db01 ~]# ssh-copy-id -i /root/.ssh/id_dsa.pub [email protected]
[root@db01 ~]# ssh-copy-id -i /root/.ssh/id_dsa.pub [email protected]
4、啟動測試(manage節點)
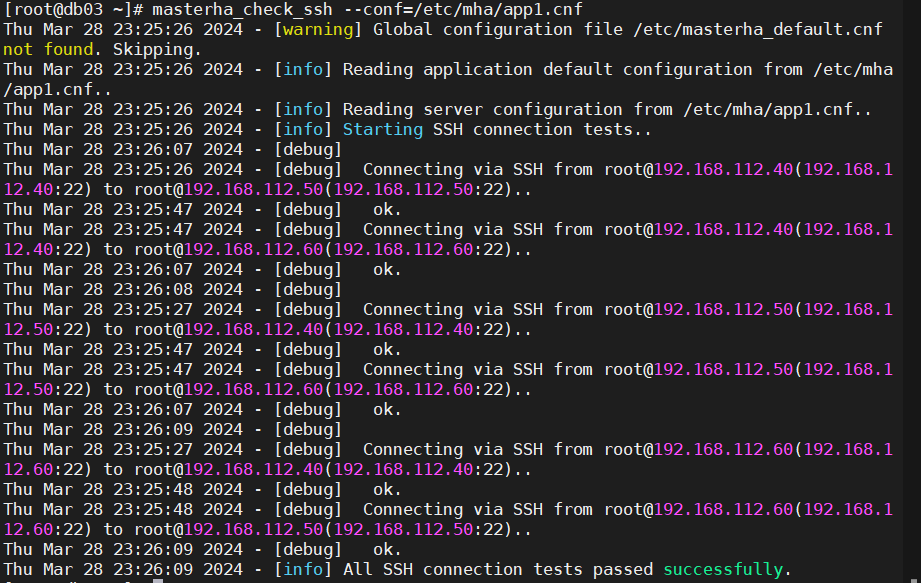
#測試ssh
[root@db03 ~]# masterha_check_ssh --conf=/etc/mha/app1.cnf
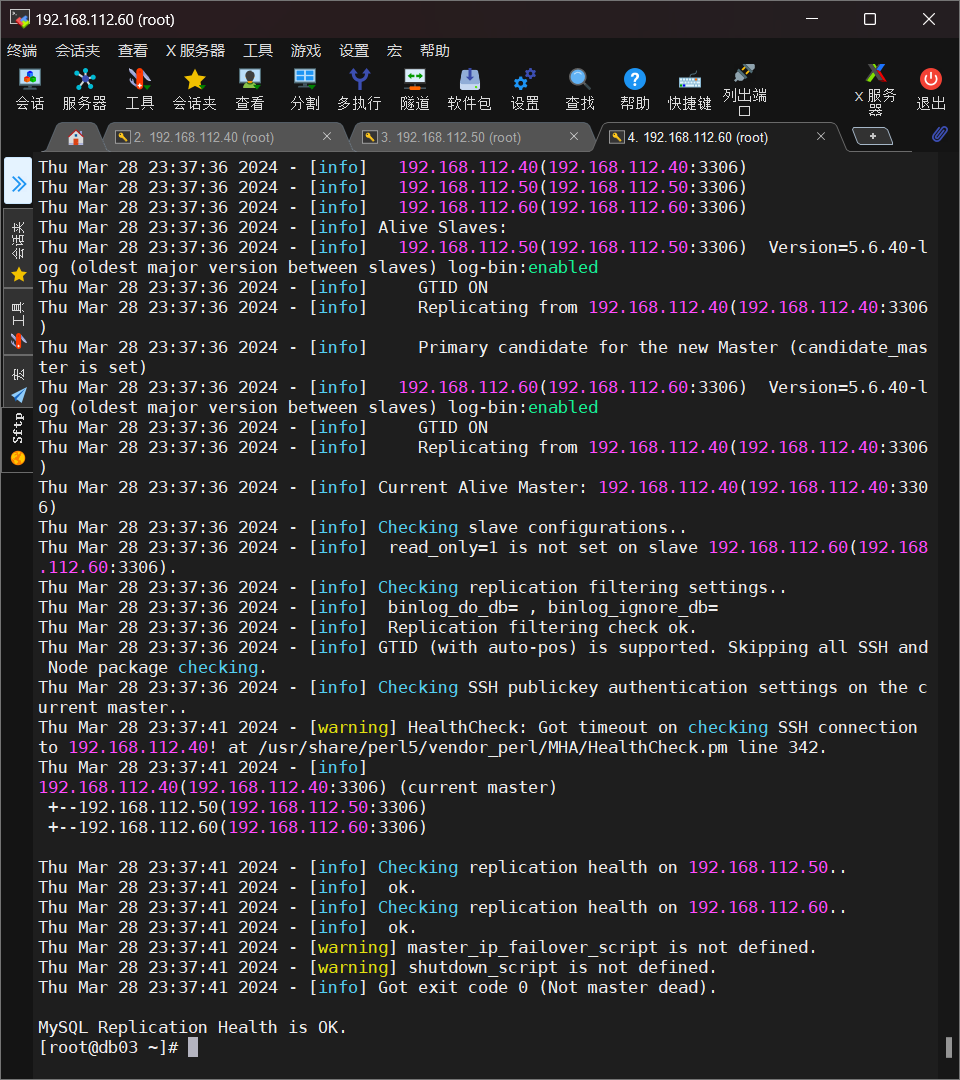
#測試複製
[root@db03 ~]# masterha_check_repl --conf=/etc/mha/app1.cnf
如果遇到MySQL Replication Health is NOT OK!
可以嘗試在manage節點的/etc/my.cnf配置文件里添加skip-name-resolv跳過解析功能變數名稱
四、啟動MHA
#啟動
[root@db03 ~]# nohup masterha_manager --conf=/etc/mha/app1.cnf --remove_dead_master_conf --ignore_last_failover < /dev/null > /var/log/mha/app1/manager.log 2>&1 &
[root@db03 ~]# jobs
[1]+  運行中               nohup masterha_manager --conf=/etc/mha/app1.cnf --remove_dead_master_conf --ignore_last_failover < /dev/null > /var/log/mha/app1/manager.log 2>&1 &
#檢測狀態
[root@db03 ~]# masterha_check_status --conf=/etc/mha/app1.cnf
app1 (pid:19754) is running(0:PING_OK), master:192.168.112.40
五、切換master測試
1、檢查兩從複製情況
#登錄db02
[root@db02 ~]# mysql -uroot -p123
#檢查複製情況
mysql> show slave status\G;
*************************** 1. row ***************************
               Slave_IO_State: Waiting for master to send event
                  Master_Host: 192.168.112.40
                  Master_User: slave
                  Master_Port: 3306
                Connect_Retry: 60
              Master_Log_File: mysql-bin.000002
          Read_Master_Log_Pos: 405
               Relay_Log_File: db02-relay-bin.000002
                Relay_Log_Pos: 615
        Relay_Master_Log_File: mysql-bin.000002
             Slave_IO_Running: Yes
            Slave_SQL_Running: Yes
              Replicate_Do_DB:
          Replicate_Ignore_DB:
           Replicate_Do_Table:
       Replicate_Ignore_Table:
      Replicate_Wild_Do_Table:
  Replicate_Wild_Ignore_Table:
                   Last_Errno: 0
                   Last_Error:
                 Skip_Counter: 0
          Exec_Master_Log_Pos: 405
              Relay_Log_Space: 818
              Until_Condition: None
               Until_Log_File:
                Until_Log_Pos: 0
           Master_SSL_Allowed: No
           Master_SSL_CA_File:
           Master_SSL_CA_Path:
              Master_SSL_Cert:
            Master_SSL_Cipher:
               Master_SSL_Key:
        Seconds_Behind_Master: 0
Master_SSL_Verify_Server_Cert: No
                Last_IO_Errno: 0
                Last_IO_Error:
               Last_SQL_Errno: 0
               Last_SQL_Error:
  Replicate_Ignore_Server_Ids:
             Master_Server_Id: 1
                  Master_UUID: 51fc215b-eab2-11ee-b7f0-000c29c4dc96
             Master_Info_File: /application/mysql/data/master.info
                    SQL_Delay: 0
          SQL_Remaining_Delay: NULL
      Slave_SQL_Running_State: Slave has read all relay log; waiting for the slave I/O thread to update it
           Master_Retry_Count: 86400
                  Master_Bind:
      Last_IO_Error_Timestamp:
     Last_SQL_Error_Timestamp:
               Master_SSL_Crl:
           Master_SSL_Crlpath:
           Retrieved_Gtid_Set: 51fc215b-eab2-11ee-b7f0-000c29c4dc96:1
            Executed_Gtid_Set: 51fc215b-eab2-11ee-b7f0-000c29c4dc96:1,
e5c86268-ed04-11ee-8716-000c2936523e:1
                Auto_Position: 1
1 row in set (0.00 sec)

ERROR:
No query specified

#登錄db03
[root@db03 ~]# mysql -uroot -p123
#檢查複製情況
mysql> show slave status\G;
*************************** 1. row ***************************
               Slave_IO_State: Waiting for master to send event
                  Master_Host: 192.168.112.40
                  Master_User: slave
                  Master_Port: 3306
                Connect_Retry: 60
              Master_Log_File: mysql-bin.000002
          Read_Master_Log_Pos: 405
               Relay_Log_File: db03-relay-bin.000004
                Relay_Log_Pos: 448
        Relay_Master_Log_File: mysql-bin.000002
             Slave_IO_Running: Yes
            Slave_SQL_Running: Yes
              Replicate_Do_DB:
          Replicate_Ignore_DB:
           Replicate_Do_Table:
       Replicate_Ignore_Table:
      Replicate_Wild_Do_Table:
  Replicate_Wild_Ignore_Table:
                   Last_Errno: 0
                   Last_Error:
                 Skip_Counter: 0
          Exec_Master_Log_Pos: 405
              Relay_Log_Space: 1461
              Until_Condition: None
               Until_Log_File:
                Until_Log_Pos: 0
           Master_SSL_Allowed: No
           Master_SSL_CA_File:
           Master_SSL_CA_Path:
              Master_SSL_Cert:
            Master_SSL_Cipher:
               Master_SSL_Key:
        Seconds_Behind_Master: 0
Master_SSL_Verify_Server_Cert: No
                Last_IO_Errno: 0
                Last_IO_Error:
               Last_SQL_Errno: 0
               Last_SQL_Error:
  Replicate_Ignore_Server_Ids:
             Master_Server_Id: 1
                  Master_UUID: 51fc215b-eab2-11ee-b7f0-000c29c4dc96
             Master_Info_File: /application/mysql-5.6.40/data/master.info
                    SQL_Delay: 0
          SQL_Remaining_Delay: NULL
      Slave_SQL_Running_State: Slave has read all relay log; waiting for the slave I/O thread to update it
           Master_Retry_Count: 86400
                  Master_Bind:
      Last_IO_Error_Timestamp:
     Last_SQL_Error_Timestamp:
               Master_SSL_Crl:
           Master_SSL_Crlpath:
           Retrieved_Gtid_Set: 51fc215b-eab2-11ee-b7f0-000c29c4dc96:1
            Executed_Gtid_Set: 15c89969-ed05-11ee-8717-000c291d4def:1,
51fc215b-eab2-11ee-b7f0-000c29c4dc96:1
                Auto_Position: 1
1 row in set (0.00 sec)

ERROR:
No query specified
2、停掉主庫
#停掉主庫
[root@db01 ~]# /etc/init.d/mysqld stop
Shutting down MySQL...... SUCCESS!

#查看db02的slave狀態
mysql> show slave status\G;
Empty set (0.00 sec)

ERROR:
No query specified

#查看db03的slave狀態
mysql> show slave status\G;
*************************** 1. row ***************************
               Slave_IO_State: Waiting for master to send event
                  Master_Host: 192.168.112.50
                  Master_User: slave
                  Master_Port: 3306
                Connect_Retry: 60
              Master_Log_File: mysql-bin.000002
          Read_Master_Log_Pos: 659
               Relay_Log_File: db03-relay-bin.000002
                Relay_Log_Pos: 662
        Relay_Master_Log_File: mysql-bin.000002
             Slave_IO_Running: Yes
            Slave_SQL_Running: Yes
              Replicate_Do_DB:
          Replicate_Ignore_DB:
           Replicate_Do_Table:
       Replicate_Ignore_Table:
      Replicate_Wild_Do_Table:
  Replicate_Wild_Ignore_Table:
                   Last_Errno: 0
                   Last_Error:
                 Skip_Counter: 0
          Exec_Master_Log_Pos: 659
              Relay_Log_Space: 865
              Until_Condition: None
               Until_Log_File:
                Until_Log_Pos: 0
           Master_SSL_Allowed: No
           Master_SSL_CA_File:
           Master_SSL_CA_Path:
              Master_SSL_Cert:
            Master_SSL_Cipher:
               Master_SSL_Key:
        Seconds_Behind_Master: 0
Master_SSL_Verify_Server_Cert: No
                Last_IO_Errno: 0
                Last_IO_Error:
               Last_SQL_Errno: 0
               Last_SQL_Error:
  Replicate_Ignore_Server_Ids:
             Master_Server_Id: 2
                  Master_UUID: e5c86268-ed04-11ee-8716-000c2936523e
             Master_Info_File: /application/mysql-5.6.40/data/master.info
                    SQL_Delay: 0
          SQL_Remaining_Delay: NULL
      Slave_SQL_Running_State: Slave has read all relay log; waiting for the slave I/O thread to update it
           Master_Retry_Count: 86400
                  Master_Bind:
      Last_IO_Error_Timestamp:
     Last_SQL_Error_Timestamp:
               Master_SSL_Crl:
           Master_SSL_Crlpath:
           Retrieved_Gtid_Set: e5c86268-ed04-11ee-8716-000c2936523e:1
            Executed_Gtid_Set: 15c89969-ed05-11ee-8717-000c291d4def:1,
51fc215b-eab2-11ee-b7f0-000c29c4dc96:1,
e5c86268-ed04-11ee-8716-000c2936523e:1
                Auto_Position: 1
1 row in set (0.00 sec)

ERROR:
No query specified
可以清晰的看到db02已經切換為master
#manage節點的狀態檢測也停止了
[root@db03 ~]# masterha_check_status --conf=/etc/mha/app1.cnf
app1 is stopped(2:NOT_RUNNING).
#對應的[server1]也被刪除了
[root@db03 ~]# cat /etc/mha/app1.cnf
[server default]
manager_log=/var/log/mha/app1/manager.log
manager_workdir=/var/log/mha/app1
master_binlog_dir=/application/mysql/data
password=mha
ping_interval=2
repl_password=123
repl_user=slave
ssh_user=root
user=mha

[server2]
candidate_master=1
check_repl_delay=0
hostname=192.168.112.50
port=3306

[server3]
hostname=192.168.112.60
port=3306
3、手動將主庫以slave身份加回去
即使重新開啟主庫,主庫也不會自動加回去了,只能以slave的身份手動加回去
mysql> change master to
    -> master_host='192.168.112.50',
    -> master_user='slave',
    -> master_password='123',
    -> master_auto_position=1;
Query OK, 0 rows affected, 2 warnings (0.01 sec)

mysql> start slave;
Query OK, 0 rows affected (0.00 sec)

mysql> show slave status\G;
*************************** 1. row ***************************
               Slave_IO_State: Connecting to master
                  Master_Host: 192.168.112.50
                  Master_User: slave
                  Master_Port: 3306
                Connect_Retry: 60
              Master_Log_File:
          Read_Master_Log_Pos: 4
               Relay_Log_File: db01-relay-bin.000001
                Relay_Log_Pos: 4
        Relay_Master_Log_File:
             Slave_IO_Running: Connecting
            Slave_SQL_Running: Yes
              Replicate_Do_DB:
          Replicate_Ignore_DB:
           Replicate_Do_Table:
       Replicate_Ignore_Table:
      Replicate_Wild_Do_Table:
  Replicate_Wild_Ignore_Table:
                   Last_Errno: 0
                   Last_Error:
                 Skip_Counter: 0
          Exec_Master_Log_Pos: 0
              Relay_Log_Space: 151
              Until_Condition: None
               Until_Log_File:
                Until_Log_Pos: 0
           Master_SSL_Allowed: No
           Master_SSL_CA_File:
           Master_SSL_CA_Path:
              Master_SSL_Cert:
            Master_SSL_Cipher:
               Master_SSL_Key:
        Seconds_Behind_Master: 0
Master_SSL_Verify_Server_Cert: No
                Last_IO_Errno: 0
                Last_IO_Error:
               Last_SQL_Errno: 0
               Last_SQL_Error:
  Replicate_Ignore_Server_Ids:
             Master_Server_Id: 0
                  Master_UUID:
             Master_Info_File: /application/mysql/data/master.info
                    SQL_Delay: 0
          SQL_Remaining_Delay: NULL
      Slave_SQL_Running_State: Slave has read all relay log; waiting for the slave I/O thread to update it
           Master_Retry_Count: 86400
                  Master_Bind:
      Last_IO_Error_Timestamp:
     Last_SQL_Error_Timestamp:
               Master_SSL_Crl:
           Master_SSL_Crlpath:
           Retrieved_Gtid_Set:
            Executed_Gtid_Set: 51fc215b-eab2-11ee-b7f0-000c29c4dc96:1
                Auto_Position: 1
1 row in set (0.00 sec)

ERROR:
No query specified
六、配置VIP漂移
在MHA(MySQL Master High Availability)高可用架構中,虛擬IP(VIP)漂移是用於確保服務不間斷的一種策略,當主資料庫發生故障時,VIP會從原主節點遷移到新的主節點,這樣應用程式和服務始終可以通過VIP訪問到當前的主資料庫,而無需修改任何指向資料庫的實際IP地址
-
VIP漂移的兩種方式
-
通過keepalived的方式,管理虛擬IP的漂移
-
通過MHA自帶腳本方式,管理虛擬IP的漂移
-
1、編輯配置文件
#manage節點
[root@db03 ~]# vim /etc/mha/app1.cnf

[server default]
master_ip_failover_script=/etc/mha/master_ip_failover	#在[server default]標簽下添加
#隨便把之前刪除的[server1]加回來
[server1]
hostname=192.168.112.40
port=3306
2、編輯MHA自帶的腳本
[root@db03 ~]# vim /etc/mha/master_ip_failover
#!/usr/bin/env perl

use strict;
use warnings FATAL => 'all';

use Getopt::Long;

my (
    $command,          $ssh_user,        $orig_master_host, $orig_master_ip,
    $orig_master_port, $new_master_host, $new_master_ip,    $new_master_port
);

my $vip = '192.168.112.66/24';
my $key = '0';
my $ssh_start_vip = "/sbin/ifconfig ens33:$key $vip";
my $ssh_stop_vip = "/sbin/ifconfig ens33:$key down";

GetOptions(
    'command=s'          => \$command,
    'ssh_user=s'         => \$ssh_user,
    'orig_master_host=s' => \$orig_master_host,
    'orig_master_ip=s'   => \$orig_master_ip,
    'orig_master_port=i' => \$orig_master_port,
    'new_master_host=s'  => \$new_master_host,
    'new_master_ip=s'    => \$new_master_ip,
    'new_master_port=i'  => \$new_master_port,
);

exit &main();

sub main {

    print "\n\nIN SCRIPT TEST====$ssh_stop_vip==$ssh_start_vip===\n\n";

    if ( $command eq "stop" || $command eq "stopssh" ) {

        my $exit_code = 1;
        eval {
            print "Disabling the VIP on old master: $orig_master_host \n";
            &stop_vip();
            $exit_code = 0;
        };
        if ($@) {
            warn "Got Error: $@\n";
            exit $exit_code;
        }
        exit $exit_code;
    }
    elsif ( $command eq "start" ) {

        my $exit_code = 10;
        eval {
            print "Enabling the VIP - $vip on the new master - $new_master_host \n";
            &start_vip();
            $exit_code = 0;
        };
        if ($@) {
            warn $@;
            exit $exit_code;
        }
        exit $exit_code;
    }
    elsif ( $command eq "status" ) {
        print "Checking the Status of the script.. OK \n";
        exit 0;
    }
    else {
        &usage();
        exit 1;
    }
}

sub start_vip() {
    `ssh $ssh_user\@$new_master_host \" $ssh_start_vip \"`;
}
sub stop_vip() {
     return 0  unless  ($ssh_user);
    `ssh $ssh_user\@$orig_master_host \" $ssh_stop_vip \"`;
}

sub usage {
    print
    "Usage: master_ip_failover --command=start|stop|stopssh|status --orig_master_host=host --orig_master_ip=ip --orig_master_port=port --new_master_host=host --new_master_ip=ip --new_master_port=port\n";
}
這裡面需要依據個人修改的是
my $vip = '192.168.112.66/24';
然後添加執行許可權
[root@db03 ~]# chmod a+x /etc/mha/master_ip_failover
3、手動綁定VIP(master節點)
#所有主機,主要是ifconfig命令
yum install -y net-tools
#綁定vip
[root@db02 ~]# ifconfig ens33:0 192.168.112.66/24
[root@db02 ~]# ip a | grep ens33
2: ens33: <BROADCAST,MULTICAST,UP,LOWER_UP> mtu 1500 qdisc pfifo_fast state UP group default qlen 1000
    inet 192.168.112.50/24 brd 192.168.112.255 scope global noprefixroute ens33
    inet 192.168.112.66/24 brd 192.168.112.255 scope global secondary ens33:0
4、啟動測試(manage節點)
masterha_check_ssh --conf=/etc/mha/app1.cnf
masterha_check_repl --conf=/etc/mha/app1.cnf
5、重啟MHA(manage節點)
#啟動
[root@db03 ~]# nohup masterha_manager --conf=/etc/mha/app1.cnf --remove_dead_master_conf --ignore_last_failover < /dev/null > /var/log/mha/app1/manager.log 2>&1 &
[1] 21063
[root@db03 ~]# jobs
[1]+  運行中               nohup masterha_manager --conf=/etc/mha/app1.cnf --remove_dead_master_conf --ignore_last_failover < /dev/null > /var/log/mha/app1/manager.log 2>&1 &
#檢測狀態,識別出master
[root@db03 ~]# masterha_check_status --conf=/etc/mha/app1.cnf
app1 (pid:21063) is running(0:PING_OK), master:192.168.112.50
6、測試IP漂移
#停掉主庫
[root@db02 ~]# /etc/init.d/mysqld stop
Shutting down MySQL..... SUCCESS!
#db01查看slave信息,經歷了一個連接不上主庫到自己提升為主庫的過程
mysql> show slave status\G;
*************************** 1. row ***************************
               Slave_IO_State:
                  Master_Host: 192.168.112.50
                  Master_User: slave
                  Master_Port: 3306
                Connect_Retry: 60
              Master_Log_File: mysql-bin.000003
          Read_Master_Log_Pos: 231
               Relay_Log_File: db01-relay-bin.000003
                Relay_Log_Pos: 401
        Relay_Master_Log_File: mysql-bin.000003
             Slave_IO_Running: No
            Slave_SQL_Running: No
              Replicate_Do_DB:
          Replicate_Ignore_DB:
           Replicate_Do_Table:
       Replicate_Ignore_Table:
      Replicate_Wild_Do_Table:
  Replicate_Wild_Ignore_Table:
                   Last_Errno: 0
                   Last_Error:
                 Skip_Counter: 0
          Exec_Master_Log_Pos: 231
              Relay_Log_Space: 1115
              Until_Condition: None
               Until_Log_File:
                Until_Log_Pos: 0
           Master_SSL_Allowed: No
           Master_SSL_CA_File:
           Master_SSL_CA_Path:
              Master_SSL_Cert:
            Master_SSL_Cipher:
               Master_SSL_Key:
        Seconds_Behind_Master: NULL
Master_SSL_Verify_Server_Cert: No
                Last_IO_Errno: 2003
                Last_IO_Error: error reconnecting to master '[email protected]:3306' - retry-time: 60  retries: 1
               Last_SQL_Errno: 0
               Last_SQL_Error:
  Replicate_Ignore_Server_Ids:
             Master_Server_Id: 2
                  Master_UUID: e5c86268-ed04-11ee-8716-000c2936523e
             Master_Info_File: /application/mysql/data/master.info
                    SQL_Delay: 0
          SQL_Remaining_Delay: NULL
      Slave_SQL_Running_State:
           Master_Retry_Count: 86400
                  Master_Bind:
      Last_IO_Error_Timestamp: 240329 00:45:33
     Last_SQL_Error_Timestamp:
               Master_SSL_Crl:
           Master_SSL_Crlpath:
           Retrieved_Gtid_Set: e5c86268-ed04-11ee-8716-000c2936523e:1
            Executed_Gtid_Set: 51fc215b-eab2-11ee-b7f0-000c29c4dc96:1,
e5c86268-ed04-11ee-8716-000c2936523e:1
                Auto_Position: 1
1 row in set (0.00 sec)

ERROR:
No query specified

mysql> show slave status\G;
Empty set (0.00 sec)

ERROR:
No query specified

#db03查看slave信息,發現主庫已經成功切換到db01
mysql> show slave status\G;
*************************** 1. row ***************************
               Slave_IO_State: Waiting for master to send event
                  Master_Host: 192.168.112.40
                  Master_User: slave
                  Master_Port: 3306
                Connect_Retry: 60
              Master_Log_File: mysql-bin.000003
          Read_Master_Log_Pos: 445
               Relay_Log_File: db03-relay-bin.000002
                Relay_Log_Pos: 408
        Relay_Master_Log_File: mysql-bin.000003
             Slave_IO_Running: Yes
            Slave_SQL_Running: Yes
              Replicate_Do_DB:
          Replicate_Ignore_DB:
           Replicate_Do_Table:
       Replicate_Ignore_Table:
      Replicate_Wild_Do_Table:
  Replicate_Wild_Ignore_Table:
                   Last_Errno: 0
                   Last_Error:
                 Skip_Counter: 0
          Exec_Master_Log_Pos: 445
              Relay_Log_Space: 611
              Until_Condition: None
               Until_Log_File:
                Until_Log_Pos: 0
           Master_SSL_Allowed: No
           Master_SSL_CA_File:
           Master_SSL_CA_Path:
              Master_SSL_Cert:
            Master_SSL_Cipher:
               Master_SSL_Key:
        Seconds_Behind_Master: 0
Master_SSL_Verify_Server_Cert: No
                Last_IO_Errno: 0
                Last_IO_Error:
               Last_SQL_Errno: 0
               Last_SQL_Error:
  Replicate_Ignore_Server_Ids:
             Master_Server_Id: 1
                  Master_UUID: 51fc215b-eab2-11ee-b7f0-000c29c4dc96
             Master_Info_File: /application/mysql-5.6.40/data/master.info
                    SQL_Delay: 0
          SQL_Remaining_Delay: NULL
      Slave_SQL_Running_State: Slave has read all relay log; waiting for the slave I/O thread to update it
           Master_Retry_Count: 86400
                  Master_Bind:
      Last_IO_Error_Timestamp:
     Last_SQL_Error_Timestamp:
               Master_SSL_Crl:
           Master_SSL_Crlpath:
           Retrieved_Gtid_Set:
            Executed_Gtid_Set: 15c89969-ed05-11ee-8717-000c291d4def:1,
51fc215b-eab2-11ee-b7f0-000c29c4dc96:1,
e5c86268-ed04-11ee-8716-000c2936523e:1
                Auto_Position: 1
1 row in set (0.00 sec)

ERROR:
No query specified
#在db01上查看vip信息
[root@db01 ~]# ip a |grep ens33
#在db02上查看vip信息
[root@db02 ~]# ip a |grep ens33
2: ens33: <BROADCAST,MULTICAST,UP,LOWER_UP> mtu 1500 qdisc pfifo_fast state UP group default qlen 1000
    inet 192.168.112.40/24 brd 192.168.112.255 scope global noprefixroute ens33
    inet 192.168.112.66/24 brd 192.168.112.255 scope global secondary ens33:0


