
目錄準備界面:view控制項LayoutCreator事件監聽OnClickListener轉跳頁面IntentIntent傳遞數據Toast和AlertDialogGson使用OKhttp3的基本使用post方法get方法輕量級存儲SharedPreferenceListView基本使用1、Simp ...
目錄
準備
開發軟體&配置:Android Studio, API34
打開軟體,新建一個空項目Empty Activity
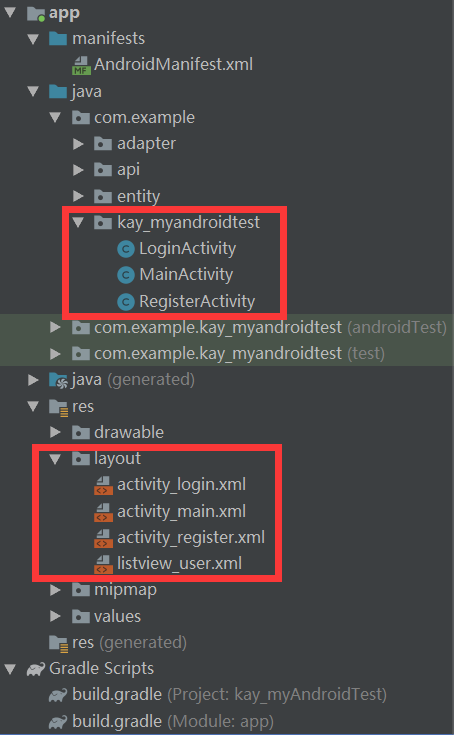
如圖所示:目錄結構
app
   | - manifests
       AndroidManifest.xml APP配置信息
   | - java 寫代碼的主目錄
       | - com.example.kay_myandroidtest
           MainActivity.java
   | - res
       | - layout
           activity_main.xml 項目主界面
界面:view控制項
點擊展開activity_login.xml代碼
<?xml version="1.0" encoding="utf-8"?>
<androidx.constraintlayout.widget.ConstraintLayout xmlns:android="http://schemas.android.com/apk/res/android"
    xmlns:app="http://schemas.android.com/apk/res-auto"
    xmlns:tools="http://schemas.android.com/tools"
    android:layout_width="match_parent"
    android:layout_height="match_parent"
    tools:context=".LoginActivity">

    <TextView
        android:id="@+id/tv_username"
        android:layout_width="wrap_content"
        android:layout_height="wrap_content"
        android:text="賬號:"
        app:layout_constraintBottom_toBottomOf="parent"
        app:layout_constraintEnd_toEndOf="parent"
        app:layout_constraintHorizontal_bias="0.167"
        app:layout_constraintStart_toStartOf="parent"
        app:layout_constraintTop_toTopOf="parent"
        app:layout_constraintVertical_bias="0.148" />

    <TextView
        android:id="@+id/tv_password"
        android:layout_width="wrap_content"
        android:layout_height="wrap_content"
        android:text="密碼:"
        app:layout_constraintBottom_toBottomOf="parent"
        app:layout_constraintEnd_toEndOf="parent"
        app:layout_constraintHorizontal_bias="0.168"
        app:layout_constraintStart_toStartOf="parent"
        app:layout_constraintTop_toTopOf="parent"
        app:layout_constraintVertical_bias="0.28" />

    <EditText
        android:id="@+id/et_username"
        android:layout_width="wrap_content"
        android:layout_height="wrap_content"
        android:ems="10"
        android:hint="請輸入有效的手機號"
        android:inputType="textPersonName"
        android:text=""
        app:layout_constraintBottom_toBottomOf="parent"
        app:layout_constraintEnd_toEndOf="parent"
        app:layout_constraintHorizontal_bias="0.696"
        app:layout_constraintStart_toStartOf="parent"
        app:layout_constraintTop_toTopOf="parent"
        app:layout_constraintVertical_bias="0.107" />

    <EditText
        android:id="@+id/et_password"
        android:layout_width="wrap_content"
        android:layout_height="wrap_content"
        android:ems="10"
        android:hint="請輸入6-20個數字"
        android:inputType="textPassword"
        app:layout_constraintBottom_toBottomOf="parent"
        app:layout_constraintEnd_toEndOf="parent"
        app:layout_constraintHorizontal_bias="0.696"
        app:layout_constraintStart_toStartOf="parent"
        app:layout_constraintTop_toTopOf="parent"
        app:layout_constraintVertical_bias="0.245" />

    <Button
        android:id="@+id/btn_toMain"
        android:layout_width="wrap_content"
        android:layout_height="wrap_content"
        android:text="返迴首頁"
        app:layout_constraintBottom_toBottomOf="parent"
        app:layout_constraintEnd_toEndOf="parent"
        app:layout_constraintHorizontal_bias="0.269"
        app:layout_constraintStart_toStartOf="parent"
        app:layout_constraintTop_toTopOf="parent"
        app:layout_constraintVertical_bias="0.398" />

    <Button
        android:id="@+id/btn_login"
        android:layout_width="wrap_content"
        android:layout_height="wrap_content"
        android:text="確認登錄"
        app:layout_constraintBottom_toBottomOf="parent"
        app:layout_constraintEnd_toEndOf="parent"
        app:layout_constraintHorizontal_bias="0.814"
        app:layout_constraintStart_toStartOf="parent"
        app:layout_constraintTop_toTopOf="parent"
        app:layout_constraintVertical_bias="0.396" />

    <TextView
        android:id="@+id/textView"
        android:layout_width="wrap_content"
        android:layout_height="wrap_content"
        android:text="用戶登錄"
        app:layout_constraintHorizontal_bias="0.5"
        app:layout_constraintVertical_bias="0.027"
        app:layout_constraintBottom_toBottomOf="parent"
        app:layout_constraintEnd_toEndOf="parent"
        app:layout_constraintStart_toStartOf="parent"
        app:layout_constraintTop_toTopOf="parent"/>
</androidx.constraintlayout.widget.ConstraintLayout>
TextView:純展示文本
EditText:輸入框
Button:按鈕
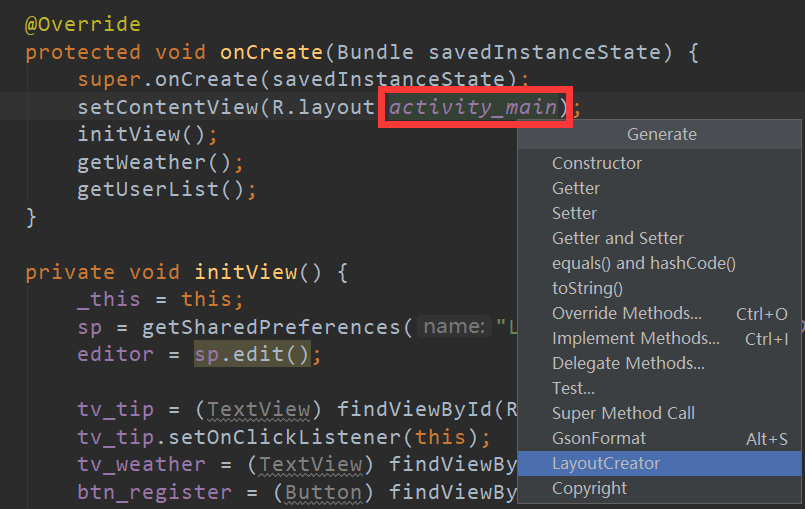
LayoutCreator
需要安裝插件GsonFormat和LayoutCreator
安裝好插件之後,回到MainActivity.java上
將滑鼠放在OnCreate方法的activity_main上,按下Alt+Insert,選擇倒數第二個LayoutCreator,選擇要導入的控制項。
事件監聽OnClickListener
當前的Activity需要implementsView.OnClickListener,然後重寫onClick方法
用LayoutCreator生成代碼的時候,如果有按鈕,會自動實現onClick方法
    @Override
    public void onClick(View v) {
        switch (v.getId()) {
            case R.id.btn_register:
                toRegPage();
                break;
            case R.id.btn_login:
                toLoginPage();
                break;
        }
    }
也可以在initView的時候,來寫(不推薦)
btn_login.setOnClickListener(new View.OnClickListener() {
     @Override
     public void onClick(View view) {

     }
});
轉跳頁面Intent
這個轉跳屬於顯示轉跳,還有隱式轉跳,不太實用,不贅述。
Intent intent = new Intent(this, XXX.class);
startActivity(intent);
this:當前頁面
XXX.class:將要轉跳的頁面
startActivity(): 這個方法屬於Context類,也就是當前頁面。寫完整的話,應該這樣寫this.startActivity(intent);
Intent傳遞數據
發送數據
例如:從Main頁面傳遞參數到Login頁面
Intent intent = new Intent(this,LoginActivity.class);
intent.putExtra("key","value");
startActivity(intent);
接受數據
在loginActicity接受數據
Intent intent = this.getIntent();
cateCode=intent.getStringExtra("cateCode");
Toast和AlertDialog
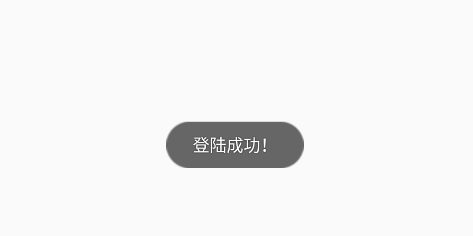
Toast
Toast.makeText(this,"登陸成功!",Toast.LENGTH_SHORT).show();
第一個參數:當前活動 this
第二個參數:提示的消息內容
第三個參數:顯示時間長短,Toast.LENGTH_SHORT或Toast.LENGTH_LONG
調整位置
Toast myToast=Toast.makeText(this,"登陸成功!",Toast.LENGTH_SHORT);
myToast.setGravity(Gravity.CENTER,0,0);
//第一個參數:起始位置;
//第二個參數:x軸偏移量;
//第三個參數:y軸偏移量
myToast.show();
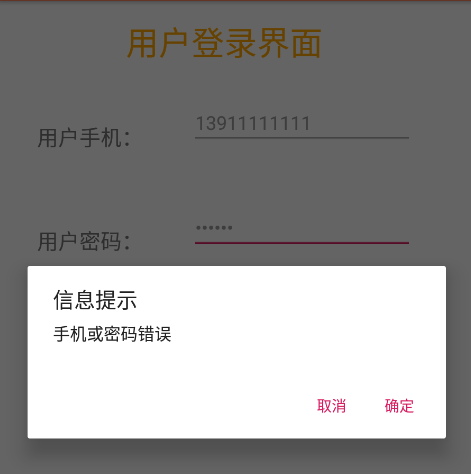
AlertDialog
基本用法
AlertDialog.Builder dialog = new AlertDialog.Builder(this);//當前活動
dialog.setIcon(R.mipmap.ic_launcher);//圖標
dialog.setTitle("信息提示");//標題
dialog.setMessage("xxx");//內容(彈窗中間)
dialog.setCancelable(true/false);//點擊彈窗外部是否關閉
dialog.setPositiveButton("確定", new DialogInterface.OnClickListener() {//按鈕文字及點擊事件
	@Override
	public void onClick(DialogInterface dialog, int which) {
		//code
	}
});
dialog.setNegativeButton("取消",null);//無點擊事件
dialog.show();
Gson使用
一、概述
Gson 是 Google 提供的用來在 Java 對象和 JSON 數據之間進行映射的 Java 類庫。可以將一個 JSON 數據轉成一個 Java 對象,或者反過來。
JSON數據有兩種類型:
(1)一種是對象,object -> {key:value,key:value,...} 。
(2)另一種是數組,array -> [value,value,...] 。【這裡的value又是一個個對象】
GSON在解析json的時候,大體上有2種類型:
(1)一種是直接在記憶體中生成object或array,通過手工指定key來獲取值;
(2)另一種是藉助javabean(即自定義類)來進行映射獲取值。
二、導入Gson依賴包
在“File”菜單下的“project structure”中的“Dependencies”下的當前Module中去添加“Library Dependency”中的搜索功能搜索得到(com.google.code.gson)。
在build.gradle中添加依賴
implementation 'com.google.code.gson:gson:2.8.5'
三、Gson類基本使用
1.直接解析,不使用javabean(不推薦)
2.藉助javabean類,生成對應javabean對象來解析數據(推薦)
(1)json數據是對象類型
Gson gson = new Gson();
自定義類 bean = gson.fromJson(json數據, 自定義類.class);
特別說明:
①如果自定義類中的屬性和json數據中的鍵名不一致,可以在自定義類中通過@SerializedName(別名1,別名2)這樣的方式來設定別名與鍵名對應。
②如果自定義類中的某個屬性不參與序列化和反序列化,可以在自定義類中通過@Expose(serialize=false,deserialize=false)這樣的方式來限制。
③如果json數據的value是數組或者對象,那麼對應自定義類中該屬性的類型分別應該是List
(2)json數據是數組類型
一般我們需要將數組類型的json數據反序列化為List
Gson gson = new Gson();
Type type=new TypeToken<List<T>>(){}.getType();
List<T> fruitList = gson2.fromJson(json數據, type);
這裡的重點就是type的獲取。
OKhttp3的基本使用
OkHttp官網地址:http://square.github.io/okhttp/
OkHttp GitHub地址:https://github.com/square/okhttp
在build.gradle中添加依賴
implementation 'com.squareup.okhttp3:okhttp:3.12.1'
提示:該插件多數用於網路應用,所以必須在項目中添加internet的訪問許可權
在AndroidManifest.xml中添加給用戶網路許可權
<uses-permission android:name="android.permission.INTERNET" />
post方法
點擊展開post代碼
OkHttpClient client = new OkHttpClient();
FormBody formBody = new FormBody.Builder()
        .add("userPhone", phoneString)
        .add("userPwd", pwdString)
        .add("userName", nicknameString)
        .add("userNickName", nicknameString)
        .add("token",UrlConfig.TOKEN)
        .build();
Request request = new Request.Builder()
        .url("http://kjxycode.zisu.edu.cn/interfaceCommonForUser/CheckUserLogin")
        .post(formBody)
        .build();
Call call = client.newCall(request);
call.enqueue(new Callback() {
    @Override
    public void onFailure(Call call, IOException e) {
        Log.d("bug","Error");
    }

    @Override
    public void onResponse(Call call, Response response) throws IOException {
        String res = response.body().string();
        runOnUiThread(new Runnable() {//強制指定是在UI主線程上運行
            @Override
            public void run() {
                 //修改主線程view
                 Toast.makeText(_this, "註冊成功", Toast.LENGTH_SHORT).show();
            }
        });
        toLoginPage();
    }
});
get方法
和post方法大同小異,只是少了formBody來傳參
點擊展開get代碼
OkHttpClient client = new OkHttpClient();
final Request request = new Request.Builder()
        .url(UrlConfig.GetUserList + "?token=" + UrlConfig.TOKEN)
        .get().build();
Call call = client.newCall(request);
call.enqueue(new Callback() {
        @Override
        public void onFailure(Call call, IOException e) {
            Log.d("mainBug-getUserList", "onFailure: " + e);
        }

        @Override
        public void onResponse(Call call, Response response) throws IOException {
            Log.d("mainBug", "userList: " + resp);
        }
});
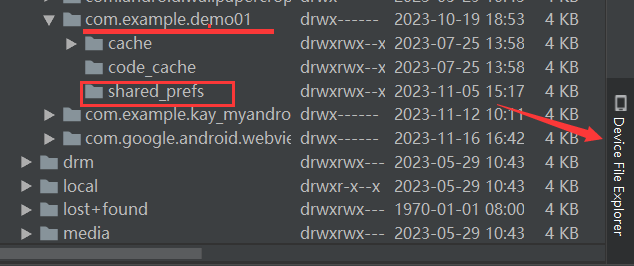
輕量級存儲SharedPreference
SharedPreferences是用xml文件來存放數據,文件存放在/data/data/<package name>/shared_prefs目錄下。
界面右下角
//讀取數據
sp = getSharedPreferences("LoginInfo", Context.MODE_PRIVATE);
String username = sp.getString("username", "");

//寫入數據
SharedPreferences sp = getSharedPreferences("LoginInfo", Context.MODE_PRIVATE);
SharedPreferences.Editor edit = sp.edit();
edit.putString("phone",phoneString);
edit.commit();
ListView基本使用
一、概述
ListView是Android中最常用的控制項之一,主要用來呈現列表形式的內容。該列表控制項上數據的顯示主要通過數據動態綁定這一方式來進行。
不過現在該控制項被歸到了“Legacy”組中,所以可以考慮後續用的越來越少了吧。替代的控制項可以用RecyclerView
二、添加控制項
在工具箱中找到“Legacy”組,然後將ListView控制項拖入佈局文件中,並設置好約束或其他形式的佈局。
三、將數據綁定到控制項
1、SimpleAdapter
點擊展開SimpleAdapter綁定代碼
List<Map<String,String>> userList = new ArrayList<>();
for (int i=0;i<9;i++) {
    Map<String,String> map=new HashMap<>();
    map.put("userName", "userName"+i);
    map.put("userPhone","userName"+i);
    userList.add(map);
}

simpleAdapter = new SimpleAdapter(
        _this,//當前頁面
        userList,//數據
        R.layout.listview_user,//自定義佈局
        new String[]{"userName","userPhone"},//每一行的單元格內容在Map中對應索引名
        new int[]{R.id.tvName,R.id.tvPhone});//每一行的單元格對應視圖的id號
lvUser.setAdapter(simpleAdapter);
2、較複雜的數據綁定
(1)定義複雜的數據源List<T>
這裡的數據源可以使用複雜類型對象的數組或者存放複雜數據類型對象的List(ArrayList)列表對象。
private List<GetUserRespBean.UserListBean> getUserList;
裡面的數據來自於利用OkHttp請求遠程伺服器介面所獲取到的返回數據。
(2)定義顯示佈局Layout listview_user.xml
創建一個佈局文件,類似前面的Activity佈局。但是要註意的是這裡的佈局是用來顯示ListView列表中的單獨一項的內容。
例如,可以新建一個水平線性佈局,然後水平放置三個控制項:覆選框、文本、按鈕。
(3)定義適配器UserListAdapter.java
此時的適配器我們需要自定義一個繼承自BaseAdapter的類UserListAdapter,然後實現基類的以下幾個方法,主要是getView()方法,獲取當前的佈局對象:LayoutInflater.from(_this).inflate(R.layout.listview_user,null);
點擊展開UserListAdapter代碼
public class UserListAdapter extends BaseAdapter {

    private List<GetUserRespBean.UserListBean> getUserList;

    private Context _this;

    public UserListAdapter(List<GetUserRespBean.UserListBean> getUserList, Context _this) {
        this.getUserList = getUserList;
        this._this = _this;
    }

    @Override
    public int getCount() {
        return getUserList.size();
    }

    @Override
    public Object getItem(int i) {
        return getUserList.get(i);
    }

    @Override
    public long getItemId(int i) {
        return getUserList.get(i).getId();
    }

    @Override
    public View getView(int i, View view, ViewGroup viewGroup) {
        view = LayoutInflater.from(_this).inflate(R.layout.listview_user,null);
        TextView tvName=view.findViewById(R.id.tvName);
        TextView tvPhone=view.findViewById(R.id.tvPhone);
        tvName.setText(getUserList.get(i).getUserName());
        tvPhone.setText(getUserList.get(i).getUserPhone());
        Button btnDel=view.findViewById(R.id.btn_update);
        btnDel.setOnClickListener(...);
    }

}
(3)例如需要在MainActivity頁面用到ListView
請求獲得數據後,new UserListAdapter,然後給lvUser.setAdapter(adapter);
@Override
public void onResponse(Call call, Response response) throws IOException {
    String resp = response.body().string();
    Gson gson = new Gson();
    GetUserRespBean userInfo = gson.fromJson(resp, GetUserRespBean.class);
    adapter = new UserListAdapter(userInfo.getUserList(), _this);
    runOnUiThread(new Runnable() {
        @Override
        public void run() {
            lvUser.setAdapter(adapter);
        }
    });
}
3、ListView的事件監聽
註意:item和item里的button同時綁定事件監聽,會產生衝突,那麼誰優先就是個問題。ListView作為容器有個屬性:
descendantFocusability來處理這個問題。
該屬性有三個給定值:
beforeDescendants:viewgroup會優先其子類控制項而獲取到焦點
afterDescendants:viewgroup只有當其子類控制項不需要獲取焦點時才獲取焦點
blocksDescendants:viewgroup會覆蓋子類控制項而直接獲得焦點
1、自身的事件監聽
主要就是項點擊事件的監聽:OnItemClickListener
點擊查看代碼
lvUser = findViewById(R.id.lvUser);
lvUser.setOnItemClickListener(new AdapterView.OnItemClickListener() {
    @Override
    public void onItemClick(AdapterView<?> adapterView, View view, int i, long l) {
        //...相關操作
    }
});
2、列表項中控制項的事件監聽
主要是在自定義適配器類中的getView方法中實現列表項控制項的事件監聽。
例如:之前在UserListAdapter中的代碼,btn_del的OnClickListener
代碼之前有,不再展示
寫於 2023-11-16 18:11:31 星期四


