Hadoop集群搭建 前期準備及JDK,hadoop安裝 設置主機名和添加主機映射 驗證連通性 SSH無密碼登錄 配置集群/分散式環境 修改workers 修改文件core-site.xml 修改hdfs-site.xml 修改mapred-site.xml 修改yarn-site.xml 分發到其 ...
Hadoop集群搭建
- 前期準備及JDK,hadoop安裝
- 設置主機名和添加主機映射
- 驗證連通性
- SSH無密碼登錄
- 配置集群/分散式環境
- 分發到其他結點
- 格式化namenode
- 執行分散式實例
- java API與HDFS的編程
1.前期準備及JDK,hadoop安裝
1.1JDK的下載地址,hadoop下載地址
選擇JDK8
選擇hadoop-3.3.5
註意點
查看鏡像是32位還是64位
uname -m
當輸出為x86_64時,說明是64位,不是的就是32位,此時需要重新下載鏡像,32位不方便
1.2創建hadoop用戶
在安裝完linus鏡像之後,需要創建一個專門的"hadoop"用戶,這裡的用戶名為 “prettyspider"
首先按 ctrl+alt+t 打開終端視窗,輸入如下命令創建新用戶 :
sudo useradd -m prettyspider -s /bin/bash
-m:將prettyspider作為用戶放入到用戶登錄目錄
-s:指定用戶登入後使用的shell
為用戶設置登錄密碼
sudo passwd prettyspider
為用戶添加管理員許可權
sudo adduser prettyspider sudo
之後登出,登錄"hadoop"用戶
1.3更新apt
sudo apt-get update
同步時間
sudo apt-get install ntpdata
ntpdata -u time2.aliyun.com # 同步為阿裡雲NTP伺服器
下載vim
sudo apt-get install vim
1.4安裝SSH、配置SSH無密碼登陸
sudo apt-get install openssh-server
安裝完之後,登錄本機
ssh localhost
在下方提示中輸入yes,再根據提示輸入“hadoop"用戶的密碼
設置免密登錄之前,一定要先用密碼登錄一下
exit                           # 退出剛纔的 ssh localhost
cd ~/.ssh/                     # 若沒有該目錄,請先執行一次ssh localhost
ssh-keygen -t rsa              # 會有提示,都按回車就可以
cat ./id_rsa.pub >> ./authorized_keys  # 加入授權
再使用ssh localhost登錄
1.5配置遠程登錄
遠程登錄實現種類比較多,最輕便的是用vscode進行遠程登錄,這裡使用的是MobaXterm軟體
可到官網中下載MobaXterm Xserver with SSH, telnet, RDP, VNC and X11 - Download (mobatek.net)
1.6JDK安裝
JDK版本為1.8.0_371
cd /usr/lib
sudo mkdir jvm #創建/usr/lib/jvm目錄用來存放JDK文件
sudo tar -zxvf ~/jdk-8u371-linux-x64.tar.gz -C /usr/lib/jvm  #將
設置環境變數
cd ~
vim ~/.bashrc
在其中添加
export JAVA_HOME=/usr/lib/jvm/jdk1.8.0_371  # 對應的版本號為jdk1.8.0_對應下載版本8u後面的數字
export JRE_HOME=${JAVA_HOME}/jre
export CLASSPATH=.:${JAVA_HOME}/lib:${JRE_HOME}/lib
export PATH=${JAVA_HOME}/bin:$PATH
是配置文件生效
source ~/.bashrc
查看是否安裝成功
java -version
當出現下圖,表明安裝成功

1.7安裝hadoop
sudo tar -zxvf ~/hadoop-3.3.5.tar.gz -C /usr/local   # 解壓到/usr/local中
cd /usr/local/
sudo mv ./hadoop-3.3.5/ ./hadoop            # 將文件夾名改為hadoop
sudo chown -R prettyspider ./hadoop       # 修改文件許可權,prettyspider為你的”hadoop"用戶名
查看hadoop是否可用
cd /usr/local/hadoop
./bin/hadoop version
出現下圖,表示可用

依次配置3台主機,對應的hadoop用戶名都為prettyspider
2.設置主機名和添加主機映射
2.1修改主機名
sudo vim /etc/hostname
3台主機分別設置為 node01 node02 node03
重啟後,對應的主機名便會更改,如
2.2添加主機映射
在node01結點上
sudo vim /etc/hosts
添加主機的映射,設置成下圖
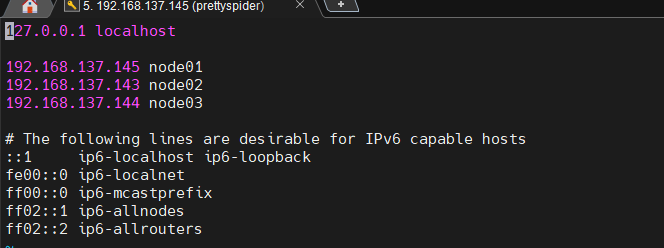
相應的其他結點也需要設置成上圖一樣
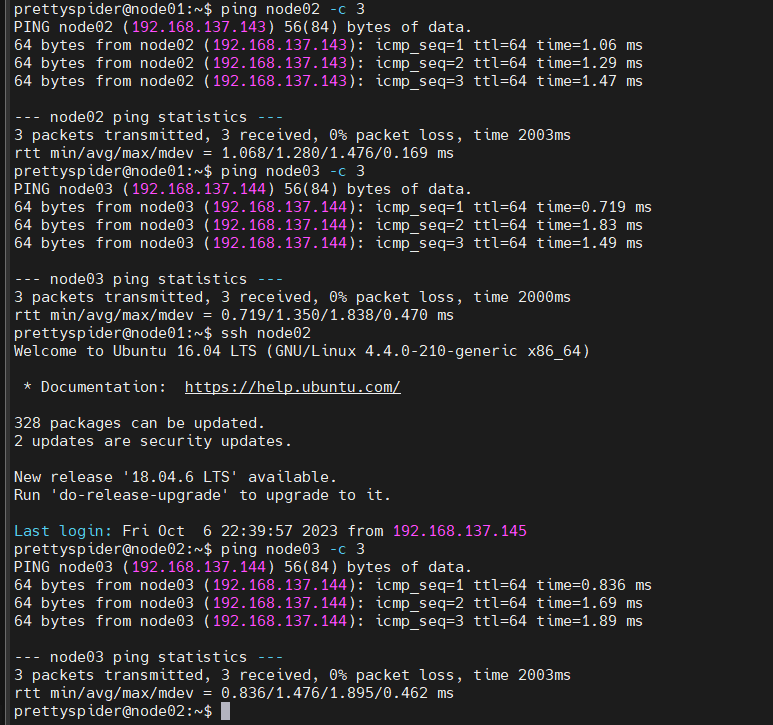
3.驗證連通性
用ping指令驗證連通性
ping node02 -c 3
連通成功的結果
4.SSH無密碼登錄
在最開始配置的SSH是只針對當前主機而言的SSH密匙,但是不利用集群的操作,所以需要統一的配置SSH密匙
4.1在主節點上刪除原有SSH,並再創建一個統一的SSH密匙
cd ~/.ssh              # 如果沒有該目錄,先執行一次ssh localhost
rm ./id_rsa*           # 刪除之前生成的公匙(如果已經存在)
ssh-keygen -t rsa       # 執行該命令後,遇到提示信息,一直按回車就可以
將生成的密匙添加到用戶的~/.ssh/authorized_keys,用於身份驗證
cat ./id_rsa.pub >> ./authorized_keys
將密匙傳入到對應的從結點上 傳輸到node02,node03
scp ~/.ssh/id_rsa.pub prettyspider@node02:/home/prettyspider/ # 此處@前後的名稱為自定義的用戶名和主機名 ,/home/後的為自定義的用戶名
在對應的結點上實現
mkdir ~/.ssh       # 如果不存在該文件夾需先創建,若已存在,則忽略本命令
cat ~/id_rsa.pub >> ~/.ssh/authorized_keys
rm ~/id_rsa.pub    # 用完以後就可以刪掉
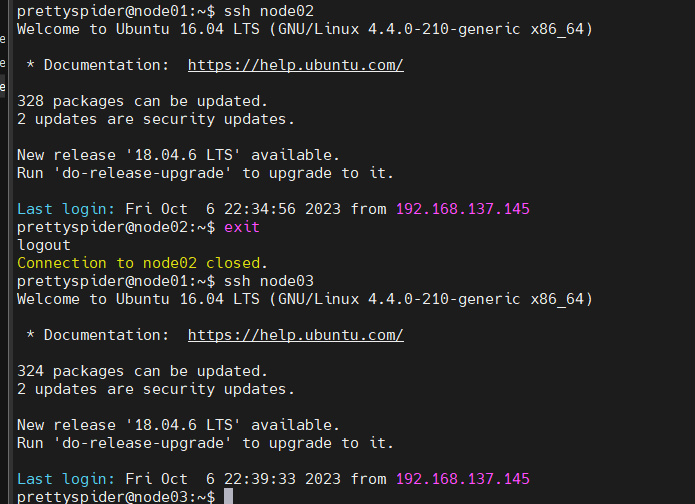
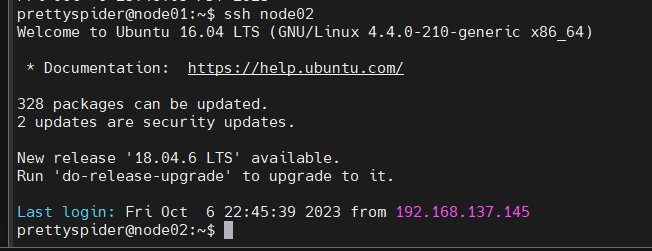
4.3查看是否成功
ssh nod02
如下,表示成功
4.4為hadoop添加PATH
在~/.bashrc中添加
export PATH=$PATH:/usr/local/hadoop/bin:/usr/local/hadoop/sbin # 指向對應hadoop路徑下的hadoop啟動文件夾的目錄
5.配置集群/分散式環境
5.1進入/usr/local/hadoop/etc/hadoop
/usr/local/hadoop/etc/hadoop
5.2修改workers
workers的作用:配置為DateNode的主機名,如下,刪除localhost

5.3修改文件core-site.xml
指定namenode的位置和設置hadoop文件系統的基本配置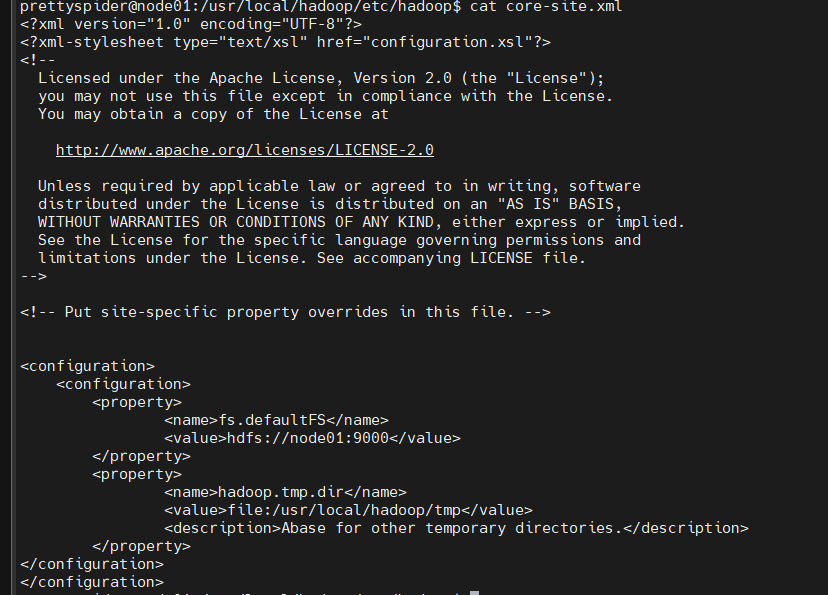
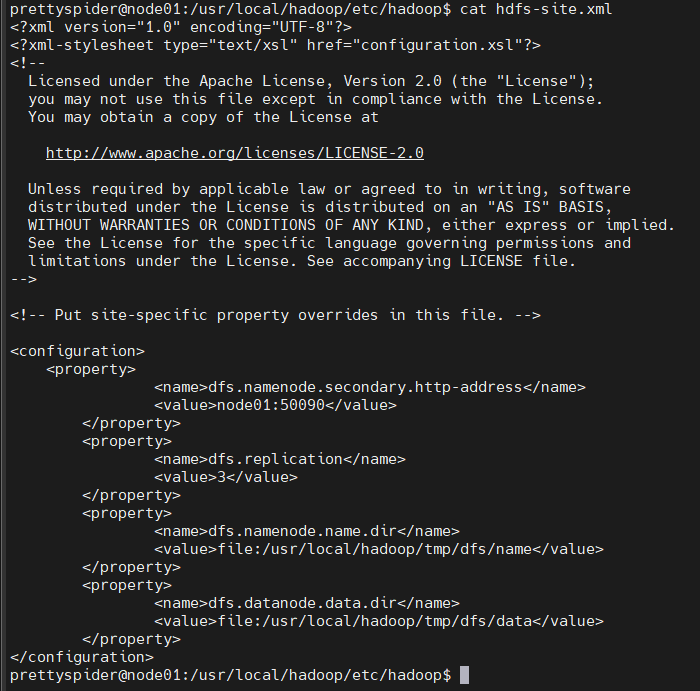
5.4修改hdfs-site.xml
配置namenode和datanode存放文件的基本路徑及配置副本的數量,最小值為3
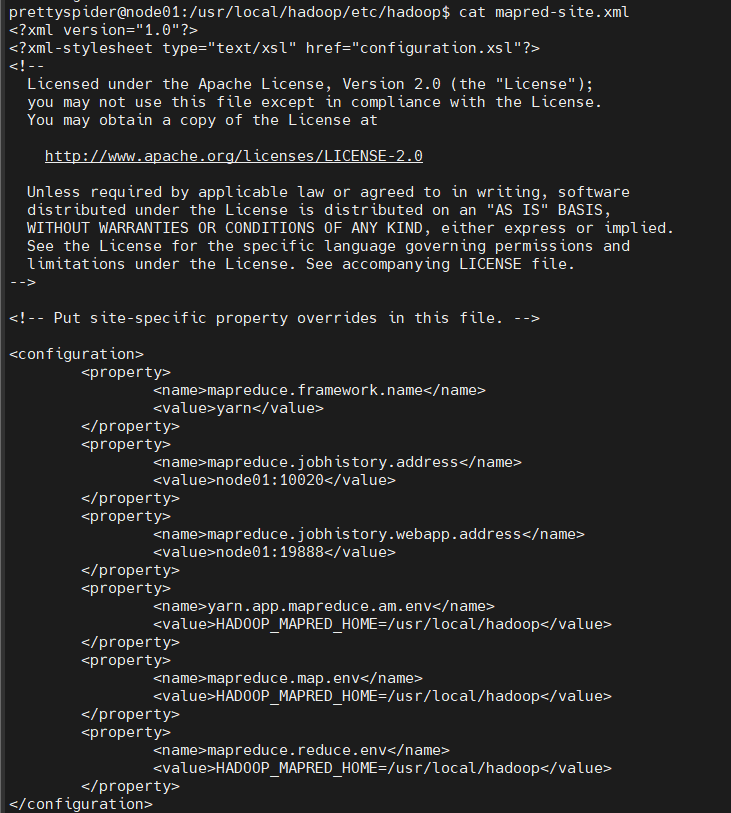
5.5修改mapred-site.xml
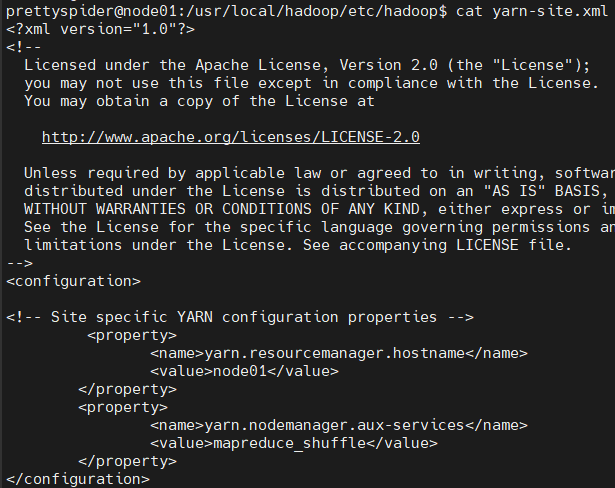
5.6修改yarn-site.xml
設置resourceManager運行在哪台機器上,設置NodeManager的通信方式
6.分發到其他結點
6.1分發其他結點
cd /usr/local
sudo rm -r ./hadoop/tmp     # 刪除 Hadoop 臨時文件
sudo rm -r ./hadoop/logs/*   # 刪除日誌文件
tar -zcf ~/hadoop.master.tar.gz ./hadoop   # 先壓縮再複製
cd ~
scp ./hadoop.master.tar.gz node02:/home/prettyspider
其中
sudo rm -r ./hadoop/tmp # 刪除 Hadoop 臨時文件
sudo rm -r ./hadoop/logs/* # 刪除日誌文件
很重要,在後期配置hbase集群時有用
6.2從節點解壓並設置用戶組
sudo rm -r /usr/local/hadoop    # 刪掉舊的(如果存在)
sudo tar -zxf ~/hadoop.master.tar.gz -C /usr/local
sudo chown -R prettyspider /usr/local/hadoop
7.格式化namenode
在從結點上完成了部署hadoop,在主節點上執行名稱結點的格式化
hdfs namenode -format
自此,hadoop集群搭建完成,啟動集群
start-dfs.sh
start-yarn.sh
mr-jobhistory-daemon.sh start historyserver
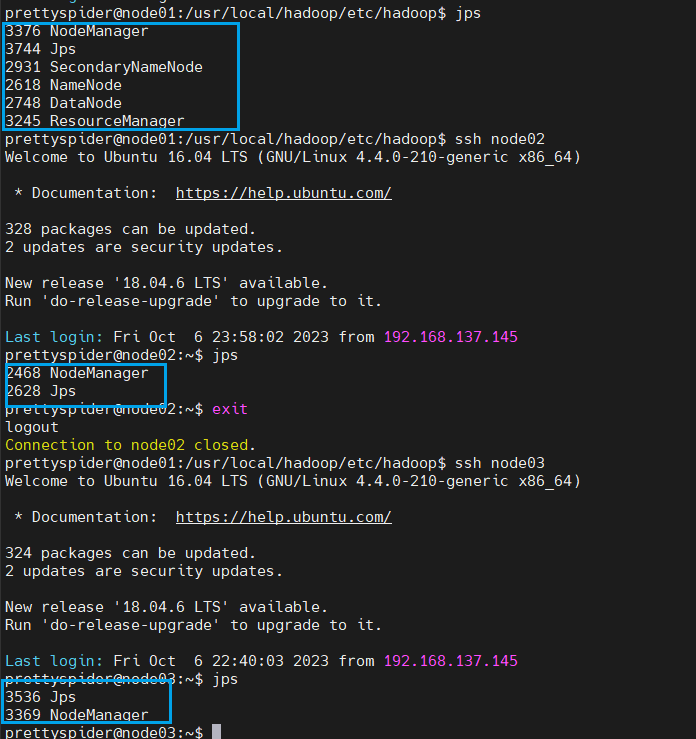
hadoop集群的規劃為

8.執行分散式實例
8.1創建HDFS上的用戶目錄
hdfs dfs -mkdir -p /user/prettyspider
hadoop用戶名是什麼,user後的用戶就是什麼
8.2創建input目錄
hdfs dfs -mkdir input # input文件夾預設在用戶目錄下,也就是prettyspider目錄下
hdfs dfs -put /usr/local/hadoop/etc/hadoop/*.xml input
8.3運行MapReduce作業
這個測試是用正則表達式獲取指定首碼的任意長的欄位
hadoop jar /usr/local/hadoop/share/hadoop/mapreduce/hadoop-mapreduce-examples-3.3.5.jar grep input output 'dfs[a-z.]+'
結果為

9.java API與HDFS的編程
1.導入Maven依賴
<dependencies>
     <dependency>
            <groupId>org.apache.hadoop</groupId>
            <artifactId>hadoop-common</artifactId>
            <version>2.7.5</version>
    </dependency>
        <dependency>
            <groupId>org.apache.hadoop</groupId>
            <artifactId>hadoop-client</artifactId>
            <version>2.7.5</version>
 </dependency>
        <dependency>
            <groupId>org.apache.hadoop</groupId>
            <artifactId>hadoop-hdfs</artifactId>
            <version>2.7.5</version>
 </dependency>
 <dependency>
            <groupId>org.apache.hadoop</groupId>
            <artifactId>hadoop-mapreduce-client-core</artifactId>
            <version>2.7.5</version>
 </dependency>
        <dependency>
            <groupId>junit</groupId>
            <artifactId>junit</artifactId>
            <version>RELEASE</version>
        </dependency>
    </dependencies>
    <build>
        <plugins>
            <plugin>
                <groupId>org.apache.maven.plugins</groupId>
                <artifactId>maven-compiler-plugin</artifactId>
                <version>3.1</version>
                <configuration>
                    <source>1.8</source>
                    <target>1.8</target>
                    <encoding>UTF-8</encoding>
                    <!--   <verbal>true</verbal>-->
                </configuration>
            </plugin>
            <plugin>
                <groupId>org.apache.maven.plugins</groupId>
                <artifactId>maven-shade-plugin</artifactId>
                <version>2.4.3</version>
                <executions>
                    <execution>
                        <phase>package</phase>
                        <goals>
                            <goal>shade</goal>
                        </goals>
                        <configuration>
                            <minimizeJar>true</minimizeJar>
                        </configuration>
                    </execution>
                </executions>
            </plugin>
        </plugins>
    </build>
2.上傳本地文件到HDFS文件系統,將HDFS文件系統中的文件下載到本地並壓縮
1.創建ConnectionJavaBean類,用於登錄HDFS
package com.prettyspider.hadoop;

import org.apache.hadoop.conf.Configuration;
import org.apache.hadoop.fs.FileSystem;

import java.io.IOException;
import java.net.URI;
import java.net.URISyntaxException;

/**
 * @author prettyspider
 * @ClassName Connection
 * @description: TODO
 * @date 2023/10/7 19:00
 * @Version V1.0
 */

public class Connection {
    // HDFS文件系統web地址
    private String hdfsUrl;
    // hadoop用戶名
    private String hadoopHost;
    // 文件系統對象
    private FileSystem fs;
    public Connection() {}

    public Connection(String hdfsUrl, String hadoopHost) {
        this.hdfsUrl = hdfsUrl;
        this.hadoopHost = hadoopHost;
    }

    public Connection(String hdfsUrl, String hadoopHost, FileSystem fs) {
        this.hdfsUrl = hdfsUrl;
        this.hadoopHost = hadoopHost;
        this.fs = fs;
    }

    public String getHadoopHost() {
        return hadoopHost;
    }

    /**
     * 將web地址和hadoop用戶名傳入,生成文件系統對象
     * @return HDFS文件系統對象
     * @throws Exception
     */
    public FileSystem init() {
        Configuration configuration = new Configuration();
        try {
            fs = FileSystem.newInstance(new URI(hdfsUrl), configuration, hadoopHost);
        } catch (IOException e) {
            throw new RuntimeException(e);
        } catch (InterruptedException e) {
            throw new RuntimeException(e);
        } catch (URISyntaxException e) {
            throw new RuntimeException(e);
        }
        return fs;
    }

    public void fsClose() {
        try {
            fs.close();
        } catch (IOException e) {
            throw new RuntimeException(e);
        }
    }

    /**
     * 獲取
     * @return hdfsUrl
     */
    public String getHdfsUrl() {
        return hdfsUrl;
    }

    /**
     * 設置
     * @param hdfsUrl
     */
    public void setHdfsUrl(String hdfsUrl) {
        this.hdfsUrl = hdfsUrl;
    }

    /**
     * 設置
     * @param hadoopHost
     */
    public void setHadoopHost(String hadoopHost) {
        this.hadoopHost = hadoopHost;
    }

    /**
     * 獲取
     * @return fs
     */
    public FileSystem getFs() {
        return fs;
    }

    /**
     * 設置
     * @param fs
     */
    public void setFs(FileSystem fs) {
        this.fs = fs;
    }

    public String toString() {
        return "Connection{hdfsUrl = " + hdfsUrl + ", hadoopHost = " + hadoopHost + ", fs = " + fs + "}";
    }
}
2.創建文件轉化工具類FileTransferUtil,實現對文件夾的上傳和下載
package com.prettyspider.hadoop.updateanddownload;

import org.apache.hadoop.fs.*;

import java.io.*;
import java.util.zip.ZipEntry;
import java.util.zip.ZipOutputStream;

/**
 * @author prettyspider
 * @ClassName update
 * @description: TODO
 * @date 2023/10/7 19:23
 * @Version V1.0
 */

public class FileTransferUtil {

    private FileTransferUtil() {
    }

    /**
     * 將本地指定路徑下的文件上傳到HDFS文件系統上
     *
     * @param localPath 本地文件路徑
     * @param hdfsPath  HDFS文件系統路徑
     * @param fs        HDFS文件系統對象
     */
    public static void update(String localPath, String hdfsPath, FileSystem fs) {
        /**
         * 細節:
         *      兩次getName()的意義不同,第一次是獲取文件夾或者文件的名稱,第二次是獲取文件的名稱,不能共用
         */
        String name1 = new File(localPath).getName();
        hdfsPath = hdfsPath + "/" + name1;
        // 獲取本地文件的文件集合
        File[] files = new File(localPath).listFiles();
        if (files != null) {
            for (File file : files) {
                // 當為文件是便上傳
                if (file.isFile()) {
                    String absolutePath = file.getAbsolutePath();
                    String name = file.getName();
                    try {
                        System.out.println(hdfsPath + "/" + name);
                        fs.copyFromLocalFile(new Path("file:///" + absolutePath), new Path(hdfsPath + "/" + name));
                    } catch (IOException e) {
                        throw new RuntimeException(e);
                    }
                } else {
                    update(file.toString(), hdfsPath, fs);
                }
            }
        }
    }

    /**
     *
     * @param localPath 本地文件路徑
     * @param hdfsPath HDFS文件系統路徑
     * @param fs HDFS文件系統對象
     * @param username 用戶名
     * @throws IOException
     */
    public static void download(String localPath, String hdfsPath, FileSystem fs,String username) throws IOException {
        RemoteIterator<LocatedFileStatus> locatedFileStatusRemoteIterator = locatedFileStatusRemoteIterator = fs.listFiles(new Path(hdfsPath), true);
        while (locatedFileStatusRemoteIterator.hasNext()) {
            LocatedFileStatus next = locatedFileStatusRemoteIterator.next();
            // 用用戶名做切分點,獲取從用戶名開始的文件路徑
            String name = next.getPath().toString().split(username)[1];
            /**
             * 細節:
             *      將獲取的用戶名進行切分,再組合
             */
            String[] arr = name.split("/");
            String fileName = "";
            for (int i = 0; i < arr.length - 1; i++) {
                fileName += arr[i] + "/";
            }
            // 獲取HDFS文件系統的路徑
            Path path = next.getPath();
            FSDataInputStream getMessage = fs.open(path);
            BufferedReader reader = new BufferedReader(new InputStreamReader(getMessage));
            /**
             * 細節:
             *      輸出時需要先創建文件目錄
             */
            File file = new File(localPath, fileName);
            if (!file.exists()) {
                file.mkdirs();
            }
            BufferedWriter writer = new BufferedWriter(new FileWriter(new File(file, arr[arr.length - 1])));
            String line;
            while ((line = reader.readLine()) != null) {
                writer.write(line);
                writer.newLine();
            }
            writer.close();
            reader.close();
        }

        // 壓縮
        ZipOutputStream zipOutputStream = new ZipOutputStream(new FileOutputStream(new File(localPath, hdfsPath + ".zip")));
        toZIp(new File(localPath,hdfsPath), zipOutputStream, hdfsPath);
    }

    /**
     *
     * @param src 文件夾對象
     * @param zipOutputStream 壓縮流
     * @param path 指定文件夾下的根目錄
     * @throws IOException
     */
    private static void toZIp(File src, ZipOutputStream zipOutputStream, String path) throws IOException {
        File[] files = src.listFiles();
        if (files != null) {
            for (File file : files) {
                if (file.isFile()) {
                    ZipEntry zipEntry = new ZipEntry(path + "\\" + file.getName());
                    zipOutputStream.putNextEntry(zipEntry);
                    BufferedInputStream bufferedInputStream = new BufferedInputStream(new FileInputStream(file));
                    byte[] bytes = new byte[1024 * 1024 * 8];
                    int len;
                    while ((len = bufferedInputStream.read(bytes))!=-1) {
                        zipOutputStream.write(bytes, 0, len);
                    }
                    bufferedInputStream.close();
                } else {
                    toZIp(file, zipOutputStream, path + "\\" + file.getName());
                }
            }
            zipOutputStream.close();
        }
    }
}
測試類
FileTransferTest
import org.apache.hadoop.fs.FileSystem;
import org.junit.Test;
import java.io.IOException;
/**
* @author prettyspider
* @ClassName fileTransferTest
* @description: TODO
* @date 2023/10/7 19:47
* @Version V1.0
*/
public class fileTransferTest {
@Test
public void testUpdate() throws IOException {
Connection connection = new Connection("hdfs://node01:9000", "prettyspider");
FileSystem fs = connection.init();
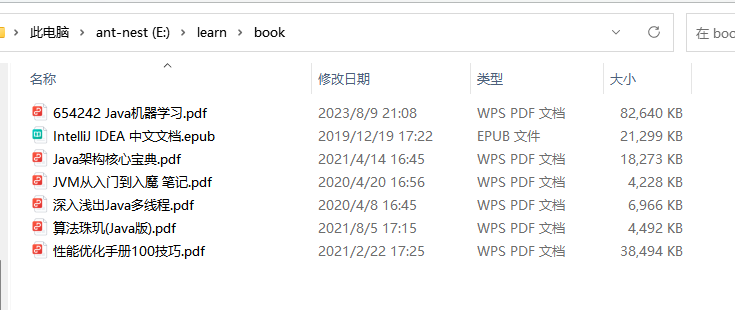
FileTransferUtil.update("E:\\test\\wordcount","input",new ConnectionTest().testInit());
// fileTransfer.download("E:\\test","input",fs,connection.getHadoopHost());
connection.fsClose();
}
}
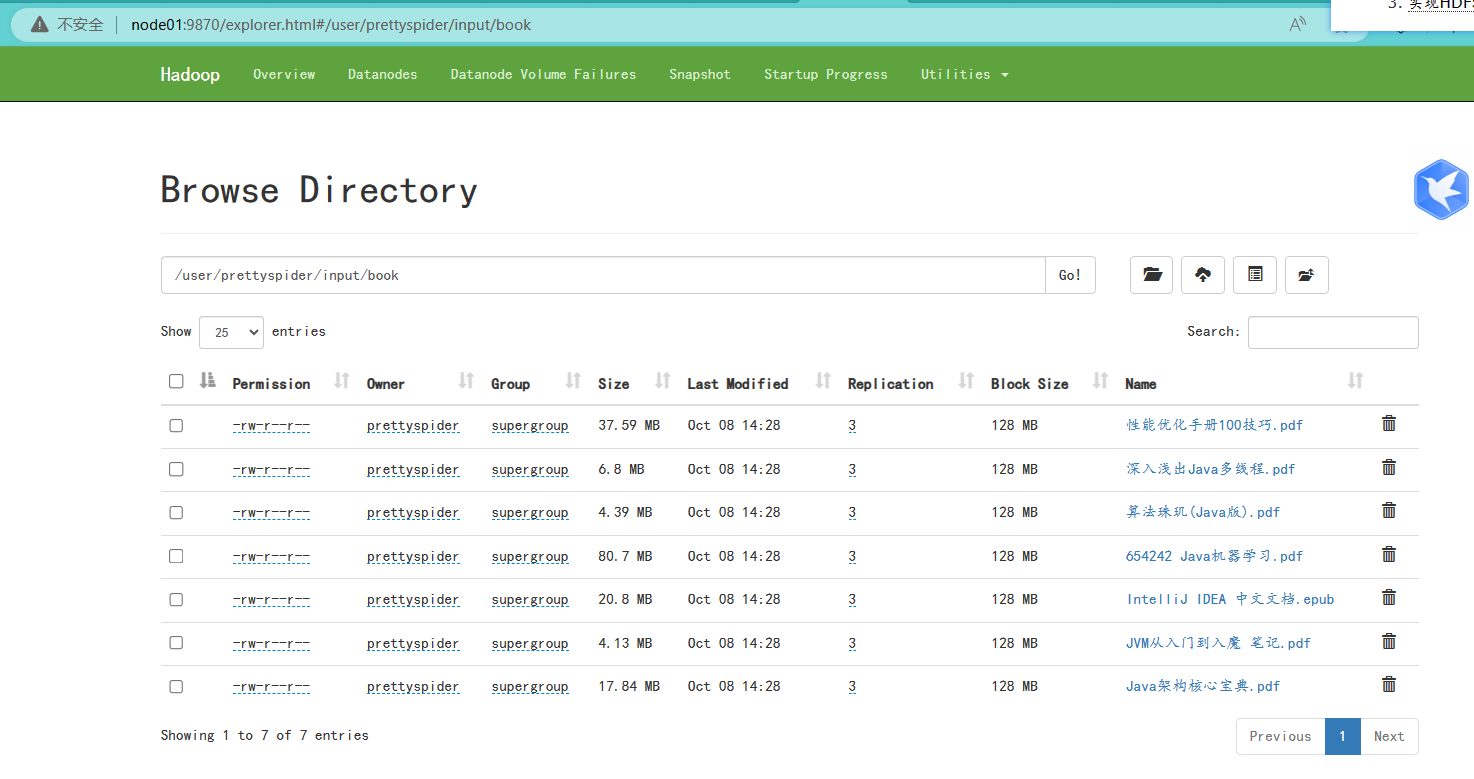
結果
本地
HDFS文件系統Web端
3.根據HDFS文件系統查看學生是否提交作業
假設用HDFS文件系統管理學生作業,如何獲取學生是否提交作業
實現:
1.根據HDFS文件系統獲取指定”班級"下的所有的已經提交作業的學生
2.與班級的學生名單進行比較,獲取沒有提交作業的學生
創建JobSunmissionUtil工具類,實現獲取沒有提交做的學生
package com.prettyspider.hadoop.jobsubmission;

import org.apache.hadoop.fs.FileStatus;
import org.apache.hadoop.fs.FileSystem;
import org.apache.hadoop.fs.Path;

import java.io.*;
import java.util.ArrayList;

/**
 * @author prettyspider
 * @ClassName Search
 * @description: TODO
 * @date 2023/10/8 11:23
 * @Version V1.0
 */

public class JobSubmissionUtil {
    private JobSubmissionUtil(){}
    public static void search(FileSystem fs) throws Exception {
        File file = new File(".\\src\\main\\java\\com\\prettyspider\\hadoop\\jobsubmission\\stu.txt");
        BufferedReader reader = new BufferedReader(new InputStreamReader(new FileInputStream(file)));
        String line;
        ArrayList<String> list = new ArrayList<>();
        ArrayList<String> nameList = new ArrayList<>();
        while ((line = reader.readLine()) != null) {
            list.add(line.split("-")[0]);
        }
        System.out.println(list);
        FileStatus[] fileStatuses = fs.listStatus(new Path("input/stu"));
        for (FileStatus fileStatus : fileStatuses) {
            String[] arr = fileStatus.getPath().toString().split("/");
            String s = arr[arr.length - 1].split("\\.")[0];
            nameList.add(s);
        }
        System.out.println(nameList);
        // 去重
        for (String name : nameList) {
            list.remove(name);
        }
        System.out.println("沒有交作業的是"+list);
    }


}
測試類
JobsubmissionTest
package com.prettyspider.hadoop.updateanddownload;

import com.prettyspider.hadoop.Connection;
import com.prettyspider.hadoop.jobsubmission.JobSubmissionUtil;
import org.apache.hadoop.fs.FileSystem;
import org.junit.Test;

/**
 * @author prettyspider
 * @ClassName SearchTest
 * @description: TODO
 * @date 2023/10/8 11:30
 * @Version V1.0
 */

public class JobSubmissionTest {
    @Test
    public void testsearch() throws Exception {
        Connection connection = new Connection("hdfs://node01:9000", "prettyspider");
        FileSystem fs = connection.init();
        JobSubmissionUtil.search(fs);
        connection.fsClose();
    }
}
4.實現HDFS文件系統指定文件夾內的文件詞頻統計(手搓)
MapReduce是hadoop兩個核心之一,MapReduce框架由Map和Reduce組成。 Map ()負責把一個大的block塊進行切片並計算。 Reduce () 負責把Map ()切片的數據進行彙總、計算。
那麼可以通過簡化,實現切片和數據統計
實現步驟:
1.將HDFS文件系統指定文件夾下的文件合併到一個文件中
2.對文件進行切分
3.將切分之後的數據利用Map集合實現統計
創建WordCountUtil工具類
package com.prettyspider.hadoop.wordcount;
import org.apache.hadoop.fs.*;
import java.io.*;
import java.util.*;
/**
* @author prettyspider
* @ClassName wordcount
* @description: TODO
* @date 2023/10/8 12:46
* @Version V1.0
*/
public class WordCountUtil {
private WordCountUtil() {}
/**
* 將指定文件夾下的文件合併到一個文件中,再對文件進行詞頻統計
* @param fs HDFS文件系統對象
* @param hdfsPath 要統計詞頻的文件夾地址
* @param mergePath 合併後的文件地址
* @throws IOException
*/
public static void wordcount(FileSystem fs,String hdfsPath,String mergePath) throws IOException {
merge(fs, hdfsPath, mergePath);
wordcount(fs, mergePath);
}
/**
* 利用Map對數據進行統計
* @param fs HDFS文件系統
* @param mergePath 合併的文件地址
* @throws IOException
*/
private static void wordcount(FileSystem fs, String mergePath) throws IOException {
FSDataInputStream open = fs.open(new Path(mergePath));
// 用集合獲取數據
ArrayList<String> list = new ArrayList<>();
BufferedReader reader = new BufferedReader(new InputStreamReader(open));
String line;
while ((line = reader.readLine()) != null) {
list.add(line);
}
StringBuilder stringBuilder = new StringBuilder();
for (String s : list) {
stringBuilder.append(s);
}
String[] arr = stringBuilder.toString().split("\\W+");
// 詞頻統計
wordstatistic(arr);
}
/**
*
* @param arr 被拆分後的詞的數組
*/
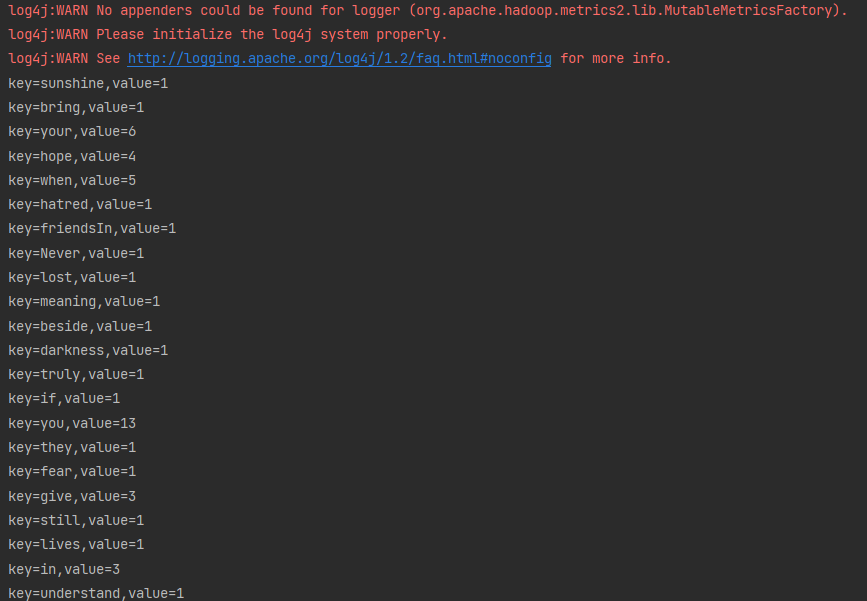
private static void wordstatistic(String[] arr) {
HashMap<String, Integer> map = new HashMap<>();
for (int i = 0; i < arr.length; i++) {
String s = arr[i];
// map中不存在數據
if (!map.containsKey(s)) {
map.put(s, 1);
} else {
int count = map.get(s) + 1;
map.put(s,count);
}
}
// 輸出結果
Set<Map.Entry<String, Integer>> entries = map.entrySet();
for (Map.Entry<String, Integer> entry : entries) {
String key = entry.getKey();
Integer value = entry.getValue();
System.out.println("key="+key+",value="+value);
}
}
/**
*
* @param fs HDFS文件系統對象
* @param hdfsPath 要統計的文件夾地址
* @param mergePath 合併後文件地址
* @throws IOException
*/
private static void merge(FileSystem fs, String hdfsPath, String mergePath) throws IOException {
FSDataOutputStream fsDataOutputStream = fs.create(new Path(mergePath));
FileStatus[] fileStatuses = fs.listStatus(new Path(hdfsPath));
BufferedWriter writer = new BufferedWriter(new OutputStreamWriter(fsDataOutputStream));
for (FileStatus fileStatus : fileStatuses) {
FSDataInputStream open = fs.open(new Path(fileStatus.getPath().toUri()));
BufferedReader reader = new BufferedReader(new InputStreamReader(open));
String line;
while ((line = reader.readLine()) != null) {
writer.write(line);
writer.newLine();
}
reader.close();
open.close();
}
writer.close();
fsDataOutputStream.close();
}
}
測試類
WordCountTest
package com.prettyspider.hadoop.updateanddownload;

import com.prettyspider.hadoop.Connection;
import com.prettyspider.hadoop.wordcount.WordCountUtil;
import org.apache.hadoop.fs.FileSystem;
import org.junit.Test;

import java.io.IOException;

/**
 * @author prettyspider
 * @ClassName WordCountTest
 * @description: TODO
 * @date 2023/10/8 13:15
 * @Version V1.0
 */

public class WordCountTest {
    @Test
    public void testwordcount() throws IOException {
        Connection connection = new Connection("hdfs://node01:9000", "prettyspider");
        FileSystem fs = connection.init();
        WordCountUtil.wordcount(fs,"input/wordcount","output/merge.txt");
		connection.fsClose();
    }
}
結果