目錄 線程簡介 線程實現(重點) 線程狀態 線程同步(重點) 線程通信問題 線程實現: 方式一:繼承Thread類 /** * TODO * @author 清蓮孤舟 * @CreateDate 2023/9/17/9:28 * 創建線程的方式一:通過繼承Thread類實現 */ //繼承Threa ...
目錄
線程實現:
方式一:繼承Thread類
/**
 * TODO
 * @author 清蓮孤舟
 * @CreateDate 2023/9/17/9:28
 * 創建線程的方式一:通過繼承Thread類實現
 */
//繼承Thread類
public class demo01 extends Thread {
//重寫run方法
    @Override
    public void run() {
        for (int i = 0; i < 20; i++) {
            System.out.println("副線程"+i);
        }
    }
//main主線程
    public static void main(String[] args) {
        demo01 demo01 = new demo01();
        //start方法啟用線程
        demo01.start();
        //run()方法啟用線程
        demo01.run();
        for (int i = 0; i < 20; i++) {
            System.out.println("主線程"+i);
        }
    }
}
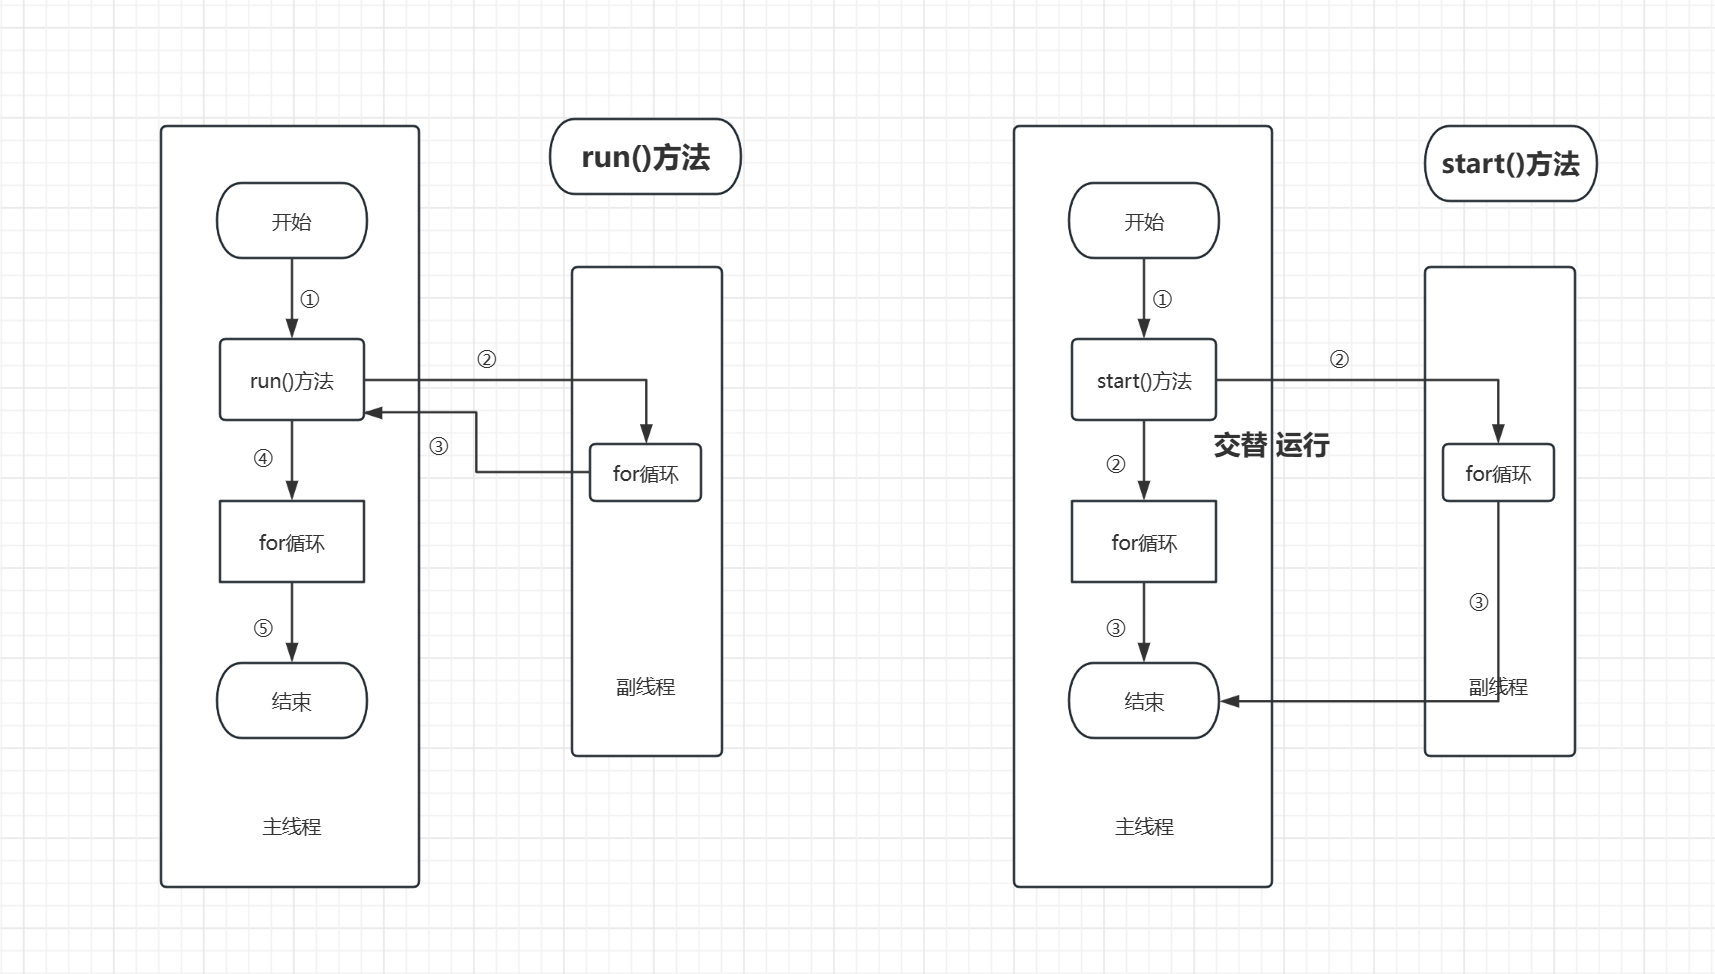
我們先調用run方法運行(註意run()方法在主函數中的順序):
副線程0    副線程1    副線程2    副線程3    副線程4    副線程5    副線程6    副線程7    副線程8    副線程9
副線程10    副線程11    副線程12    副線程13    副線程14    副線程15    副線程16    副線程17    副線程18    副線程19

主線程0    主線程1    主線程2    主線程3    主線程4    主線程5    主線程6    主線程7    主線程8    主線程9
主線程10    主線程11    主線程12    主線程13    主線程14    主線程15    主線程16    主線程17    主線程18    主線程19
可以看出程式先運行完run線程再運行main主線程。符合程式按序執行的規制。同理如果將run()方法放在主函數的最後,那麼先輸出的將是"主線程"隨後是"副線程"。
接下來我們調用start()方法:
主線程0    副線程0    主線程1    主線程2    主線程3    主線程4    副線程1    主線程5    主線程6    主線程7    副線程2    主線程8    主線程9    主線程10   主線程11   主線程12   副線程3
主線程13   主線程14   主線程15   主線程16   主線程17   主線程18   主線程19   副線程4    副線程5    副線程6    副線程7    副線程8    副線程9    副線程10   副線程11   副線程12   副線程13
副線程14   副線程15   副線程16   副線程17   副線程18   副線程19
顯而易見程式並不是按序執行的,而是交替並行的。這便是上節中介紹的併發,在一段時間內交替完成。
(PS:如果你在運行時發現輸出結果並不是交替的,那麼請將for迴圈次數增加,20次迴圈對於你的電腦來說太簡單了)

方式二:實現Runnable介面(重點)
/**
 * TODO
 * @author Cooper
 * @CreateDate 2023/9/17/10:26
 * 創建線程方式二:實現Runnable介面
 */
public class demo02 implements Runnable{
//   同樣的重寫run()方法
    @Override
    public void run() {
        for (int i = 0; i < 20; i++) {
            System.out.print("副線程"+i+"\t");
        }
    }
    public static void main(String[] args) {
        demo02 demo02 = new demo02();
//        創建線程對象,通過線程對象開啟線程
        Thread thread = new Thread(demo02);
        thread.start();
//      可以簡寫為該寫法new Thread(demo02).start();
        for (int i = 0; i < 20; i++) {
            System.out.print("主線程"+i+"\t");
        }
    }
}
源碼解析:
//Runnable源碼 只有一個run()方法
public interface Runnable {
    public abstract void run();
}
//Thread方法 需要傳入一個實現Runnable的對象
public Thread(Runnable target) {
    init(null, target, "Thread-" + nextThreadNum(), 0);
}
運行結果:
主線程0    副線程0    主線程1    副線程1    主線程2    主線程3    主線程4    主線程5    副線程2    主線程6
主線程7    主線程8    副線程3    主線程9    副線程4    主線程10    主線程11    主線程12    主線程13    主線程14
主線程15    主線程16    主線程17    副線程5    主線程18    副線程6    副線程7    主線程19    副線程8    副線程9
副線程10    副線程11    副線程12    副線程13    副線程14    副線程15    副線程16    副線程17    副線程18    副線程19
線程併發案例:
這裡使用狂神的案例:
 1 /**
 2  * TODO
 3  *
 4  * @author Cooper
 5  * @CreateDate 2023/9/17/10:42
 6  */
 7 public class demo03 implements Runnable{
 8     private int TicketNumber = 10;
 9     @Override
10     public void run() {
11         while (true){
12             if(TicketNumber==0){
13                 break;
14             }
15             try {
16                 //線程暫停200ms
17                 Thread.sleep(200);
18             } catch (InterruptedException e) {
19                 e.printStackTrace();
20             }
21             //Thread.currentThread().getName()獲取當前線程的名字
22             System.out.println(Thread.currentThread().getName()+"===>拿到了第"+TicketNumber--+"票");
23         }
24     }
25     public static void main(String[] args) {
26         demo03 ticket = new demo03();
27         new Thread(ticket,"小張").start();
28         new Thread(ticket,"小李").start();
29         new Thread(ticket,"小王").start();
30     }
31 }
運行結果:
小李===>拿到了第8票
小張===>拿到了第10票
小王===>拿到了第9票
小王===>拿到了第6票
小李===>拿到了第7票
小張===>拿到了第7票
小李===>拿到了第3票
小王===>拿到了第4票
小張===>拿到了第5票
小李===>拿到了第2票
小王===>拿到了第2票
小張===>拿到了第2票
小張===>拿到了第1票
小王===>拿到了第1票
小李===>拿到了第1票
此時我們發現了一些問題--->同一張票被兩個人拿到了! 這就是線程不安全,數據紊亂。後序我們將通過線程同步解決這個問題。
方式三:實現callable介面(瞭解即可)
 1 import java.util.ArrayList;
 2 import java.util.List;
 3 import java.util.concurrent.*;
 4 /**
 5  * TODO
 6  *
 7  * @author Cooper
 8  * @CreateDate 2023/9/17/14:52
 9  */
10 public class demo04 implements Callable<List<String>> {
11     @Override
12     public List<String> call() throws Exception {
13         List<String> result = new ArrayList<>();
14         for (int i = 0; i < 5; i++) {
15             result.add(Thread.currentThread().getName()+"===>"+i);
16             System.out.print(Thread.currentThread().getName()+"===>"+i+"\t");
17         }
18         return result;
19     }
20     public static void main(String[] args) throws ExecutionException, InterruptedException {
21         demo04 test1 = new demo04();
22         demo04 test2 = new demo04();
23         demo04 test3 = new demo04();
24 //        創建服務開啟三個線程
25         ExecutorService service = Executors.newFixedThreadPool(3);
26         System.out.println("運行中:");
27 //        提交執行
28         Future<List<String>> r1 = service.submit(test1);
29         Future<List<String>> r2 = service.submit(test2);
30         Future<List<String>> r3 = service.submit(test3);
31 //        獲取結果
32         List<String> result1 = r1.get();
33         List<String> result2 = r2.get();
34         List<String> result3 = r3.get();
35         System.out.println();
36
37         System.out.println("運行結束:");
38         System.out.println(result1);
39         System.out.println(result2);
40         System.out.println(result3);
41 //        關閉服務
42         service.shutdown();
43     }
44 }
運行結果:
運行中:
pool-1-thread-2===>0    pool-1-thread-1===>0    pool-1-thread-2===>1    pool-1-thread-3===>0
pool-1-thread-2===>2    pool-1-thread-1===>1    pool-1-thread-2===>3    pool-1-thread-1===>2
pool-1-thread-3===>1    pool-1-thread-1===>3    pool-1-thread-2===>4    pool-1-thread-1===>4
pool-1-thread-3===>2    pool-1-thread-3===>3    pool-1-thread-3===>4
運行結束:
[pool-1-thread-1===>0, pool-1-thread-1===>1, pool-1-thread-1===>2, pool-1-thread-1===>3, pool-1-thread-1===>4]
[pool-1-thread-2===>0, pool-1-thread-2===>1, pool-1-thread-2===>2, pool-1-thread-2===>3, pool-1-thread-2===>4]
[pool-1-thread-3===>0, pool-1-thread-3===>1, pool-1-thread-3===>2, pool-1-thread-3===>3, pool-1-thread-3===>4]
本文來自博客園,作者:Lollipop_pro,轉載請註明原文鏈接:https://www.cnblogs.com/CooperCode/p/17709026.html


