
一、簡介 官網: https://spring.io/projects/spring-framework#overview 官方下載工具: https://repo.spring.io/release/org/springframework/spring/ github下載: https://git ...
一、簡介
官網: https://spring.io/projects/spring-framework#overview 官方下載工具: https://repo.spring.io/release/org/springframework/spring/ github下載: https://github.com/spring-projects/spring-framework maven依賴:<dependency>
<groupId>org.springframework</groupId>
<artifactId>spring-webmvc</artifactId>
<version>5.2.0.RELEASE</version>
</dependency>
<!-- https://mvnrepository.com/artifact/org.springframework/spring-webmvc -->
<dependency>
<groupId>org.springframework</groupId>
<artifactId>spring-jdbc</artifactId>
<version>5.2.0.RELEASE</version>
</dependency>
1.spring全家桶的結構構圖: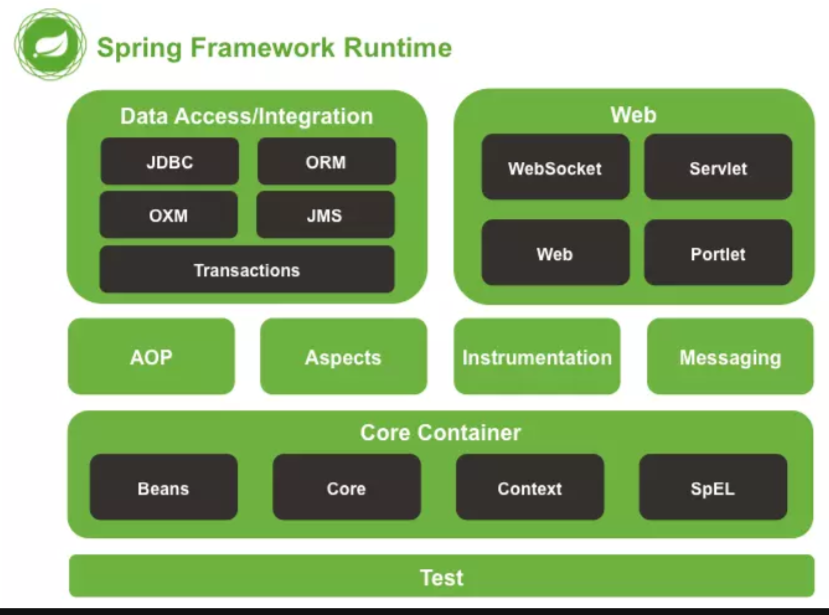
最下邊的是測試單元 其中spring封裝了自己的測試單元
-
Core Container
- core:提供了框架的基本組成部分 包括ioc和依賴註入功能
- beans:提供了BeanFactory 實現了工廠模式。方便解耦
- context:上下文內容
- expression:提供了強大的表達式語言,用於在運行時查詢和操作對象。
3.Data Access/Integration 數據訪問/集成
- 該模塊包含JDBC、ORM、OXM、JMS和事務處理模塊
- JDBC:提供了JDBC的抽象層,可以更方便的處理資料庫
- ORM:模塊提供了流行的對象關係型映射的API的集成
- OXM:模塊提供了對OXM實現的支持(啥是OXM)
- JMS:包含了生產和消費消息的功能
- 事務:毋庸置疑,可以實現特殊介面類以及所有的pojo支持編程式和聲明式事務管理。
4.Web
Web層由Web、Servlet、Web-Sockethe和Web-Portlet組成- Web模塊:提供面向web的基本功能和麵向web的應用上下文
- Servlet模塊:為web應用提供了模型視圖看著(MVC)和RestWeb服務的實現。Spring的MVC框架可以將代碼與web表單進行分離。
- Web-Socket
- Web-Portlet
二、IOC:
2.1理論:IOC也就是控制反轉 其基本理解就是Spring將創建對象的過程轉交給了IOC容器。,在其它類中我們只需要調用即可,不需要重新創建對象。 在我們傳統的三層架構模型中,目錄結構分別為pojo、dao、和service 當我們在service中調用dao時,常會使用到 private UserDao userDao=new UserDao(); 這就是我們通常的思維,需要創建對象才可以使用,但是引入spring後,便可以使用<bean>標簽就可以創建對象。 2.2 Spring 中IOC的實現提供了兩種方式: 2.2.1BeanFactory:這是IOC的基本實現,是Spring的內部介面,不會提供給開發人員使用。 載入配置文件時,不會創建對象,只有在使用的時候才會創建對象(一會可以代碼解釋 註意的是getBean的動作) 2.2.2ApplicationContext 它是BeanFactory介面的子介面,提供了更加強大的功能開發人員進行載入配置文件的時候就進行了創建。//1.引入jar包
//2.編輯配置文件
<?xml version="1.0" encoding="UTF-8" ?>
<beans xmlns="http://www.springframework.org/schema/beans"
xmlns:xsi="http://www.w3.org/2001/XMLSchema-instance"
xmlns:p="http://www.springframework.org/schema/p"
xsi:schemaLocation="http://www.springframework.org/schema/beans
http://www.springframework.org/schema/beans/spring-beans.xsd">
配置對象 id為唯一限定名 一般為類名的小寫 class是類所在的位置
<bean id="teacher" class="com.qiang.pojo.Teacher"></bean>
</beans>
//3.測試
@Test
public void testTeacherCreate(){
//載入配置文件
ApplicationContext ac=new ClassPathXmlApplicationContext("applicationConfig.xml");
Teacher teacher = ac.getBean("teacher", Teacher.class);
System.out.println(teacher);
}
//在以上代碼中 如果使用的是ApplicationContext 則在進行載入配置文件時 就已經在IOC容器中創建好了teacher對象
//如果是使用的是 BeanFactory ac 創建對象,則在getbean時才會創建對象(不可操作,因為該介面不對開發人員透明)
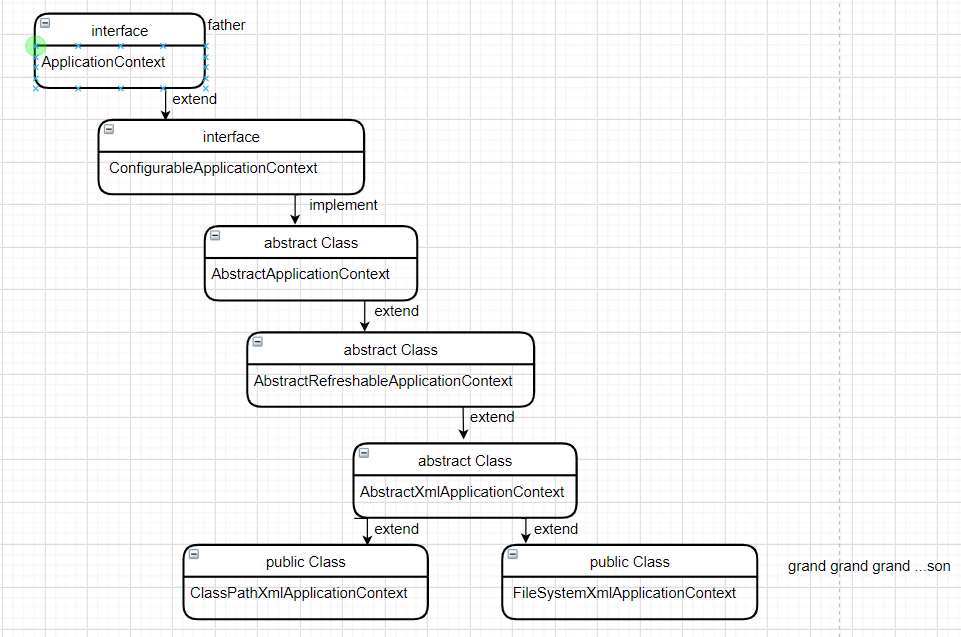
2.2.3 ApplicationContext介面的實現類的繼承關係
<bean id="唯一標識" class="類的全限定名"> </bean>
B :使用普通工廠類創建bean實例
1.建立普通類teacher,包含個別屬性,並添加get、set方法

2.創建工廠類
public class SchoolFactory {
    Teacher teacher=new Teacher();
    public  Teacher getInstance(){
        return teacher;
    }
}
在工廠類中實例化對象,並添加一個普通方法可以獲取到對象

3.配置文件

<!--    普通工廠類創建bean實例-->
    <bean id="factory" class="com.qiang.pojo.factory.SchoolFactory" ></bean>
    <bean id="teacher1" factory-bean="factory" factory-method="getInstance"></bean>

第一個bean是一個實例化的對象也就是對象工廠
第二個bean 是利用對象工廠來創建的對象實例化
            factory標簽指的是  是哪個工廠對象,對應上邊的id
            factory-method指的是調用可以獲取對象實例的方法(普通方法)


4.測試:

/**
* 測試普通工廠類創建bean實例
*/
@Test
public void testTeacherFactory1(){
    //載入配置文件
    ApplicationContext ac=new ClassPathXmlApplicationContext("applicationConfig.xml");
    Teacher teacher1 = ac.getBean("teacher1", Teacher.class);
    System.out.println(teacher1);
}
如果在程式中可能需要頻繁的創建某個類的實例對象,採用工廠模式會更好
2.3.2 依賴註入 也就是註入屬性 依賴註入也就是對屬性的註入,分為三種:構造器註入、set註入以及p標簽註入 其中的構造註入,需要走的是帶參構造 set註入,走的是set方法和無參構造 p標簽註入和set註入基本一樣,只不過頭文件中需要引入 對象工廠介面中最基本的是BeanFactory,它可以支持懶載入,也就是在載入配置文件時,不會創建實例對象,而是在需要調用時才會創建。 如今使用的是applicationContext來解析配置文件,他的底層介面也是BeanFactory,但是它可以在載入配置文件的時候,就直接創建了bean實例。 以Student類作為演示public class Student {
private String sname;
private int age;
private String sex;
public Student(String sname, int age, String sex) {
this.sname = sname;
this.age = age;
this.sex = sex;
System.out.println("這是三個參數的無參構造");
}
public Student(String sname, int age) {
this.sname = sname;
this.age = age;
System.out.println("這是第一個屬性為name的兩個參數的構造");
}
public Student( int age,String sname) {
this.sname = sname;
this.age = age;
System.out.println("這是第一個屬性為age的兩個參數的構造");
}
public Student() {
System.out.println("這是無參構造");
}
public String getSname() {
return sname;
}
public void setSname(String sname) {
this.sname = sname;
}
public int getAge() {
return age;
}
public void setAge(int age) {
this.age = age;
}
public String getSex() {
return sex;
}
public void setSex(String sex) {
this.sex = sex;
}
@Override
public String toString() {
return "Student{" +
"sname='" + sname + '\'' +
", age=" + age +
", sex='" + sex + '\'' +
'}';
}
}
A 構造器註入 <constructor-arg>
<bean id="stu1" class="com.qiang.pojo.Student">
    <constructor-arg name="sname" value="zs"></constructor-arg>
    <constructor-arg name="age" value="15"></constructor-arg>
</bean>
看我們的實體類中就可以發現,我們的含有兩個參數的構造器,有兩個,在這個時候我們使用的構造器的構造函數就不知道使用的是哪個帶參的構造器
因此我們可以使用 index來標識下標 就可以指定先執行那個代餐的構造

    其中constructor-arg中也可以使用type來標識參數類型來確定屬性
        如果是八大基本數據類型,則可以直接寫關鍵字,如果是其他類型,則需要添加類的全限定路徑

    如果其中還含有其他對象類型的參數,
    如此時的student類中包含屬性  private Grade grade;

    構造器:
        <bean>
        <construct-arg type="com.qiang.Grade" ref="grade"></construct-arg>
        </bean>

        <bean id="grade" class="com.qiang.Grade"></bean>
B set方法註入 此時需要在類中對屬性添加set方法 以及無參構造
<bean id="student2" class="com.qiang.pojo.Student">
        <property name="id" value="2"></property>
        <property name="name" value="李四"></property>
    </bean>
C :p標簽註入 此時就要添加對應的set方法以及無參構造 以及添加頭文件
D:也可以set註入和構造器註入 混合使用 但是需要有對應的構造方法
2.3.3 不同屬性類型對應的寫法: 由於我們的屬性的在不同的使用場景下可能有不同的屬性類型,如集合、數組等情況,因此可能會需要使用到不同的標簽,下麵只演示使用set方法註入的情況 那就意味著,我們需要添加構造方法和無參構造。實體類
public class Order {
private String [] cources;
private List<String> lists;
private Map<String,String> maps;
private Set<String> sets;
配置文件

<!--    測試不同屬性類型的屬性註入-->
    <bean id="order" class="com.qiang.pojo.Order">
<!--        數組集合使用array標簽-->
        <property name="cources">
            <array>
                <value>美羊羊</value>
                <value>蘭羊羊</value>
            </array>
        </property>
<!--        list集合類型使用list標簽-->
        <property name="lists">
            <list>
                <value>舒克</value>
                <value>貝塔</value>
            </list>
        </property>
<!--        set集合使用set標簽-->
        <property name="sets">
            <set>
                <value>mysql</value>
                <value>javase</value>
                <value>javaweb</value>
            </set>
        </property>


        <property name="maps">
            <map>
                <entry key="java" value="我們在學習的語言"></entry>
                <entry key="web" value="前端的"></entry>
            </map>
        </property>
數組類型的使用<array><value></value></array>
list類表類型的使用:<list><value></value></list>
set集合類型的使用<set><value></value></set>
map集合類型的使用<map><entry key="" value=""></entry></map>
2.4 Bean的作用域: scope屬性
- singleton:預設值 單例模式 每次獲取的bean都是同一個對象
- prototype:每次獲取bean都會被重新實例化
- request:每次請求都會重新實例化對象,但是在同一請求下獲取的情況下的bean是單例的
- session 每次會話內的bean是單例的
- application:整個應用程式對象內的bean實例都是單例模式的
- websocket:同一個websocket對象內的對象是單例的。
Singleton
<!--    測試單例模式-->
    <bean id="stu3" class="com.qiang.pojo.Student" scope="singleton"></bean>

測試類:

@Test
public void testStudent3(){
    //載入配置文件
    BeanFactory ac=new ClassPathXmlApplicationContext("applicationConfig2.xml");
    Student stu1 = ac.getBean("stu3", Student.class);
    System.out.println(stu1);
    Student stu2 = ac.getBean("stu3", Student.class);
    System.out.println(stu2);
    System.out.println(stu1==stu2);
}

結果:
com.qiang.pojo.Student@10a035a0
com.qiang.pojo.Student@10a035a0
true
prototype

<!--    測試多例模式-->
<bean id="stu4" class="com.qiang.pojo.Student" scope="prototype"></bean>

測試類

@Test
public void testStudent4(){
    //載入配置文件
    BeanFactory ac=new ClassPathXmlApplicationContext("applicationConfig2.xml");
    Student stu1 = ac.getBean("stu4", Student.class);
    System.out.println(stu1);
    Student stu2 = ac.getBean("stu4", Student.class);
    System.out.println(stu2);
    System.out.println(stu1==stu2);
}

結果:
com.qiang.pojo.Student@10a035a0
com.qiang.pojo.Student@67b467e9
false
2.5 bean的生命周期
2.5.1 一般理解下的bean的生命周期:
- 通過構造器創建bean實【此時執行的是無參構造】
- 為bean屬性設置值以及對其他的bean的引用【set註入】
- 調用bean的初始化方法,在配置文件中配置
- bean對象可以使用了 【已經獲取到了對象】
- 當容器關閉時,調用bean的銷毀方法【在配置文件中配置】
實體類對象
public class People implements Serializable {
    private String oid;
    public People() {
        System.out.println("第一步:執行無參構造");
    }
    public String getOid() {
        return oid;
    }
    public void setOid(String oid) {
        this.oid = oid;
        System.out.println("第二步: 調用set方法給屬性設置值......");
    }
    public void initMethod(){
        System.out.println("第三步:執行初始化方法............");
    }
    public void destroyMethod(){
        System.out.println("第五步:執行銷毀方法............");
    }
    @Override
    public String toString() {
        return "People{" +
                "oid='" + oid + '\'' +
                '}';
    }
}
配置文件  添加初始化方法 和銷毀方法
<bean id="people" class="com.qiang.pojo.People"
    init-method="initMethod"
    destroy-method="destroyMethod">
</bean>
其中的標簽init-method、destroy-method 中的方法是在實體類中自定義的

 測試類

/**
* 測試bean的生命周期
*/
@Test
public void testBeanLive(){
    //載入配置文件
    ClassPathXmlApplicationContext ac=new ClassPathXmlApplicationContext("applicationConfig2.xml");
    //獲取bean實例
    People people = ac.getBean("people", People.class);
    System.out.println("第四步:獲取bean實例對象 。。。");
    System.out.println(people);
    //手動銷毀
    ac.close();
}


結果:
第一步:執行無參構造
第三步:執行初始化方法............
第四步:獲取bean實例對象 。。。
People{oid='null'}
第五步:執行銷毀方法............
2.5.2 添加後置處理器的生命周期的方法
- 第一步:執行無參數的構造方法 。。。
- 第二步: 調用set方法給屬性設置值......
- 在初始化之前執行的方法
- 第三步:執行初始化方法............
- 在初始化之後執行的方法
- 第四步:獲取bean實例對象 。。。
- 第五步:執行銷毀方法............
在實體類中 實現了BeanPostProcessor介面
    並重寫了
@Override
public Object postProcessAfterInitialization(Object bean, String beanName) throws BeansException {
    System.out.println("在初始化之前執行的方法");
    return bean;
}


@Override
public Object postProcessBeforeInitialization(Object bean, String beanName) throws BeansException {
    System.out.println("在初始化之後執行的方法");


    return bean;
}
2.6 自動裝配: 裝配的意思是 就是怎麼去創建對象 spring的裝配方式有三種: 在xml中顯示的裝配 也就是使用<bean>標簽 在Java中的顯示配置 new關鍵字 自動裝配機制 Spring的自動裝配你有兩個角度的實現 分別是 組件掃描和 自動裝配 組件掃描:spring 回自動發現應用上下文中所創建的bean 自動裝配:spring自動滿足bean之間的依賴,也就是使用IOC和DI 自動裝配的實現方式有兩種,一種是通過xml的bena標簽 也可以使用註解方式 2.6.1 通過XMl中的標簽 自動裝配 A:byName 按名稱自動裝配 通俗理解:在xml配置文件中 使用bean標簽 通過bynae自動諸如和,每次遇到名稱為 byname屬性值時就自動創建對象
實體類Dog
private String color;
private int age;


配置文件
<bean id="d1" class="com.qiang.pojo.Dog" autowire="byName">
    <property name="age" value="15"></property>
</bean>

測試類:
@Test
public void testDog1(){
    ApplicationContext ac=new ClassPathXmlApplicationContext("applicationConfig.xml");
    Dog d1 = ac.getBean("d1", Dog.class);
    System.out.println(d1.getAge());
}

結果:
15
B.byType 按類型自動裝配
配置文件
<bean id="d1" class="com.qiang.pojo.Dog" autowire="byType">
    <property name="age" value="21"></property>
</bean>


測試類:
@Test
public void testDog1(){
    ApplicationContext ac=new ClassPathXmlApplicationContext("applicationConfig.xml");
    Dog d1 = ac.getBean(Dog.class);
    System.out.println(d1.getAge());
}


結果:
21
2.6.2根據註解開發 spring中的註解註入的有:@Autowired、@Resources @Qualifier @Service @Commonent @Controller @Repository 在使用註解開發時,需要現在配置文件中開啟組件掃描功能 <!--開啟組件掃描--> <context:component-scan base-package="cn.liushao"></context:component-scan> 開啟組件掃描 便可以自動查找其中的自動註入 不同的註解的區分:
- Autowired是自動註入,自動從spring的上下文找到合適的bean來註入。
- Resource用來指定名稱註入。
- Qualifier和Autowired配合使用,指定bean的名稱。
- Service,Controller,Repository分別標記類是Service層類,Controller層類,Dao層的類,spring掃描註解配置時,會標記這些類要生成bean。
- Component是一種泛指,標記類是組件,spring掃描註解配置時,會標記這些類要生成bean。
分析:  由於註解@Autowired是預設按類型裝配的,一個類型的可能會有多個實現方法
        因此在演示的時候 就可以選擇一個介面,有多個實現類來作為演示

1.構建一個介面
public interface TeacherService {
    public void sayName();
    public void saysex();
}


2.創建多個實現類(以三個舉例)
@Component
public class TeacherServiceImpl1 implements TeacherService {
    @Override
    public void sayName() {
        System.out.println("A");
    }
}

@Component
public class TeacherServiceImpl1 implements TeacherService {
    @Override
    public void sayName() {
        System.out.println("B");
    }
}

@Component
public class TeacherServiceImpl1 implements TeacherService {
    @Override
    public void sayName() {
        System.out.println("C");
    }
}

3.創建兩外一個類,可以調用該類的實現類
public class TeacherController {
    @Autowired
    //創建對象
    private TeacherService teacherService;
    public void soutResult(){
        teacherService.sayName();
    }
}

4.修改配置文件 開啟掃描

<!--    測試註解開發-->
    <context:component-scan base-package="com.qiang"></context:component-scan>

5.測試:

@Test
public void testAopAno(){
    ApplicationContext ac=new ClassPathXmlApplicationContext("applicationConfig.xml");
    TeacherController contro = ac.getBean("teacherController", TeacherController.class);
    contro.soutResult();
}
6.觀察結果:
org.springframework.beans.factory.UnsatisfiedDependencyException: Error creating bean with name 'teacherController': Unsatisfied dependency expressed through field 'teacherService'; nested exception is org.springframework.beans.factory.NoUniqueBeanDefinitionException: No qualifying bean of type 'com.qiang.service.TeacherService' available: expected single matching bean but found 3: teacherServiceImpl1,teacherServiceImpl2,teacherServiceImpl3

分析:由於在service介面有多個實現類,使用autowired是按類型註入,可能會找不到使用哪個  因此可以搭配使用@Qualifier註解


修改第三步:
public class TeacherController {
    @Autowired
    @Qualifier("teacherServiceImpl1")
    //創建對象
    private TeacherService teacherService;
    public void soutResult(){
        teacherService.sayName();
    }
}
繼續進行測試  結果為:
A
結果顯示正常


繼續修改第三步:
public class TeacherController {
   @Resource(name = "teacherServiceImpl1")
    //創建對象
    private TeacherService teacherService;
    public void soutResult(){
        teacherService.sayName();
    }
}
繼續進行測試  結果為:
A
結果顯示正常
通過上述例子可以看出,如果一個類需要由多個實例變數時,可以搭配使用 @Autowired @Qualifier("teacherServiceImpl1"),也可以單獨使用 @Resource(name = "teacherServiceImpl1"
三、AOP 3.1AOP簡介: AOP通俗理解就是面向切麵編程,是對面向對象的一種補充、將那些與業務無關的,但卻對多個對象產生影響的公共行為和邏輯,抽取並封裝為一個可重用的模板,這個模板就被稱為”切麵“,使用AOP減少了系統中的重覆代碼、降低了模塊間的耦合度,同時提高了系統的可維護性。 AOP的底層是動態代理,分別為JDK動態代理和CGLIB動態代理 3.2術語: 連接點:可以被增強的方法 切入點: 實際真正被增強的方法,稱為切入點 通知(增強):又被叫做增強,實際增強的邏輯部分稱為通知[增強] 切麵(是個動作):把通知應用到切入點的過程。 其中:通知有五種: 前置通知(before) 後置(返回)通知(after returning) 、環繞通知(Around)、異常通知(after-throwing) 通知通俗理解就是AOP暴漏給我們的方法,我們在這個方法中直接定義需要擴展的代碼即可,但是其執行順序,交給了spring來處理。 3.3 AOP的準備工作: 首先介紹一下Aspect J 這個是一個獨立的AOP模型,但不是Spring框架的內容。 因此在演示的時候需要導入相關的jar包,或者使用maven文件 切入點表達式:知道對那個類的方法進行增強 execution( [許可權修飾符] [返回值類型] [類的全路徑] [方法名][參數列表]) 3.4 AOP通知 3.4.1基於XML的配置通知 A 第一種方式:
1.添加jar包

2.建造實體類和代理對象類
    普通類應包含一個普通方法,該普通方法也就是要增強的那個方法
public class Student implements Serializable {
    public void add(){
        System.out.println("這個只是一個普通的方法");
    }
}


public class StudentProxy {
    //配置前置通知
    public void before(){
        System.out.println("前置通知。。。。。");
    }
    //配置後置返回通知
    public void afterreturning(){
        System.out.println("後置返回通知....");
    }
    //配置最終通知
    public void after(){
        System.out.println("最終通知....");
    }
    //配置環繞通知
    public void around(ProceedingJoinPoint proceedingJoinPoint) throws Throwable {
        System.out.println("環繞通知前");
        proceedingJoinPoint.proceed();
        System.out.println("環繞通知後....");
    }
    //配置異常通知
    public void afterThrow(){
        System.out.println("異常通知....");
    }
}


3.修改配置文件


在修改配置文件時應註意,頭文件也需要進行修改

xmlns:aop="http://www.springframework.org/schema/aop"
xsi:http://www.springframework.org/schema/aop
    https://www.springframework.org/schema/aop/spring-aop.xsd"

//註入
<bean id="student" class="com.qiang.pojo.Student"></bean>
<bean id="studentProxy" class="com.qiang.pojo.StudentProxy"></bean>

<aop:config >
    <!--切入點-->
    <aop:pointcut id="pc" expression="execution(* com.qiang.pojo.Student.add(..))"/>
    <!--配置切麵-->
    <aop:aspect ref="studentProxy">
        <!--將增強應用到具體的方法上-->
        <!--前置通知-->
        <aop:before method="before" pointcut-ref="pc"></aop:before>
        <!--後置返回通知-->
       <aop:after-returning method="afterreturning" pointcut-ref="pc"></aop:after-returning>
        <!--最終通知-->
        <aop:after method="after" pointcut-ref="pc"></aop:after>
        <!--環繞通知-->
        <aop:around method="around" pointcut-ref="pc"></aop:around>
    </aop:aspect>
以上沒有演示異常通知,異常通知在程式發生異常時才會發生。


測試:
@Test
public void testAopXmlDemo1(){
    ApplicationContext ac=new ClassPathXmlApplicationContext("applicationConfig.xml");
    Student student = ac.getBean("student", Student.class);
    student.add();
}


結果:

前置通知。。。。。
環繞通知前
這個只是一個普通的方法
環繞通知後....
最終通知....
後置返回通知....
分析:
前置通知:在連接點之前執行的通知
後置返回通知:一般在方法的結尾,必然會多一個返回值
環繞通知:包含了前置通知和後置通知
異常通知:處理異常數據,事務回滾
3.4.2基於註解的配置通知
B:第二種方式
1.引入jar包

2.創建實體類
@Component
public class User {
    public void add(){
        System.out.println("這是一個普通方法");
    }
}

3.創建代理類
@Component
@Aspect //生成代理對象
public class UserProxy {
    //前置通知
    @Before(value = "execution(* org.qiang.aop.anno.pojo.User.add(..))")
    public void before(){
        System.out.println("前置通知。。。");
    }
    //後置返回通知
    @AfterReturning(value = "execution(* org.qiang.aop.anno.pojo.User.add(..))")
    public void afterReturning(){
        System.out.println("後置返回通知afterReturning....");
    }
    //環繞通知
    @Around(value = "execution(* org.qiang.aop.anno.pojo.User.add(..))")
    public void around(ProceedingJoinPoint proceedingJoinPoint) throws Throwable{
        System.out.println("環繞之前....");
        // 被增強的方法執行了
        proceedingJoinPoint.proceed();
        System.out.println("環繞之後....");
    }
//    //異常通知 只有手動創造了異常才可以觸發這個通知
//    @AfterThrowing(value = "execution(* org.qiang.aop.anno.pojo.User.add(..))")
//    public void afterThrowing(){
//        System.out.println("異常通知 afterThrowing......");
//    }


//最終通知
    @After(value = "execution(* org.qiang.aop.anno.pojo.User.add(..))")
    public void after(){
        System.out.println("最終通知....");
    }

}

//修改配置文件


<!--    開啟組件掃描-->
    <context:component-scan base-package="org.qiang.aop.anno"></context:component-scan>


<!--    開啟Aspect生成代理對象-->
<aop:aspectj-autoproxy></aop:aspectj-autoproxy>


//測試:

@Test
public void testAopAnno(){
    ApplicationContext ac=new ClassPathXmlApplicationContext("applicationConfig2.xml");
    User user = ac.getBean("user", User.class);
    user.add();
}


結果:
環繞之前....
前置通知。。。
這是一個普通方法
環繞之後....
最終通知....
後置返回通知afterReturning....
C:第三種方式抽取重覆代碼
只需要修改代理類對象就可以了
@Component
@Aspect //生成代理對象
public class UserProxy {


//    抽取切入點
    @Pointcut(value = "execution(* org.qiang.aop.anno.pojo.User.add(..))")
    public void pointcutDemo(){


    }
    //前置通知
    @Before(value = "pointcutDemo()")
    public void before(){
        System.out.println("前置通知。。。");
    }


    //後置返回通知
    @AfterReturning(value = "pointcutDemo()")
    public void afterReturning(){
        System.out.println("後置返回通知afterReturning....");
    }


    //環繞通知
    @Around(value = "pointcutDemo()")
    public void around(ProceedingJoinPoint proceedingJoinPoint) throws Throwable{
        System.out.println("環繞之前....");
        // 被增強的方法執行了
        proceedingJoinPoint.proceed();
        System.out.println("環繞之後....");
    }


//    //異常通知 只有手動創造了異常才可以觸發這個通知
//    @AfterThrowing(value = "pointcutDemo()")
//    public void afterThrowing(){
//        System.out.println("異常通知 afterThrowing......");
//    }


    //最終通知
    @After(value = "pointcutDemo()")
    public void after(){
        System.out.println("最終通知....");
    }

}
D : AOP 底層是動態代理預設的是JDK動態代理的方法,也可以通過
<aop: aspectj-autoproxy proxy-target-class="true"></aop :aspect-autoproxy>
標簽來修改,其預設值是false是JDK動態代理的格式,改為true就可以使用CGLIB代理格式。
3.5 Spring的事務管理 Spring框架將固定的冗餘部分的套路代碼進行了封裝,對程式員僅提供簡單的XML配置就可以完成事務的管理,不需要在編寫事務管理代碼。這也就是Spring的非常重要功能--聲明式事務 聲明式事務是基於AOP實現的(動態代理)。程式員只需要調用持久層代碼和業務邏輯代碼,將開啟事務的代碼反正該了前置通知中,將事務回滾和事務提交的代碼放在了後置通知中。 使用事物可以保證操作前後數據的完整性,事務的四個特性:ACID 原子性、一致性、隔離性和持久性 編程式事務:整個事務的操作都是由程式員進行手動管理,手動提交,手動回滾 聲明式事務:整個事務由其他框架進行管理,我們使用事務的時候只需要進行簡單的聲明或 者配置即可。 Spring中的Tx模塊就包含了對聲明式事務的封裝,以下是我們的日常的手動提交事務的寫法:
public void testdemo1() throws SQLException {
    Connection conn= DriverManager.getConnection("","","");
    //關閉自動提交
    conn.setAutoCommit(false);
    try {
        PreparedStatement ptst=conn.prepareStatement("insert into bank  values=(?,?)");

        ptst.executeUpdate();

    }catch (Exception e){
    //再發生異常時,就會進行事務的回滾
        conn.rollback();
    }

}
回顧Aop切麵編程,可以發現共通點,在關閉自動提交的部分,可以用前置通知來代替,try代碼塊的部分就可以理解為是切入點,事務提交的部分可以使用後置通知來實現,而對於出現異常,事務回滾的操作就可以使用異常通知來處理。
也就是:
在org.springframework.jdbc.datasource.DataSourceTransactionManager 中的
方法:
protected void doBegin(){
    conn.setAutoCommit(false)
}

protected void doBegin() {

}

protected void doRollback() {


}
添加事務通知:
<tx:advice id="tt" transaction-manager="transactionmanager">
    <tx:attributes>
            <tx: method name="方法名">
    </tx:attributes>
</ tx: advice>


<aop:config>
              <aop:pointcut id="pt"  expression="execution(* 類的全路徑.方法(. .))" />
            <aop:advisor advice-ref="tt"  pointcut-ref="pt"> </aop:advisor>
</aop:config>
聲明式事務的四個基礎屬性介紹: <tx:method>標簽下有屬性配置,也可以用在註解上:

