
本文將通過閱讀源碼方式分析SpringBoot應用的啟動流程,不涉及Spring啟動部分(有相應的文章介紹)。 本文不會對各個流程做展開分析,後續會有文章介紹詳細流程。 # SpringApplication類 ## 應用啟動入口 使用以下方式啟動一個SpringBoot應用: ```java @S ...
本文將通過閱讀源碼方式分析SpringBoot應用的啟動流程,不涉及Spring啟動部分(有相應的文章介紹)。
本文不會對各個流程做展開分析,後續會有文章介紹詳細流程。
SpringApplication類
應用啟動入口
使用以下方式啟動一個SpringBoot應用:
@SpringBootApplication
public class SpringBootDemoApplication {

  public static void main(String[] args) {
    SpringApplication.run(SpringBootDemoApplication.class, args);
  }
}
run方法
public static ConfigurableApplicationContext run(Class<?> primarySource, String... args) {
	return run(new Class<?>[] { primarySource }, args);
}

public static ConfigurableApplicationContext run(Class<?>[] primarySources, String[] args) {
	return new SpringApplication(primarySources).run(args);
}

public ConfigurableApplicationContext run(String... args) {
	StopWatch stopWatch = new StopWatch();
	stopWatch.start();
	ConfigurableApplicationContext context = null;
	Collection<SpringBootExceptionReporter> exceptionReporters = new ArrayList<>();
	configureHeadlessProperty();
	SpringApplicationRunListeners listeners = getRunListeners(args);
	listeners.starting();
	try {
		ApplicationArguments applicationArguments = new DefaultApplicationArguments(args);
		// 獲取應用env
		ConfigurableEnvironment environment = prepareEnvironment(listeners, applicationArguments);
		configureIgnoreBeanInfo(environment);
		// 列印banner
		Banner printedBanner = printBanner(environment);
		// 創建ApplicationContext
		context = createApplicationContext();
		exceptionReporters = getSpringFactoriesInstances(SpringBootExceptionReporter.class,
				new Class[] { ConfigurableApplicationContext.class }, context);
		// 一些準備工作
		prepareContext(context, environment, listeners, applicationArguments, printedBanner);
		// refresh ApplicationContext
		refreshContext(context);
		afterRefresh(context, applicationArguments);
		stopWatch.stop();
		if (this.logStartupInfo) {
			new StartupInfoLogger(this.mainApplicationClass).logStarted(getApplicationLog(), stopWatch);
		}
		// 調用listener
		listeners.started(context);
		// 調用ApplicationRunner和CommandLineRunner
		callRunners(context, applicationArguments);
	} catch (Throwable ex) {
		handleRunFailure(context, ex, exceptionReporters, listeners);
		throw new IllegalStateException(ex);
	}

	try {
		listeners.running(context);
	} catch (Throwable ex) {
		handleRunFailure(context, ex, exceptionReporters, null);
		throw new IllegalStateException(ex);
	}
	return context;
}
獲取應用env
private ConfigurableEnvironment prepareEnvironment(SpringApplicationRunListeners listeners,
		ApplicationArguments applicationArguments) {
	// 創建StandardServletEnvironment, 會初始化四個PropertySource:
	// servletConfigInitParams, servletContextInitParams, systemProperties, systemEnvironment
	// 比如-Dserver.port=8888會在systemProperties中
	ConfigurableEnvironment environment = getOrCreateEnvironment();
	// 添加defaultProperties和命令行配置參數即CommandLinePropertySource
	// 通常都沒有這兩個配置
	configureEnvironment(environment, applicationArguments.getSourceArgs());
	// 使用ConfigurationPropertySourcesPropertySource封裝並暴露所有的PropertySource集
	ConfigurationPropertySources.attach(environment);
	// 添加ApplicationEnvironmentPreparedEvent事件並觸發multicastEvent載入應用配置文件
	listeners.environmentPrepared(environment);
	// 將spring.main.xx配置載入到SpringApplication對象
	bindToSpringApplication(environment);
	if (!this.isCustomEnvironment) {
		environment = new EnvironmentConverter(getClassLoader()).convertEnvironmentIfNecessary(environment,
				deduceEnvironmentClass());
	}
	ConfigurationPropertySources.attach(environment);
	return environment;
}
載入配置文件的入口在ConfigFileApplicationListener類中:
public void postProcessEnvironment(ConfigurableEnvironment environment, SpringApplication application) {
	addPropertySources(environment, application.getResourceLoader());
}

protected void addPropertySources(ConfigurableEnvironment environment, ResourceLoader resourceLoader) {
	// 添加RandomValuePropertySource
	RandomValuePropertySource.addToEnvironment(environment);
	// 載入配置文件
	new Loader(environment, resourceLoader).load();
}
載入配置文件的源碼較多,此處不做記錄,簡單梳理一下流程:
- 載入active profile配置文件
- 如果配置了spring.config.additional-location或spring.config.location參數,會使用它們作為配置文件。如果這兩個參數值是目錄,則會從這兩個目錄下查找配置文件
- 預設從classpath:/,classpath:/config/,file:./,file:./config/*/,file:./config/目錄下查找application-xx.properties或application-xx.yml文件
- 使用PropertiesPropertySourceLoader和YamlPropertySourceLoader解析配置文件
- 會將配置參數封裝成OriginTrackedMapPropertySource類型對象,使用applicationConfig: [classpath:/application-dev.yml]之類的字元串作為PropertySource的名稱
- 載入預設的application.properties或application.yml文件
- 解析出來的所有PropertySource都會添加到environment的propertySources中,propertySources是一個MutablePropertySources對象,管理著所有的PropertySource集,在這個過程中,添加的先後順序決定了配置的優先順序
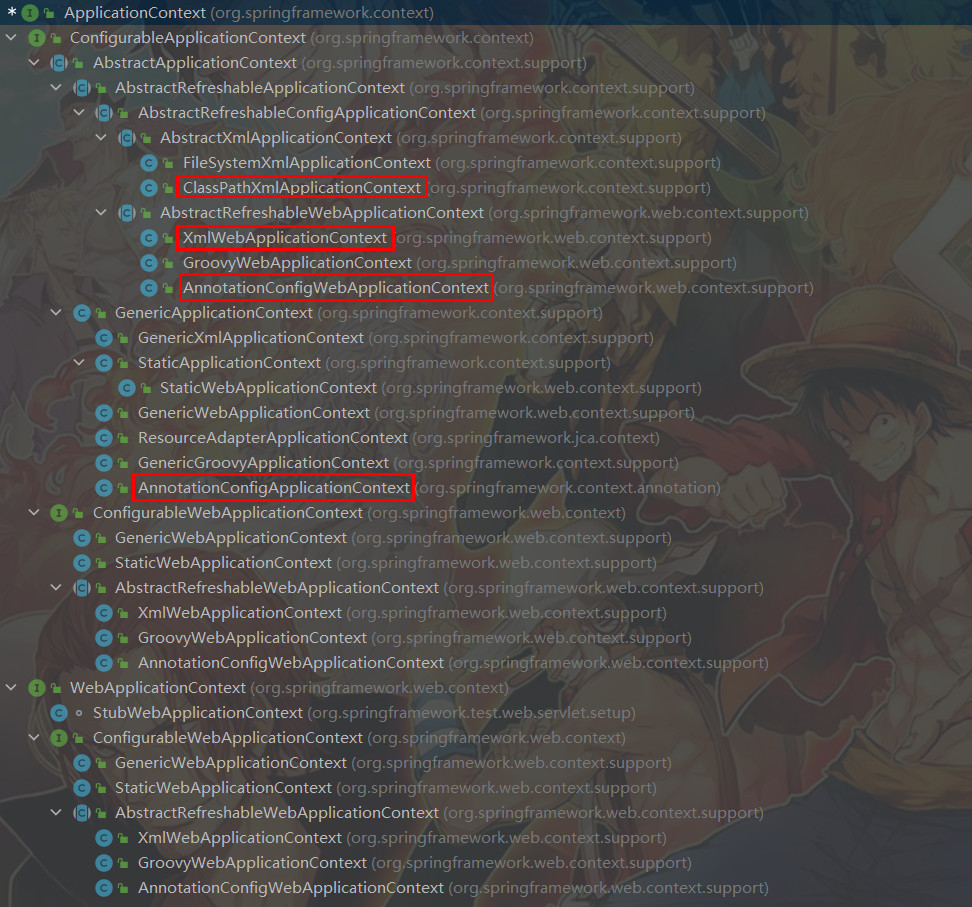
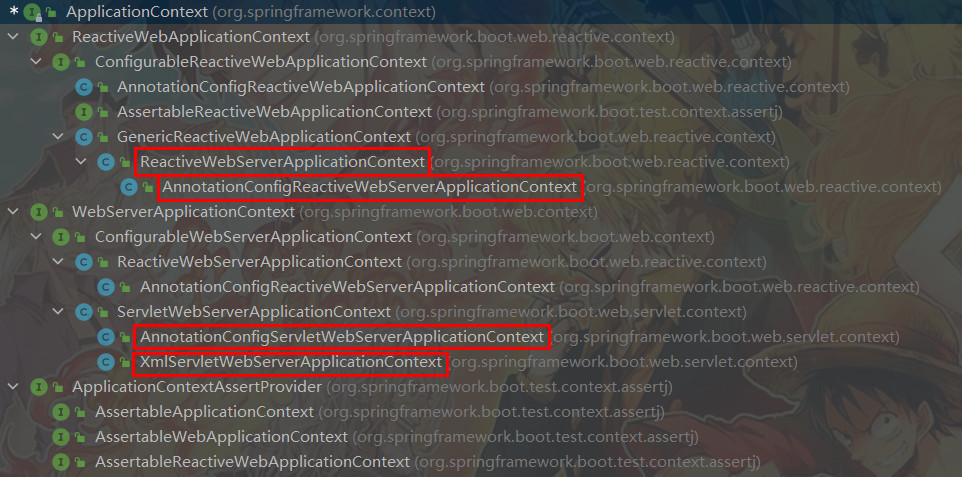
創建ApplicationContext
protected ConfigurableApplicationContext createApplicationContext() {
	Class<?> contextClass = this.applicationContextClass;
	if (contextClass == null) {
		try {
			switch (this.webApplicationType) {
			case SERVLET:
				// AnnotationConfigServletWebServerApplicationContext類
				contextClass = Class.forName(DEFAULT_SERVLET_WEB_CONTEXT_CLASS);
				break;
			case REACTIVE:
				// AnnotationConfigReactiveWebServerApplicationContext類
				contextClass = Class.forName(DEFAULT_REACTIVE_WEB_CONTEXT_CLASS);
				break;
			default:
				// AnnotationConfigApplicationContext類
				contextClass = Class.forName(DEFAULT_CONTEXT_CLASS);
			}
		} catch (ClassNotFoundException ex) {
			throw new IllegalStateException("Unable create a default ApplicationContext", ex);
		}
	}
	return (ConfigurableApplicationContext) BeanUtils.instantiateClass(contextClass);
}
prepareContext
private void prepareContext(
		ConfigurableApplicationContext context, ConfigurableEnvironment environment,
		SpringApplicationRunListeners listeners, ApplicationArguments applicationArguments,
		Banner printedBanner) {
	context.setEnvironment(environment);
	postProcessApplicationContext(context);
	// Apply any ApplicationContextInitializers to the context before it is refreshed.
	// ApplicationContextInitializers集是在創建SpringApplication對象的時候初始化的
	applyInitializers(context);
	// 觸發contextPrepared事件
	listeners.contextPrepared(context);
	if (this.logStartupInfo) {
		logStartupInfo(context.getParent() == null);
		logStartupProfileInfo(context);
	}
	// 獲取BeanFactory並註冊必要的Bean
	ConfigurableListableBeanFactory beanFactory = context.getBeanFactory();
	// 註冊啟動參數
	beanFactory.registerSingleton("springApplicationArguments", applicationArguments);
	// 註冊banner printer
	if (printedBanner != null) {
		beanFactory.registerSingleton("springBootBanner", printedBanner);
	}
	// 設置是否允許Bean覆蓋,使用spring.main.allowBeanDefinitionOverriding參數配置
	if (beanFactory instanceof DefaultListableBeanFactory) {
		((DefaultListableBeanFactory) beanFactory)
				.setAllowBeanDefinitionOverriding(this.allowBeanDefinitionOverriding);
	}
	if (this.lazyInitialization) {
		context.addBeanFactoryPostProcessor(new LazyInitializationBeanFactoryPostProcessor());
	}
	// Load the sources
	Set<Object> sources = getAllSources();
	// 將SpringApplication.run(Xxx.class, args)方法傳入的Class註冊到容器
	// 使用AnnotatedBeanDefinitionReader.register(Class<?>...)方法註冊啟動類
	load(context, sources.toArray(new Object[0]));
	// 觸發contextLoaded事件
	listeners.contextLoaded(context);
}
refreshApplicationContext
protected void refresh(ConfigurableApplicationContext applicationContext) {
	applicationContext.refresh();
}
調用的是ServletWebServerApplicationContext的refresh方法:
public final void refresh() throws BeansException, IllegalStateException {
	try {
		super.refresh();
	} catch (RuntimeException ex) {
		// 關閉web server
		WebServer webServer = this.webServer;
		if (webServer != null) {
			webServer.stop();
		}
		throw ex;
	}
}
絕大多數的refresh邏輯都在AbstractApplicationContext類裡面,ServletWebServerApplicationContext中會在onRefresh階段創建webServer:
protected void onRefresh() {
	super.onRefresh();
	try {
		createWebServer();
	} catch (Throwable ex) {
		throw new ApplicationContextException("Unable to start web server", ex);
	}
}
調用ApplicationRunner和CommandLineRunner
private void callRunners(ApplicationContext context, ApplicationArguments args) {
	List<Object> runners = new ArrayList<>();
	runners.addAll(context.getBeansOfType(ApplicationRunner.class).values());
	runners.addAll(context.getBeansOfType(CommandLineRunner.class).values());
	AnnotationAwareOrderComparator.sort(runners);
	for (Object runner : new LinkedHashSet<>(runners)) {
		if (runner instanceof ApplicationRunner) {
			callRunner((ApplicationRunner) runner, args);
		}
		if (runner instanceof CommandLineRunner) {
			callRunner((CommandLineRunner) runner, args);
		}
	}
}
SpringBootApplication註解
指示一個配置類,該類聲明一個或多個@Bean方法,並觸發自動配置和組件掃描。這是一個方便的註解,相當於聲明@Configuration、@EnableAutoConfiguration和@ComponentScan註解。
@SpringBootConfiguration
@EnableAutoConfiguration
@ComponentScan(excludeFilters = { @Filter(type = FilterType.CUSTOM, classes = TypeExcludeFilter.class),
		@Filter(type = FilterType.CUSTOM, classes = AutoConfigurationExcludeFilter.class) })
public @interface SpringBootApplication {

	/**
	 * Exclude specific auto-configuration classes such that they will never be applied.
	 */
	@AliasFor(annotation = EnableAutoConfiguration.class)
	Class<?>[] exclude() default {};

	/**
	 * Exclude specific auto-configuration class names such that they will never be
	 * applied.
	 */
	@AliasFor(annotation = EnableAutoConfiguration.class)
	String[] excludeName() default {};

	/**
	 * Base packages to scan for annotated components. Use scanBasePackageClasses
	 * for a type-safe alternative to String-based package names.
	 */
	@AliasFor(annotation = ComponentScan.class, attribute = "basePackages")
	String[] scanBasePackages() default {};

	/**
	 * Type-safe alternative to scanBasePackages for specifying the packages to
	 * scan for annotated components. The package of each class specified will be scanned.
	 */
	@AliasFor(annotation = ComponentScan.class, attribute = "basePackageClasses")
	Class<?>[] scanBasePackageClasses() default {};

	/**
	 * The BeanNameGenerator class to be used for naming detected components
	 * within the Spring container.
	 */
	@AliasFor(annotation = ComponentScan.class, attribute = "nameGenerator")
	Class<? extends BeanNameGenerator> nameGenerator() default BeanNameGenerator.class;

	/**
	 * Specify whether @Bean methods should get proxied in order to enforce
	 * bean lifecycle behavior, e.g. to return shared singleton bean instances even in
	 * case of direct @Bean method calls in user code. This feature requires
	 * method interception, implemented through a runtime-generated CGLIB subclass which
	 * comes with limitations such as the configuration class and its methods not being
	 * allowed to declare final.
	 */
	@AliasFor(annotation = Configuration.class)
	boolean proxyBeanMethods() default true;
}
SpringBootConfiguration註解
指示一個類提供Spring Boot application @Configuration功能。可以替代Spring的標準@Configuration註解,以便可以自動找到配置類。
應用程式應該只標註一個@SpringBootConfiguration,大多數SpringBoot應用程式將從@SpringBootApplication繼承它。
@Configuration
public @interface SpringBootConfiguration {

	@AliasFor(annotation = Configuration.class)
	boolean proxyBeanMethods() default true;
}
EnableAutoConfiguration註解
啟用SpringBoot自動裝配功能,嘗試猜測和配置可能需要的組件Bean。
自動裝配類通常是根據類路徑和定義的Bean來應用的。例如,如果類路徑上有tomcat-embedded.jar,那麼可能需要一個TomcatServletWebServerFactory(除非已經定義了自己的Servlet WebServerFactory Bean)。
自動裝配試圖儘可能地智能化,並將隨著開發者定義自己的配置而取消自動裝配相衝突的配置。開發者可以使用exclude()排除不想使用的配置,也可以通過spring.autoconfig.exclude屬性排除這些配置。自動裝配總是在用戶定義的Bean註冊之後應用。
用@EnableAutoConfiguration註解標註的類所在包具有特定的意義,通常用作預設掃描的包。通常建議將@EnableAutoConfiguration(如果沒有使用@SpringBootApplication註解)放在根包中,以便可以搜索所有子包和類。
自動裝配類是普通的Spring @Configuration類,使用SpringFactoriesLoader機制定位。通常使用@Conditional方式裝配,最常用的是@ConditionalOnClass和@ConditionalOnMissingBean註解。
@AutoConfigurationPackage
@Import(AutoConfigurationImportSelector.class)
public @interface EnableAutoConfiguration {

	/**
	 * Exclude specific auto-configuration classes such that they will never be applied.
	 */
	Class<?>[] exclude() default {};

	/**
	 * Exclude specific auto-configuration class names such that they will never be
	 * applied.
	 * 當類路徑下沒有指定的類時,可以使用這個屬性指定排除的類
	 */
	String[] excludeName() default {};
}
AutoConfigurationPackage註解
Registers packages with AutoConfigurationPackages. When no base packages or base package classes are specified, the package of the annotated class is registered.
@Import(AutoConfigurationPackages.Registrar.class)
public @interface AutoConfigurationPackage {

	String[] basePackages() default {};

	Class<?>[] basePackageClasses() default {};
}
AutoConfigurationImportSelector類
DeferredImportSelector介面的實現類,處理自動裝配,導出所有需要自動裝配的類。
創建WebServer
SpringBoot會在onRefresh階段創建webServer,首先從spring容器獲取ServletWebServerFactory,然後調用getWebServer方法創建webServer。
getWebServer方法需要傳入ServletContextInitializer集來初始化ServletContext。
@FunctionalInterface
public interface ServletContextInitializer {

	void onStartup(ServletContext servletContext) throws ServletException;
}
我們開發者如果需要使用ServletContextInitializer來初始化ServletContext的話,也可以編寫一個實現類,然後將其註冊到spring容器即可。
另外,SpringBoot還會自動裝配DispatcherServletAutoConfiguration類,這個類會創建DispatcherServlet和DispatcherServletRegistrationBean。DispatcherServlet是SpringWebMvc的最核心組件,DispatcherServletRegistrationBean實現了ServletContextInitializer介面,可以將DispatcherServlet註冊到ServletContext。以TomcatServletWebServerFactory為例,這個類會通過TomcatStarter來調用所有的ServletContextInitializer,TomcatStarter實現了ServletContainerInitializer介面,Tomcat的ServletContext在啟動階段會調用ServletContainerInitializer的onStartup方法來初始化Servlet容器。
SpringBoot啟動流程
- 初始化environment應用配置參數:servletConfigInitParams, servletContextInitParams, systemProperties, systemEnvironment及配置文件等
- 創建ApplicationContext對象,SpringBoot應用預設使用的是AnnotationConfigServletWebServerApplicationContext類
- prepareContext階段:觸發一些事件,將啟動類註冊到Spring容器
- refresh階段:掃描應用組件,自動裝配
- onRefresh階段:創建並初始化WebServer
- 調用ApplicationRunner和CommandLineRunner


