SQLAlchemy是著名的ORM(Object Relational Mapping-對象關係映射)框架。其主要作用是在編程中,把面向對象的概念跟資料庫中表的概念對應起來。對許多語言(例如JAVA/PYTHON)來說就是定義一個對象,並且這個對象對應著一張資料庫的表。而這個對象的實例,就對應著表中... ...
SQLAlchemy是著名的ORM(Object Relational Mapping-對象關係映射)框架。其主要作用是在編程中,把面向對象的概念跟資料庫中表的概念對應起來。對許多語言(例如JAVA/PYTHON)來說就是定義一個對象,並且這個對象對應著一張資料庫的表。而這個對象的實例,就對應著表中的一條記錄。
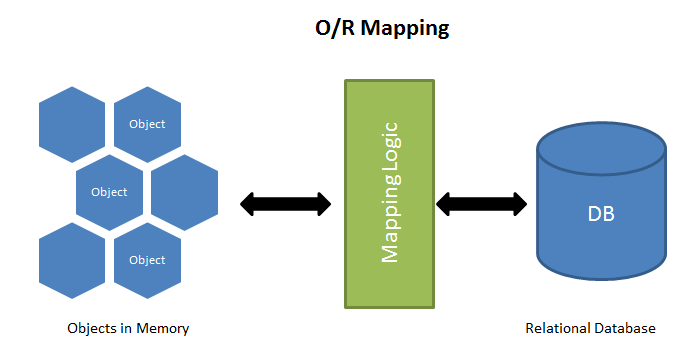
其整體思路如下圖所示:

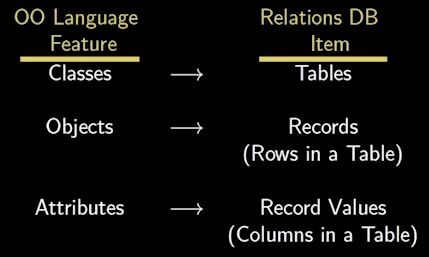
其中類、對象與屬性與資料庫相關內容的對應關係如下圖所示:

ORM的優點:
-
數據模型與代碼統一定義,更新與維護簡單,代碼高度重用一致。
-
ORM有現成的工具,很多功能都可以自動完成,比如表格增刪、預處理、事務等。
-
基於ORM的業務代碼比較簡單,代碼量少,語義性好,容易理解。
-
你不必編寫性能不佳的SQL。
ORM的缺點:
-
ORM庫多層封裝,實現巧妙,需要花很多精力學習和設置。
-
對於複雜的查詢,ORM要麼是無法表達,要麼是性能不如原生的SQL。
-
ORM抽象掉了資料庫層,開發者無法瞭解底層的資料庫操作,也無法定製一些特殊的SQL。
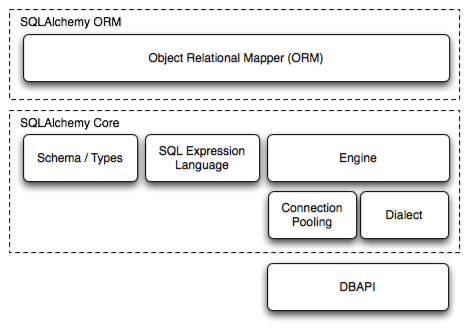
從整體上看,ORM節省了開發時間,減少了代碼錯誤的可能性,同時能夠方便地在多個資料庫間靈活遷移,還是非常值得使用。而在python語言中,SQLAlchemy是著名的ORM框架之一,它的整體架構如下圖所示:

從圖中可以看出,SQLAIchemy是分層架構,由Core以及ORM兩部分組成。其中,Core完成了與資料庫操作的各類封閉,是相對低層的。而ORM層則利用Core層的能力進行更巨集觀的操作。因此,在一段python代碼中,使用Core與ORM層同時來操作資料庫也是可行的,並不矛盾與衝突。
下麵先從最基本的表格創建做起。非ORM編程中,表格的創建無非兩個途徑:
●基於DBMS本身提供的CLI/GUI界面,發出DDL語句進行資料庫/表格本身的增刪改查。
●使用語言連接資料庫後,發出命令來對資料庫/表格進行增刪改查。
而由於每種資料庫都有自己的方言,所以命令語句各有差異,需要不斷地調整。而使用SQLAlchemy則實現了代碼統一。例如以下代碼在mssql以及mysql上創建表格,並且可以查詢表格的元數據,以及插入數據後的查詢。
from sqlalchemy import (Column, Integer, MetaData, String, Table,
                        create_engine, text, Float, DateTime, ForeignKey)
from sqlalchemy_utils.functions import create_database, database_exists

configure_pg = {"user": "postgres",
                'password': '88488848',
                'dns': 'dbserver.home',
                "port": 5432,
                'prefix': 'postgresql+psycopg2',
                'postfix': ''
                }

configure_mssql = {"user": "sa",
                   'password': '88488848',
                   'dns': 'dbserver.home',
                   "port": 1433,
                   'prefix': 'mssql+pymssql',
                   'postfix': '?charset=utf8'
                   }

configure_mysql = {"user": "root",
                   'password': '88488848',
                   'dns': 'dbserver.home',
                   "port": 3306,
                   'prefix': 'mysql+mysqlconnector',
                   'postfix': ''
                   }

config = {'mssql': configure_mssql,
          'mysql': configure_mysql, 'postgresql': configure_pg}

database_name = 'testdb'
table_sensor_location = "sensor_location"
table_sensor_data = "sensor_data"


def linkdb(targetstr):
    """
    連接不同的資料庫

    Args:
        targetstr (string): 資料庫名稱

    Returns:
        engine: 用於後續的資料庫連接
    """
    if targetstr in config.keys():
        item = config[targetstr]
        connectstring = f"{item['prefix']}://{item['user']}:{item['password']}@{item['dns']}:{item['port']}/{database_name}{item['postfix']}"
        engine = create_engine(connectstring, echo=True, future=True)

    # 如果資料庫不存在,則創建之
    if not database_exists(engine.url):
        create_database(engine.url)

    # 做一個測試,不針對任何表
    with engine.connect() as conn:
        result = conn.execute(text("select 'hello world'"))
        print(result.all())
    return engine


def createtbs(connector):
    """"
    創建資料庫中的2張表。用於保存感測器數據與感測器本身的信息
    """
    metadata_obj = MetaData()

    # 描述感測器的表
    sensor_location_tb = Table(
        table_sensor_location,
        metadata_obj,
        Column('id', Integer, primary_key=True, autoincrement=False),
        Column('location', String(30), nullable=False)
    )

    # 保存感測器數據的表
    sensor_data_tb = Table(
        table_sensor_data,
        metadata_obj,
        Column('id', Integer, primary_key=True, autoincrement=False),
        Column('sensor_id', ForeignKey(
            f'{table_sensor_location}.id'), nullable=False),
        Column('area', String(30)),
        Column('pm25', Float),
        Column('timestamp', DateTime)
    )
    print(sensor_data_tb.compile())

    # 創建並返回表
    metadata_obj.create_all(connector)
    return sensor_data_tb, sensor_location_tb


def tableinfo(connector, tablename):
    """
    獲得指定表名的相關元數據信息

    Args:
        connector (engine): 資料庫連接器
        tablename (string): 要查詢的表名
    """
    metadata_obj = MetaData()
    some_table = Table(tablename, metadata_obj, autoload_with=connector)
    print([c.name for c in some_table.columns])


def gensonsorinfo(connector):
    with connector.connect() as conn:
        conn.execute(text(f"INSERT INTO {table_sensor_location} (id, location) VALUES (:x, :y)"),
                     [{"x": 1, "y": '1號樓'}, {"x": 2, "y": '2號樓'}])

        conn.commit()

        result = conn.execute(
            text(f"SELECT id, location FROM {table_sensor_location}"))
        for x, y in result:
            print(f"id: {x}  location: {y}")


# 依次連接多個資料庫。從而驗證代碼的一致性
for dbname in config.keys():
    con = linkdb(dbname)
    createtbs(con)
    tableinfo(con, table_sensor_data)
    tableinfo(con, table_sensor_location)
    gensonsorinfo(con)
從代碼可以看出,可以用統一的訪問方式來操作mssql/mysql/postgresql三種資料庫。而且,以上方式與前文中的基於游標的寫法類似。


