本文將深入探討 AM 向 RM 申請並獲得 Container 資源後,在 NM 節點上如何啟動和清理 Container。將詳細分析整個過程的源碼實現。 ...
本文將深入探討 AM 向 RM 申請並獲得 Container 資源後,在 NM 節點上如何啟動和清理 Container。將詳細分析整個過程的源碼實現。
一、Container 生命周期介紹
Container 的啟動由 ApplicationMaster 通過調用 RPC 函數 ContainerManagementProtocol#startContainers() 發起請求,NM 中的 ContainerManagerImpl 組件負責接收並處理該函數發來的請求。
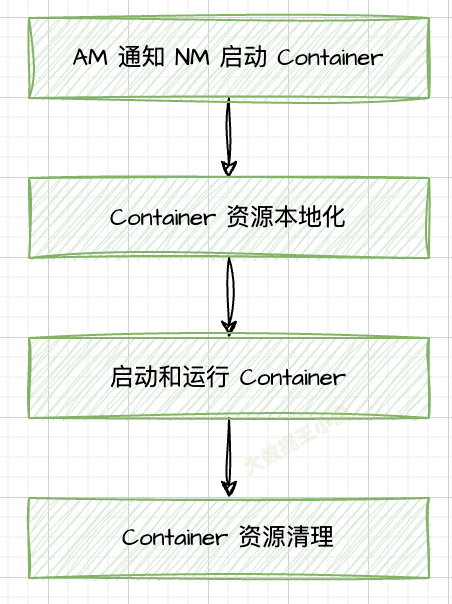
Container 啟動過程主要分為四個階段:通知 NM 啟動 Container、資源本地化、啟動並運行 Container、資源清理。

資源本地化:
主要是指分散式緩存機制完成的工作(詳見上一篇《6-3 NodeManager 分散式緩存》)。
功能包括初始化各種服務組件、創建工作目錄、從 HDFS 下載運行所需的各種資源(比如文本文件、JAR 包、可執行文件)等。
Container 啟動:
由 ContainerLauncher 服務完成,該服務將進一步調用插拔式組件 ContainerExecutor。Yarn 中提供了三種 ContainerExecutor 實現,分別為 DefaultContainerExecutor、LinuxContainerExecutor、DockerContainerExecutor。
資源清理:
是資源本地化的逆過程,它負責清理各類資源,均由 ResourceLocalizationService 服務完成。
二、Container 生命周期源碼分析
一)AM 通知 NM 啟動 Container
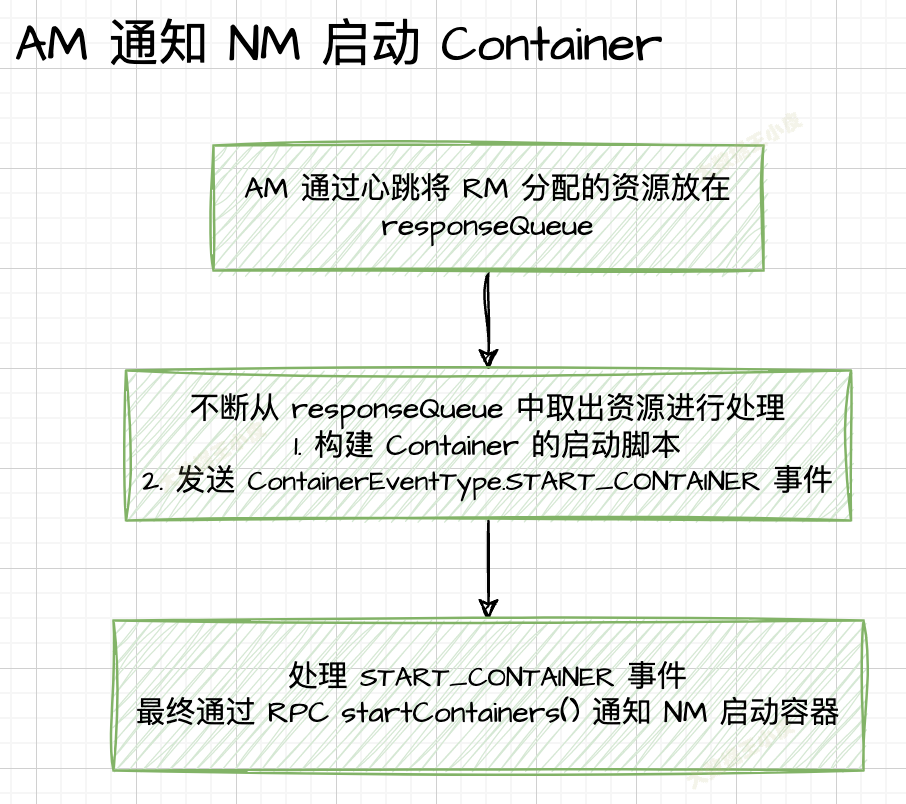
主要流程如下:

AM AMRMClientAsyncImpl 通過 RPC 函數 ApplicationMaster#allocate() 周期性向 RM 申請資源,並將申請到的資源保存在阻塞隊列 responseQueue 中。
(下麵僅截取重要邏輯的源碼)
  private class HeartbeatThread extends Thread {
    public void run() {
      while (true) {
        AllocateResponse response = null;

          try {
            // 發心跳。發給 RM 當前的進度,從 RM 領取分配的 Container 及其他信息。
            response = client.allocate(progress);
          }

          // 將 RM 通過心跳返回的信息放到阻塞隊列 responseQueue 中,等待處理
          responseQueue.put(response);
跟蹤 responseQueue,其在 CallbackHandlerThread 進行取出,處理分配到的 Container。
  private class CallbackHandlerThread extends Thread {
    public void run() {
      while (true) {
        try {
          AllocateResponse response;
          try {
            // 從 responseQueue 取出資源,對應心跳線程中 responseQueue.put(response)
            response = responseQueue.take();
          }

          // 重點:處理分配到的 Container
          List<Container> allocated = response.getAllocatedContainers();
          if (!allocated.isEmpty()) {
            // 到 ApplicationMaster#onContainersAllocated() 處理
            handler.onContainersAllocated(allocated);
          }
ApplicationMaster#onContainersAllocated() 會對分配出來的 Container 資源進行處理。
    public void onContainersAllocated(List<Container> allocatedContainers) {
      for (Container allocatedContainer : allocatedContainers) {
        // 創建運行 Container 的 LaunchContainerRunnable 線程
        Thread launchThread = createLaunchContainerThread(allocatedContainer,
            yarnShellId);

        // launch and start the container on a separate thread to keep
        // the main thread unblocked
        // as all containers may not be allocated at one go.
        launchThreads.add(launchThread);
        launchedContainers.add(allocatedContainer.getId());
        // 啟動 LaunchContainerRunnable 線程
        launchThread.start();
      }
    }
launchThread 是內部類 LaunchContainerRunnable 的實例,關註其 run() 方法幹了啥,主要兩件事:
- 構建 Container 的啟動腳本
- 調用
NMClientAsync#startContainerAsync()api 介面發送ContainerEventType.START_CONTAINER事件
	  // 1. 構建 Container 的啟動腳本(省略了構建的細節)
	  ContainerLaunchContext ctx = ContainerLaunchContext.newInstance(
        localResources, myShellEnv, commands, null, allTokens.duplicate(),
          null);
      containerListener.addContainer(container.getId(), container);
	  // 2. 重點:通過 NMClientAsync api 發送 ContainerEventType.START_CONTAINER 事件
      nmClientAsync.startContainerAsync(container, ctx);
後續就是處理這個事件,並調用 NM RPC 函數啟動 container 的過程,具體如下:
- 放到
BlockingQueue<ContainerEvent> events中 NMClientAsyncImpl的eventDispatcherThread會不斷處理events中的事件START_CONTAINER事件對應的狀態機處理類是StartContainerTransition- 其中執行
container.nmClientAsync.getClient().startContainer() - 這裡調用 NM RPC
**ContainerManagementProtocol#startContainers()**通知 NM 啟動 Container。
// yarn/client/api/impl/NMClientImpl.java
  public Map<String, ByteBuffer> startContainer(
      Container container, ContainerLaunchContext containerLaunchContext)
          throws YarnException, IOException {

        // 獲取 RPC 代理(stub)
        proxy =
            cmProxy.getProxy(container.getNodeId().toString(),
                container.getId());

        // 重點:獲取到 RPC 調用協議 ContainerManagementProtocol,並通過 RPC 函數 startContainers 啟動 Container
        StartContainersResponse response =
            proxy
                .getContainerManagementProtocol().startContainers(allRequests);
至此,AM 與 NM 的交互流程已實現,通過 RPC 函數 ContainerManagementProtocol#startContainers() 來啟動 Container。後面我們將繼續在 NM 端看是如何處理這個 RPC 請求的。
二)Container 資源本地化
在 NM 端處理上述 RPC 請求的是:yarn/server/nodemanager/containermanager/ContainerManagerImpl#startContainers。
主要完成兩個事情:
- 應用程式初始化工作(該 Container 是 AM 發送到該節點的第一個 Container)
- Container 本地化工作(非第一個 Container,會嘗試下載前面 Container 還未開始下載的文件,以加快文件下載速度)

1、程式初始化操作
裡面會先做一些許可權檢查、初始化等,然後調用函數 startContainerInternal(),我們重點關註這裡面的邏輯。
// org/apache/hadoop/yarn/server/nodemanager/containermanager/ContainerManagerImpl.java
  private void startContainerInternal(NMTokenIdentifier nmTokenIdentifier,
      ContainerTokenIdentifier containerTokenIdentifier,
      StartContainerRequest request) throws YarnException, IOException {
    // 省略 Token 認證及 ContainerLaunchContext上下文初始化
    // 真正處理邏輯
    this.readLock.lock();
    try {
      if (!serviceStopped) {
        // Create the application
        Application application =
            new ApplicationImpl(dispatcher, user, applicationID, credentials, context);
        // 應用程式的初始化,供後續 container 使用,這個邏輯只調用一次,通常由來自 ApplicationMaster 的第一個 container 完成
        if (null == context.getApplications().putIfAbsent(applicationID,
          application)) {
          // 1. 發送事件 ApplicationEventType.INIT_APPLICATION(資源本地化)
          dispatcher.getEventHandler().handle(
            new ApplicationInitEvent(applicationID, appAcls,
              logAggregationContext));
        }

        this.context.getNMStateStore().storeContainer(containerId,
            containerTokenIdentifier.getVersion(), request);
        // 2. 發送事件 ApplicationEventType.INIT_CONTAINER(啟動和運行 Container)
        dispatcher.getEventHandler().handle(
          new ApplicationContainerInitEvent(container));

        this.context.getContainerTokenSecretManager().startContainerSuccessful(
          containerTokenIdentifier);
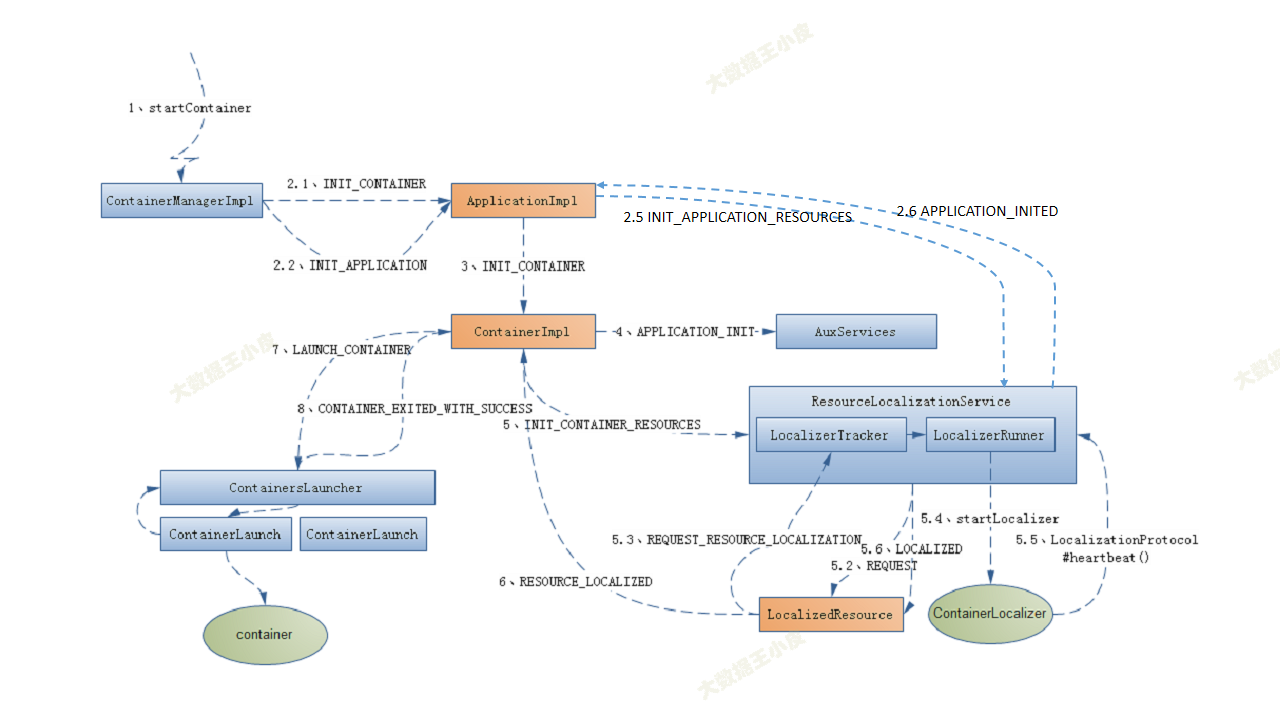
發送事件 ApplicationEventType.INIT_APPLICATION,AppInitTransition 狀態機設置 ACL 屬性後,向 LogHandler(目前有兩種實現方式,分別是 LogAggregationService 和 NonAggregatingLogHandler,這裡以 LogAggregationService 服務為例)發送事件 LogHandlerEventType.APPLICATION_STARTED。
當 LogHandler 收到 ApplicationEventType.APPLICATION_LOG_HANDLING_INITED 事件後,將創建應用程式日誌目錄、設置目錄許可權等。然後向 ApplicationImpl 發送一個 ApplicationEventType.APPLICATION_LOG_HANDLING_INITED 事件。
// yarn/server/nodemanager/containermanager/logaggregation/LogAggregationService.java
	case APPLICATION_STARTED:
        LogHandlerAppStartedEvent appStartEvent =
            (LogHandlerAppStartedEvent) event;
        initApp(appStartEvent.getApplicationId(), appStartEvent.getUser(),
            appStartEvent.getCredentials(),
            appStartEvent.getApplicationAcls(),
            appStartEvent.getLogAggregationContext());

  // initApp()
  private void initApp(final ApplicationId appId, String user,
      Credentials credentials, Map<ApplicationAccessType, String> appAcls,
      LogAggregationContext logAggregationContext) {
    ApplicationEvent eventResponse;
    try {
      verifyAndCreateRemoteLogDir(getConfig());
      initAppAggregator(appId, user, credentials, appAcls,
          logAggregationContext);
      // 發送事件
      eventResponse = new ApplicationEvent(appId,
          ApplicationEventType.APPLICATION_LOG_HANDLING_INITED);
    } catch (YarnRuntimeException e) {
      LOG.warn("Application failed to init aggregation", e);
      eventResponse = new ApplicationEvent(appId,
          ApplicationEventType.APPLICATION_LOG_HANDLING_FAILED);
    }
    this.dispatcher.getEventHandler().handle(eventResponse);
  }
ApplicationImpl 收到 ApplicationEventType.APPLICATION_LOG_HANDLING_INITED 事件後,直接向 ResourceLocalizationService 發送 LocalizationEventType.INIT_APPLICATION_RESOURCES 事件,此時 ApplicationImpl 仍處於 INITING 狀態。
           .addTransition(ApplicationState.INITING, ApplicationState.INITING,
               ApplicationEventType.APPLICATION_LOG_HANDLING_INITED,
ResourceLocalizationService 收到事件請求時會創建一個 LocalResourcesTrackerImpl 對象,為接下來資源下載做準備,並向 ApplicationImpl 發送事件 ApplicationEventType.APPLICATION_INITED。
// yarn/server/nodemanager/containermanager/localizer/ResourceLocalizationService.java
  private void handleInitApplicationResources(Application app) {
    // 0) Create application tracking structs
    String userName = app.getUser();
    // 創建 LocalResourcesTrackerImpl 對象,為接下來的資源下載做準備
    privateRsrc.putIfAbsent(userName, new LocalResourcesTrackerImpl(userName,
        null, dispatcher, true, super.getConfig(), stateStore, dirsHandler));
    String appIdStr = app.getAppId().toString();
    appRsrc.putIfAbsent(appIdStr, new LocalResourcesTrackerImpl(app.getUser(),
        app.getAppId(), dispatcher, false, super.getConfig(), stateStore,
        dirsHandler));
    // 1) Signal container init
    //
    // This is handled by the ApplicationImpl state machine and allows
    // containers to proceed with launching.
    // 向 ApplicationImpl 發送 ApplicationEventType.APPLICATION_INITED 事件
    dispatcher.getEventHandler().handle(new ApplicationInitedEvent(
          app.getAppId()));
  }
ApplicationImpl 收到 ApplicationEventType.APPLICATION_INITED 事件後,依次向該應用程式已經保持的所有 Container 發送一個 INIT_CONTAINER 事件以通知它們進行初始化。此時,ApplicationImpl 運行狀態由 INITING 轉換為 RUNNING。
2、完成 Container 本地化工作
之後的一些處理邏輯:
ContainerImpl收到 INIT_CONTAINER 事件後,先向附屬服務AuxServices發送APPLICATION_INIT事件,以通知它有新的應用程式 Container 啟動,然後從ContainerLaunchContext中獲取各類可見性資源,並保存到ContainerImpl中特定的數據結構中,之後向ResourceLocalizationService發送LocalizationEventType.INIT_CONTAINER_RESOURCES事件,此時ContainerImpl運行狀態已由 NEW 轉換為 LOCALIZING。ResourceLocalizationService收到LocalizationEventType.INIT_CONTAINER_RESOURCES事件後,依次將 Container 所需的資源封裝成一個 REQUEST 事件,發送給對應的資源狀態追蹤器LocalResourcesTrackerImpl。LocalResourcesTrackerImpl收到 REQUEST 事件後,將為對應的資源創建一個狀態機對象LocalizeResource以跟蹤資源的生命周期,並將 REQUEST 事件進一步傳送給LocalizedResource。LocalizedResource收到 REQUEST 事件後,將待下載資源信息通過LocalizerEventType.REQUEST_RESOURCE_LOCALIZATION事件發送給資源下載服務ResourceLocalizationService,之後LocalizedResource狀態由 NEW 轉換為 DOWNLOADING。
【這裡是重點,對應的下載邏輯】
ResourceLocalizationService 收到 LocalizerEventType.REQUEST_RESOURCE_LOCALIZATION 事件後,將交給 LocalizerTracker(ResourceLocalizationService 的內部類) 服務處理。
- 如果是 PUBLIC 資源,則統一交給 PublicLocalizer 處理。
- 如果該 Container 未創建 LocalizerRunner 線程,則創建一個。
- 然後添加到該線程的下載隊列中。
該線程會調用 ContainerExecutor#startLocalizer() 函數下載資源,該函數通過協議 LocalizationProtocol 與 ResourceLocalizationService 通信,以順序獲取待下載資源位置下載。待資源下載完成後,向 LocalizedResource 發送一個 LOCALIZED 事件。
    public void handle(LocalizerEvent event) {
      String locId = event.getLocalizerId();
      switch (event.getType()) {
      case REQUEST_RESOURCE_LOCALIZATION:
        // 0) find running localizer or start new thread
        LocalizerResourceRequestEvent req =
          (LocalizerResourceRequestEvent)event;
        switch (req.getVisibility()) {
        case PUBLIC:
          // 如果是 PUBLIC 資源,則統一交給 PublicLocalizer 處理
          publicLocalizer.addResource(req);
          break;
        case PRIVATE:
        case APPLICATION:
          // 檢查是否已經為該 Container 創建了 LocalizerRunner 線程,
          // 如果沒有,則創建一個,
          // 然後添加到該線程的下載隊列中,該線程會調用 ContainerExecutor#startLocalizer() 函數下載資源
          synchronized (privLocalizers) {
            LocalizerRunner localizer = privLocalizers.get(locId);
            if (null == localizer) {
              LOG.info("Created localizer for " + locId);
              localizer = new LocalizerRunner(req.getContext(), locId);
              privLocalizers.put(locId, localizer);
              localizer.start();
            }
            // 1) propagate event
            localizer.addResource(req);
          }
          break;
        }
        break;
      }
    }
LocalizedResource 收到 LOCALIZED 事件後,會向 ContainerImpl 發送一個 ContainerEventType.RESOURCE_LOCALIZED 事件,並且將狀態從 DOWNLOADING 轉換為 LOCALIZED。ContainerImpl 收到事件後,會檢查所依賴的資源是否全部下載完畢,如果下載完成則向 ContainersLauncher 服務發送一個 LAUNCH_CONTAINER 事件,以啟動對應 Container。
資源本地化過程可概括為:
- 在 NM 上,同一個應用程式的所有
ContainerImpl非同步併發向資源下載服務ResourceLocalizationService發送待下載的資源。 ResourceLocalizationService下載完一類資源後,將通知依賴該資源的所有Container- 一旦一個 Container 依賴的資源已經全部下載完成,則該Container進入運行階段。
三)啟動和運行 Container
我們再回到 ContainerManagerImpl,INIT_APPLICATION 事件的處理完成了「資源本地化」的操作,後續發送 INIT_CONTAINER 事件,是本節「啟動和運行 Container」要分析的部分。
// org/apache/hadoop/yarn/server/nodemanager/containermanager/ContainerManagerImpl.java
  private void startContainerInternal(NMTokenIdentifier nmTokenIdentifier,
      ContainerTokenIdentifier containerTokenIdentifier,
      StartContainerRequest request) throws YarnException, IOException {
          // 1. 發送事件 ApplicationEventType.INIT_APPLICATION(資源本地化)
          dispatcher.getEventHandler().handle(
            new ApplicationInitEvent(applicationID, appAcls,
              logAggregationContext));

        // 2. 發送事件 ApplicationEventType.INIT_CONTAINER(啟動和運行 Container)
        dispatcher.getEventHandler().handle(
          new ApplicationContainerInitEvent(container));
發送事件 ApplicationEventType.INIT_CONTAINER,由 ApplicationImpl 處理
    .addTransition(ApplicationState.NEW, ApplicationState.NEW,
        ApplicationEventType.INIT_CONTAINER,
        INIT_CONTAINER_TRANSITION)
- 發送
ContainerEventType.INIT_CONTAINER事件 - 在
ContainerImpl.RequestResourcesTransition中處理 - 其中重點邏輯是啟動 Container
container.sendLaunchEvent() - 又發送
ContainersLauncherEventType.LAUNCH_CONTAINER事件
這裡探究下 LAUNCH_CONTAINER 事件的處理流程。從這裡去跟蹤的時候會發現,沒有狀態機註冊這個事件,找不到對應的處理邏輯,那麼這個事件是如何被處理的呢?
我們去找到這個事件類型註冊的地方:
// yarn/server/nodemanager/containermanager/ContainerManagerImpl.java
dispatcher.register(ContainersLauncherEventType.class, containersLauncher);
其註冊的事件處理器為 ContainersLauncher 類,在這裡我們找到了 handle() 方法,裡面對事件進行處理。
// yarn/server/nodemanager/containermanager/launcher/ContainersLauncher.java
  public void handle(ContainersLauncherEvent event) {
    // TODO: ContainersLauncher launches containers one by one!!
    Container container = event.getContainer();
    ContainerId containerId = container.getContainerId();
    switch (event.getType()) {
      case LAUNCH_CONTAINER:
        Application app =
          context.getApplications().get(
              containerId.getApplicationAttemptId().getApplicationId());

        // LAUNCH_CONTAINER 事件的處理邏輯,創建 ContainerLaunch 線程並啟動線程
        ContainerLaunch launch =
            new ContainerLaunch(context, getConfig(), dispatcher, exec, app,
              event.getContainer(), dirsHandler, containerManager);
        // 提交到線程池
        containerLauncher.submit(launch);
        // 將其加入到運行的 Container 數據結構 running 中
        running.put(containerId, launch);
        break;
ContainerLaunch 類繼承自 Callable 類,通過 submit() 提交到線程池中,之後調用 Callable 類的實現方法 call() 來真正執行線程,主要邏輯如下:
- 準備 Container 的執行環境
- shell啟動腳本的封裝與拓展(添加自定義腳本)
- 創建本地工作目錄
- 設置token的保存路徑
- 更新 Container 狀態,從 LOCALIZED 轉換為 RUNNING
- 發送
CONTAINER_LAUNCHED事件 - 發送
START_MONITORING_CONTAINER事件,啟動對該 container 的資源監控
- 發送
- 調用 ContainerExecutor 對象在 NM 節點上啟動 Container
- ContainerExecutor 由用戶指定(
DefaultContainerExecutor,LinuxContainerExecutor,DockerContainerExecutor) - 通過具體的 ContainerExecutor 在 NM 上啟動 Container
- ContainerExecutor 由用戶指定(
// yarn/server/nodemanager/containermanager/launcher/ContainerLaunch.java
  public Integer call() {
    // 啟動 Container 前的準備工作:
    // 1.shell啟動腳本的封裝與拓展(添加自定義腳本)
    // 2.創建本地工作目錄
    // 3.設置token的保存路徑
    final ContainerLaunchContext launchContext = container.getLaunchContext();

      // 發送 CONTAINER_LAUNCHED 事件 & START_MONITORING_CONTAINER 事件
      dispatcher.getEventHandler().handle(new ContainerEvent(
            containerID,
            ContainerEventType.CONTAINER_LAUNCHED));
      context.getNMStateStore().storeContainerLaunched(containerID);

        // 重點:調用 ContainerExecutor 對象啟動 Container
        // ContainerExecutor 由用戶指定(DefaultContainerExecutor, LinuxContainerExecutor, DockerContainerExecutor)
        exec.activateContainer(containerID, pidFilePath);
        ret = exec.launchContainer(new ContainerStartContext.Builder()
            .setContainer(container)
            .setLocalizedResources(localResources)
            .setNmPrivateContainerScriptPath(nmPrivateContainerScriptPath)
            .setNmPrivateTokensPath(nmPrivateTokensPath)
            .setUser(user)
            .setAppId(appIdStr)
            .setContainerWorkDir(containerWorkDir)
            .setLocalDirs(localDirs)
            .setLogDirs(logDirs)
            .build());


    // 完成發送 CONTAINER_EXITED_WITH_SUCCESS 事件
    LOG.info("Container " + containerIdStr + " succeeded ");
    dispatcher.getEventHandler().handle(
        new ContainerEvent(containerID,
            ContainerEventType.CONTAINER_EXITED_WITH_SUCCESS));
同時,由於 ContainerExecutor#launchContainer 函數是阻塞式的,因此只有當腳本執行完成後才退出,這使得 ContainerLauncher 可在第一時間知道 Container 完成時間,之後向 ContainerImpl 發送一個 CONTAINER_EXITED_WITH_SUCCESS 事件,此時 ContainerImpl 狀態由 RUNNING 轉換為 EXITED_WITH_SUCCESS。
至此,一個 Container 運行完成,接下來將進入該 Container 的資源清理階段。
四)Container 資源清理
當 Container 運行完成後(成功或失敗),會執行資源清理工作。主要清理下麵兩類資源:
ResourceLocalizationService:從 HDFS 下載到本地的數據文件ContainerExecutor:為 Container 創建私有工作目錄,並保存一些臨時文件(比如 Container 進程 pid 文件)
在上一步 call() 方法最後,Container 運行完成時,會發送 CONTAINER_EXITED_WITH_SUCCESS 事件。
// yarn/server/nodemanager/containermanager/container/ContainerImpl.java
    .addTransition(ContainerState.RUNNING,
        ContainerState.EXITED_WITH_SUCCESS,
        ContainerEventType.CONTAINER_EXITED_WITH_SUCCESS,
        new ExitedWithSuccessTransition(true))

// ------------------------
  static class ExitedWithSuccessTransition extends ContainerTransition {
    public void transition(ContainerImpl container, ContainerEvent event) {
      // Set exit code to 0 on success
      container.exitCode = 0;

      if (clCleanupRequired) {
        // 向 ContainerLauncher 發送 ContainersLauncherEventType.CLEANUP_CONTAINER 清理事件
        container.dispatcher.getEventHandler().handle(
            new ContainersLauncherEvent(container,
                ContainersLauncherEventType.CLEANUP_CONTAINER));
      }

      // 向 ResourceLocalizationService 發送 LocalizationEventType.CLEANUP_CONTAINER_RESOURCES 清理事件
      container.cleanup();
    }
  }
1、ContainerLauncher 清理臨時目錄
處理 ContainersLauncherEventType.CLEANUP_CONTAINER 事件。
處理邏輯會進入到 ContainersLauncher 的 handle() 方法,將 Container 從正在運行的 Container 列表中移除,並調用 ContainerLaunch#cleanupContainer() 方法清除 Container 占用的臨時目錄。
      case CLEANUP_CONTAINER:
        // 將 Container 從正在運行 Container 列表中移除
        ContainerLaunch launcher = running.remove(containerId);
        if (launcher == null) {
          // Container not launched. So nothing needs to be done.
          return;
        }

        // Cleanup a container whether it is running/killed/completed, so that
        // no sub-processes are alive.
        try {
          // 清理 Container 占用的臨時目錄(kill進程,刪除 pid 文件等)
          launcher.cleanupContainer();
        } catch (IOException e) {
          LOG.warn("Got exception while cleaning container " + containerId
              + ". Ignoring.");
        }
        break;
2、ResourceLocalizationService 清理用戶工作目錄和私有目錄
處理 LocalizationEventType.CLEANUP_CONTAINER_RESOURCES 事件。
    case CLEANUP_CONTAINER_RESOURCES:
      handleCleanupContainerResources((ContainerLocalizationCleanupEvent)event);
      break;
handleCleanupContainerResources() 將會刪除
- 用戶工作的數據(即從 HDFS 下載的數據)
${yarn.nodemanager.local-dirs}/usercache/<user>/appcache/${appid}/${containerid} - 私有目錄數據
${yarn.nodemanager.local-dirs}/nmPrivate/${appid}/${containerid}(執行腳本、token文件、pid文件)- 其中 執行腳本、token 會在 Container 啟動時複製到 「用戶工作的數據」目錄中
這兩個目標都存放了 Tokens 文件和 Shell 運行腳本。
3、保留的目錄
註意:{yarn.nodemanager.local-dirs}/usercache/{appid}/output 並不會刪除,計算任務之間有依賴關係,因此 NodeManager 不能在 Container 運行完成之後立刻清理它占用的所有資源,尤其是產生的中間數據,而只有當所有 Container 運行完成之後,才能夠全部清空這些資源。
當一個應用程式運行結束時,需要由它廣播給各個NodeManager,再進一步由NodeManager清理應用程式占用的所有資源,包括產生的中間數據。

到這裡 container 清理工作完成。
三、小結
本節深入源碼介紹了 Container 生命周期的整體流程。從通知 NM 啟動 Container、資源本地化、啟動 Container、資源清理四個方面進行了介紹。
參考文章:
《Hadoop技術內幕:深入解析YARN架構設計與實現原理》
Yarn Container啟動流程源碼分析
NodeManager詳細組件及功能
深入解析yarn架構設計與技術實現-NodeManager2
hadoop-yarn-src-read - 一些 yarn 學習筆記


