Spring Spring 核心學習內容 IOC、AOP、 JdbcTemplate、聲明式事務 1.Spring 幾個重要概念 Spring 可以整合其他的框架(Spring 是管理框架的框架) Spring 有兩個核心的概念: IOC 和 AOP IOC Inversion Of Control ...
Spring 核心學習內容 IOC、AOP、 JdbcTemplate、聲明式事務
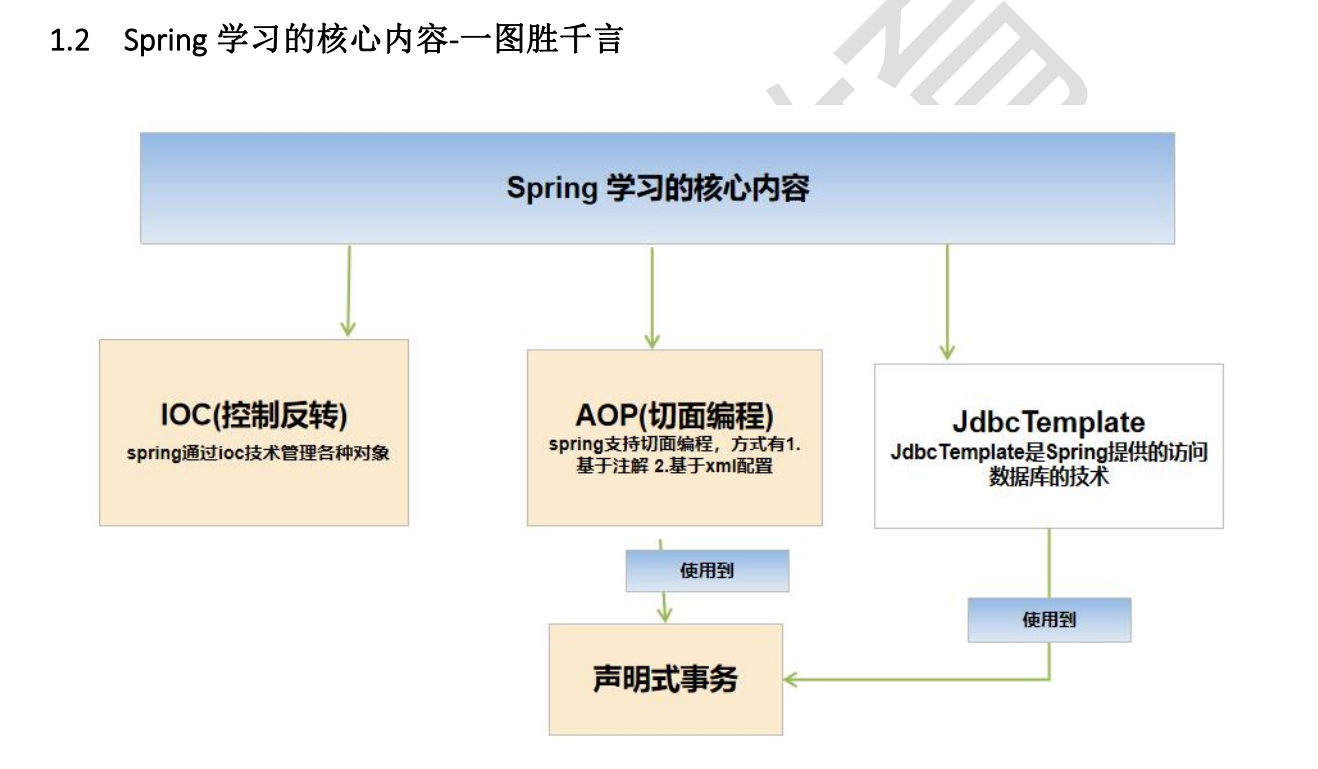
1.Spring 幾個重要概念
-
Spring 可以整合其他的框架(Spring 是管理框架的框架)
-
Spring 有兩個核心的概念: IOC 和 AOP
-
IOC Inversion Of Control 控制反轉
-
動態代理(學好了才能學好AOP)
-
AOP Aspect-oriented programming 面向切麵編程
那麼接下來我們就開始逐個擊破他們吧
2.IOC / DI( 註入依賴)
我們傳統的開發模式是:編寫程式 ==> 在程式中讀取配置文件信息,通過new或反射創建對象,用對象完成任務
IOC開發模式:在配置文件中配置好對象的屬性和依賴 ==> 在程式中利用IOC直接根據配置文件,創建對象, 並放入到容器(ConcurrentHashMap)中, 並可以完成對象之間的依賴 ,當需要使用某個對象實例的時候, 就直接從容器中獲取即可(那麼容器到底是什麼呢,我們待會再講)
總結:由傳統的new、反射創建對象 ==> IOC通過註解或配置直接創建對象
有什麼好處呢?
-
程式員可以更加關註如何使用對象完成相應的業務
-
IOC 也體現了 Spring 最大的價值,通過配置,給程式提供需要使用的web層對象(Servlet、Service、Dao、JavaBean、Entity),實現解耦。
3.Spring容器結構與機制
我們先快速入門一下使用IOC基本的代碼
如上文步驟所說,先配置一個xml文件,當然配之前我們要先創建一個類,這樣才能在配置xml的class中輸入類的全路徑
所以我們先簡單的創建一個Monster類
package com.spring.bean;
public class Monster {
private Integer id;
private String name;
private String skill;
@Override
public String toString() {
return "Monster{" +
"id=" + id +
", name='" + name + '\'' +
", skill='" + skill + '\'' +
'}';
}
public Integer getId() {
return id;
}
public void setId(Integer id) {
this.id = id;
}
public String getName() {
return name;
}
public void setName(String name) {
this.name = name;
}
public String getSkill() {
return skill;
}
public void setSkill(String skill) {
this.skill = skill;
}
public Monster(Integer id, String name, String skill) {
this.id = id;
this.name = name;
this.skill = skill;
}
public Monster() {
}
}
然後配置我們的xml文件
<?xml version="1.0" encoding="UTF-8"?>
<beans xmlns="http://www.springframework.org/schema/beans"
xmlns:xsi="http://www.w3.org/2001/XMLSchema-instance"
xsi:schemaLocation="http://www.springframework.org/schema/beans http://www.springframework.org/schema/beans/spring-beans.xsd">
<!--
1.配置Monster對象/javabean
2.在beans中可以配置多個bean
3.bean就是一個java對象,只是符合幾個條件而已
4.class屬性是類的全路徑,記得類要有無參構造器,就可以讓spring底層使用反射
5.id 表示 該類在spring容器中的id,將來可通過id獲取該對象(id一定要不同,後面會解釋)
6.property是用於給該對象屬性賦值
-->
<bean class="com.spring.bean.Monster" id="monster01">
<property name="id" value="1"/>
<property name="name" value="牛魔王"/>
<property name="skill" value="芭蕉扇"/>
</bean>
</beans>然後我們再簡單的寫一個測試類展示一下基本代碼
public class springBeanstest {
    @Test
    public void getMonster(){
        //1.創建容器 --> 和容器配置文件關聯(debug處)
        ApplicationContext ioc = new ClassPathXmlApplicationContext("beans.xml");
        //2.通過getBean獲取對象
        //Object monster01 = ioc.getBean("monster01");  //預設返回obj
        //也可以使用另一個getBean方法直接獲取他的運行類型的對象,這樣就無需強轉獲取monster的方法
        Monster monster01 = ioc.getBean("monster01", Monster.class);
        System.out.println(monster01.getSkill());
    }
}
那麼簡單的介紹了一下代碼之後,我們正式開始分析ioc容器的底層機制,怎麼辦呢,毫無疑問的方法 ==> debug
斷點打在第一行的創建容器上,讓我們開始進入ioc的內部世界。
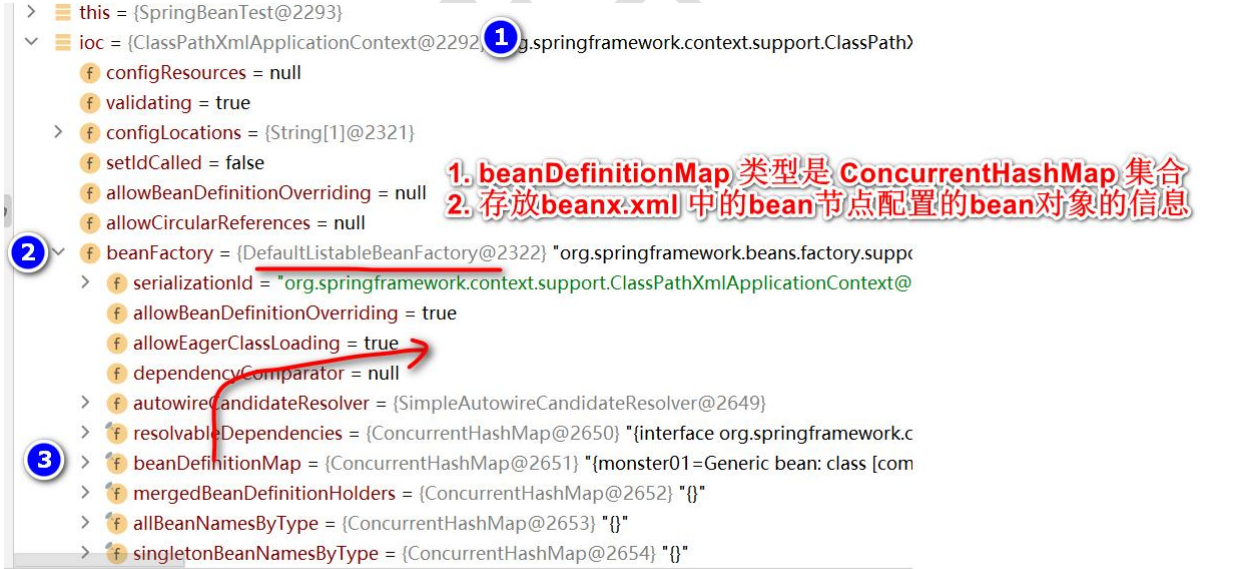
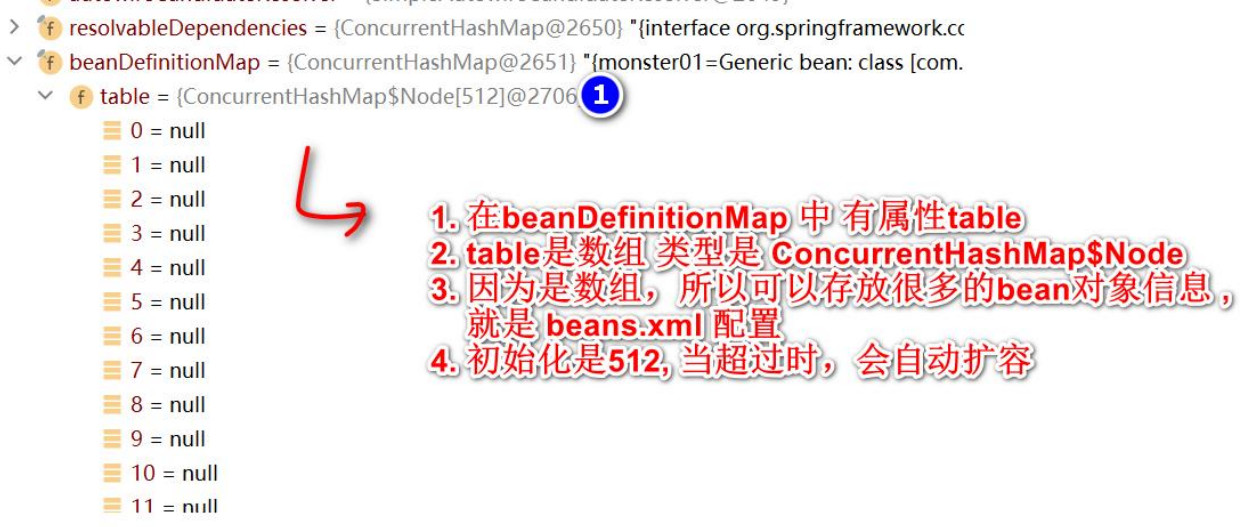
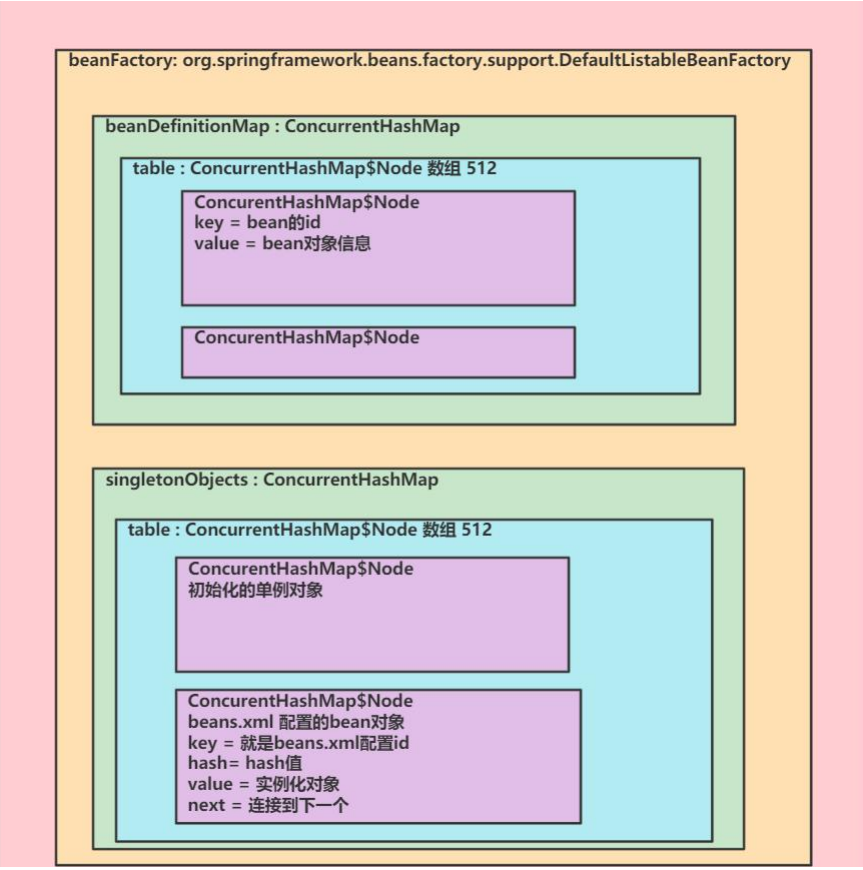
點開我們的beanFactory,找到我們重點關註第3個:beanDefinitionMap,我們可以看到它的右邊灰色括弧內(就是它的類型)是一個ConcurrentHashMap,打開它我們看到有一個table,table的類型是ConcurrentHashMap的一個內部類Node,而且還是一個數組,每一個數組都存放著配置文件中的不同bean對象,它的初始化大小是512個,超過才會自動擴容
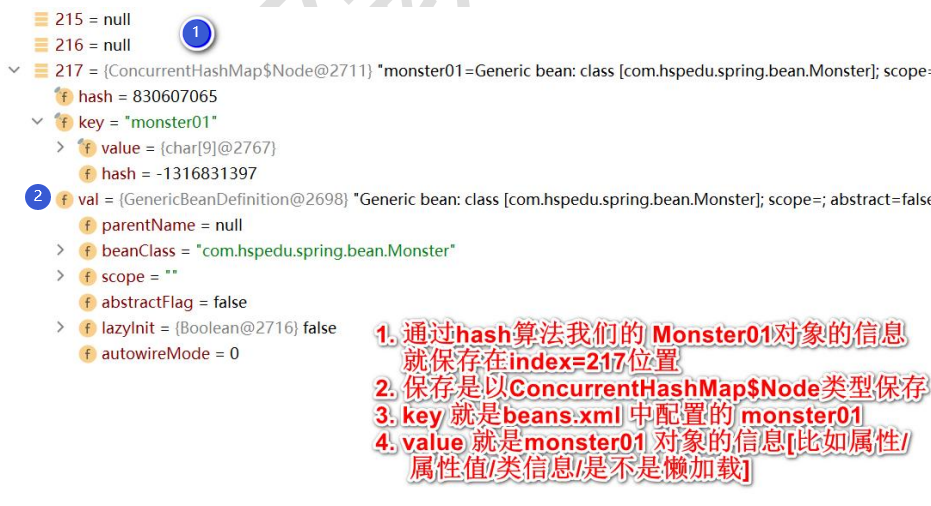
我們往下翻,終於找到第217個數組存放著我們的Monster01對象
我們繼續往下翻,找到一個propertyValues
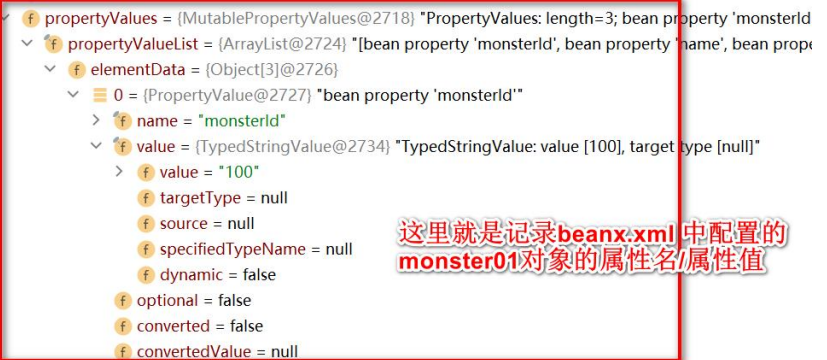
其實也就是指xml里的property
<bean class="com.spring.bean.Monster"  id="monster01">
        <property name="id" value="1"/>
        <property name="name" value="牛魔王"/>
        <property name="skill" value="芭蕉扇"/>
    </bean>
好,hold on,hold on,hold on,所以說我現在考你一個問題,真真正正創建出來的monster01到底放在哪?你可能會說在beanDefinitionMap的table中,錯,其實beanDefinitionMap的table存的只是beans.xml配置文件的對象,最終創建出來的monster01放在接下來的singletonObjects中
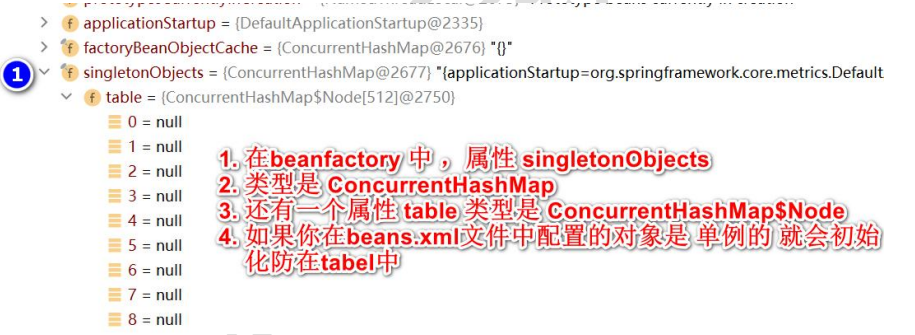
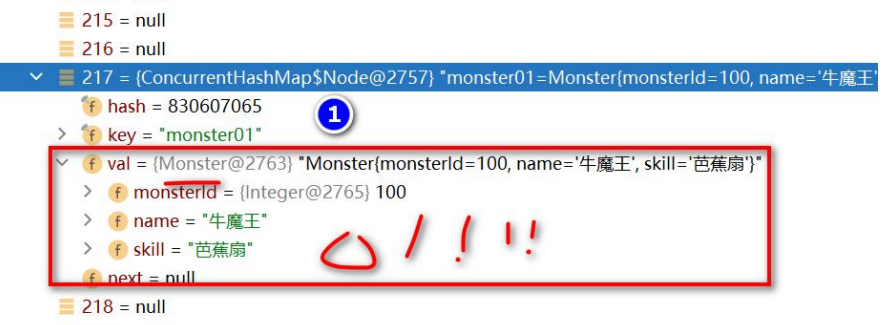
到此,我們終於找到了創建出來的monster01最終存放的地方,在beanFactory的singletonObjects的table里。我們可以看到它的類型雀雀實實是Monster了
那麼我們來解釋一下這行代碼,getBean是怎麼查到monster01的
Monster monster01 = ioc.getBean("monster01", Monster.class);getBean是怎麼查到monster01的
-
首先,他會在beanDefinitionMap的table里找是否有monster01
-
如果發現有一個單例的對象,就又用monster01這個id去singletonObjects的table里獲取真正的monster01。
-
如果發現不是單例的對象,他就通過反射機制動態創建一個單例的對象返回給ioc.getBean
說了這麼多,肯定有小伙伴不知道什麼叫單例,具體可以去網上瞭解,這裡簡要介紹一下,預設情況下,一個Spring容器的每一個bean對象都只能有一個實例對象,創建的再多也只有一個相同的對象,這就叫單例,這同時也是一個設計模式叫單例模式。
當然你要是寫兩遍這個代碼,monster01 就不等於 monster02了,因為是兩個spring容器
ApplicationContext ioc = new ClassPathXmlApplicationContext("beans.xml");//創建容器
Monster monster01 = ioc.getBean("monster01", Monster.class); //獲取對象
ApplicationContext ioc = new ClassPathXmlApplicationContext("beans.xml");//創建容器
Monster monster02 = ioc.getBean("monster01", Monster.class); //獲取對象到這裡,我們也驗證了上面配置xml文件時為什麼說每個bean的id要不同的原因了。(如果相同創建的一直是同一個對象)
最後再額外補充一個
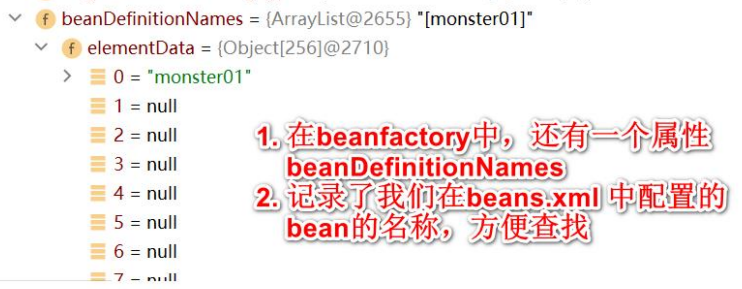
Spring容器結構總結:
Bean的生命周期:
說明: bean 對象創建是由 JVM 完成的,然後執行如下方法
-
執行構造器
-
執行 set 相關方法
-
調用 bean 的初始化的方法(需要配置)
-
使用 bean
-
當容器關閉時候,調用 bean 的銷毀方法(需要配置)
public class House {
private String name;
public House() {
System.out.println("House() 構造器");
}
public String getName() {
return name;
}
public void setName(String name) {
System.out.println("House setName()...");
this.name = name;
}
public void init() { //不一定要叫init,只要在xml里配置init-method這裡的方法名就好
System.out.println("House init()..");
}
public void destory() { //同理,不一定要叫destory
System.out.println("House destory()..");
}
}
//輸出順序:
House() 構造器
House setName()...
House init()..
業務操作
House destory()..<!-- 配置 bean 的初始化方法和銷毀方法 -->
<bean id="house" class="com.spring.beans.House"
init-method="init" destroy-method="destory">
<property name="name" value="北京豪宅"/>
</bean>後置處理器:
後置處理器會在 bean 初始化init方法調用前和初始化init方法調用後被調用,對所有的類都生效,這也是切麵編程的核心之一(在不影響源代碼情況下切進來,對多個對象進行操作),後面我們會細講Spring是如何實現他的。
4.實現sping的底層的註解方式註入bean(重點!!!)
-
寫一個簡單的 Spring 容器 , 通過讀取類的註解 (@Component @Controller @Service @Reponsitory),將對象註入到 IOC 容器
-
也就是說,不使用 Spring 原生框架,我們自己使用 IO+Annotaion+反射+集合 技術實現, 打通 Spring 註解方式開發的技術痛點
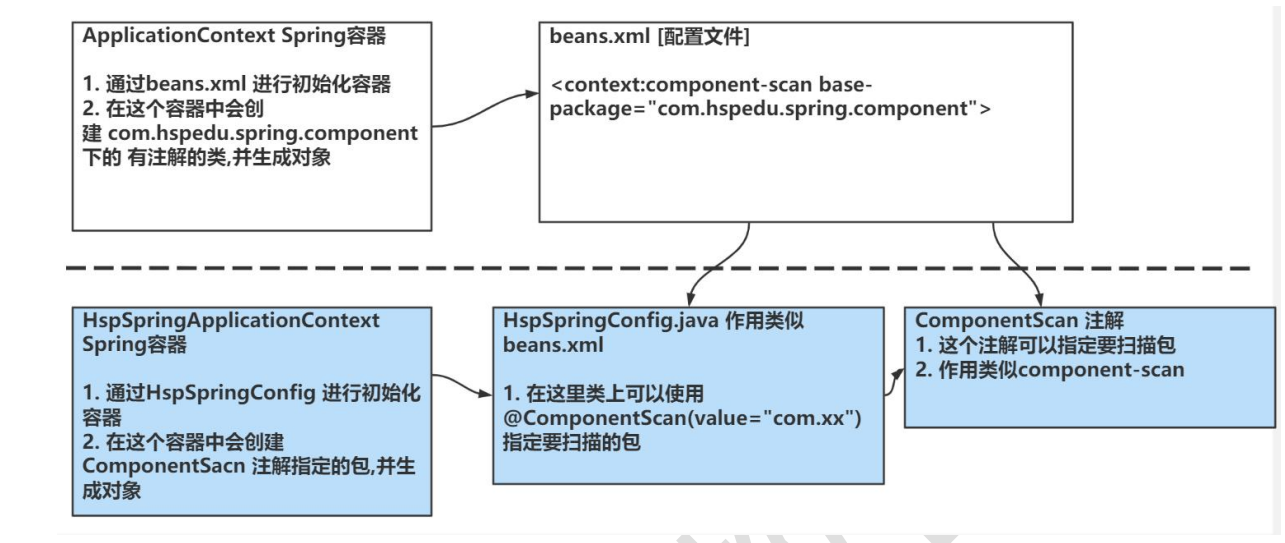
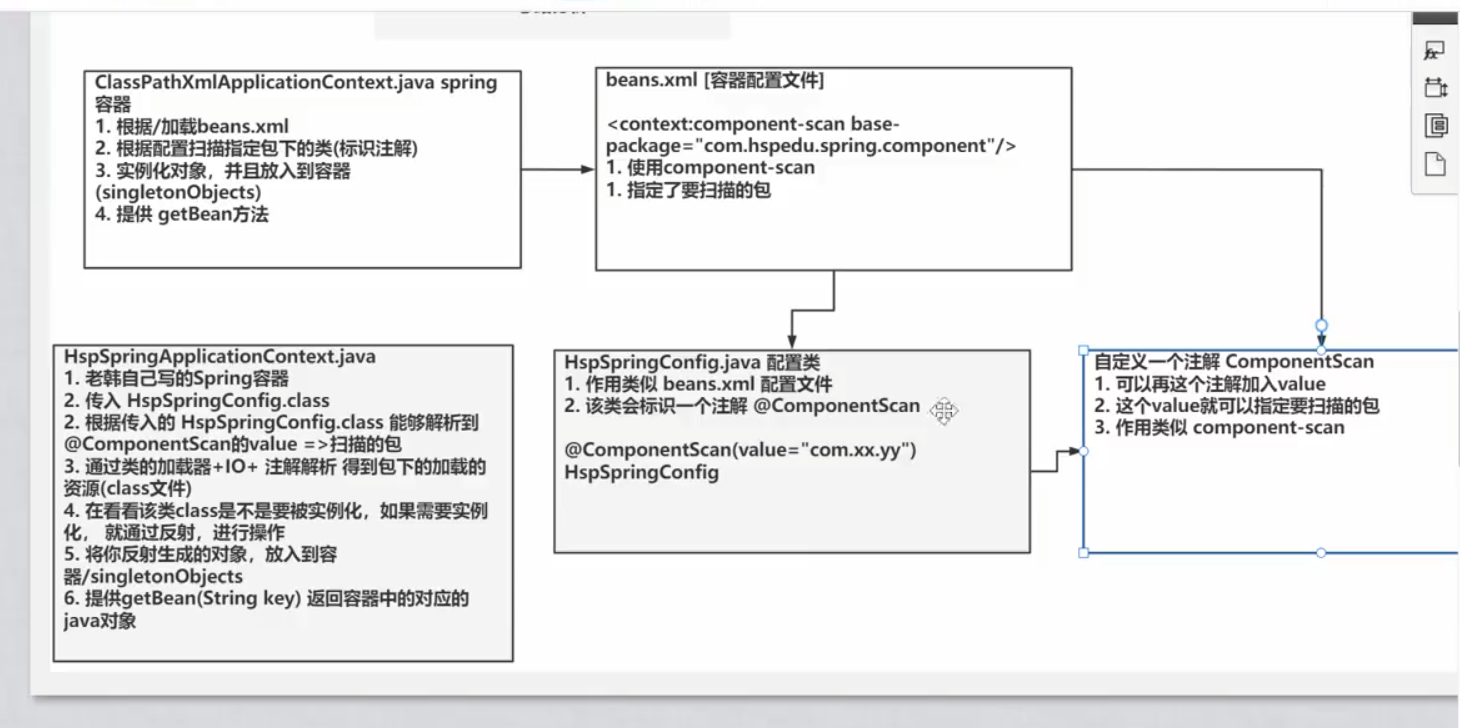
思路分析圖:
那麼開發一個程式首先做的就是畫圖分析思路啦
-
我們用虛線分隔開官方實現和我們自己實現的兩個部分,上面的是官方的實現,下麵是我們自己的。
-
我們將beans.xml分成兩部分從而實現替代,一個是自定義註解(ComponentScan),一個是類似beans.xml的配置類(HspSpringConfig),配置類會寫上我們的自定義註解,註解里的value就相當於xml文件中的base-package的作用,由此我們的配置類(HspSpringConfig)就達到了替代beans.xml的作用
-
那麼我們再來實現自己的容器類(HspSpringApplication)作為官方的ClassPathXmlApplicationContext的替代品,思路很簡單,不過就是拿到到配置類的.class文件,然後獲取自定義註解下的value值(也就是要掃描的包的全路徑),通過反射包的全路徑獲取包下的各種class文件(編譯後的java類),再進行一系列操作實現getBean的平替方法
實現:
思路分析完了,可能現在小伙伴就開始無從下手了,那麼我們首先開始照著圖片搭建一個框架,也就是在IDEA中創建好包和類先。其中Component就是寫了一些自定義註解的類(也就是要掃描的包),test是測試用的
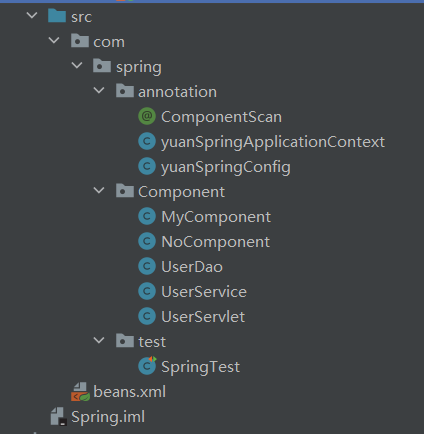
於是乎,我們就可以開始辛苦的敲代碼了
先從beans.xml的平替類下手,自定義註解和配置類
package com.spring.annotation;
import java.lang.annotation.ElementType;
import java.lang.annotation.Retention;
import java.lang.annotation.RetentionPolicy;
import java.lang.annotation.Target;
/**
* @Author: Yjc
* @Description: 自定義註解
* @DateTime: 2023/4/23 20:23
**/
@Target(ElementType.TYPE) // @Target 註解用於定義註解的使用範圍,即被描述的註解可以用在什 麽地方。ElementType.TYPE 表示該註解可以用於類、介面、枚舉和註解類型
@Retention(RetentionPolicy.RUNTIME) //作用範圍是運行時
public @interface ComponentScan {
String value() default ""; //可以給一個叫value的字元串 , 也就是可以@ComponentScan(value = "xxx")這樣使用
}package com.spring.annotation;
/**
* @Author: Yjc
* @Description: 配置類
* @DateTime: 2023/4/23 20:29
**/
@ComponentScan(value = "com.spring.Component")
public class yuanSpringConfig {
}再寫幾個簡單的組件類用來測試,為了簡潔我這就放一起了,實際上拆開放在各自的類里
@ComponentScan
public class MyComponent {
}
public class NoComponent { //沒有註解的類,後面要寫邏輯來排除
}
@Repository
public class UserDao {
}
@Service
public class UserService {
}
@Controller
@Component(value = "id1") //相當於給UserServlet命名為id1,最後測試getBean是否能夠獲取它
public class UserServlet {
}然後就是我們最重要的容器類了,但是我們這裡先實現一半,防止朋友們過於困惑,我們分段實現
package com.spring.annotation;
import java.io.File;

import java.lang.annotation.Annotation;

import java.net.URL;

import java.util.Objects;

import java.util.concurrent.ConcurrentHashMap;
/**
-
@Author: Yjc
-
@Description: 容器類
@DateTime: 2023/4/23 21:18
**/
public class yuanSpringApplicationContext {
private Class configClass;
private final ConcurrentHashMap<String, Objects> ioc = new ConcurrentHashMap<>(); //我們之前分析過了,其實ApplicationContext底層就是一個ConcurrentHashMappublic yuanSpringApplicationContext(Class configClass) {
//獲取傳入的配置類yuanSpringConfig.class
this.configClass = configClass;
//獲取傳入的配置類的註解
ComponentScan ComponentScan = (ComponentScan) this.configClass.getDeclaredAnnotation(ComponentScan.class);
String path = ComponentScan.value();//掃描獲取的value(包)下的所有文件 //1.獲取類載入器 ClassLoader classLoader = yuanSpringApplicationContext.class.getClassLoader(); //2.通過類載入器獲取包下文件的url path = path.replace(".","/"); //將.全部改成 / 這樣才是路徑 URL resource = classLoader.getResource(path); //註意:通過閱讀源碼,這個空里的路徑應該是以/為分割,所以有了上一句話 File file = new File(resource.getFile()); //IO中目錄也可以當成一個文件 if (file.isDirectory()){ File[] files = file.listFiles(); //獲取包下的所有文件 for (File f : files) { System.out.println("==========="); //檢查一下有沒有拿到 File absoluteFilePath = f.getAbsoluteFile(); System.out.println(absoluteFilePath); } }}
}
寫完這些,我們寫個測試用例試一下,是否拿到了要掃描的包下的資源
package com.spring.test;
import com.spring.annotation.yuanSpringApplicationContext;
import com.spring.annotation.yuanSpringConfig;
import org.junit.Test;
/**
- @Author: Yjc
- @Description: 測試用例
@DateTime: 2023/4/23 21:26
**/
public class SpringTest {
@Test
public void testspring(){
//調用容器類的構造器,放入配置類的class類。
yuanSpringApplicationContext ioc = new yuanSpringApplicationContext(yuanSpringConfig.class);
}

}
很顯然,我們成功了

那麼我們接下來繼續實現,想辦法拿到類的全路徑從而通過反射去除沒有web組件註解的類
package com.spring.annotation;
import org.springframework.stereotype.Controller;
import org.springframework.stereotype.Repository;
import org.springframework.stereotype.Service;
import java.io.File;
import java.lang.annotation.Annotation;
import java.net.URL;
import java.util.Objects;
import java.util.concurrent.ConcurrentHashMap;
/**
* @Author: Yjc
* @Description: 容器類
* @DateTime: 2023/4/23 21:18
**/
public class yuanSpringApplicationContext {
private Class configClass;
private final ConcurrentHashMap<String, Object> ioc = new ConcurrentHashMap<>(); //我們之前分析過了,其實ApplicationContext底層就是一個ConcurrentHashMap
public yuanSpringApplicationContext(Class configClass) {
//獲取傳入的配置類yuanSpringConfig.class
this.configClass = configClass;
//獲取傳入的配置類的註解
ComponentScan ComponentScan = (ComponentScan) this.configClass.getDeclaredAnnotation(ComponentScan.class);
String path = ComponentScan.value();
//掃描獲取的value(包)下的所有文件
//1.獲取類載入器
ClassLoader classLoader = yuanSpringApplicationContext.class.getClassLoader();
//2.通過類載入器獲取包下文件的url
path = path.replace(".", "/"); //將.全部改成 / ,這樣才是路徑
URL resource = classLoader.getResource(path); //註意:通過閱讀源碼,這個空里的路徑應該是以/為分割
File file = new File(resource.getFile()); //IO中目錄也可以當成一個文件
if (file.isDirectory()) {
File[] files = file.listFiles(); //獲取包下的所有文件
for (File f : files) {
System.out.println("==========="); //檢查一下有沒有拿到
String absoluteFilePath = String.valueOf(f.getAbsoluteFile());
System.out.println(absoluteFilePath);
//E:\JavaProject\Spring\out\production\Spring\com\spring\Component\MyComponent.class
//獲取com.spring.Component.MyComponent
//1.獲取類名MyComponent,也就是想辦法去掉.class和前面的
String className = absoluteFilePath.substring(absoluteFilePath.lastIndexOf("\\") + 1,
absoluteFilePath.lastIndexOf(".class"));
//2.想辦法拿到com.spring.Component. 其實只要把獲取到的註解拿過來就好了(也就是path)
String classFullName = path.replace("/", ".") + "." + className;
System.out.println(classFullName);
//3.把沒有加自定義註解Component和相關的web組件註解的類去掉
try {
//通過類載入器反射獲取該類的class對象
//那麼有人可能會問,為什麼不用forName方法反射呢,因為forName還會調用static靜態方法
//而classLoader只是獲取class對象的信息,相當於一個輕量級的反射
//Class<?> classForName = Class.forName(classFullName);
Class<?> aClass = classLoader.loadClass(classFullName);
if (aClass.isAnnotationPresent(ComponentScan.class)
|| aClass.isAnnotationPresent(Controller.class)
|| aClass.isAnnotationPresent(Service.class)
|| aClass.isAnnotationPresent(Repository.class)) {
//這個時候我們就需要完整的反射,如果該類有靜態方法就可以執行了
Class<?> classForName = Class.forName(classFullName);
Object newInstance = classForName.newInstance();
//將其放入容器中
ioc.put(className, newInstance);
}else {
System.out.println("有一個不是組件的類");
}
} catch (Exception e) {
System.out.println("出錯了");
}
}
}
}
}經過測試,冇問題。
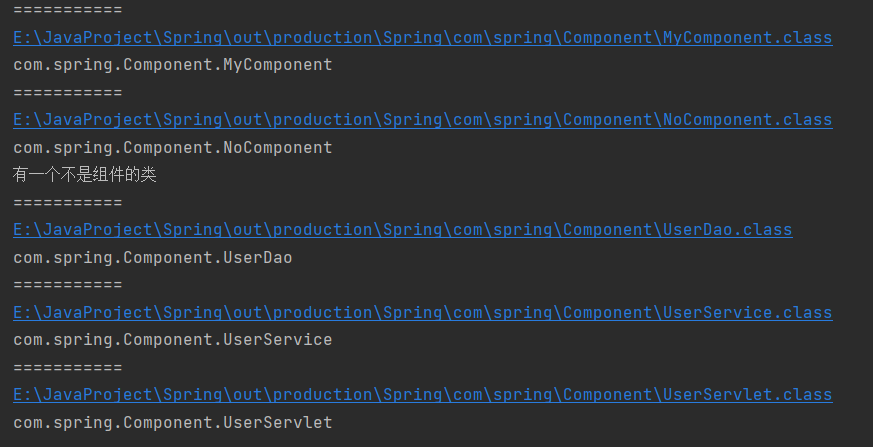
至此,我們已經可以將對象放入ioc容器中了,所以我們再寫個簡單的getBean方法作為獲取實例對象的getter吧
public Object getBean(String name){
return ioc.get(name);
}可以再寫個簡單的測試類試用一下
package com.spring.test;
import com.spring.annotation.yuanSpringApplicationContext;
import com.spring.annotation.yuanSpringConfig;
import org.junit.Test;
/**
* @Author: Yjc
* @Description: 測試用例
* @DateTime: 2023/4/23 21:26
**/
public class SpringTest {
@Test
public void testspring() {
yuanSpringApplicationContext ioc = new yuanSpringApplicationContext(yuanSpringConfig.class);
System.out.println(ioc.getBean("id1"));
}
}

那麼到此為止,一個簡單的Spring註解的過程就實現完畢了。以後見到註解就知道它是怎麼來的,有腳踏實地的感覺了


