自己實現Mybatis底層機制-01 主要實現:封裝SqlSession到執行器+Mapper介面和Mapper.xml+MapperBean+動態代理Mapper的方法 1.Mybatis整體架構分析 對上圖的解讀: 1)mybatis 的核心配置文件 mybatis-config.xml:進 ...
自己實現Mybatis底層機制-01
主要實現:封裝SqlSession到執行器+Mapper介面和Mapper.xml+MapperBean+動態代理Mapper的方法
1.Mybatis整體架構分析
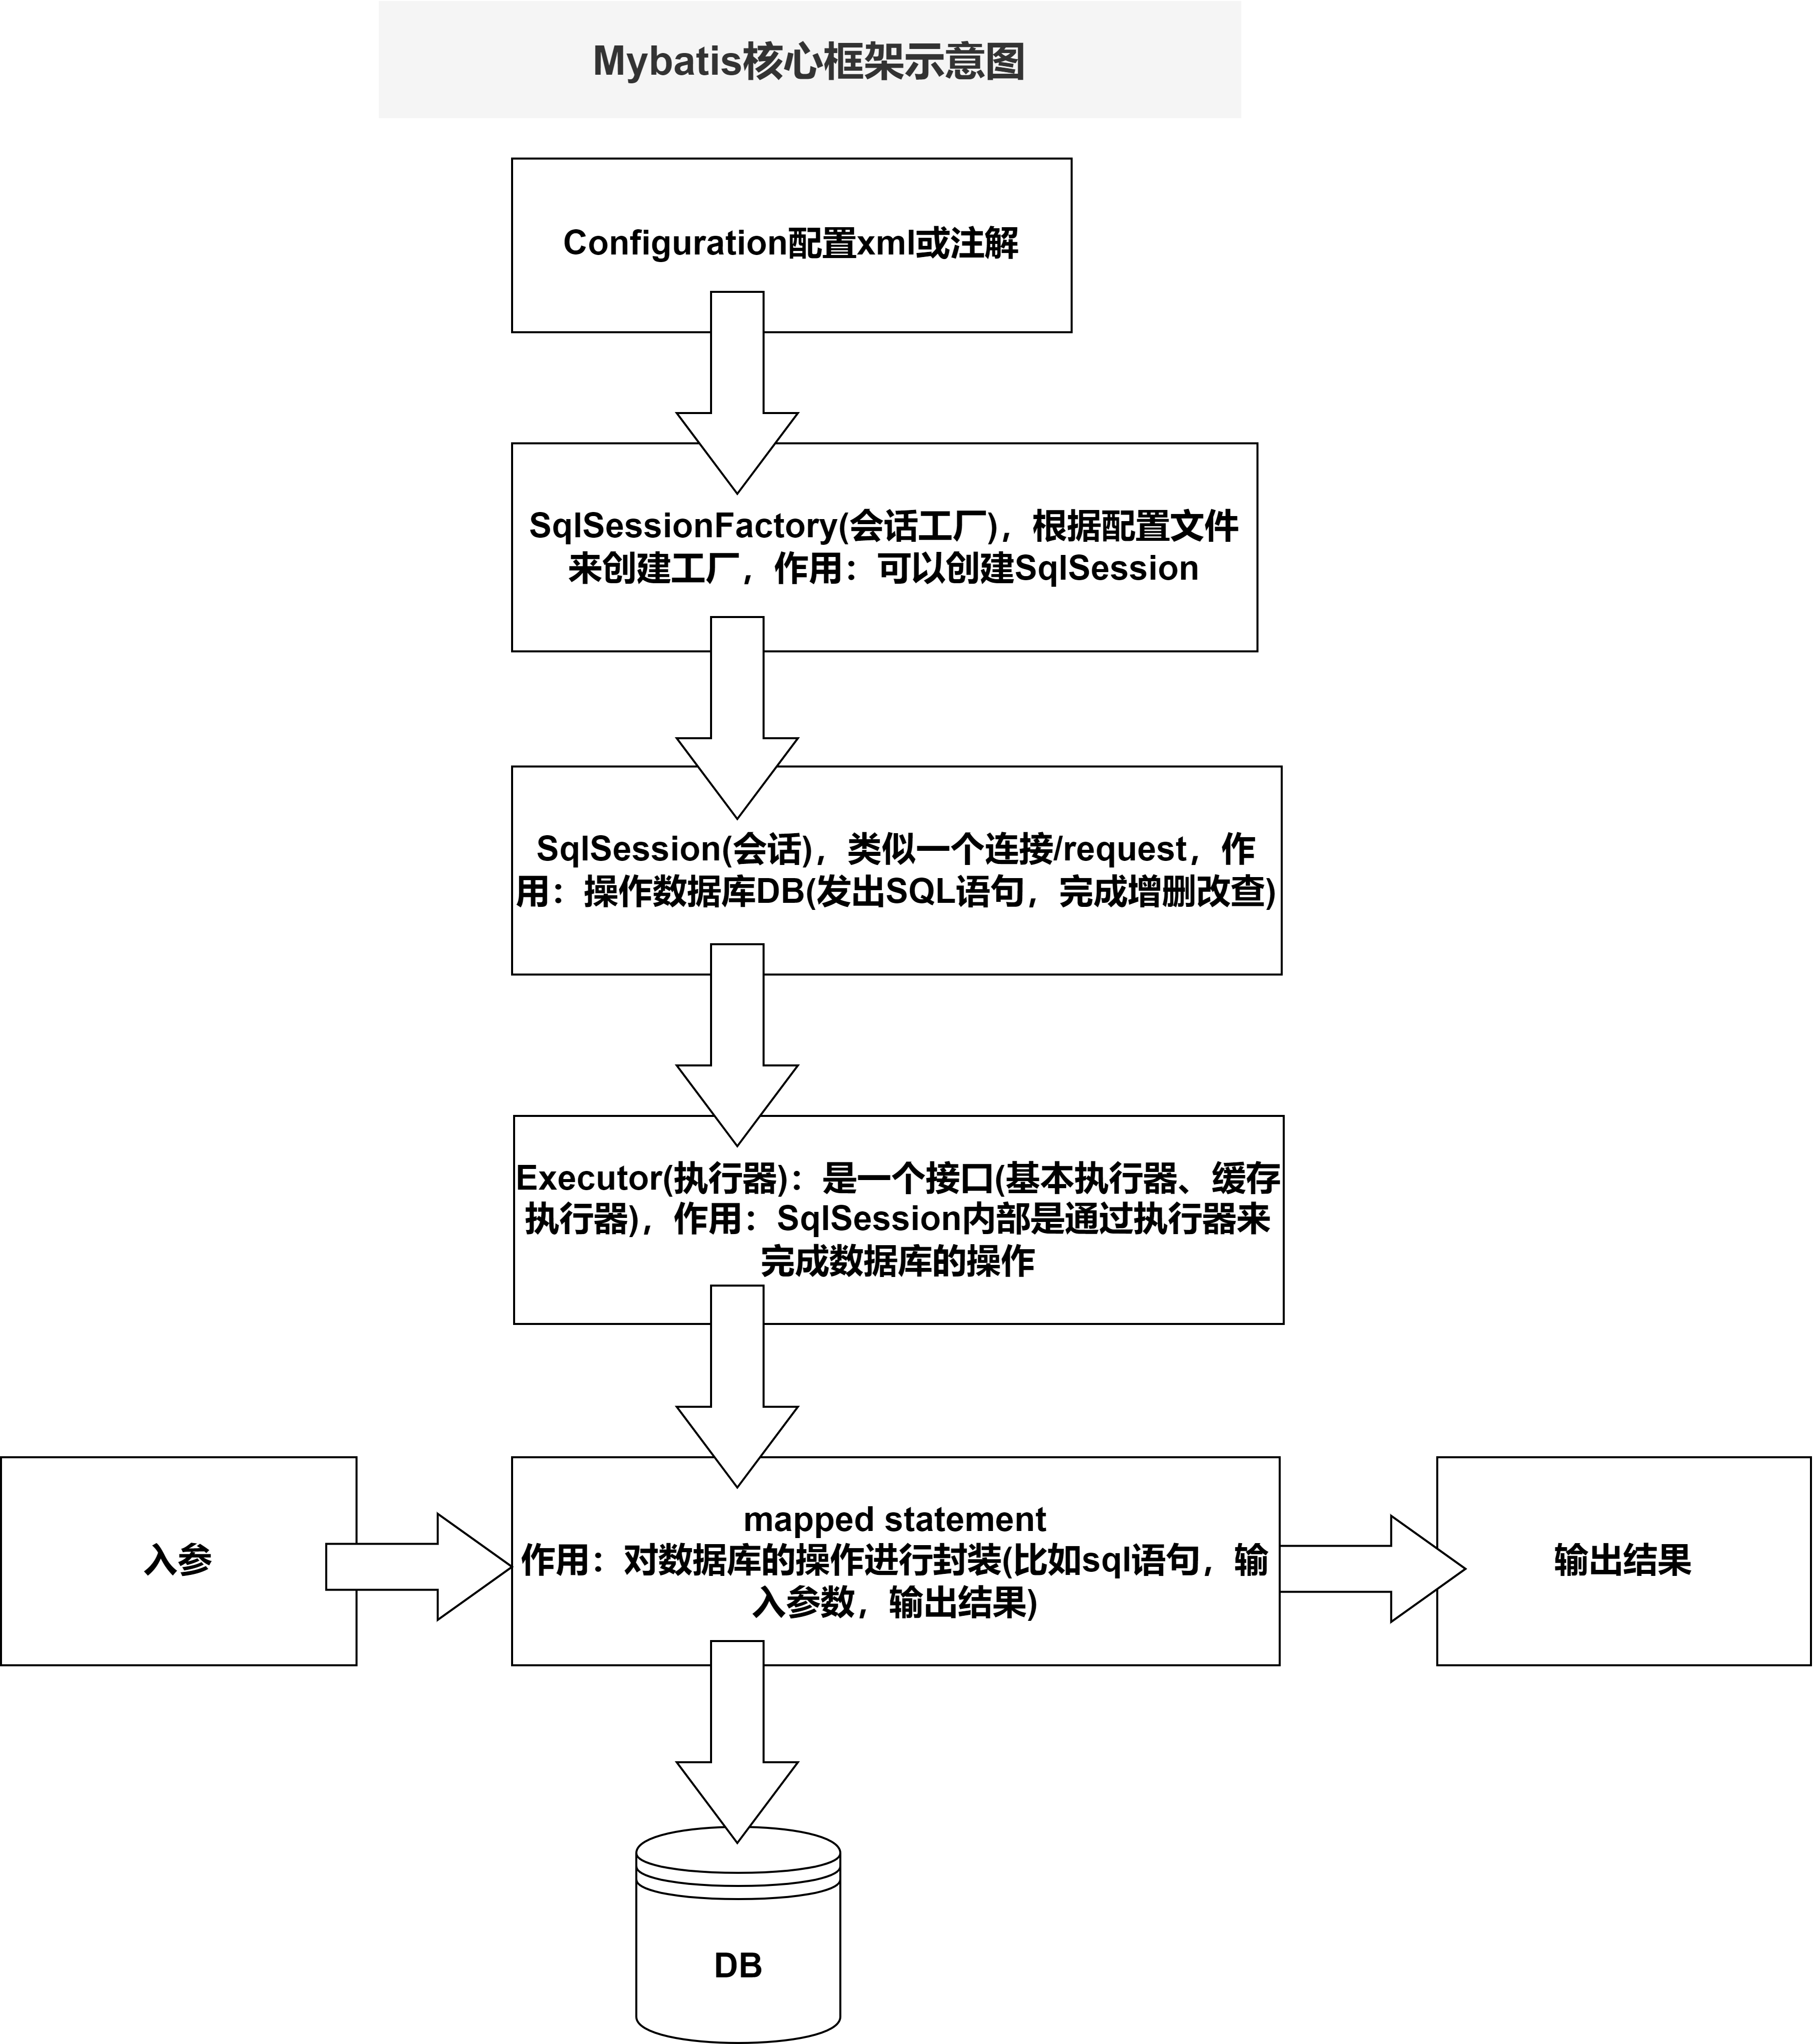
對上圖的解讀:
1)mybatis 的核心配置文件
mybatis-config.xml:進行全局配置,全局只能有一個這樣的配置文件
XxxMapper.xml 配置多個SQL,可以有多個 XxxMapper.xml 配置文件
2)通過 mybatis-config.xml 配置文件得到 SqlSessionFactory
3)通過 SqlSessionFactory 得到 SqlSession,用 SqlSession 就可以操作數據了
4)SqlSession 底層是 Executor(執行器),有兩個重要的實現類
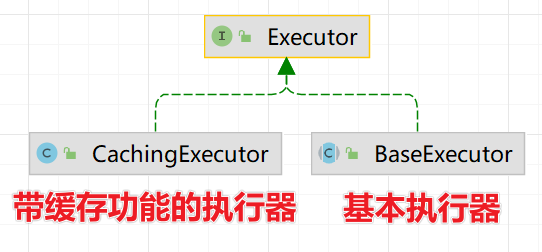
5)MappedStatement 是通過 XxxMapper.xml 來定義的,用來生成 statement 對象
6)參數輸入執行並輸出結果集,無需動手判斷參數類型和參數下標位置,且自動將結果集映射為Java對象
2.搭建開發環境
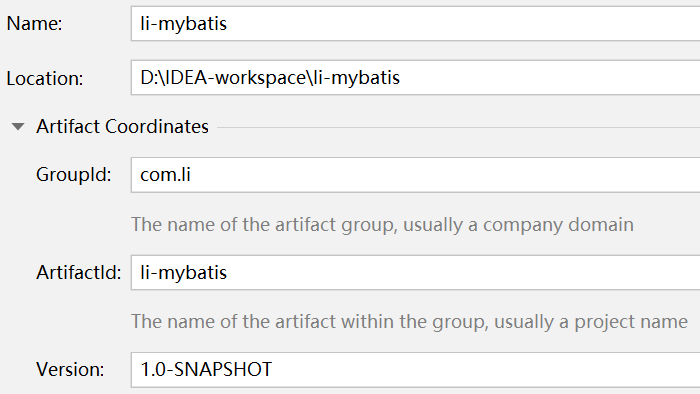
(1)創建maven項目

(2)在pom.xml 中引入必要的依賴
<!--指定編譯器/source/target的版本-->
<properties>
    <project.build.sourdeEncoding>UTF-8</project.build.sourdeEncoding>
    <maven.compiler.source>1.8</maven.compiler.source>
    <maven.compiler.target>1.8</maven.compiler.target>
    <java.version>1.8</java.version>
</properties>

<!--引入必要的依賴-->
<dependencies>
    <!--dom4j-->
    <dependency>
        <groupId>dom4j</groupId>
        <artifactId>dom4j</artifactId>
        <version>1.6.1</version>
    </dependency>
    <!--mysql-->
    <dependency>
        <groupId>mysql</groupId>
        <artifactId>mysql-connector-java</artifactId>
        <version>5.1.49</version>
    </dependency>
    <!--lombok-簡化entity/javabean/pojo 的開發-->
    <dependency>
        <groupId>org.projectlombok</groupId>
        <artifactId>lombok</artifactId>
        <version>1.18.4</version>
    </dependency>
    <!--junit-->
    <dependency>
        <groupId>junit</groupId>
        <artifactId>junit</artifactId>
        <version>4.12</version>
    </dependency>
</dependencies>
(3)創建資料庫和表
-- 創建資料庫
CREATE DATABASE `li_mybatis`;
USE `li_mybatis`;
-- 創建monster表
CREATE TABLE `monster`(
`id` INT NOT NULL AUTO_INCREMENT,
`age` INT NOT NULL,
`birthday` DATE DEFAULT NULL,
`email` VARCHAR(255) NOT NULL,
`gender` TINYINT NOT NULL,-- 1 male,0 female
`name` VARCHAR(255) NOT NULL,
`salary` DOUBLE NOT NULL,
PRIMARY KEY(`id`)
)CHARSET=utf8
-- insert
INSERT INTO `monster` VALUES(NULL,200,'2000-11-11','[email protected]',1,'牛魔王',8888);

3.設計思路
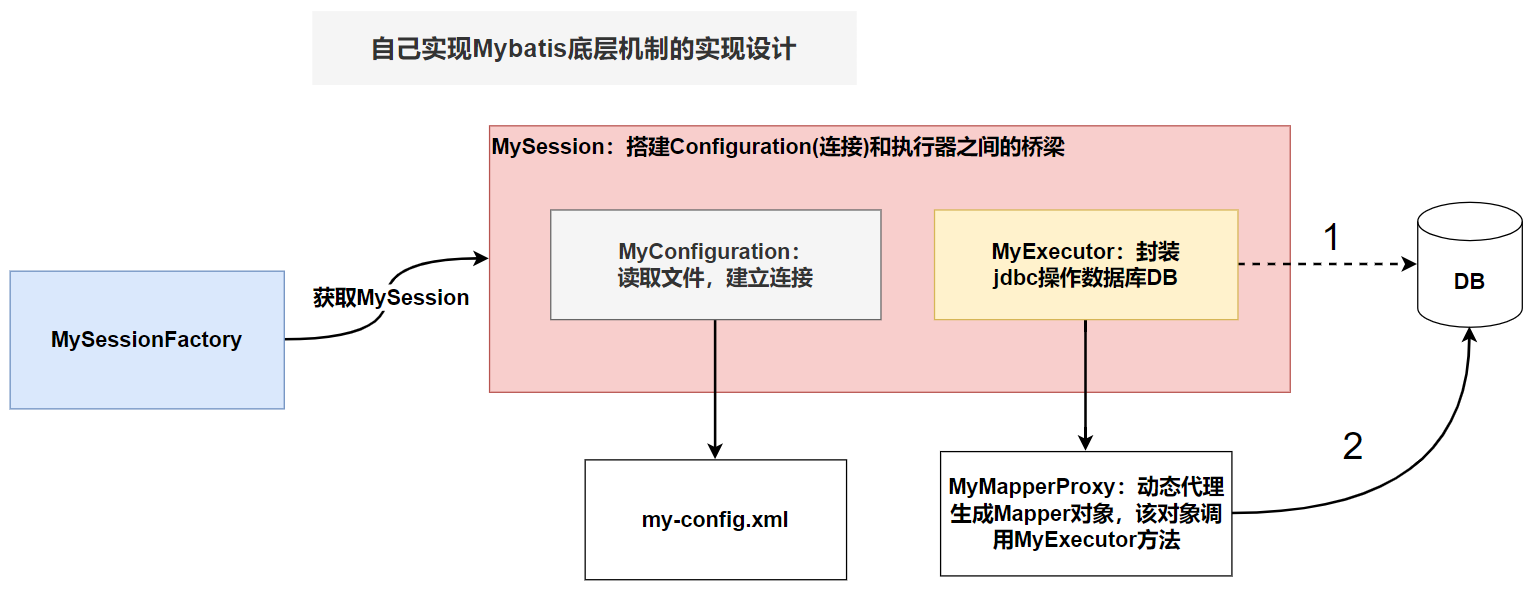
解讀:
-
傳統的方式操作資料庫
1)得到 MySession 對象
2)調用 MyExecutor 的方法完成操作
3)MyExecutor 的連接是從 MyConfiguration 獲取 -
Mybatis 操作資料庫的方式
1)得到 MySession 對象
2)不直接調用 MyExecutor 的方法
3)而是通過 MyMapperProxy 獲取 Mapper 對象
4)調用 Mapper 的方法,完成對資料庫的操作
5)Mapper 最終還是動態代理方式,使用 MyExecutor 的方法完成操作
6)這裡比較麻煩的就是 MyMapperProxy 的動態代理機制如何實現
4.任務階段1
階段1任務:通過配置文件,獲取資料庫連接
4.1分析

4.2代碼實現
(1)在src 的 resources目錄下創建 my-config.xml,模擬原生的 mybatis 配置文件
<?xml version="1.0" encoding="UTF-8" ?>
<database>
<!--配置連接資料庫的信息-->
<property name="driverClassName" value="com.mysql.jdbc.Driver"/>
<property name="url" value="jdbc:mysql://localhost:3306/li_mybatis?
useSSL=true&useUnicode=true&characterEncoding=UTF-8"/>
<property name="username" value="root"/>
<property name="password" value="123456"/>
</database>
(2)創建 MyConfiguration 類,用來讀取xml文件,建立連接
因為這裡重點是實現 Mybatis 的底層機制,為了簡化操作,就不使用資料庫連接池了,直接使用原生的connection 連接
package com.li.limybatis.sqlsession;

import org.dom4j.Document;
import org.dom4j.Element;
import org.dom4j.io.SAXReader;

import java.io.InputStream;
import java.sql.Connection;
import java.sql.DriverManager;

/**
 * @author 李
 * @version 1.0
 * 用來讀取xml文件,建立連接
 */
public class MyConfiguration {
    //屬性-類的載入器
    private static ClassLoader loader = ClassLoader.getSystemClassLoader();

    //讀取xml文件並處理
    public Connection build(String resource) {
        Connection connection = null;
        try {
            //先載入配置文件 my-config.xml,獲取對應的InputStream
            InputStream stream = loader.getResourceAsStream(resource);
            //解析 my-config.xml文件
            SAXReader reader = new SAXReader();
            Document document = reader.read(stream);
            //獲取 xml文件的根元素 <database>
            Element root = document.getRootElement();
            System.out.println("root=" + root);
            //根據root解析,獲取Connection
            connection = evalDataSource(root);
        } catch (Exception e) {
            e.printStackTrace();
        }
        return connection;
    }

    //解析 my-config.xml 的信息,並返回 Connection
    private Connection evalDataSource(Element node) {
        if (!"database".equals(node.getName())) {
            throw new RuntimeException("root節點應該是<database>");
        }

        //連接DB的必要參數
        String driverClassName = null;
        String url = null;
        String username = null;
        String password = null;

        //遍歷node下的子節點,獲取其屬性值
        for (Object item : node.elements("property")) {
            //i就是對應的 property節點
            Element i = (Element) item;
            //property節點的 name屬性的值
            String name = i.attributeValue("name");
            //property節點的 value屬性的值
            String value = i.attributeValue("value");

            //判斷值是否為空
            if (name == null || value == null) {
                throw new RuntimeException("property節點沒有設置name或value屬性!");
            }
            switch (name) {
                case "url":
                    url = value;
                    break;
                case "username":
                    username = value;
                    break;
                case "driverClassName":
                    driverClassName = value;
                    break;
                case "password":
                    password = value;
                    break;
                default:
                    throw new RuntimeException("屬性名沒有匹配到..");
            }
        }
        //獲取連接
        Connection connection = null;
        try {
            Class.forName(driverClassName);
            connection = DriverManager.getConnection(url, username, password);
        } catch (Exception e) {
            e.printStackTrace();
        }
        return connection;
    }
}
5.任務階段2
階段2任務:通過實現執行器機制,對數據表進行操作
5.1分析
我們把對資料庫的操作封裝到一套Executor機制中,程式具有更好的拓展性,結構更加清晰。這裡我們先實現傳統的方式連接資料庫,即通過MyExecutor直接操作資料庫。
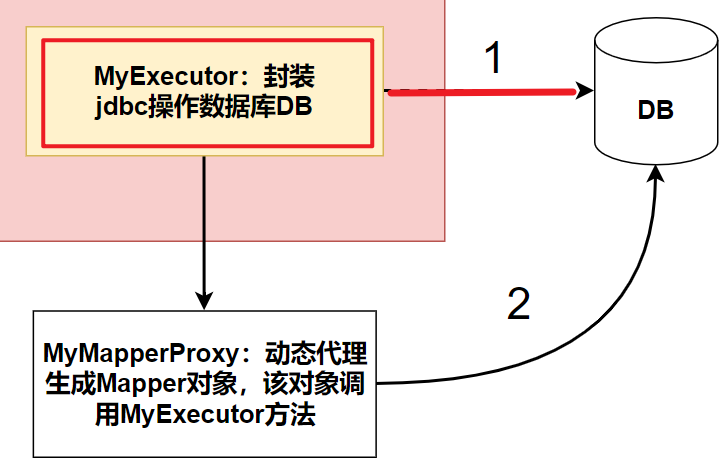
5.2代碼實現
(1)生成 entity 類 Monster.java
package com.li.entity;

import lombok.*;

import java.util.Date;

/**
 * @author 李
 * @version 1.0
 * Monster類和 monster有映射關係
 *
 * 註解說明:
 * @Getter 給所有屬性生成 getter方法
 * @Setter 給所有屬性生成 setter方法
 * @ToString 生成toString方法
 * @NoArgsConstructor 生成一個無參構造器
 * @AllArgsConstructor 生成一個全參構造器
 * @Data 會生成上述除了無參/全參構造器的所有方法,此外還會生成equals,hashCode等方法
 */
@Getter
@Setter
@ToString
@NoArgsConstructor
@AllArgsConstructor
public class Monster {

    private Integer id;
    private Integer age;
    private String name;
    private String email;
    private Date birthday;
    private double salary;
    private Integer gender;
}
(2)Executor 介面
package com.li.limybatis.sqlsession;

/**
 * @author 李
 * @version 1.0
 */
public interface Executor {
    //泛型方法
    public <T> T query(String statement, Object parameter);
}
(3)執行器實現類 MyExecutor.java
package com.li.limybatis.sqlsession;

import com.li.entity.Monster;

import java.sql.Connection;
import java.sql.PreparedStatement;
import java.sql.ResultSet;
import java.sql.SQLException;

/**
 * @author 李
 * @version 1.0
 */
public class MyExecutor implements Executor {
    private MyConfiguration myConfiguration = new MyConfiguration();

    /**
     * 根據sql,返回查詢結果
     *
     * @param sql
     * @param parameter
     * @param <T>
     * @return
     */
    @Override
    public <T> T query(String sql, Object parameter) {
        //獲取連接對象
        Connection connection = getConnection();
        //查詢返回的結果集
        ResultSet set = null;
        PreparedStatement pre = null;
        try {
            //構建PreparedStatement對象
            pre = connection.prepareStatement(sql);
            //設置參數,如果參數多,可以使用數組處理
            pre.setString(1, parameter.toString());
            //查詢返回的結果集
            set = pre.executeQuery();
            //把結果集的數據封裝到對象中-monster
            //說明:這裡做了簡化處理,認為返回的結果就是一個monster記錄,完善的寫法應該使用反射機制
            Monster monster = new Monster();
            //遍歷結果集,將數據封裝到monster對象中
            while (set.next()) {
                monster.setId(set.getInt("id"));
                monster.setName(set.getString("name"));
                monster.setEmail(set.getString("email"));
                monster.setAge(set.getInt("age"));
                monster.setGender(set.getInt("gender"));
                monster.setBirthday(set.getDate("birthday"));
                monster.setSalary(set.getDouble("salary"));
            }
            return (T) monster;

        } catch (Exception e) {
            e.printStackTrace();
        } finally {
            try {
                if (set != null) {
                    set.close();
                }
                if (pre != null) {
                    pre.close();
                }
                if (connection != null) {
                    connection.close();
                }
            } catch (Exception e) {
                e.printStackTrace();
            }
        }
        return null;
    }

    //編寫方法,通過myConfiguration對象返回連接
    private Connection getConnection() {
        Connection connection = myConfiguration.build("my-config.xml");
        return connection;
    }
}
(4)進行測試
@Test
public void query() {
    Executor executor = new MyExecutor();
    Monster monster =
            (Monster) executor.query("select * from monster where id = ?", 1);
    System.out.println("monster--" + monster);
}
測試結果:

6.任務階段3
階段3任務:將執行器封裝到SqlSession
6.1代碼實現
(1)創建 MySqlSession 類,將執行器封裝到SqlSession中。
package com.li.limybatis.sqlsession;

/**
 * @author 李
 * @version 1.0
 * MySqlSession:搭建Configuration(連接)和Executor之間的橋梁
 */
public class MySqlSession {
    //執行器
    private Executor executor = new MyExecutor();
    //配置
    private MyConfiguration myConfiguration = new MyConfiguration();

    //編寫方法selectOne,返回一條記錄
    public <T> T selectOne(String statement,Object parameter){
        return executor.query(statement, parameter);
    }
}
(2)測試
@Test
public void selectOne() {
    MySqlSession mySqlSession = new MySqlSession();
    Monster monster =
            (Monster) mySqlSession.selectOne("select * from monster where id=?", 1);
    System.out.println("monster=" + monster);
}
測試結果:


