
2023-02-22 1、Git常用命令 (1)Git中的初始化 git init (2)查看文件狀態 git status (3)將內容提交到暫存區 git add 文件的名稱 (4)將內容提交到本地倉庫 git commit -m "這裡放置本次提交的說明" (5)複合形式——將內容提交到暫存區 ...
1、Spring
1.1、簡介
- Spring:春天----->給軟體行業帶來了春天!
- 2002,首次推出了Spring框架的雛形: interface21框架!
- Spring框架即以interface21框架為基礎,經過重新設計,並不斷豐富其內涵,於2004年3月24日,發佈了1.0正式版。
- Rod Johnson ,Spring Framework創始人,著名作者。很難想象Rod Johnson的學歷,真的讓好多人大吃一驚,他是悉尼大學的博士,然而他的專業不是電腦,而是音樂學。
- spring理念:使現有的技術更加容易使用,本身是一個大雜燴,整合了現有的技術框架!
- SSH : Struct2 + Spring + Hibernate !
- SSM : SpringMvc + Spring + Mybatis!
官網: https:/lspring.io/projects/spring-framework#overview
官方下載地址: http://repo.spring.io/release/orglspringframework/spring
GitHub: https:/lgithub.comlspring-projects/spring-framework
1 <!-- https : //mvnrepository.com/artifact/org.springframework/spring-webmvc -->2<dependency>
<groupId>org.springframework</groupId>
<artifactId>spring-webmvc</ artifactId>
<version>5.2.O.RELEASE</version>
    </ dependency>
<!-- https://mvnrepository.com/artifact/org.springframework/spring-webmvc -->8<dependency>
<groupId>org.springframework</groupId>
<artifactid>spring-jdbc</artifactId>
<cversion>5.2.0.RELEASE</version>
    </ dependency>
1.2、優點
- Spring是一個開源的免費的框架(容器)!
- Spring是一個輕量級的、非入侵式的框架!
- 控制反轉(IOC),面向切麵編程(AOP) !
- 支持事務的處理,對框架整合的支持!
總結一句話: Spring就是一個輕量級的控制反轉(IOC))和麵向切麵編程(AOP)的框架!
2、IOC理論推導
- UserDao 介面
- UserDaoImpl 介面實現類
- UserService 業務介面
- UserServiceImpl 業務實現類
在之前的業務中,用戶的需求可能會影響我們原來的代碼,我們需要根據用戶的需求去修改源代碼,如果程式代碼量十分大,修改一次的成本代價十分昂貴!
我們使用一個Set介面實現,已經發生了革命性的變化!
//利用set動態實現值的註入
public void setUserDao(UserDao userDao) {
    this.userDao = userDao;
}
- 之前,程式是主動創建對象,控制權在程式員手上!
- 使用了Set註入後,程式不再具有主動性,而是變成了被動的接受對象
這種思想,從本質上解決了問題,我們程式員不用再去管理對象的創建!系統的耦合性大大降低,可以更加專註在業務的實現上!這是IOC的原型!
IOC本質
控制反轉loC(Inversion of Control),是一種設計思想,DI(依賴註入)是實現loC的一種方法,也有人認為DI只是loC的另一種說法。沒有loC的程式中,我們使用面向對象編程,對象的創建與對象間的依賴關係完全硬編碼在程式中,對象的創建由程式自己控制,控制反轉後將對象的創建轉移給第三方,個人認為所謂控制反轉就是︰獲得依賴對象的方式反轉了。
採用XML方式配置Bean的時候,Bean的定義信息是和實現分離的,而採用註解的方式可以把兩者合為一體,Bean的定義信息直接以註解的形式定義在實現類中,從而達到了零配置的目的。
控制反轉是一種通過描述(XML或註解)並通過第三方去生產或獲取特定對象的方式。在Spring中實現控制反轉的是loC容器,其實現方法是依賴註入(Dependency Injection,Dl)。
控制:獲取對象的控制權從程式轉換到容器。
反轉:程式由主動創建對象變成被動接收對象。
3、IOC創建對象的方式
1.使用無參構造創建對象,預設!
2.假設我們要使用有參構造創建對象
-
下標賦值
<!--第一種:下標賦值--> <bean id="user" class="com.ws.pojo.User"> <constructor-arg index="0" value="ws學Java"/> </bean> -
通過類型創建
<!--第一種:通過類型創建,不建議使用-->
<bean id="user" class="com.ws.pojo.User">
    <constructor-arg type="java.lang.String" value="qidayang"/>
</bean>
3.參數名
<!--第三種方式:直接通過參數名創建-->
    <bean id="user" class="com.ws.pojo.User">
        <constructor-arg name="name" value="其打樣"/>
    </bean>
總結:在配置文件載入的時候,容器中管理的對象就已經初始化了!
4、Spring配置
4.1、別名
<!--如果添加了別名,我們也可以通過別名獲取這個對象-->
<alias name="user" alias="userNew"/>
4.2、Bean的配置
<!--id:bean的唯一標識符,也就是我們學的對象名
class:bean所對應的全限定名:包名+類名
name:也是別名,而且name可以去多個別名-->
<bean id="userT" class="com.ws.pojo.UserT" name="userTNew,userTNew2 u3;u4">
    <constructor-arg name="name" value="xiahouxue"/>
</bean>


## 4.3import

這個import,一般用於團隊開發使用,他可以將多個配置文件,導入合併為一個!


假設,現在項目中有多個人開發,這三個人複製不同的類開發,不同的類需要註冊在不同的bean中,我們可以利用import將所有人的beans.xml合併為一個總的!

- 張三

- 李四

- 王五

- applicationContext.xml

  ```xml
  <import resource="beans.xml"/>
  <import resource="beans1.xml"/>
使用的時候,直接使用總的配置就可以了!
5、依賴註入(DI)
5.1、構造器註入
前面已經說過
5.2、Set方式註入 【重點】
- 依賴註入:Set註入!
- 依賴:bean對象的創建依賴於容器!
- 註入:bean對象中的所有屬性,由容器來註入!
【環境搭建】
1.複雜類型
2.真實測試對象
5.3、擴展方式註入
實體類
package com.ws.pojo;

public class Address {
    private String address;

    public String getAddress() {
        return address;
    }

    public void setAddress(String address) {
        this.address = address;
    }

    @Override
    public String toString() {
        return "Address{" +
                "address='" + address + '\'' +
                '}';
    }
}
package com.ws.pojo;

import java.util.*;

public class Student {
    private String name;
    private Address address;
    private String[] books;
    private List<String> hobbys;
    private Map<String, String> card;
    private Set<String> games;
    private String wife;
    private Properties info;

    public String getName() {
        return name;
    }

    public void setName(String name) {
        this.name = name;
    }

    public Address getAddress() {
        return address;
    }

    public void setAddress(Address address) {
        this.address = address;
    }

    public String[] getBooks() {
        return books;
    }

    public void setBooks(String[] books) {
        this.books = books;
    }

    public List<String> getHobbys() {
        return hobbys;
    }

    public void setHobbys(List<String> hobbys) {
        this.hobbys = hobbys;
    }

    public Map<String, String> getCard() {
        return card;
    }

    public void setCard(Map<String, String> card) {
        this.card = card;
    }

    public Set<String> getGames() {
        return games;
    }

    public void setGames(Set<String> games) {
        this.games = games;
    }

    public String getWife() {
        return wife;
    }

    public void setWife(String wife) {
        this.wife = wife;
    }

    public Properties getInfo() {
        return info;
    }

    public void setInfo(Properties info) {
        this.info = info;
    }

    @Override
    public String toString() {
        return "Student{" +
                "name='" + name + '\'' +
                ", address=" + address.toString() +
                ", books=" + Arrays.toString(books) +
                ", hobbys=" + hobbys +
                ", card=" + card +
                ", games=" + games +
                ", wife='" + wife + '\'' +
                ", info=" + info +
                '}';
    }
}
測試類
import com.ws.pojo.Student;
import org.springframework.context.ApplicationContext;
import org.springframework.context.support.ClassPathXmlApplicationContext;

public class MyTest {
    public static void main(String[] args) {
        ApplicationContext applicationContext = new ClassPathXmlApplicationContext("beans.xml");
        Student student = (Student) applicationContext.getBean("student");
        System.out.println(student.toString());
    }

    /*Student{
     name='qdy',
     address=Address{address='廈門'}, books=[紅樓夢, 西游記, 水滸傳],
     hobbys=[聽歌, 敲代碼, 看電影], card={身份證=1234567890, 銀行卡=1234345234, =},
     games=[lol, 王者, 吃雞],
     wife='null',
     info={學號=31, 性別=男, 年齡=19}
     }*/
}
完善註入信息
<?xml version="1.0" encoding="UTF-8"?>
<beans xmlns="http://www.springframework.org/schema/beans"
       xmlns:xsi="http://www.w3.org/2001/XMLSchema-instance"
       xsi:schemaLocation="http://www.springframework.org/schema/beans
        https://www.springframework.org/schema/beans/spring-beans.xsd">


    <bean id="address" class="com.ws.pojo.Address">
        <property name="address" value="廈門"/>
    </bean>
    <bean id="student" class="com.ws.pojo.Student">
        <!--第一種:普通值註入-->
        <property name="name" value="qdy"/>
        <!--第二種:bean註入-->
        <property name="address" ref="address"/>
        <!--第三種:數組註入:ref-->
        <property name="books" >
            <array>
                <value>紅樓夢</value>
                <value>西游記</value>
                <value>水滸傳</value>
            </array>
        </property>

        <!--List-->
        <property name="hobbys">
            <list>
                <value>聽歌</value>
                <value>敲代碼</value>
                <value>看電影</value>
            </list>
        </property>

        <!--Map-->
        <property name="card">
            <map>
                <entry key="身份證" value="1234567890"/>
                <entry key="銀行卡" value="1234345234"/>
                <entry key="" value=""/>
            </map>
        </property>

        <!--Set-->
        <property name="games">
            <set>
                <value>lol</value>
                <value>王者</value>
                <value>吃雞</value>
            </set>
        </property>

        <!--null-->
        <property name="wife" >
                <null/>
        </property>

        <!--Properties-->
        <property name="info">
            <props >
                <prop key="性別">男</prop>
                <prop key="學號">31</prop>
                <prop key="年齡">19</prop>
            </props>
        </property>
    </bean>
</beans>
5.4、bean的作用域
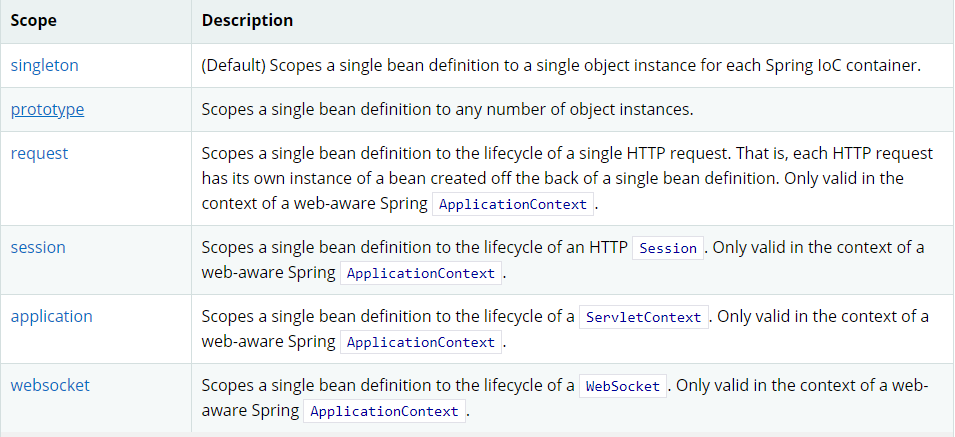
1.單例模式(Spring預設機制)
1 <bean id="user2" class="com.ws.pojo.user" c:age="18" c:name="狂神"
scope="sing1eton" />
2.原型模式:每次從容器中get的時候,都會產生一個新對象!
1<bean id="accountservice" class="com.something.Defau1tAccountservice"
scope="prototype" />
3.其餘的request、session、 application、這些個只能在web開發中使用到!
6、Bean的自動裝配
- 自動裝配是Spring滿足bean依賴的一種方式!
- Spring會在上下文中自動尋找,並自動給bean裝配屬性!
在Spring中有三中裝配方式
- 在xml中顯示的配置
- 在Java中顯示配置
- 隱式的自動裝配bean 【重要】
6.1、測試
環境搭建:一個人有兩個寵物!
6.2、ByName自動裝配
   <!--ByName:會自動在上下文中查找,和自己對象set方法後面的值對應的beanid-->
    <bean id="people" class="com.ws.pojo.People" autowire="byName">
        <property name="name" value="xq"/>
    </bean>
6.3、ByType自動裝配
    <bean id="dog" class="com.ws.pojo.Dog"/>
    <bean class="com.ws.pojo.Cat"/>


    <!--ByName:會自動在上下文中查找,和自己對象set方法後面的值對應的beanid-->
    <!--ByType:會自動在上下文中查找,和自己對象屬性相同的bean, bean的id屬性可以省略-->
    <bean id="people" class="com.ws.pojo.People" autowire="byType">
        <property name="name" value="xq"/>
    </bean>
小結:
- ByName的時候,需要保證所有的bean的id唯一,並且這個bean需要和自動註入的屬性的set方法的值一致!
- ByType的時候,需要保證所有的bean的calss唯一,並且這個bean需要和自動註入的屬性的類型一致!
6.4、使用註解自動裝配
要使用註解須知:
- 導入約束,context約束
- == 配置註解的支持: context:annotation-config/
<?xml version="1.0" encoding="UTF-8"?>
<beans xmlns="http://www.springframework.org/schema/beans"
    xmlns:xsi="http://www.w3.org/2001/XMLSchema-instance"
    xmlns:context="http://www.springframework.org/schema/context"
    xsi:schemaLocation="http://www.springframework.org/schema/beans
        https://www.springframework.org/schema/beans/spring-beans.xsd
        http://www.springframework.org/schema/context
        https://www.springframework.org/schema/context/spring-context.xsd">

    <context:annotation-config/>

</beans>
@Autowired
- 直接在屬性使用即可!也可以在set方法上使用!
- 使用Autowired 我們可以不用編寫Set方法了,前提是自動裝配的屬性在IOC(Spring) 容器中,且符合名字ByName!
科普:
@Nullable 欄位標記了這個註解,說明這個欄位可以為null.
7、使用註解開發
在Spring 4 之後,要是用註解開發,必須要保證aop的包導入了!
使用註解需要導入context約束,增加註解的支持!
<?xml version="1.0" encoding="UTF-8"?>
<beans xmlns="http://www.springframework.org/schema/beans"
    xmlns:xsi="http://www.w3.org/2001/XMLSchema-instance"
    xmlns:context="http://www.springframework.org/schema/context"
    xsi:schemaLocation="http://www.springframework.org/schema/beans
        https://www.springframework.org/schema/beans/spring-beans.xsd
        http://www.springframework.org/schema/context
        https://www.springframework.org/schema/context/spring-context.xsd">

    <context:annotation-config/>

</beans>
- bean
- 屬性如何註解
//等價於 <bean id="user" class="com.ws.pojo.User"/>
@Component
public class User {

    public String name;

    @Value("asdfas")
    public void setName(String name) {
        this.name = name;
    }
-
衍生的註解
@Component 有幾個衍生註解,我們在web開發中,會按照mvc三層架構分層!
-
dao 【@Repository】
-
service 【@Service】
-
controller 【@Controller】
這四個註解功能都是一樣的,都是將某個類註冊到Spring中,裝配Bean!
-
-
自動裝配置
@Autowired : 自動裝配通過類型。名字
	如果Autowired不能唯一自動裝配上屬性,則需要通過@Qualifier(value="xxx")- @Nullable欄位標記了這個註解,說明這個欄位可以為null;
@Resource:自動裝配通過名字。類型。
- 作用域
//等價於 <bean id="user" class="com.ws.pojo.User"/>
@Component
@Scope("prototype")
public class User {

    public String name;

    @Value("asdfas")
    public void setName(String name) {
        this.name = name;
    }
- 小結
xml與註解:
- xml更加萬能,適合用於任何場合!維護簡單方便
- 註解:不是自己的類使用不了,維護相對複雜!
xml與註解最佳實踐:
- xml用來管理bean
- 註解只負責完成屬性的註入
- 我們在使用的過程中,只需要註意一個問題:必須讓註解生效,就需要開啟註解的支持!
<!--指定掃描包,這個包下的註解就會生效-->
    <context:component-scan base-package="com.ws"/>
    <context:annotation-config/>
8、使用Java的方式配置Spring
我們現在要完全不使用Spring的xml配置了,全權交給Java來做!
JavaConfig 是Spring的一個子項目,在Spring 4之後,它成為了一個核心功能!
實體類:
//這裡這個註解的意思,就是說明這個類被Spring接管了,註冊到了Spring容器中
@Component
public class User {
    public String name;

    public String getName() {
        return name;
    }

    @Value("其打樣") //屬性註入值
    public void setName(String name) {
        this.name = name;
    }

    @Override
    public String toString() {
        return "User{" +
                "name='" + name + '\'' +
                '}';
    }
配置文件:
@Configuration
//這個也會被Spring容器托管,註冊到容器中,因為他本來就是一個@Component
//@Configuration 代表這是一個配置類,就和我們之前看的beans.xml是一樣的
@ComponentScan("com.ws")
@Import(UserConfig2.class)
public class UserConfig {
    //註冊一個bean,就相當於之前寫的一個bean標簽
    //這個方法的名字就相當於bean標簽中的id屬性
    //這個方法的返回值就相當於bean標簽中的class屬性
    @Bean
    public User getUser() {
        //就是返回要註入到bean中的對象!
        return new User();
    }
測試類:
public class MyTest {
    public static void main(String[] args) {
        //如果完全使用了配置類方式去做,我們就只能通過AnnotationConfig 上:下文來獲取容器,通過配置類的cLass對象載入!
        ApplicationContext context = new AnnotationConfigApplicationContext(UserConfig.class);
        User user =(User) context.getBean("getUser");
        System.out.println(user.getName());
    }
}
這種純Java的配置文件,在SpringBoot中隨處可見!
9、代理模式
為什麼要學習代理模式?因為就是SpringAOP的底層!【SpringAOP 和 SpringMVC】
代理模式:
- 靜態代理
- 動態代理
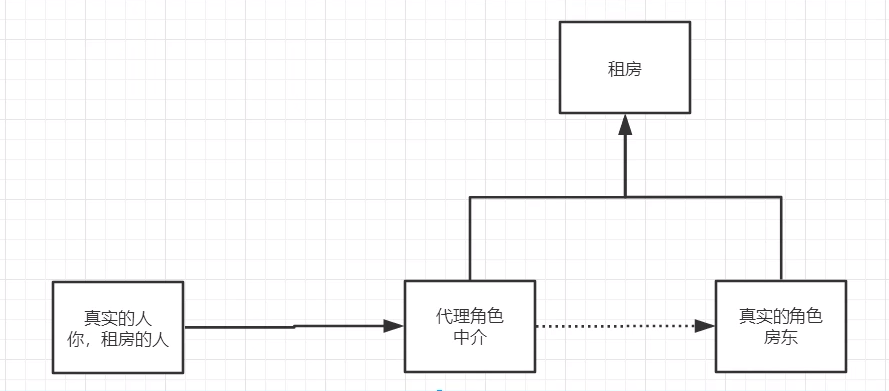
9.1、靜態代理
角色分析:
- 抽象角色 ︰ 一般會使用介面或者抽象類來解決
- 真實角色 ︰ 被代理的角色
- 代理角色 ∶ 代理真實角色,代理真實角色後,我們一般會做一些附屬操作
- 客戶 : 訪問代理對像的人!
代碼步驟:
1.介面
/**
 * @author 平卉陌路
 */
public interface Rent {
    //出租房屋
    public void rent();
}
2.真實角色
/**
 * @author 平卉陌路
 */
public class Host implements Rent{

    @Override
    public void rent() {
        System.out.println("房東要出租房子!");
    }
}
3.代理角色
/**
 * @author 平卉陌路
 */
public class Proxy implements Rent{
    private Host host;

    public Proxy() {
    }

    public Proxy(Host host) {
        this.host = host;
    }

    @Override
    public void rent() {
        host.rent();
        seeHouse();
        signAgreement();
        free();
    }

    //看房
    public void seeHouse(){
        System.out.println("中介帶你看房!");
    }

    //簽合同
    public void signAgreement(){
        System.out.println("簽租賃合同");
    }
    //收中介費
    public void free(){
        System.out.println("收中介費");
    }
}
4.客戶端訪問代理角色
/**
 * @author 平卉陌路
 */
public class Client {
    public static void main(String[] args) {

        //房東要出租房子
        Host host = new Host();
        /*host.rent();*/

        //代理,中介幫房東出租房子,但中介會有一些附屬操作
        Proxy proxy = new Proxy(host);
        //你不用面對房東,找中介租房即可!
        proxy.rent();
    }
}
代理模式的好處:
- 可以使真實角色的操作更加純粹!不用去關註一些公共的業會公共也就就交給代理角色!
- 實現了業務的分工!
- 公共業務發生擴展的時候,方便集中管理!
缺點:
- 一個真實角色就會產生一個代理角色;代碼量會翻倍開發效率會變低
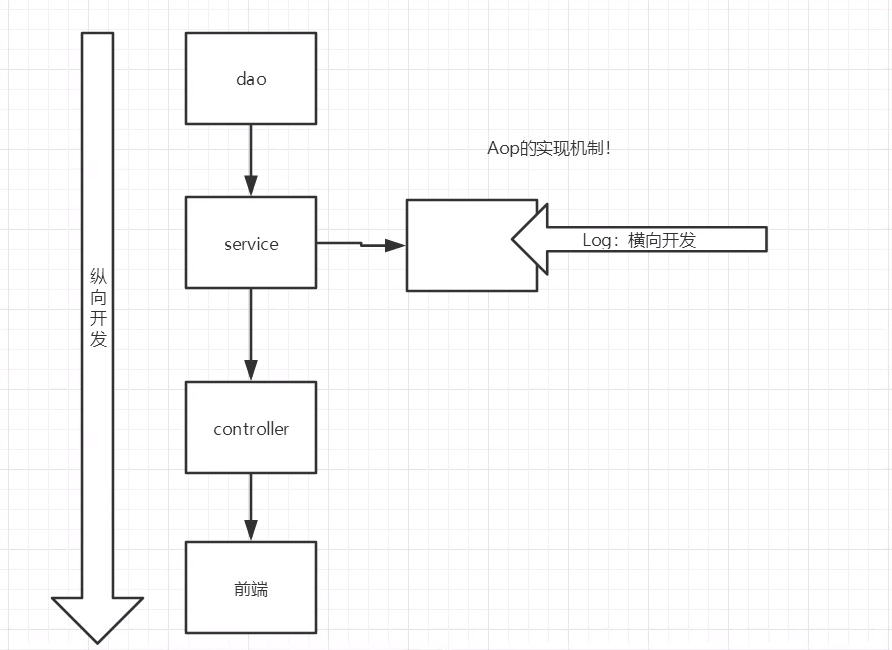
9.2、加深理解
聊聊橫向AOP開發:
 9.3、動態代理
- 動態代理和靜態代理角色一樣
- 動態代理的代理類是動態生成的,不是我們直接寫好的!
- 動態代理分為兩大類:基於介面的動態代理,基於類的動態代理
- 基於介面---JDK動態代理 ----【我們在這裡使用】
- 基於類:cglib
- java位元組碼實現: javasist
需要瞭解兩個類: Proxy:代理,InvocationHandler:調用處理程式
動態代理的好處:
- 可以使真實角色的操作更加純粹!不用去關註一些公共的業務
- 公共也就就交給代理角色!實現了業務的分工!
- 公共業務發生擴展的時候,方便集中管理!
- 一個動態代理類代理的是一個介面,一般就是對應的一類業務。
- 一個動態代理類可以代理多個類,只要是實現了同一個介面即可!
10、AOP
10.1、什麼是AOP
AOP (Aspect Oriented Programming)意為: 面向切麵編程,通過預編譯方式和運行期動態代理實現程式功能的統一維護的一種技術。AOP是OOP的延續,是軟體開發中的一個熱點,也是Spring框架中的一個重要內容,是函數式編程的一種衍生範型。利用AOP可以對業務邏輯的各個部分進行隔離,從而使得業務邏輯各部分之間的耦合度降低,提高程式的可重用性,同時提高了開發的效率。
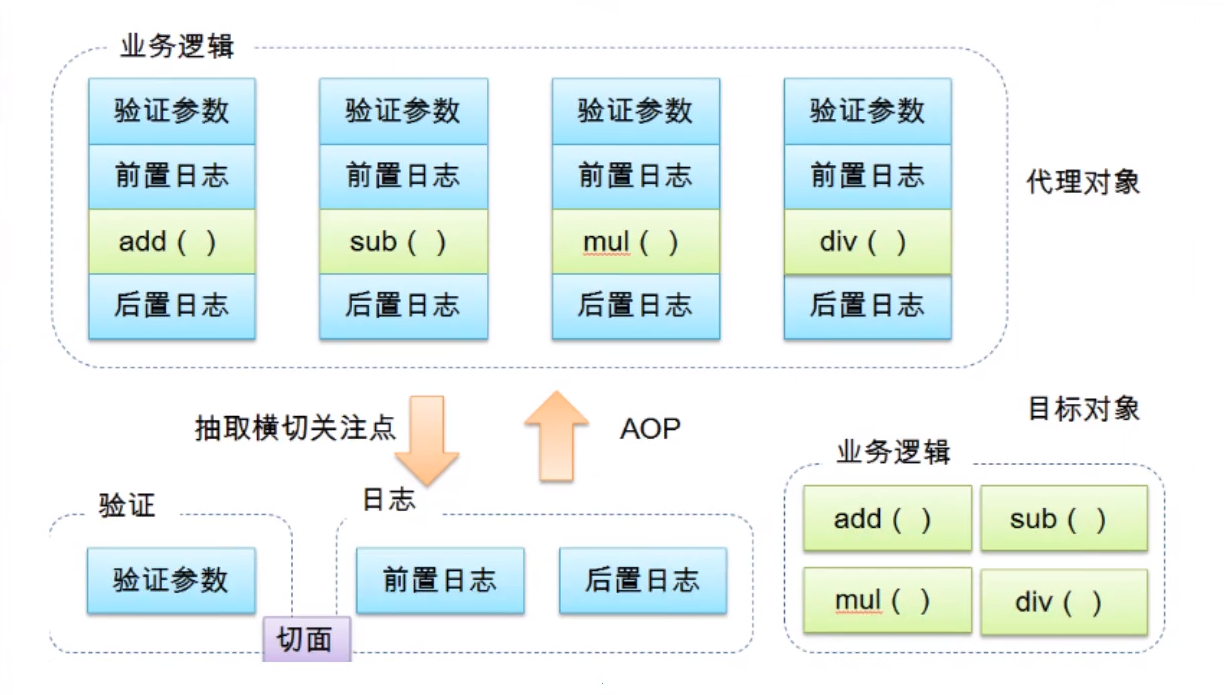
10.2 、Aop在Spring中的作用
提供聲明式事務;允許用戶自定義切麵。
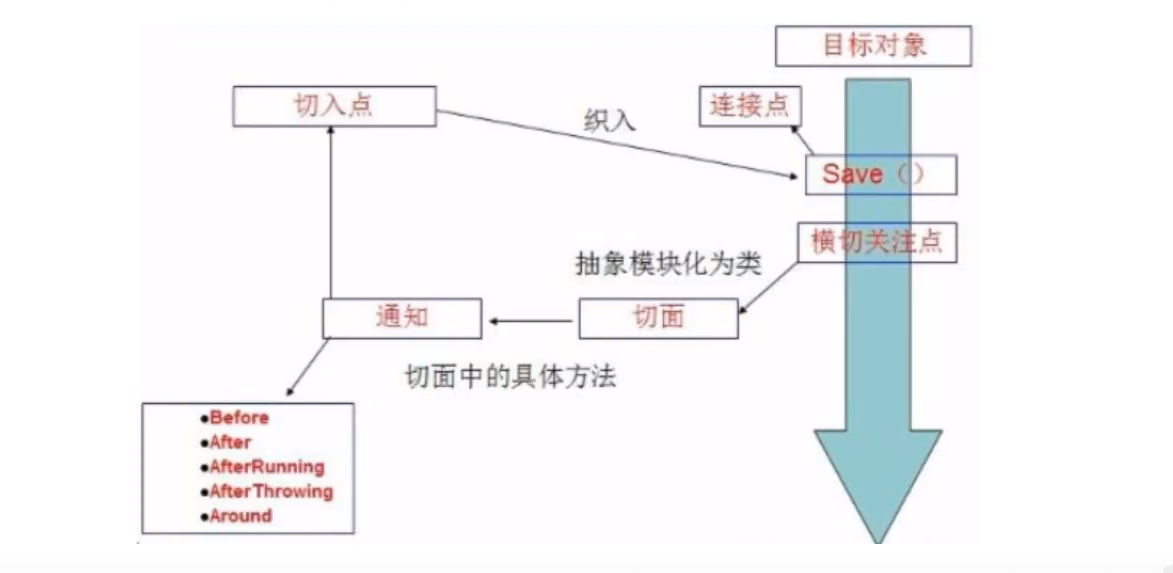
- 橫切關註點:跨越應用程式多個模塊的方法或功能。即是,與我們業務邏輯無關的,但是我們需要關註的部分,就是橫切關註點。如日誌,安全,緩存,事務等等....
- 切麵(ASPECT)︰橫切關註點被模塊化的特殊對象。即,它是一個類。
- 通知(Advice) :切麵必須要完成的工作。即,它是類中的一個方法。
- 目標(Target)︰被通知對象。
- 代理(Proxy)∶向目標對象應用通知之後創建的對象。
- 切入點(PointCut):切麵通知執行的“地點"的定義。
- 連接點(JointPoint):與切入點匹配的執行點。
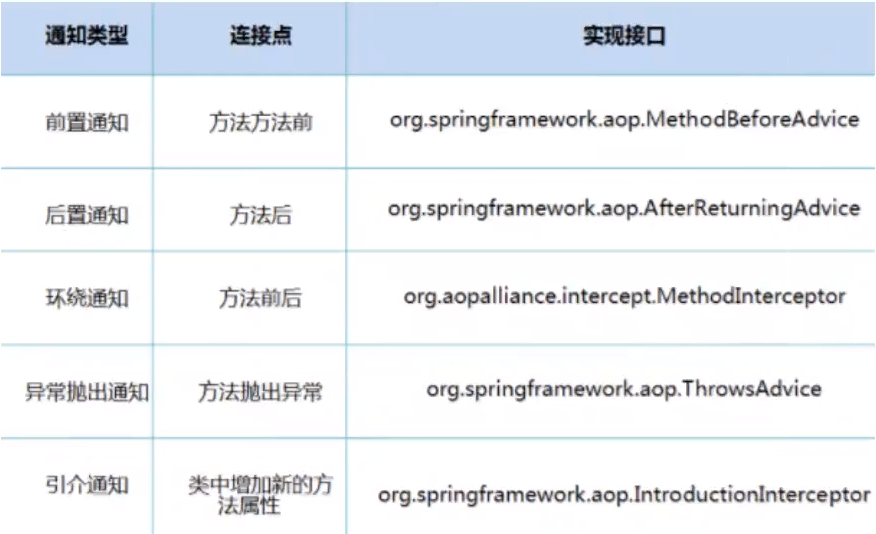
SpringAOP中,通過Advice定義橫切邏輯,Spring中支持5種類型的Advice:

即Aop在不改變原有代碼的情況下,去增加新的功能.
10.3、使用Spring實現Aop【重點】
使用AOP織入,需要導入一個依賴包!
<!-- https://mvnrepository.com/artifact/org.aspectj/aspectjweaver -->
<dependency>
    <groupId>org.aspectj</groupId>
    <artifactId>aspectjweaver</artifactId>
    <version>1.9.5</version>
</dependency>
註冊bean:
 <!--註冊bean-->
    <bean id="userService" class="com.ws.service.UserServiceImpl"/>
    <bean id="log" class="com.ws.log.Log"/>
    <bean id="afterLog" class="com.ws.log.AfterLog"/>
方式一 :使用Spring的介面 【主要是SpringAPI介面實現】
<!--方式一:使用原生Spring API介面-->
<!--配置aop:需要導入aop的約束-->
 <aop:config>
         <!--切入點 expression :表達式 execution:要執行的位置-->
         <aop:pointcut id="pointcut" expression="execution(* com.ws.service.UserServiceImpl.*(..))"/>
         <!--執行環繞增加-->
         <aop:advisor advice-ref="log" pointcut-ref="pointcut"/>
         <aop:advisor advice-ref="afterLog" pointcut-ref="pointcut"/>
     </aop:config>
方式二 :自定義類實現AOP (XML)【主要是切麵定義】
    <!--方式二:基於xml的聲明式AspectJ-->

      <bean id="diy" class="com.ws.diy.DiyPointCut"/>
        <aop:config>
            <!-- 自定義切麵 ref:要引用的類-->
            <aop:aspect ref="diy">
                <!--切入點-->
                <aop:pointcut id="pointcut" expression="execution(* com.ws.service.UserServiceImpl.*(..))"/>
                <!--配置通知-->
                <!--前置通知-->
                <aop:before method="before" pointcut-ref="pointcut"/>
                <!--後置通知-->
                <aop:after method="after" pointcut-ref="pointcut"/>
                <!--環繞通知-->
                <aop:around method="around" pointcut-ref="pointcut"/>
                <!--異常通知-->
                <aop:after-throwing method="afterThrowing" pointcut-ref="pointcut" throwing="throwable"/>
                <!--最終通知-->
                <aop:after-returning method="afterReturning" pointcut-ref="pointcut"/>
            </aop:aspect>
        </aop:config>
方式三 :使用註解實現
<!--方式三:基於註解的聲明式AspectJ-->

    <bean id="annotationPointCut" class="com.ws.diy.AnnotationPointCut"/>
    <!--開啟註解支持 jdk(預設proxy-target-class="false")  cglib(proxy-target-class="true")-->
    <aop:aspectj-autoproxy proxy-target-class="true"/>
11. 整合mybatis
文檔: https://mybatis.org/spring/zh/
<?xml version="1.0" encoding="UTF-8"?>
<project xmlns="http://maven.apache.org/POM/4.0.0"
xmlns:xsi="http://www.w3.org/2001/XMLSchema-instance"
xsi:schemaLocation="http://maven.apache.org/POM/4.0.0 http://maven.apache.org/xsd/maven-4.0.0.xsd">
<parent>
<artifactId>spring-study</artifactId>
<groupId>com.hou</groupId>
<version>1.0-SNAPSHOT</version>
</parent>
<modelVersion>4.0.0</modelVersion>
<artifactId>spring-10-mybatis</artifactId>
<dependencies>
<dependency>
<groupId>mysql</groupId>
<artifactId>mysql-connector-java</artifactId>
<version>5.1.47</version>
</dependency>
<dependency>
<groupId>org.mybatis</groupId>
<artifactId>mybatis-spring</artifactId>
<version>2.0.4</version>
</dependency>
<dependency>
<groupId>org.springframework</groupId>
<artifactId>spring-jdbc</artifactId>
<version>5.2.3.RELEASE</version>
</dependency>
<dependency>
<groupId>org.mybatis</groupId>
<artifactId>mybatis</artifactId>
<version>3.5.2</version>
</dependency>
<dependency>
<groupId>org.aspectj</groupId>
<artifactId>aspectjweaver</artifactId>
<version>1.9.4</version>
</dependency>
<dependency>
<groupId>org.projectlombok</groupId>
<artifactId>lombok</artifactId>
<version>1.18.12</version>
</dependency>
</dependencies>
<build>
<resources>
<resource>
<directory>src/main/resources</directory>
<includes>
<include>**/*.properties</include>
<include>**/*.xml</include>
</includes>
</resource>
<resource>
<directory>src/main/java</directory>
<includes>
<include>**/*.properties</include>
<include>**/*.xml</include>
</includes>
<filtering>true</filtering>
</resource>
</resources>
</build>
</project>
<?xml version="1.0" encoding="UTF-8" ?>
<!DOCTYPE configuration
PUBLIC "-//mybatis.org//DTD Config 3.0//EN"
"http://mybatis.org/dtd/mybatis-3-config.dtd">
<configuration>
<typeAliases>
<package name="com.ws.pojo"/>
</typeAliases>
<environments default="development">
<environment id="development">
<transactionManager type="JDBC"/>
<dataSource type="POOLED">
<property name="driver" value="com.mysql.jdbc.Driver"/>
<property name="url" value="jdbc:mysql://111.230.212.103:3306/mybatis?userSSL=true&
userUnicode=true&characterEncoding=UTF-8"/>
<property name="username" value="root"/>
<property name="password" value="ws"/>
</dataSource>
</environment>
</environments>
<mappers>
<mapper class="com.mapper.UserMapper"/>
</mappers>
</configuration>
<?xml version="1.0" encoding="UTF-8" ?>
<!DOCTYPE mapper
PUBLIC "-//mybatis.org//DTD Config 3.0//EN"
"http://mybatis.org/dtd/mybatis-3-mapper.dtd">
<mapper namespace="com.mapper.UserMapper">
<select id="selectUser" resultType="user">
select * from mybatis.user;
</select>
</mapper>
public interface UserMapper {
List<User> selectUser();
}
整合
方法一:
UserMapperImpl
package com.ws.mapper;

import com.ws.pojo.User;
import org.mybatis.spring.SqlSessionTemplate;

import java.util.List;

public class UserMapperImpl implements UserMapper {

    private SqlSessionTemplate sqlSessionTemplate;

    public void setSqlSessionTemplate(SqlSessionTemplate sqlSessionTemplate) {
        this.sqlSessionTemplate = sqlSessionTemplate;
    }

    public List<User> selectUser() {
        UserMapper mapper = sqlSessionTemplate.getMapper(UserMapper.class);
        return mapper.selectUser();
    }
}
mybatis.xml
<?xml version="1.0" encoding="UTF-8" ?>
<!DOCTYPE configuration
        PUBLIC "-//mybatis.org//DTD Config 3.0//EN"
        "http://mybatis.org/dtd/mybatis-3-config.dtd">

<configuration>

    <typeAliases>
        <package name="com.ws.pojo"/>
    </typeAliases>

</configuration>
spring.xml
<?xml version="1.0" encoding="UTF-8"?>
<beans xmlns="http://www.springframework.org/schema/beans"
xmlns:xsi="http://www.w3.org/2001/XMLSchema-instance"
xmlns:aop="http://www.springframework.org/schema/aop"
xsi:schemaLocation="http://www.springframework.org/schema/beans
https://www.springframework.org/schema/beans/spring-beans.xsd
http://www.springframework.org/schema/aop
https://www.springframework.org/schema/aop/spring-aop.xsd">
<!--data source-->
<bean id="datasource" class="org.springframework.jdbc.datasource.DriverManagerDataSource">
<property name="driverClassName" value="com.mysql.jdbc.Driver"/>
<property name="url" value="jdbc:mysql://localhost:3306/mybatis?useSSL=true&useUnicode=true&characterEncoding=UTF-8;
userUnicode=true&characterEncoding=UTF-8"/>
<property name="username" value="root"/>
<property name="password" value="root"/>
</bean>
<!--sqlsession-->
<bean id="sqlSessionFactory" class="org.mybatis.spring.SqlSessionFactoryBean">
<property name="dataSource" ref="datasource" />
<!--bound mybatis-->
<property name="configLocation" value="classpath:mybatis-config.xml"/>
<property name="mapperLocations" value="classpath:com/ws/mapper/UserMapper.xml"/>
</bean>
<bean id="sqlSession" class="org.mybatis.spring.SqlSessionTemplate">
<constructor-arg index="0" ref="sqlSessionFactory"/>
</bean>
<bean id="userMapper" class="com.ws.mapper.UserMapperImpl">
<property name="sqlSessionTemplate" ref="sqlSession"></property>
</bean>
</beans>
test
import com.ws.mapper.UserMapper;
import com.ws.pojo.User;
import org.springframework.context.support.ClassPathXmlApplicationContext;

import java.io.IOException;


public class Mytest {


    public static void main(String[] args) throws IOException {

        ClassPathXmlApplicationContext context = new ClassPathXmlApplicationContext("spring-dao.xml");
        UserMapper userMapper = context.getBean("userMapper", UserMapper.class);

        for (User user : userMapper.selectUser()) {
            System.out.println(user);
        }
    }
}
方法二:
<?xml version="1.0" encoding="UTF-8"?>
<beans xmlns="http://www.springframework.org/schema/beans"
xmlns:xsi="http://www.w3.org/2001/XMLSchema-instance"
xsi:schemaLocation="http://www.springframework.org/schema/beans
https://www.springframework.org/schema/beans/spring-beans.xsd">
<!--data source-->
<bean id="datasource" class="org.springframework.jdbc.datasource.DriverManagerDataSource">
<property name="driverClassName" value="com.mysql.jdbc.Driver"/>
<property name="url" value="jdbc:mysql://localhost:3306/mybatis?useSSL=true&useUnicode=true&characterEncoding=UTF-8;/>
<property name="username" value="root"/>
<property name="password" value="hdk123"/>
</bean>
<!--sqlsession-->
<bean id="sqlSessionFactory" class="org.mybatis.spring.SqlSessionFactoryBean">
<property name="dataSource" ref="datasource" />
<!--bound mybatis-->
<property name="configLocation" value="classpath:mybatis-config.xml"/>
<property name="mapperLocations" value="classpath:com/mapper/UserMapper.xml"/>
</bean>
<!--<bean id="sqlSession" class="org.mybatis.spring.SqlSessionTemplate">-->
<!--<constructor-arg index="0" ref="sqlSessionFactory"/>-->
<!--</bean>-->
<!--<bean id="userMapper" class="com.ws.mapper.UserMapperImpl">-->
<!--<property name="sqlSessionTemplate" ref="sqlSession"></property>-->
<!--</bean>-->
<bean id="userMapper2" class="com.ws.mapper.UserMapperIml2">
<property name="sqlSessionFactory" ref="sqlSessionFactory"></property>
</bean>
</beans>
package com.ws.mapper;
import com.ws.pojo.User;
import org.apache.ibatis.session.SqlSession;
import org.mybatis.spring.support.SqlSessionDaoSupport;
import java.util.List;
public class UserMapperIml2 extends SqlSessionDaoSupport implements UserMapper {
public List<User> selectUser() {
SqlSession sqlSession = getSqlSession();
UserMapper mapper = sqlSession.getMapper(UserMapper.class);
return mapper.selectUser();
}
}
12. 聲明式事務
- 要麼都成功,要麼都失敗
- 十分重要,涉及到數據一致性
- 確保完整性和一致性
事務的acid原則:
- 原子性
- 一致性
- 隔離性
- 多個業務可能操作一個資源,防止數據損壞
- 持久性
- 事務一旦提交,無論系統發生什麼問題,結果都不會被影響。
Spring中的事務管理
- 聲明式事務
- 編程式事務
聲明式事務
<?xml version="1.0" encoding="UTF-8"?>
<beans xmlns="http://www.springframework.org/schema/beans"
xmlns:xsi="http://www.w3.org/2001/XMLSchema-instance"
xmlns:tx="http://www.springframework.org/schema/tx"
xmlns:aop="http://www.springframework.org/schema/aop"
xsi:schemaLocation="http://www.springframework.org/schema/beans
https://www.springframework.org/schema/beans/spring-beans.xsd
http://www.springframework.org/schema/tx
https://www.springframework.org/schema/tx/spring-tx.xsd
http://www.springframework.org/schema/aop
https://www.springframework.org/schema/aop/spring-tx.aop">
<!--data source-->
<bean id="datasource" class="org.springframework.jdbc.datasource.DriverManagerDataSource">
<property name="driverClassName" value="com.mysql.jdbc.Driver"/>
<property name="url" value="jdbc:mysql://111.230.212.103:3306/mybatis?userSSL=true&
userUnicode=true&characterEncoding=UTF-8"/>
<property name="username" value="root"/>
<property name="password" value="hdk123"/>
</bean>
<!--sqlsession-->
<bean id="sqlSessionFactory" class="org.mybatis.spring.SqlSessionFactoryBean">
<property name="dataSource" ref="datasource" />
<!--bound mybatis-->
<property name="configLocation" value="classpath:mybatis-config.xml"/>
<property name="mapperLocations" value="classpath:com/mapper/*.xml"/>
</bean>
<!--聲明式事務-->
<bean id="transactionManager" class="org.springframework.jdbc.datasource.DataSourceTransactionManager">
<constructor-arg ref="datasource" />
</bean>
<!--結合aop實現事務置入-->
<!--配置事務的類-->
<tx:advice id="tx1" transaction-manager="transactionManager">
<!--給哪些方法配置事務-->
<!--配置事務的傳播特性-->
<tx:attributes>
<tx:method name="add" propagation="REQUIRED"/>
<tx:method name="delete" propagation="REQUIRED"/>
<tx:method name="update" propagation="REQUIRED"/>
<tx:method name="*" propagation="REQUIRED"/>
<tx:method name="query" read-only="true"/>
</tx:attributes>
</tx:advice>
<!--配置事務切入-->
<aop:config>
<aop:pointcut id="txpointxut" expression="execution(* com.mapper.*.*(..))"/>
<aop:advisor advice-ref="tx1" pointcut-ref="txpointxut"/>
</aop:config>
</beans>
<?xml version="1.0" encoding="UTF-8"?>
<beans xmlns="http://www.springframework.org/schema/beans"
xmlns:xsi="http://www.w3.org/2001/XMLSchema-instance"
xsi:schemaLocation="http://www.springframework.org/schema/beans
https://www.springframework.org/schema/beans/spring-beans.xsd">
<import resource="spring-dao.xml"/>
<bean id="userMapper2" class="com.mapper.UserMapperIml2">
<property name="sqlSessionFactory" ref="sqlSessionFactory"></property>
</bean>
</beans>
Mapper
package com.ws.mapper;

import com.ws.pojo.User;

import java.util.List;

public interface UserMapper {
    List<User> selectUser();
    int addUser(User user);
    int delete(int id);
}
<?xml version="1.0" encoding="UTF-8" ?>
<!DOCTYPE mapper
        PUBLIC "-//mybatis.org//DTD Config 3.0//EN"
        "http://mybatis.org/dtd/mybatis-3-mapper.dtd">

<mapper namespace="com.mapper.UserMapper">
    <select id="selectUser" resultType="user">
        select * from mybatis.user;
    </select>

    <insert id="addUser" parameterType="user">
        insert into mybatis.user (id, name, pwd) values
        (#{id}, #{name}, #{pwd})
    </insert>

    <delete id="delete" parameterType="int">
        delete from mybatis.user where id=#{id}
    </delete>
</mapper>
package com.mapper;

import com.pojo.User;
import org.apache.ibatis.session.SqlSession;
import org.mybatis.spring.support.SqlSessionDaoSupport;

import java.util.List;

public class UserMapperIml2 extends SqlSessionDaoSupport implements UserMapper {

    public List<User> selectUser() {
        User user = new User(6, "long", "zhi");
        SqlSession sqlSession = getSqlSession();
        UserMapper mapper = sqlSession.getMapper(UserMapper.class);
        mapper.addUser(user);
        mapper.delete(6);
        return mapper.selectUser();
    }

    public int addUser(User user) {
        return getSqlSession().getMapper(UserMapper.class).addUser(user);
    }

    public int delete(int id) {
        return getSqlSession().getMapper(UserMapper.class).delete(id);
    }
}


