Dapper 是一個 容易上手,輕量級,靈活高效,開源的 迷你 ORM,由 Stack Overflow 團隊的 Sam Saffron 出品,你可以利用 Dapper 簡化數據訪問並且支持高性能, 還有一點, Dapper 提供了很多非同步方法,本篇我們就來聊一聊如何在 ASP.NET Core 中 ...
學習ASP.NET Core Blazor編程系列文章之目錄 學習ASP.NET Core Blazor編程系列一——綜述 學習ASP.NET Core Blazor編程系列二——第一個Blazor應用程式(上)
學習ASP.NET Core Blazor編程系列三——實體 學習ASP.NET Core Blazor編程系列五——列表頁面 學習ASP.NET Core Blazor編程系列七——新增圖書 學習ASP.NET Core Blazor編程系列八——數據校驗 學習ASP.NET Core Blazor編程系列十三——路由(完) 學習ASP.NET Core Blazor編程系列十五——查詢 學習ASP.NET Core Blazor編程系列十六——排序 學習ASP.NET Core Blazor編程系列二十——文件上傳(完) 學習ASP.NET Core Blazor編程系列二十一——數據刷新 學習ASP.NET Core Blazor編程系列二十二——登錄(1)
九、模擬登錄
登錄的本質原理同網頁應用是一樣的,一般的流程是:
用戶打開登頁--》輸入賬號密碼後提交表單--》服務端驗證成功後生成cookie信息寫入瀏覽器--》之後用戶訪問頁面時瀏覽器會帶上此cookie信息作為用戶標識--》服務端解析此cookie信息就能識別這個用戶了。
在webapi出現之後,出現了JWT這樣的認證方式,原理大同小異,相同的是, 認證信息都是保存在請求頭中傳遞的,不同是JWT中的認證信息需要編碼寫入請求頭之後再發送請求,不像瀏覽器,發送請求時會自動帶上cookie信息,不需要編碼。
Blazor中的登錄流程可以分成幾下幾個步驟:
- 啟用驗證
- 製作自定義AuthenticationStateProvider
- 修改App.razor
- 使用AuthorizeView和進行登錄驗證和角色授權
自定義AuthenticationStateProvider
首先來理解一下什麼是AuthenticationStateProvider。AuthenticationStateProvider是一個抽象類,由Microsoft.AspNetCore.Components.Authorization類庫提供,主要用來提供當前用戶的認證狀態信息。既然是抽象類,我們需要自定義一個它的子類,由於是模擬登錄,進行登錄流程的驗證,因此我們先來做一個測試的Provider來試試。
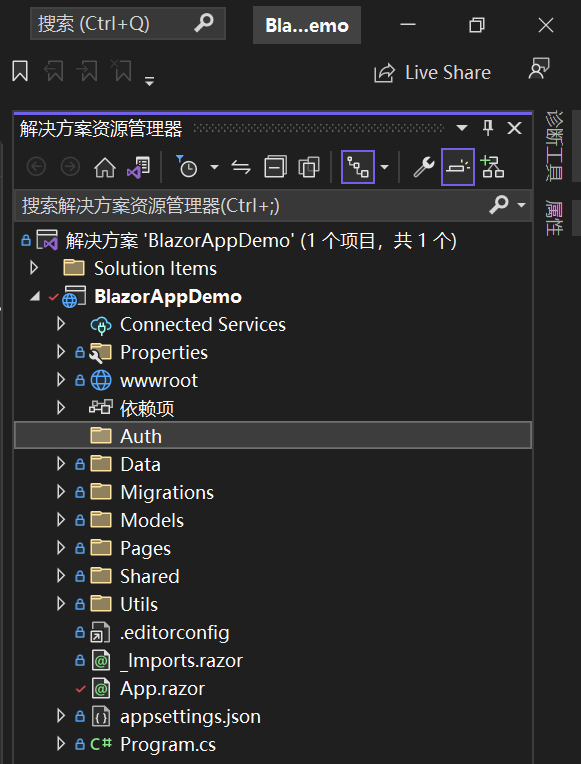
1. 在Visual Studio 2022的解決方案資源管理器中,在項目名稱“BlazorAppDemo”上單擊滑鼠右鍵,在彈出菜單中選擇“添加—>新建文件夾”,並將之命名為“Auth”。如下圖。

2. 在Visual Studio 2022的解決方案資源管理器中,滑鼠左鍵選中“Auth”文件夾,右鍵單擊,在彈出菜單中選擇“添加—>類”,並將類命名為“ImitateAuthStateProvider”。 AuthStateProvider類的最核心方法是 Task<AuthenticationState> GetAuthenticationStateAsync()。基於最簡單的登錄機制,我們的擴展提供程式如下。具體代碼如下:
using BlazorAppDemo.Models;
using Microsoft.AspNetCore.Components.Authorization;
using System.Security.Claims;

namespace BlazorAppDemo.Auth
{
    public class ImitateAuthStateProvider : AuthenticationStateProvider
    {
        bool isLogin = false;
        public override Task<AuthenticationState> GetAuthenticationStateAsync()
        {
            if (isLogin)
            {


                var claims = new List<Claim>()
            {
                new Claim(ClaimTypes.Name,"user"),
                new Claim(ClaimTypes.Role, "admin")
            };

                var anonymous = new ClaimsIdentity(claims, "testAuthType");
                return Task.FromResult(new AuthenticationState(new ClaimsPrincipal(anonymous)));
            }
            else
            {

            var anonymous = new ClaimsIdentity();
            return Task.FromResult(new AuthenticationState(new ClaimsPrincipal(anonymous)));

        }
        }
        public void Login(UserInfo request)
        {
            if (request.UserName == "user" && request.Password == "111111")
                isLogin = true;
            NotifyAuthenticationStateChanged(GetAuthenticationStateAsync());


        }

    }

}
ImitateAuthStateProvider繼承AuthenticationStateProvider,並重寫GetAuthenticationStateAsync方法。
- var anonymous = new ClaimsIdentity();:我們現在進行模擬登錄,先做一個匿名的使用者,所以ClaimsIdentity的構造方法中不傳參數。
- 返回AuthenticationState。
- 我們給ClaimsIdentity一個List<Claim>屬性,其中有使用者的名字和角色,表示我們已登錄成功。
3. 在Visual Studio 2022的解決方案資源管理器中,使用滑鼠雙擊在文本編輯器中打開Program.cs文件,使用
builder.Services.AddScoped<ImitateAuthStateProvider>();
builder.Services.AddScoped<AuthenticationStateProvider>(implementationFactory =>
implementationFactory.GetRequiredService<ImitateAuthStateProvider>());
;這二行代碼使用DI方式註入ImitateAuthStateProvider。具體代碼如下:
using BlazorAppDemo.Data;
using BlazorAppDemo.Models;
using Microsoft.AspNetCore.Components;
using Microsoft.AspNetCore.Components.Web;
using Microsoft.Extensions.Configuration;
using Microsoft.EntityFrameworkCore;
using Microsoft.Extensions.Hosting;
using Microsoft.AspNetCore.Components.Authorization;
using BlazorAppDemo.Auth;

var builder = WebApplication.CreateBuilder(args);

// Add services to the container.

builder.Services.AddRazorPages();

builder.Services.AddServerSideBlazor();

builder.Services.AddSingleton<WeatherForecastService>();

System.Console.WriteLine(ConfigHelper.Configuration["ConnectionStrings:BookContext"]);
builder.Services.AddDbContextFactory<BookContext>(opt =>
    opt.UseSqlServer(ConfigHelper.Configuration["ConnectionStrings:BookContext"]));
//builder.Services.AddScoped<AuthenticationStateProvider, ImitateAuthStateProvider>();
builder.Services.AddScoped<ImitateAuthStateProvider>();
builder.Services.AddScoped<AuthenticationStateProvider>(implementationFactory =>
implementationFactory.GetRequiredService<ImitateAuthStateProvider>());


var app = builder.Build();

// Configure the HTTP request pipeline.
if (!app.Environment.IsDevelopment())
{
    app.UseExceptionHandler("/Error");

    // The default HSTS value is 30 days. You may want to change this for production scenarios, see https://aka.ms/aspnetcore-hsts.
    app.UseHsts();
}


using (var scope = app.Services.CreateScope())
{
    var services = scope.ServiceProvider;
    try
    {
        Console.WriteLine("資料庫開始初始化。");
        var context = services.GetRequiredService<BookContext>();

        // requires using Microsoft.EntityFrameworkCore;
        context.Database.Migrate();
        // Requires using RazorPagesMovie.Models;
        SeedData.Initialize(services);
        Console.WriteLine("資料庫初始化結束。");
    }

    catch (Exception ex)
    {
        var logger = services.GetRequiredService<ILogger<Program>>();

        logger.LogError(ex, "資料庫數據初始化錯誤.");

    }
}


app.UseHttpsRedirection();

app.UseStaticFiles();

app.UseRouting();


app.MapBlazorHub();

app.MapFallbackToPage("/_Host");

app.Run();
修改App.razor
現在我們已經完成了登錄認證的Provider了,接下來要做的事情,就是讓我們的頁面上的組件,可以獲取登錄信息,來決定是登錄用戶是否已經授權。這一步請參數之前的文章學習ASP.NET Core Blazor編程系列二十三——登錄(3)之中的“七、修改路由與啟動頁面”。
修改Login.razor頁面進行登錄
在Visual Studio 2022的文本編輯器中打開Login.razor組件文件,我們將滑鼠定位到@code中的SubmitHandler方法 ,寫上我們登錄成功的代碼。具體代碼如下:
@page "/Login"
@using BlazorAppDemo.Auth;
@using BlazorAppDemo.Models
@using BlazorAppDemo.Utils
@layout LoginLayout
@inject NavigationManager NavigationManager
@inject ImitateAuthStateProvider AuthStateProvider;

<div class="card align-items-center">
    <div class="card-body my-2">
        <h3>Login</h3>
        <hr />
        <EditForm  Model="loginModel" OnValidSubmit="SubmitHandler" OnInvalidSubmit="InvalidHandler">
            <DataAnnotationsValidator />

            <div class="form-group">
                <label for="userName">  @HtmlHelper.GetDisplayName(loginModel ,m=> m.UserName)</label>
                <InputText @bind-Value="loginModel.UserName" class="form-control" id="userName" />
                <ValidationMessage For="()=>loginModel.UserName" />

            </div>
            <div class="form-group">
                <label for="pwd"> @HtmlHelper.GetDisplayName(loginModel ,m=> m.Password)</label>
                <InputPassword @bind-Value="loginModel.Password" class="form-control" id="pwd" />
                <ValidationMessage For="()=>loginModel.Password" />
            </div>

            <span class="form-control-plaintext"></span>
            <div class="form-group row">
                <div class="col-sm-10">
            <button class="btn btn-primary">登錄</button>
                </div>
            </div>
        </EditForm>

    </div>
</div>


@code {
    private UserInfo loginModel = new UserInfo();
    bool isAuthLoading = false;
    private void SubmitHandler()
    {
        Console.WriteLine($"用戶名:{loginModel.UserName} ,密碼:{loginModel.Password}");
         isAuthLoading = true;
    try {
         AuthStateProvider.Login(new UserInfo() {
                    UserName = loginModel.UserName,
                    Password =loginModel.Password
        });
            NavigationManager.NavigateTo("/Index");
    } catch (Exception ex) {

         Console.WriteLine(ex.Message);

    } finally {
        isAuthLoading = false;
    }
    }

    private void InvalidHandler()
    {

        Console.WriteLine($"用戶名: {loginModel.UserName} ,密碼:{loginModel.Password}");

    }

}
登錄並顯示當前用戶
1.在Visual Studio 2022的文本編輯器中打開MainLayout.razor組件文件,在AuthorizeView中顯示當前登錄用戶,具體代碼如下:
2.在Visual Studio 2022的菜單欄上,找到“調試-->開始調試”或是按F5鍵,Visual Studio 2022會生成BlazorAppDemo應用程式,瀏覽器中會Login登錄頁面。@using BlazorAppDemo.Pages @inherits LayoutComponentBase <PageTitle>BlazorAppDemo</PageTitle> <div class="page"> <div class="sidebar"> <NavMenu /> </div> <main> <AuthorizeView> <Authorized> <div class="top-row px-4"> <a href="https://docs.microsoft.com/aspnet/" target="_blank">About</a> <p> 你好, @context.User.Identity.Name! </p> </div> <article class="content px-4"> @Body </article> </Authorized> <NotAuthorized> <div style="margin: 120px 0; width:100%; text-align: center; color: red;"> <span style="font-size:20px">檢測到登錄超時,請重新<a href="/login" style="text-decoration:underline">登錄</a>!
</span> </div> <RedirectToLogin></RedirectToLogin> </NotAuthorized> </AuthorizeView> </main> </div>
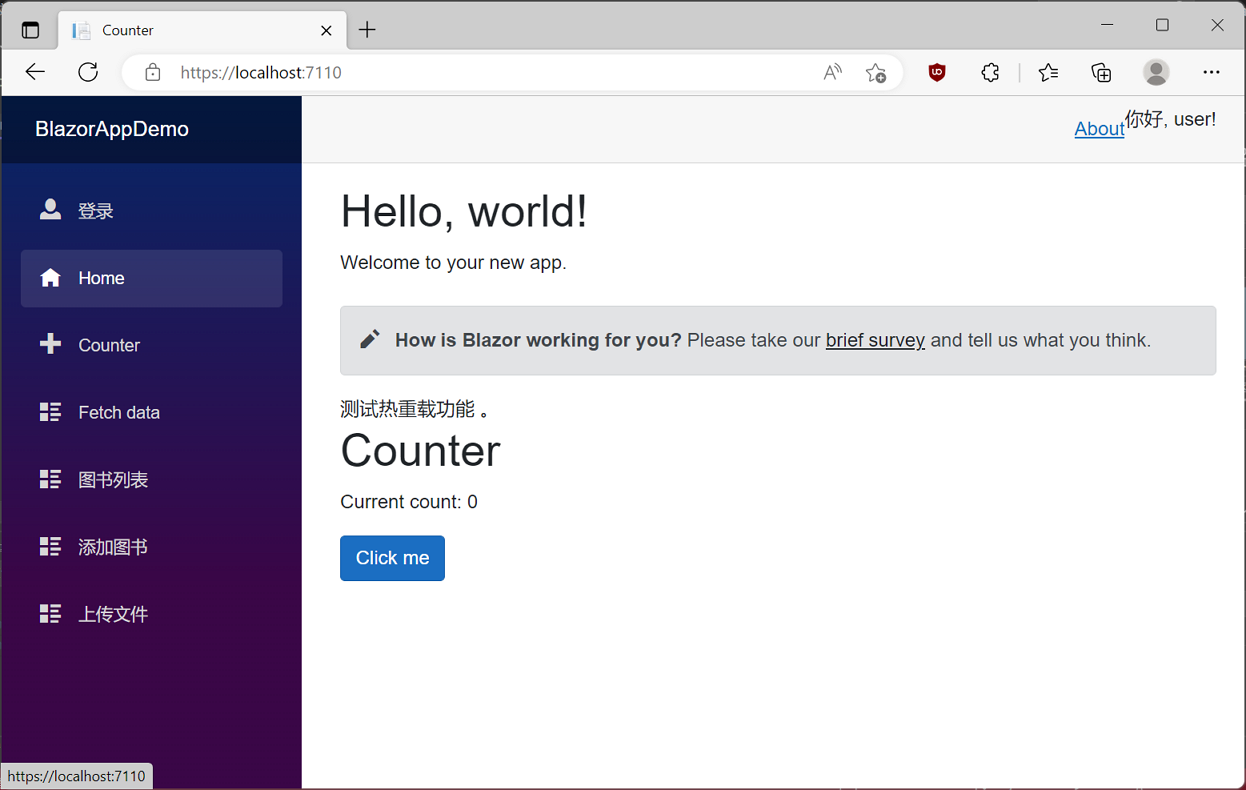
3.我們在用戶名輸入框中輸入用戶名,在密碼輸入框中輸入密碼,點擊“登錄”按鈕,進行模擬登錄。我們進入了系統。如下圖。 
到此為止,我們已經實現了Blazor的登錄認證流程,接下來我們要來實現通過jwt進行登錄。


