
本文已收錄至Github,推薦閱讀 👉 Java隨想錄 微信公眾號:Java隨想錄 CSDN: 碼農BookSea 轉載請在文首註明出處,如發現惡意抄襲/搬運,會動用法律武器維護自己的權益。讓我們一起維護一個良好的技術創作環境! 根節點枚舉與安全點 什麼是根節點枚舉 HotSpot使用的是可達性分 ...
最近在極客時間上面學習丁雪豐老師的《玩轉 Spring 全家桶》,看到一個在application.properties 裡面生成隨機數的例子,覺得很厲害,帶著崇拜的心情去閱讀了一下Spring的源碼,總算搞清楚了它是怎麼工作的,閱讀優秀的源代碼是一個很不錯的學習方式,這篇文章就是記錄一下這個學習的過程。
還是先通過示例來進入學習
首先我們建一個springboot的工程,入口程式如下, 就是列印出兩個從配置文件中定義的value
@SpringBootApplication
@Slf4j
public class PropertySourceDemoApplication implements ApplicationRunner {
    @Value("${property.demo.test}")
    private String hello;

    @Value("${property.demo.random}")
    private int random_value;
    public static void main(String[] args) {
        SpringApplication.run(PropertySourceDemoApplication.class, args);
    }

    @Override
    public void run(ApplicationArguments args) throws Exception {
        log.info("{} {}", hello, random_value);
    }
}
配置文件 application.properties
property.demo.random=${random.int}
property.demo.test=hello
程式輸入出為 "hello -14137621", 這個-14137621就是我們生成的隨機數
那麼這個功能是怎麼在spring-boot實現的呢?
準備階段
首先我們需要工具類,我們自己可以設計一下,如果我們需要完成這項任務,那麼我們需要兩個最基本的類,一個是隨機數生成類org.springframework.boot.env.RandomValuePropertySource,一個是讀取配置文件類 org.springframework.boot.env.PropertiesPropertySourceLoader。我們來看下這兩個類的代碼。
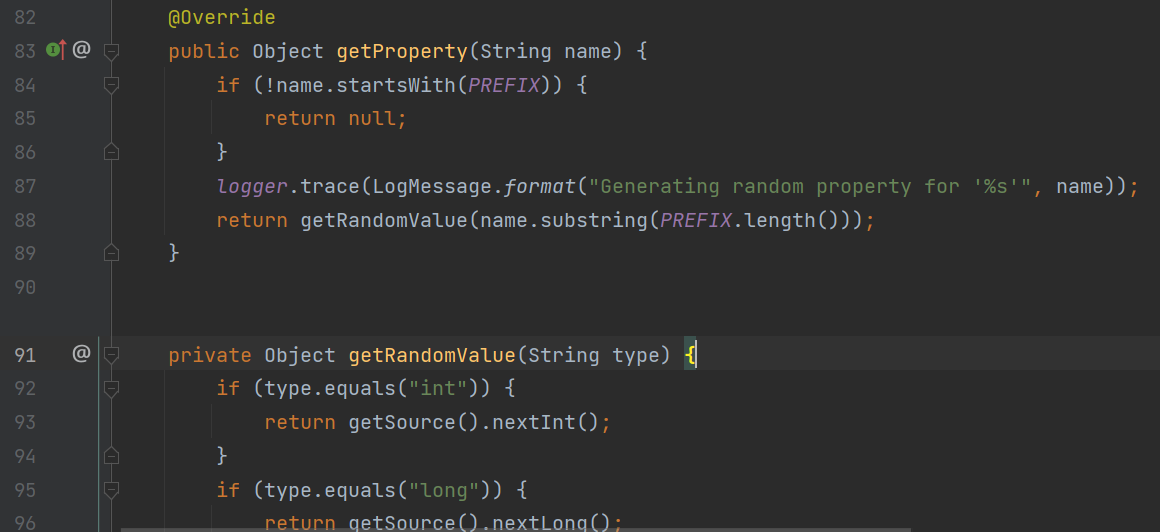
上圖是RandomValuePropertySource, 我們可以看到它的getProperty方法就是看name是不是以random開頭,是的話就生成隨機數返回,這就是我們為什麼值為${random.int}
再來看PropertiesPropertySourceLoader
public class PropertiesPropertySourceLoader implements PropertySourceLoader {

	private static final String XML_FILE_EXTENSION = ".xml";

	@Override
	public String[] getFileExtensions() {
		return new String[] { "properties", "xml" };
	}

	@Override
	public List<PropertySource<?>> load(String name, Resource resource) throws IOException {
		List<Map<String, ?>> properties = loadProperties(resource);
		if (properties.isEmpty()) {
			return Collections.emptyList();
		}
		List<PropertySource<?>> propertySources = new ArrayList<>(properties.size());
		for (int i = 0; i < properties.size(); i++) {
			String documentNumber = (properties.size() != 1) ? " (document #" + i + ")" : "";
			propertySources.add(new OriginTrackedMapPropertySource(name + documentNumber,
					Collections.unmodifiableMap(properties.get(i)), true));
		}
		return propertySources;
	}

	@SuppressWarnings({ "unchecked", "rawtypes" })
	private List<Map<String, ?>> loadProperties(Resource resource) throws IOException {
		String filename = resource.getFilename();
		List<Map<String, ?>> result = new ArrayList<>();
		if (filename != null && filename.endsWith(XML_FILE_EXTENSION)) {
			result.add((Map) PropertiesLoaderUtils.loadProperties(resource));
		}
		else {
			List<Document> documents = new OriginTrackedPropertiesLoader(resource).load();
			documents.forEach((document) -> result.add(document.asMap()));
		}
		return result;
	}

}
通過閱讀這個代碼我們可以看出或者猜測,它就是把尾碼名是properties或者xml的文件讀到記憶體中,實際上也是這樣的。
有了這兩個類,剩下的就是如何把它們組織起來,這是spring強大的地方,也是複雜的地方。
這裡不同版本可能代碼不一樣,但是大同小異吧,我使用的是springboot 3.0.0。
這裡把代碼的組織結構貼出來


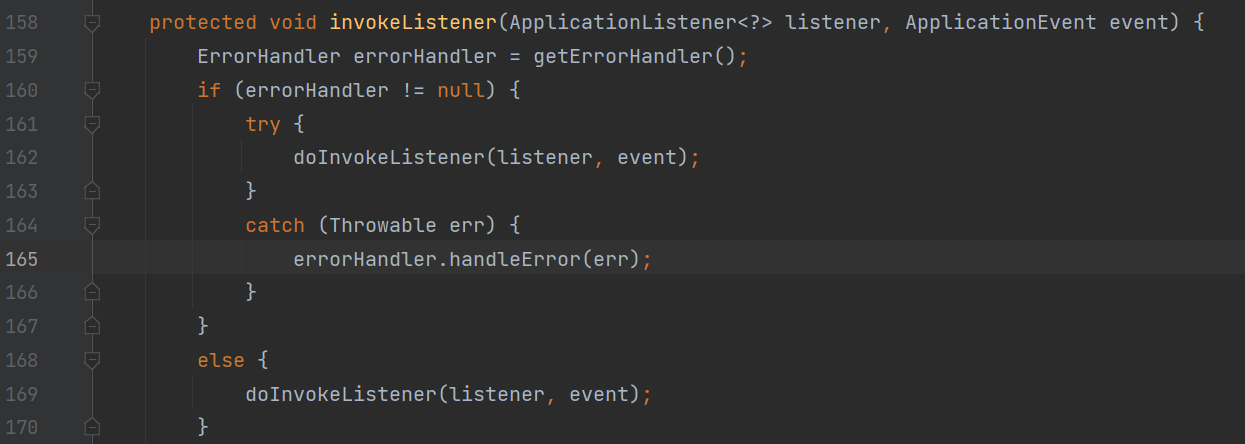

最後我們可以看到執行了ApplicationListener.onApplicationEvent.
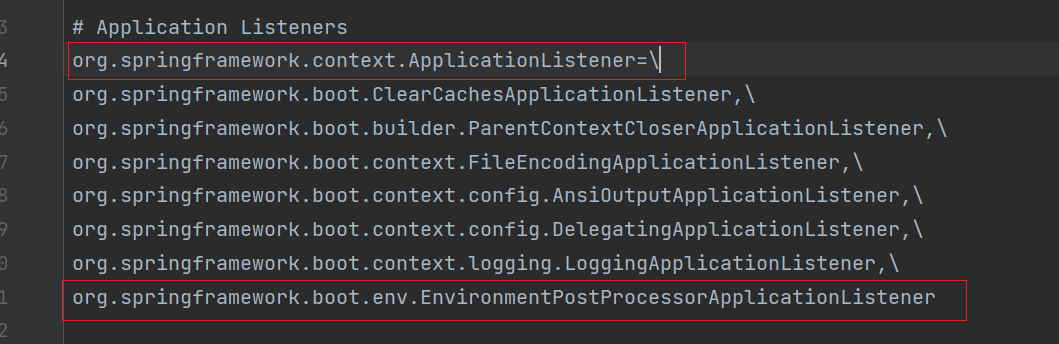
我們打開spring.factories 中看到EnviormentPostProcessorApplicationListener實現了這個介面
打開它的代碼可以看到
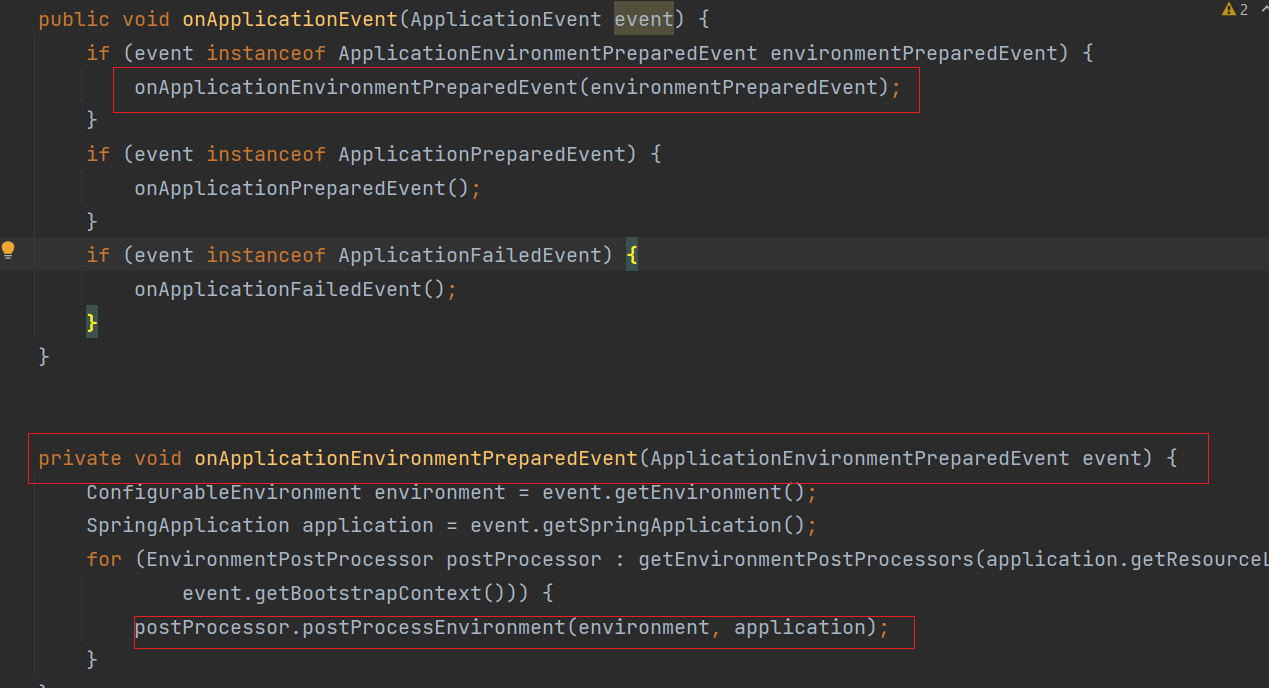
最後到了EnvironmentPostProcessor.postProcessEnvironment
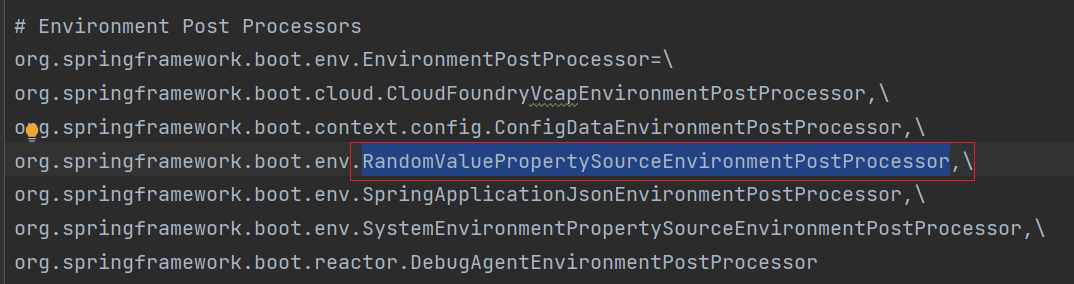
這個EnvironmentPostProcessor也是在spring.factories裡面配置了

可以看到這裡調用了我們前面說的工具類的RandomValuePropertySource.addToEnvironment(environment, this.logger);
我們來看一眼它的代碼
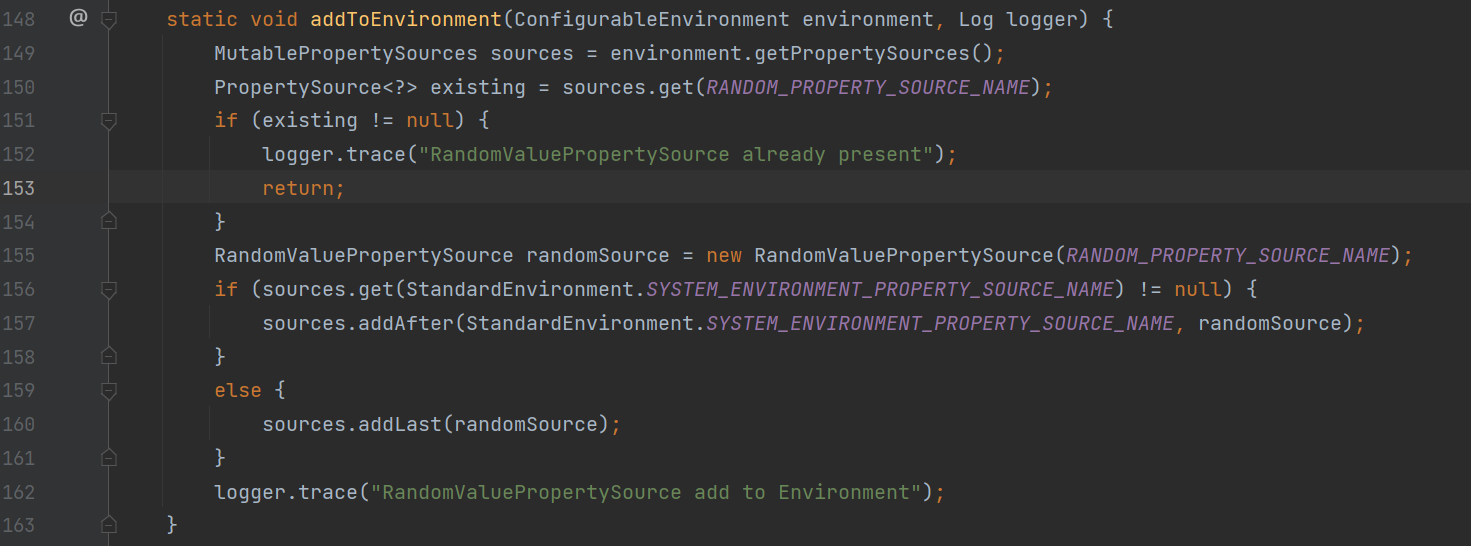
可以看到它就是把RandomValuePropertySource添加到Enviorment的PropertySources裡面,留在後面用。 後面我們會看到它是怎麼用。
代碼的流程大概是這樣的
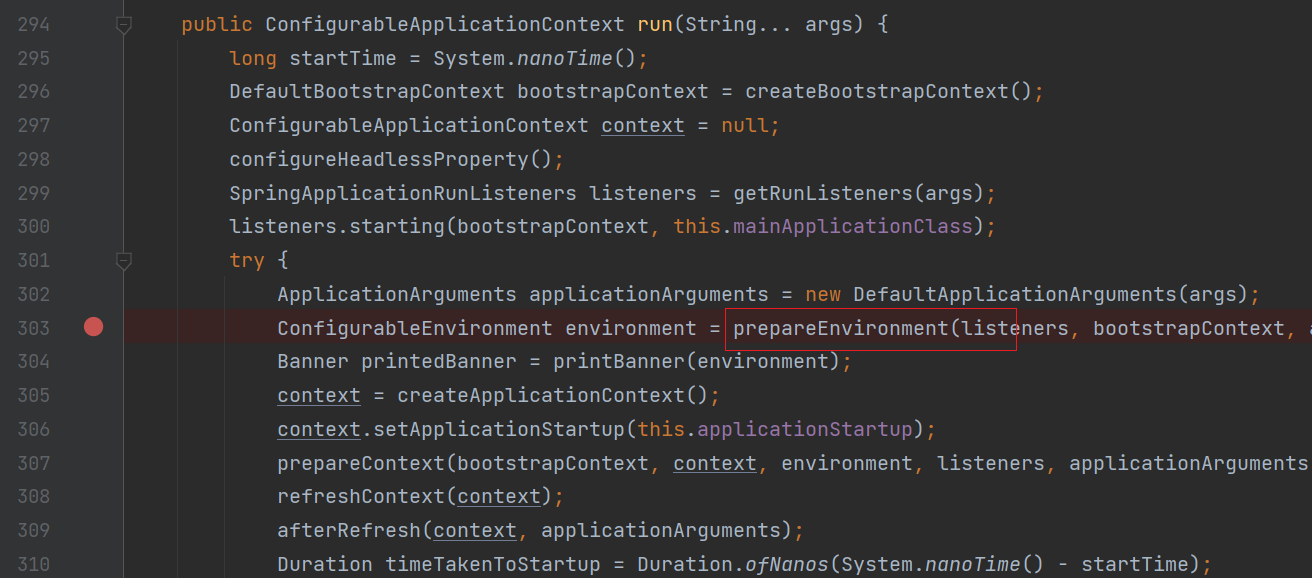
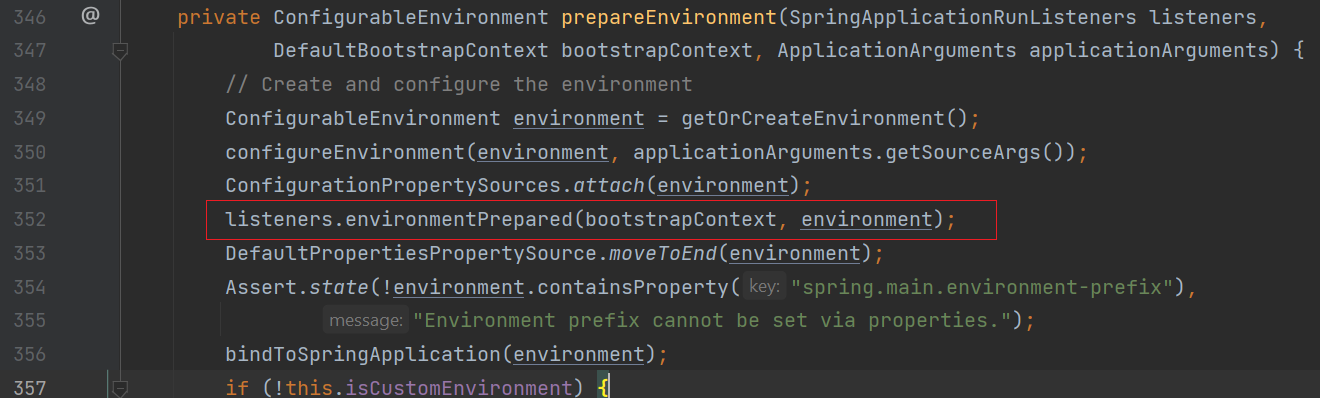
SpringApplication -> Run() -> prepareEnvironment() ->listeners.environmentPrepared(bootstrapContext, environment)
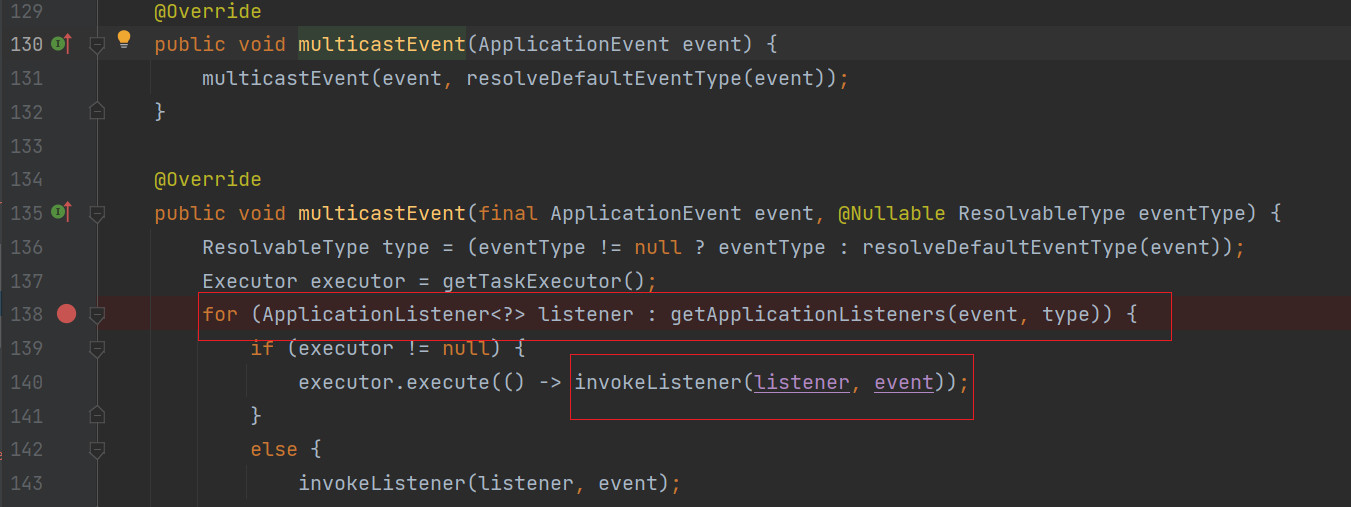
EventPublishingRunListener -> SimpleApplicationEventMulticaster -> multicastEvent() -> listener.onApplicationEvent(event)
onApplicationEnvironmentPreparedEvent-> RandomValuePropertySource.addToEnvironment()
代碼到這裡RandomValuePropertySource工具就準備好了, 讀配置文件的類PropertiesPropertySourceLoader代碼類似,這裡不詳述。
生成隨機數
我原本以為讀出配置文件後,就直接用RandomValuePropertySource生成了隨機數,後來通過調試發現不是的,生成隨機數是在Bean創建的時候,拿到需要註入的field的時候,再去找配置文件記憶體中找到,然後再生成的。 這個過程有些複雜,我花了不少時間才將它理出來。
SpringApplication.run
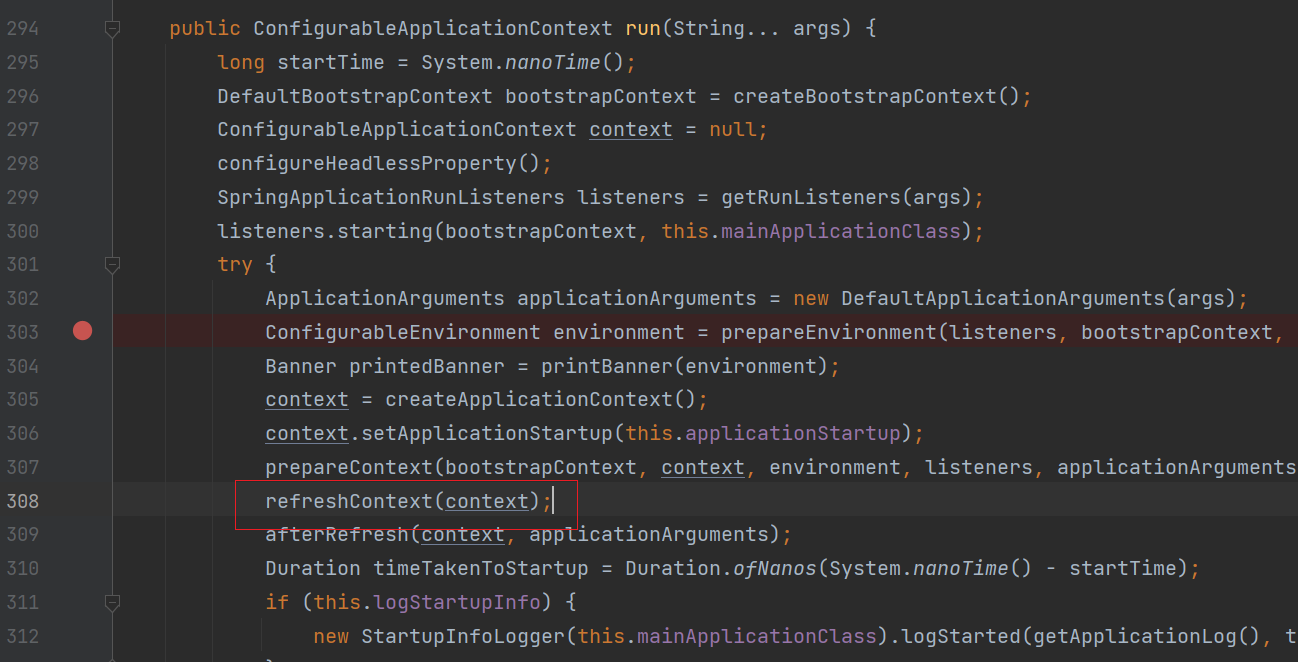
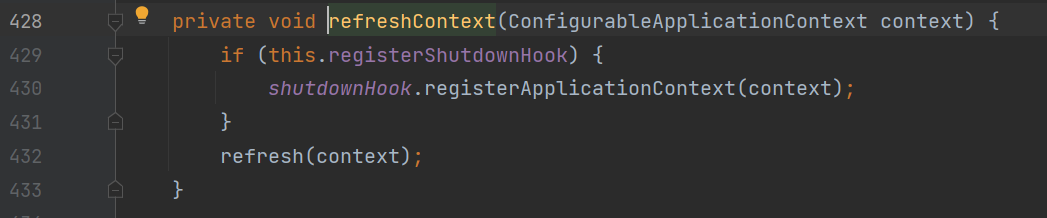

這裡跳到到spring framework包裡面的org.springframework.context.support.refresh()方法
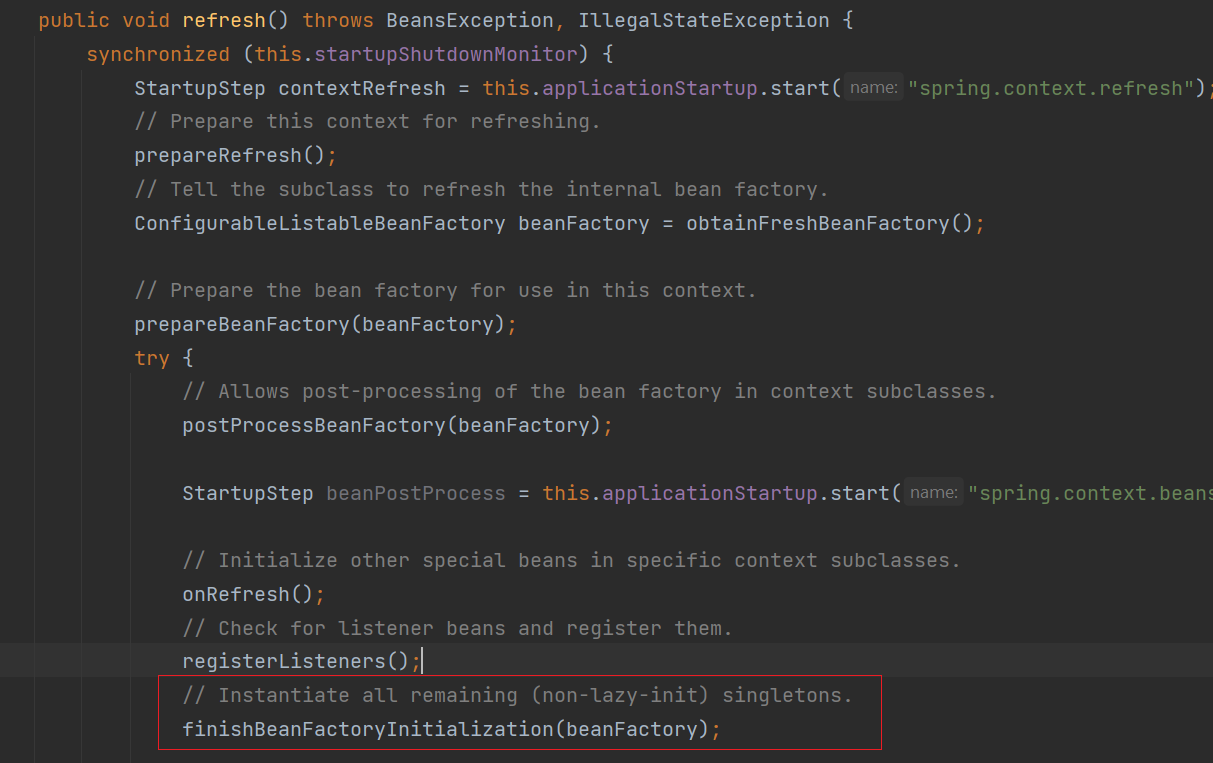
這裡圖太多不貼了,只貼主要類和方法
AbstractApplicationContext.finishBeanFactoryInitialization -> DefaultListableBeanFactory.preInstantiateSingletons ->
DefaultListableBeanFactory.getBean ->
AbstractBeanFactory.getBean ->
AbstractAutowireCapableBeanFactory.createBean() ->
AbstractAutowireCapableBeanFactory.doCreateBean() ->
AbstractAutowireCapableBeanFactory.populateBean() ->
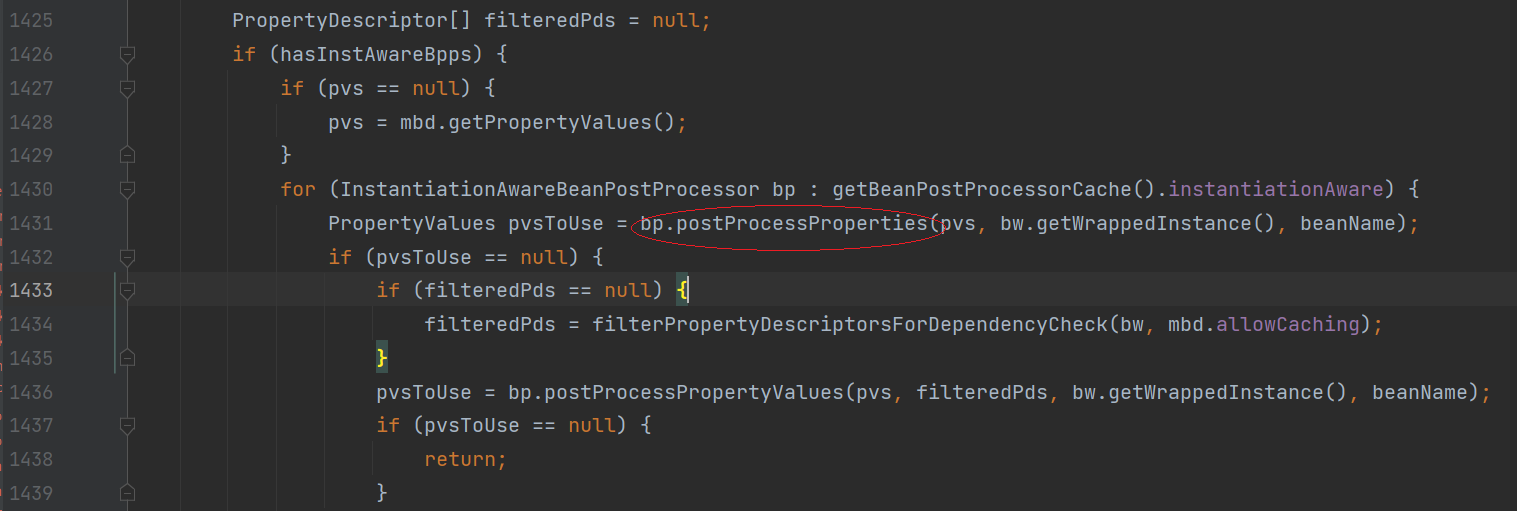
這裡調用InstantiationAwareBeanPostProcessor.postProcessProperties 會有一個List,只有當對象是AutoWiredAnnotationBeanPostProcessor的時候才會調用我們的給註解載入值。
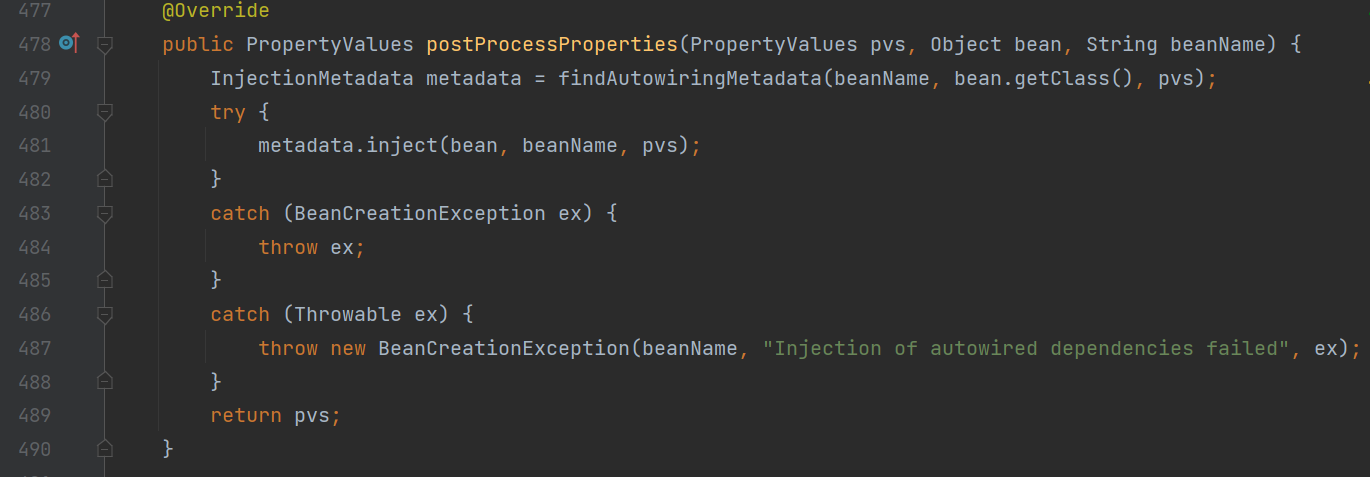
這裡調用InjectMetadata.inject() 就是註入我們要的value.
InjectedElement.inject() ->
InjectionMetadata.getResourceToInject() ->
CommonAnnotationBeanPostProcessor.getResource() ->
CommonAnnotationBeanPostProcessor.autowireResource() ->
AutowireCapableBeanFactory.resolveDependency() ->
DefaultListableBeanFactory.doResolveDependency() ->
AbstractBeanFactory.resolveEmbeddedValue
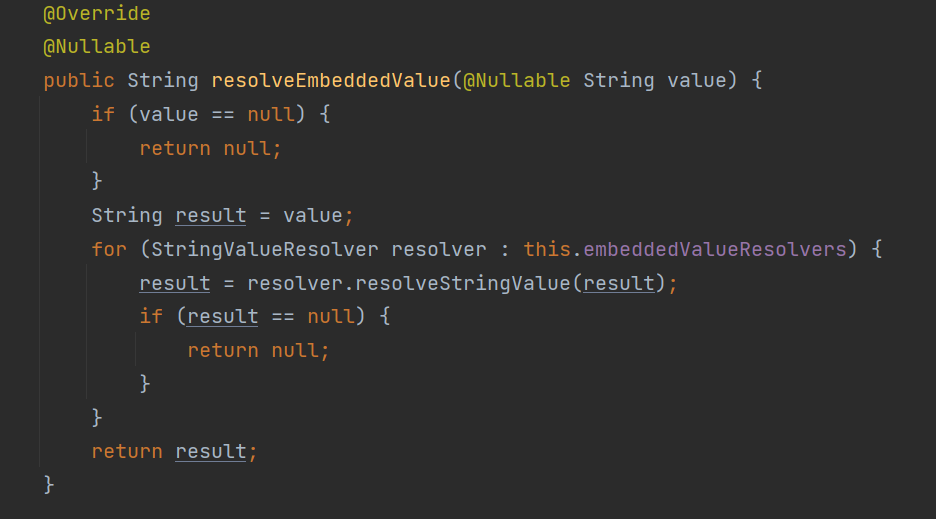
這個embeddedValueResolvers是這麼來的
beanFactory.addEmbeddedValueResolver(strVal -> getEnvironment().resolvePlaceholders(strVal));
AbstractPropertyResolver.resolvePlaceholders()
AbstractPropertyResolver.doResolvePlaceholders()
PropertySourcesPropertyResolver.getPropertyAsRawString()
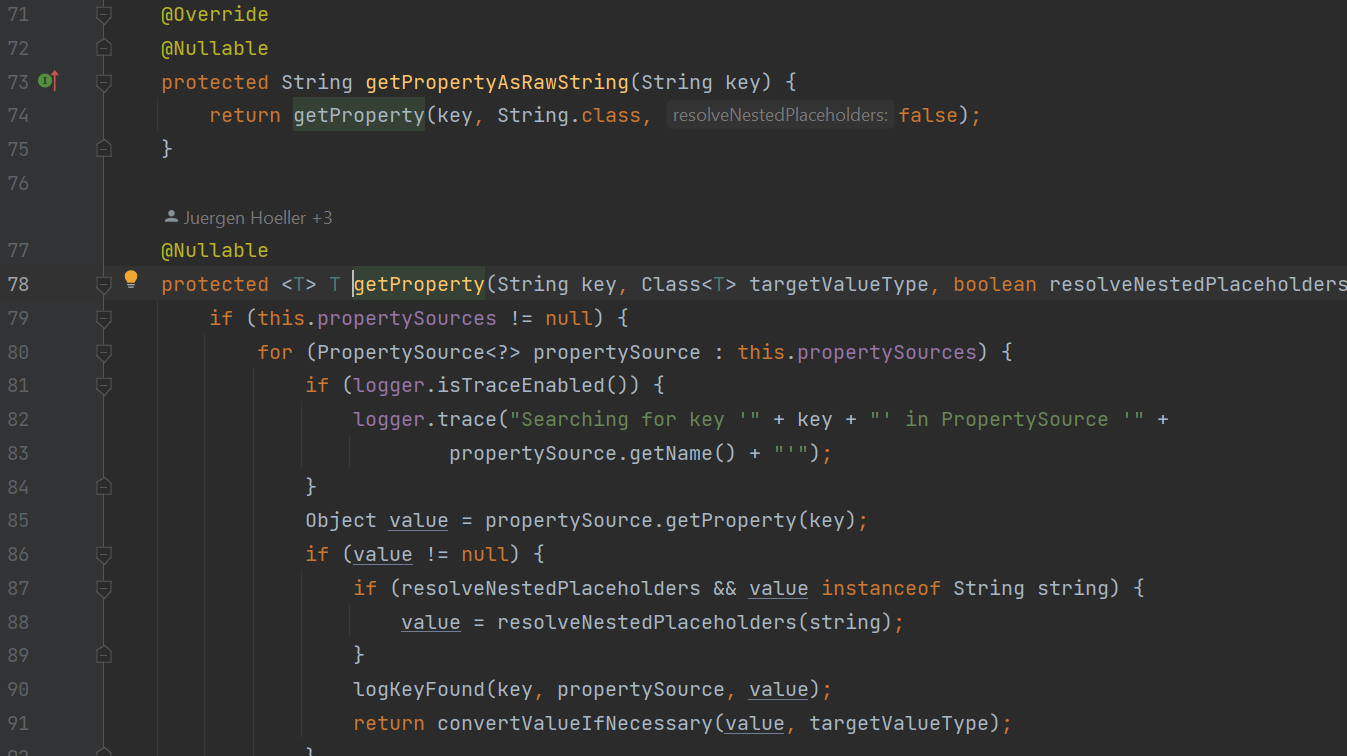
這裡的this.PropertySources就是包含了最開始準備階段的RandomValuePropertySource。有好幾個PropertySource都去找值,找到值就返回。
這樣我們整個流程就打通了。
總結
Spring的代碼非常的龐大,代碼水平也非常高,往往不是我們常規的思路,需要非常複雜的組織起代碼來,我閱讀整個代碼的時候就是不停的debug,帶著問題去找,這是我第一次去閱讀它的代碼,花的時間比較多,還有許多問題沒有來的及看,比如spring.factories 是怎麼去初始化那些介面的呢?等等問題。 萬事開頭難,走出第一步,我想後面再讀會容易很多。


