
uni-app自帶uni.request用於網路請求,因為我們需要自定義攔截器等功能,也是為了和我們後臺管理保持統一,這裡我們使用比較流行且功能更強大的axios來實現網路請求。 Axios 是一個基於 promise 網路請求庫,作用於node.js 和瀏覽器中。 它是 isomorphic 的( ...
uni-app自帶uni.request用於網路請求,因為我們需要自定義攔截器等功能,也是為了和我們後臺管理保持統一,這裡我們使用比較流行且功能更強大的axios來實現網路請求。
Axios 是一個基於 promise 網路請求庫,作用於node.js 和瀏覽器中。 它是 isomorphic 的(即同一套代碼可以運行在瀏覽器和node.js中)。在服務端它使用原生 node.js http 模塊, 而在客戶端 (瀏覽端) 則使用 XMLHttpRequests。
Axios特性:
- 從瀏覽器創建 XMLHttpRequests
- 從 node.js 創建 http 請求
- 支持 Promise API
- 攔截請求和響應
- 轉換請求和響應數據
- 取消請求
- 自動轉換JSON數據
- 客戶端支持防禦XSRF
一、安裝axios和axios-auth-refresh組件
1、新增uni-app自定義常量配置文件
HBuilderX有針對於uni-app的通用配置,很多通用常量可以直接配置在manifest.json文件中,且HBuilderX提供圖形化配置界面。但我們有許多業務系統相關的常量配置,那麼就需要一個自定義常量配置文件。
uni-app中定義全局常量有多種方式,在vue.js框架中也可以使用App.vue裡面的globalData,根據業務需求,自定義常量可能會很多,不便於和官方配置融合在一起,所以這裡使用新增配置project.config.js文件並掛載Vue.prototype的方式來實現常量配置。
- 在工程的根目錄下新增project.config.js
 module.exports = {
        # 配置請求後臺地址
	APP_API_BASE_URL: 'http://127.0.0.1:8080',
	# 多租戶項目,這裡是預設的租戶id
	APP_TENANT_ID: '0',
	# OAuth2授權的用戶名密碼
	APP_CLIENT_ID: 'gitegg-admin',
	# client_id:client_secret加密後的值,直接傳,不需要再進行BASE64加密
	APP_CLIENT_SECRET: 'Z2l0ZWdnLWFkbWluOjEyMzQ1Ng=='
}
- 在main.js中導入、掛載project.config.js
 // 導入js文件
import ProjectConfig from './project.config'
 // 掛載
Vue.prototype.$ProjectConfig = ProjectConfig
- 在項目中引用
this.$ProjectConfig.APP_API_BASE_URL
- 如果是在APP掛在前引用,那麼使用以下方法引用
import ProjectConfig from './project.config'
2、打開HBuilderX終端命令視窗,用於執行yarn安裝命令
HBuilderX預設沒有開啟終端命令視窗,選中項目,有兩種方式打開命令視窗:
- 按快捷鍵Ctrl+Alt+T打開終端視窗
- 菜單欄中,選擇 視圖 > 顯示終端(C)
3、執行安裝axios(http請求攔截)和 axios-auth-refresh(強大的token刷新)組件命令
yarn add axios
yarn add axios-auth-refresh
4、在目錄/common/utils新建axios.js,創建Axios 實例
const VueAxios = {
  vm: {},
  // eslint-disable-next-line no-unused-vars
  install (Vue, instance) {
    if (this.installed) {
      return
    }
    this.installed = true
    if (!instance) {
      // eslint-disable-next-line no-console
      console.error('You have to install axios')
      return
    }
    Vue.axios = instance
    Object.defineProperties(Vue.prototype, {
      axios: {
        get: function get () {
          return instance
        }
      },
      $http: {
        get: function get () {
          return instance
        }
      }
    })
  }
}
export {
  VueAxios
}
5、在目錄/common/utils新建request.js,自定義Axios攔截器
在這裡定義攔截器主要用於:自動設置token、token過期刷新、統一異常提示、返回數據處理等功能。
import axios from 'axios'
import createAuthRefreshInterceptor from 'axios-auth-refresh'
import store from '@/store'
import { serialize } from '@/common/util'
import { VueAxios } from './axios'
import { ACCESS_TOKEN, REFRESH_ACCESS_TOKEN } from '@/store/mutation-types'
 // 導入js文件
import ProjectConfig from '@/project.config.js'

// uni-app適配
axios.defaults.adapter = function(config) {
  return new Promise((resolve, reject) => {
      var settle = require('axios/lib/core/settle');
      var buildURL = require('axios/lib/helpers/buildURL');
      uni.request({
          method: config.method.toUpperCase(),
          url: config.baseURL + buildURL(config.url, config.params, config.paramsSerializer),
          header: config.headers,
          data: config.data,
          dataType: config.dataType,
          responseType: config.responseType,
          sslVerify: config.sslVerify,
          complete: function complete(response) {
              response = {
                  data: response.data,
                  status: response.statusCode,
                  errMsg: response.errMsg,
                  header: response.header,
                  config: config
              };
              settle(resolve, reject, response);
          }
      })
  })
}

// 創建 axios 實例
const request = axios.create({
  // API 請求的預設首碼
  baseURL: ProjectConfig.APP_API_BASE_URL,
  timeout: 30000 // 請求超時時間
})

// 當token失效時,需要調用的刷新token的方法
const refreshAuthLogic = failedRequest =>
  axios.post(ProjectConfig.APP_API_BASE_URL + '/oauth/token',
  serialize({
      grant_type: 'refresh_token',
      refresh_token: uni.getStorageSync(REFRESH_ACCESS_TOKEN)
    }),
    {
      headers: { 'TenantId': ProjectConfig.APP_TENANT_ID, 'Content-Type': 'application/x-www-form-urlencoded', 'Authorization': 'Basic ' + ProjectConfig.APP_CLIENT_SECRET },
      skipAuthRefresh: true // 刷新token請求過期,不再進行刷新
    }
    ).then(tokenRefreshResponse => {
      if (tokenRefreshResponse.status === 200 && tokenRefreshResponse.data && tokenRefreshResponse.data.success) {
        const result = tokenRefreshResponse.data.data
        uni.setStorageSync(ACCESS_TOKEN, result.tokenHead + result.token, result.expiresIn * 1000)
        uni.setStorageSync(REFRESH_ACCESS_TOKEN, result.refreshToken, result.refreshExpiresIn * 1000)
        failedRequest.response.config.headers['Authorization'] = result.tokenHead + result.token
      } else if (tokenRefreshResponse.status === 200 && tokenRefreshResponse.data &&
        !tokenRefreshResponse.data.success && tokenRefreshResponse.data.code === 401) {
          store.dispatch('Timeout').then(async () => {
			uni.navigateTo({
				url: '/pages/login/login'
			})
        })
      }
      return Promise.resolve()
})

// 初始化刷新token攔截器
createAuthRefreshInterceptor(request, refreshAuthLogic, {
  pauseInstanceWhileRefreshing: true // 當刷新token執行時,暫停其他請求
})

// 異常攔截處理器
const errorHandler = (error) => {
  if (error.response) {
    const data = error.response.data
    if (error.response.status === 403) {
	  uni.showToast({
	  	title: '您沒有許可權訪問此介面',
	  	icon:'error',
		duration: 2000
	  });
    } else if (error.response.status === 401 && !(data.result && data.result.isLogin)) {
       // 當刷新token超時,則調到登錄頁面
	   uni.showModal({
		title: '登錄超時',
	   	content: '由於您長時間未操作, 為確保全全, 請重新登錄系統進行後續操作 !',
		confirmText: '重新登錄',
	   	showCancel: false,
		success: (res) => {
			if(res.confirm) {
				store.dispatch('Timeout').then(() => {
				    uni.navigateTo({
				    	url: '/pages/login/login'
				    })
				})
			}
		}
	   })
    }
  }
  return Promise.reject(error)
}

// request interceptor
request.interceptors.request.use(config => {
  const token = uni.getStorageSync(ACCESS_TOKEN)
  // 如果 token 存在
  // 讓每個請求攜帶自定義 token 請根據實際情況自行修改
  if (token && config.authenticationScheme !== 'Basic') {
    config.headers['Authorization'] = token
  }
  config.headers['TenantId'] = ProjectConfig.APP_TENANT_ID
  return config
}, errorHandler)

// response interceptor
request.interceptors.response.use((response) => {
  const res = response.data
  if (res && res.code) {
    if (res.code !== 200) {
	  uni.showToast({
	  	title: '操作失敗: ' + res.msg,
	  	icon:'error',
	  	duration: 2000
	  });
      return Promise.reject(res || 'Error')
    } else {
      return response.data
    }
  } else {
    return response
  }
}, errorHandler)

const installer = {
  vm: {},
  install (Vue) {
    Vue.use(VueAxios, request)
  }
}

export default request

export {
  installer as VueAxios,
  request as axios
}
二、請求後臺介面並實現登錄功能
1、新建api目錄,用於存放所有後臺請求的介面,在api目錄下新建login目錄,存放用於登錄的相關介面
2、在/api/login目錄下新增login.js
import request from '@/common/utils/request'
import ProjectConfig from '@/project.config.js'

const loginApi = {
  // 登錄
  Login: '/oauth/token',
  // 退出登錄
  Logout: '/oauth/logout',
  // 獲取系統配置的驗證碼類型
  CaptchaType: '/oauth/captcha/type',
  // 獲取圖片驗證碼
  ImageCaptcha: '/oauth/captcha/image',
  // 發送簡訊驗證碼
  SendSms: '/oauth/sms/captcha/send',
  // 獲取用戶信息
  UserInfo: '/system/account/user/info',
  // 第三方登錄
  SocialLoginUrl: '/oauth/social/login/',
  // 第三方登錄回調
  SocialLoginCallback: '/oauth/social/',
  // 第三方用戶綁定---通過手機號驗證碼綁定
  SocialBindMobile: '/oauth/social/bind/mobile',
  // 第三方用戶綁定---通過賬號密碼綁定
  SocialBindAccount: '/oauth/social/bind/account',
  // 發送簡訊驗證碼
  SmsSend: '/extension/sms/code/send',
  // 校驗簡訊驗證碼
  SmsCheckPre: '/extension/sms/check/code/pre',
  // 校驗簡訊驗證碼
  SmsCheck: '/extension/sms/check/code',
  // 發送註冊簡訊
  SmsRegisterSend: '/system/account/register/sms/send',
  // 賬戶註冊
  Register: '/system/account/register',
  // 校驗用戶是否存在
  CheckUserExist: '/system/account/register/check'
}

export default loginApi

/**
 * OAuth2登錄
 * @param parameter
 * @returns {*}
 */
export function login (parameter) {
  return request({
    url: loginApi.Login,
    authenticationScheme: 'Basic',
    method: 'post',
    headers: { 'Authorization': 'Basic ' + ProjectConfig.APP_CLIENT_SECRET },
    skipAuthRefresh: true,
    data: parameter
  })
}

/**
 * OAuth2退出登錄
 * @param parameter
 * @returns {*}
 */
export function logout (parameter) {
  return request({
    url: loginApi.Logout,
    method: 'post',
    skipAuthRefresh: true,
    data: parameter
  })
}

/**
 * 獲取驗證碼類型
 * @param parameter
 * @returns {*}
 */
export function getCaptchaType () {
  return request({
    url: loginApi.CaptchaType,
    method: 'get'
  })
}

/**
 * 獲取圖片驗證碼
 * @param parameter
 * @returns {*}
 */
export function getImageCaptcha () {
  return request({
    url: loginApi.ImageCaptcha,
    method: 'get'
  })
}

/**
 * 獲取簡訊驗證碼
 * @param parameter
 * @returns {*}
 */
export function getSmsCaptcha (parameter) {
  return request({
    url: loginApi.SendSms,
    method: 'post',
    data: parameter
  })
}

/**
 * 獲取用戶信息
 * @param parameter
 * @returns {*}
 */
export function getInfo () {
  return request({
    url: loginApi.UserInfo,
    method: 'get'
  })
}

/**
 * 獲取第三方登錄的URL
 * @param {Object} socialType
 */
export function getSocialLoginUrl (socialType) {
  return request({
    url: loginApi.SocialLoginUrl + socialType,
    method: 'get'
  })
}

/**
 * 第三方登錄回調地址
 * @param {Object} socialType
 * @param {Object} parameter
 */
export function socialLoginCallback (socialType, parameter) {
  return request({
    url: loginApi.SocialLoginCallback + socialType + '/callback',
    method: 'get',
    params: parameter
  })
}

/**
 * 發送簡訊驗證碼
 * @param {Object} parameter
 */
export function sendSmsCode (parameter) {
  return request({
    url: loginApi.SmsSend,
    method: 'post',
    data: parameter
  })
}

/**
 * 校驗簡訊驗證碼
 * @param {Object} parameter
 */
export function checkSmsCode (parameter) {
  return request({
    url: loginApi.SmsCheckPre,
    method: 'get',
    params: parameter
  })
}

/**
 * 發送註冊簡訊驗證碼
 * @param {Object} parameter
 */
export function smsRegisterSend (parameter) {
  return request({
    url: loginApi.SmsRegisterSend,
    method: 'post',
    data: parameter
  })
}

/**
 * 校驗用戶是否存在
 * @param {Object} parameter
 */
export function checkUserExist (parameter) {
  return request({
    url: loginApi.CheckUserExist,
    method: 'post',
    data: parameter
  })
}

/**
 * 用戶註冊
 * @param {Object} parameter
 */
export function userRegister (parameter) {
  return request({
    url: loginApi.Register,
    method: 'post',
    data: parameter
  })
}

/**
 * 第三方用戶綁定---通過手機號驗證碼綁定
 * @param {Object} parameter
 */
export function userBindMobile (parameter) {
  return request({
    url: loginApi.SocialBindMobile,
    method: 'post',
    data: parameter
  })
}

/**
 * 第三方用戶綁定---通過賬號密碼綁定
 * @param {Object} parameter
 */
export function userBindAccount (parameter) {
  return request({
    url: loginApi.SocialBindAccount,
    method: 'post',
    data: parameter
  })
}
3、在/pages目錄下創建login目錄,新增login.vue登錄頁面,用於登錄。
<!-- 藍色簡潔登錄頁面 -->
<template>
	<view class="login-bg">
		<br /><br /><br /><br /><br /><br /><br />
		<view class="t-login">
			<form class="cl">
				<view class="t-a">
					<image src="@/static/login/user.png"></image>
					<input type="text" name="username" placeholder="請輸入手機號碼" maxlength="11" v-model="username" />
				</view>
				<view class="t-a">
					<image src="@/static/login/pwd.png"></image>
					<input type="password" name="password" maxlength="100" placeholder="請輸入密碼" v-model="password" />
				</view>
				<button @tap="login()">登 錄</button>
				<view class="t-c">
					<text class="t-c-txt" @tap="reg()">註冊賬號</text>
					<text @tap="forgotPwd()">忘記密碼</text>
				</view>
			</form>
			<view class="t-f"><text>—————— 其他登錄方式 ——————</text></view>
			<view class="t-e cl">
				<view class="t-g" @tap="wxLogin()"><image src="@/static/login/wx2.png"></image></view>
				<view class="t-g" @tap="zfbLogin()"><image src="@/static/login/qq2.png"></image></view>
				<view class="t-g" @tap="zfbLogin()"><image src="@/static/login/wb.png"></image></view>
			</view>
		</view>
		<image class="img-a" src="@/static/login/bg1.png"></image>
	</view>
</template>
<script>
import md5 from '@/common/md5.min.js';
import { mapActions } from 'vuex'
import { ACCESS_TOKEN, REFRESH_ACCESS_TOKEN } from '@/store/mutation-types'
export default {
	data() {
		return {
			username: '',
			password: '',
			grant_type: 'password'
		};
	},
	onLoad() {},
	methods: {
		...mapActions(['Login', 'Logout']),
		login() {
			var that = this;
			if (!that.username) {
				uni.showToast({ title: '請輸入手機號', icon: 'none' });
				return;
			}
			if (!/^[1][3,4,5,7,8,9][0-9]{9}$/.test(that.username)) {
				uni.showToast({ title: '請輸入正確手機號', icon: 'none' });
				return;
			}
			if (!that.password) {
				uni.showToast({ title: '請輸入密碼', icon: 'none' });
				return;
			}
			const loginParams = {}
			loginParams.username = that.username
			loginParams.grant_type = 'password'
			loginParams.password = md5(that.password)
			that.Login(loginParams)
			  .then((res) => this.loginSuccess(res))
			  .catch(err => this.requestFailed(err))
			  .finally(() => {

			})
		},
		loginSuccess (res) {
		  // 判斷是否記住密碼
		  uni.showToast({ title: '登錄成功!', icon: 'none' });
		  uni.switchTab({
		  	url: '/pages/tabBar/component/component',
			fail(err) {
				console.log(err)
			}
		  })
		},
		requestFailed (res) {
		 // 判斷是否記住密碼
		  uni.showToast({ title: '登錄失敗:' + res.msg, icon: 'none' });
		},
		//忘記密碼
		forgotPwd() {
			uni.showToast({ title: '忘記密碼', icon: 'none' });
		},
		//立刻註冊
		reg() {
			uni.showToast({ title: '註冊賬號', icon: 'none' });
		}
	}
};
</script>
<style>
.img-a {
	width: 100%;
	position: absolute;
	bottom: 0;
}
.login-bg {
	height: 100vh;
	background-image: url(/static/login/bg3.png);
}
.t-login {
	width: 580rpx;
	padding: 55rpx;
	margin: 0 auto;
	font-size: 28rpx;
	background-color: #ffffff;
	border-radius: 20rpx;
	box-shadow: 0 5px 7px 0 rgba(0, 0, 0, 0.15);
	z-index: 9;
}
.t-login button {
	font-size: 28rpx;
	background: linear-gradient(to right, #ff8f77, #fe519f);
	color: #fff;
	height: 90rpx;
	line-height: 90rpx;
	border-radius: 50rpx;
}

.t-login input {
	padding: 0 20rpx 0 120rpx;
	height: 90rpx;
	line-height: 90rpx;
	margin-bottom: 50rpx;
	background: #f6f6f6;
	border: 1px solid #f6f6f6;
	font-size: 28rpx;
	border-radius: 50rpx;
}
.t-login .t-a {
	position: relative;
}
.t-login .t-a image {
	width: 40rpx;
	height: 40rpx;
	position: absolute;
	left: 40rpx;
	top: 28rpx;
	padding-right: 20rpx;
}
.t-login .t-b {
	text-align: left;
	font-size: 46rpx;
	color: #000;
	padding: 300rpx 0 120rpx 0;
	font-weight: bold;
}
.t-login .t-d {
	text-align: center;
	color: #999;
	margin: 80rpx 0;
}
.t-login .t-c {
	text-align: right;
	color: #666666;
	margin: 30rpx 30rpx 40rpx 0;
}
.t-login .t-c .t-c-txt {
	margin-right: 300rpx;
}
.t-login .t-e {
	text-align: center;
	width: 600rpx;
	margin: 40rpx auto 0;
}
.t-login .t-g {
	float: left;
	width: 33.33%;
}

.t-login .t-e image {
	width: 70rpx;
	height: 70rpx;
}
.t-login .t-f {
	text-align: center;
	margin: 80rpx 0 0 0;
	color: #999;
}
.t-login .t-f text {
	margin-left: 20rpx;
	color: #b9b9b9;
	font-size: 27rpx;
}
.t-login .uni-input-placeholder {
	color: #aeaeae;
}
.cl {
	zoom: 1;
}
.cl:after {
	clear: both;
	display: block;
	visibility: hidden;
	height: 0;
	content: '\20';
}
</style>
4、將頁面中用到的圖片,複製到/static/login目錄下
5、配置pages.json文件,將新增的login.vue文件目錄加入到配置中。pages.json類似於vue.js工程下的路由頁面配置
6、在App.vue文件的onLaunch方法中新增判斷,當token為空時,跳轉到我們剛剛新建的登錄界面。
			const token = uni.getStorageSync(ACCESS_TOKEN)
			if(!token || token === ''){
				uni.navigateTo({
					url: '/pages/login/login'
				})
			} else {
				console.log('已登錄');
			}
三、在手機模擬器中運行並預覽登錄界面
上文中介紹瞭如果配置HBuilderX連接手機模擬器,預覽並調試uni-app項目,這裡我們通過以上配置和編寫,實現了登錄界面,現在我們可以在手機模擬器中查看剛剛寫的登錄頁面了。
1、啟動手機模擬器 > 雙擊桌面的nox_adb快捷方式
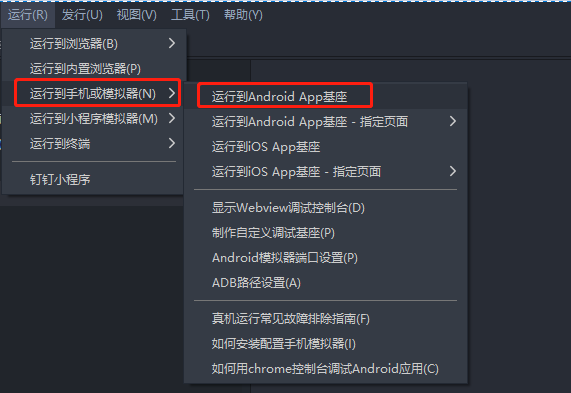
2、在HBuilder X中依次點擊 運行 -> 運行到手機或模擬器 -> 運行到Android App基座
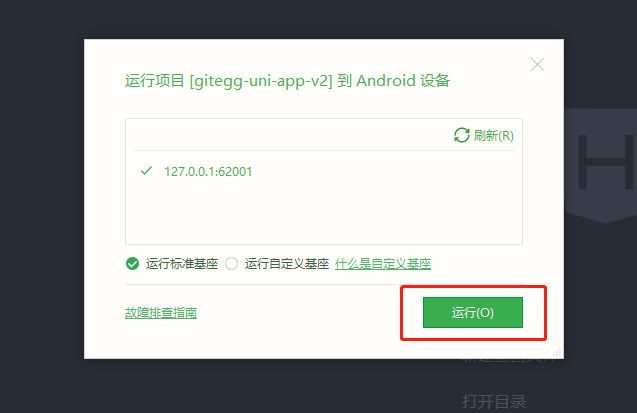
3、彈出框會顯示我們已連接的模擬器,點擊運行,HBuilderX就可以自動打包app發佈到模擬器中運行,並可以在HBuilderX控制台查看運行日誌。
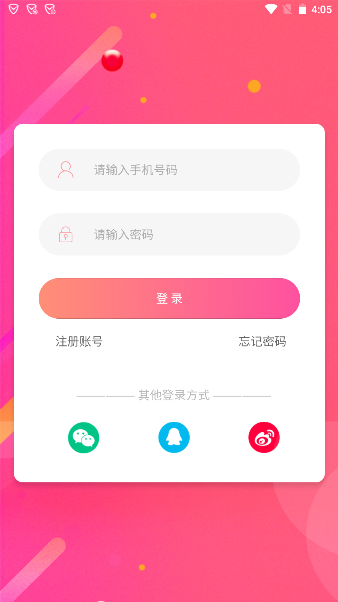
4、在手機模擬器展示的登錄界面中,輸入我們系統用戶的手機號碼 + 密碼,登錄成功後即可跳轉到登錄後的界面。
源碼地址:
Gitee: https://gitee.com/wmz1930/GitEgg
GitHub: https://github.com/wmz1930/GitEgg


