一篇文章帶你掌握主流辦公框架——SpringBoot 在之前的文章中我們已經學習了SSM的全部內容以及相關整合 SSM是Spring的產品,主要用來簡化開發,但我們現在所介紹的這款框架——SpringBoot,卻是用來簡化Spring開發的框架 SpringBoot是由Pivowtal團隊提供的全新 ...
一篇文章帶你掌握主流辦公框架——SpringBoot
在之前的文章中我們已經學習了SSM的全部內容以及相關整合
SSM是Spring的產品,主要用來簡化開發,但我們現在所介紹的這款框架——SpringBoot,卻是用來簡化Spring開發的框架
SpringBoot是由Pivowtal團隊提供的全新框架,其設計目的就是用來簡化Spring應用的初始搭建以及開發過程,用來簡化開發工具的工具,你是否已經滿懷期待~
溫馨提醒:在學習前請學習SSM內容以及Maven的高階內容(依賴傳遞)等內容
SpringBoot簡介
SpringBoot是由Pivotal團隊提供的全新框架,其設計目的就是用來簡化Spring應用的初始搭建以及開發過程
SpringBoot概述
SpringBoot是針對Spring的繁瑣過程進行優化而產生的框架
Spring程式缺點:
- 配置繁瑣
- 依賴設置繁瑣
SpringBoot程式優點:
- 自動配置
- 起步依賴(簡化依賴配置)
- 輔助功能(內置伺服器等)
SpringBoot項目開發
我們通過一個簡單的SpringBoot案例和SSM案例的比較來展現SpringBoot的優勢
SSM框架構造
首先我們回憶一下SSM框架的基本構造圖:

我們來總結一些SSM框架必備的一些文檔:
- pom.xml配置文檔
- ServletConfig配置Java類
- SpringMvcConfig配置Java類
- Collector服務層Java文檔
SpringBoot框架構造
相對而言,我們的SpringBoot將SSM的框架內容隱藏起來,達到簡化框架的作用
我們下麵來介紹創建一個SpringBoot框架的具體步驟:
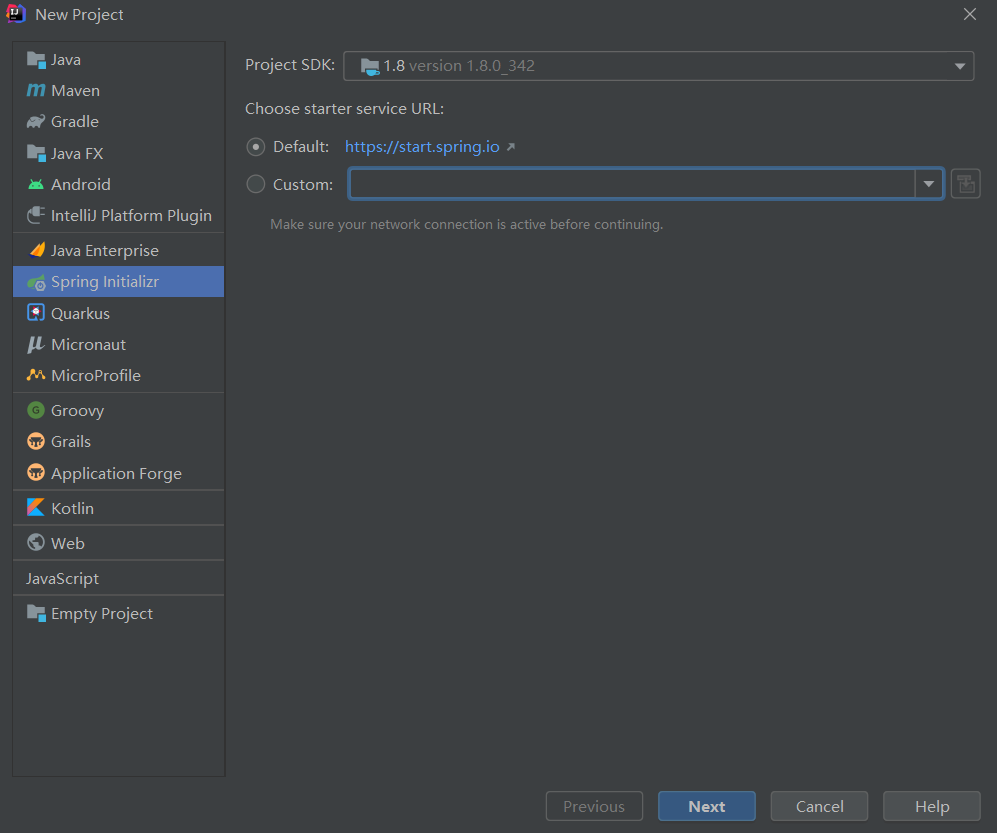
- IDEA創建新項目,選擇SpringBoot框架,JDK選擇1.8版本(Default預設在網頁下載,需要聯網)
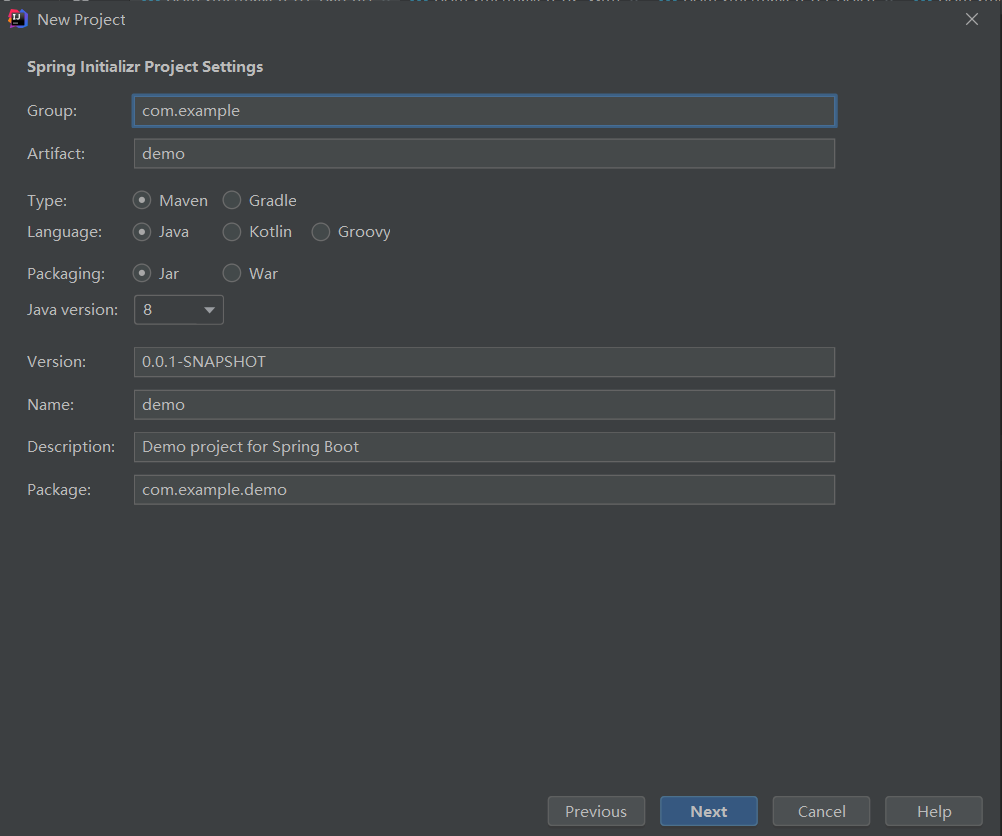
- 選擇Maven,Java,jar等相關選項,註意選擇Java8(目前SpringBoot只支持Java8的版本)
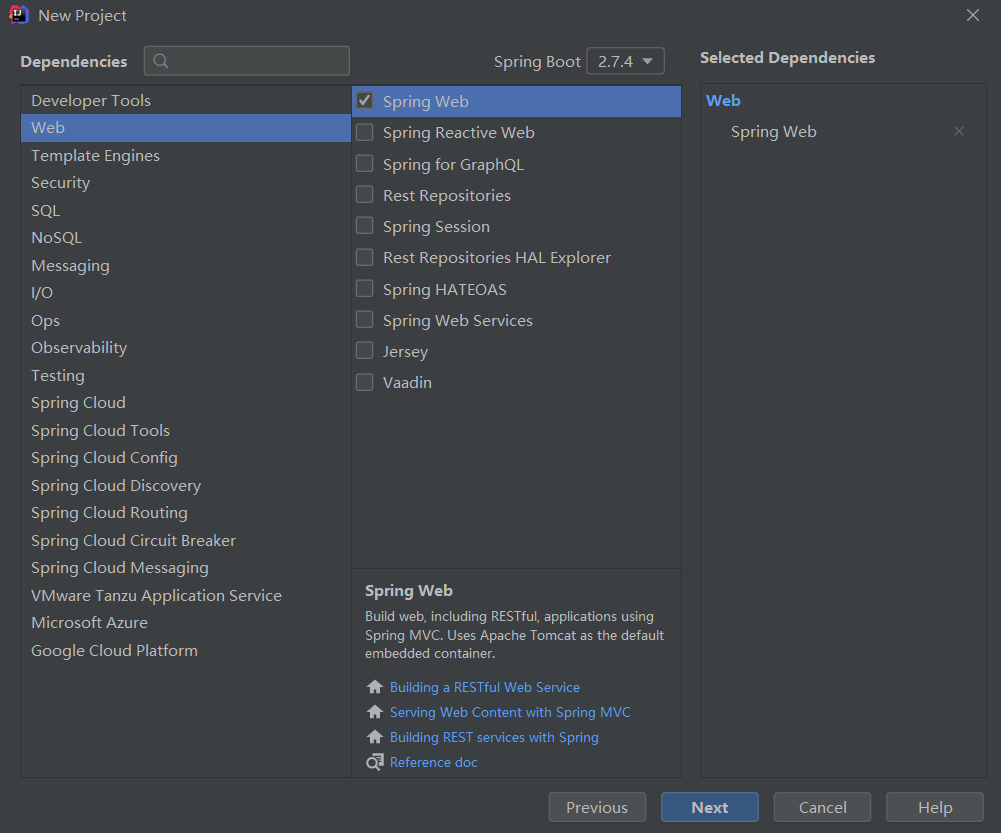
- 選擇Web中的SpringWeb,確保右側存在Spring Web選項(上方可選擇SpringBoot版本)
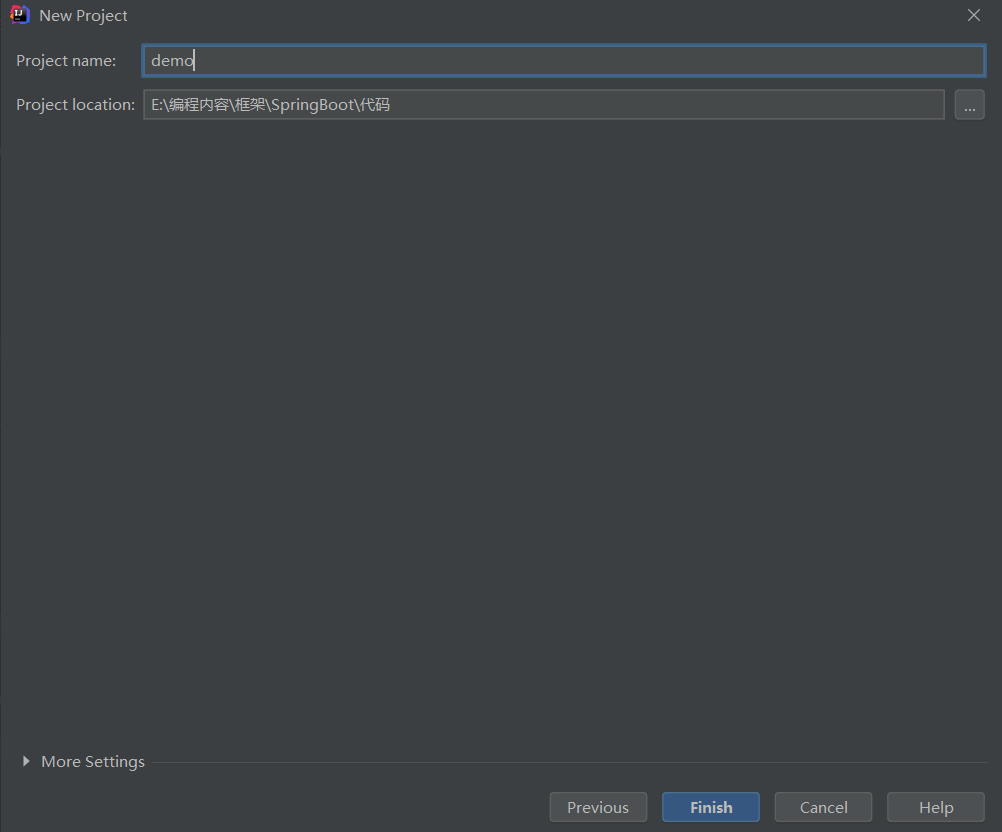
- 創建項目即可
- 刪除無關項目,只保留src和pom.xml即可
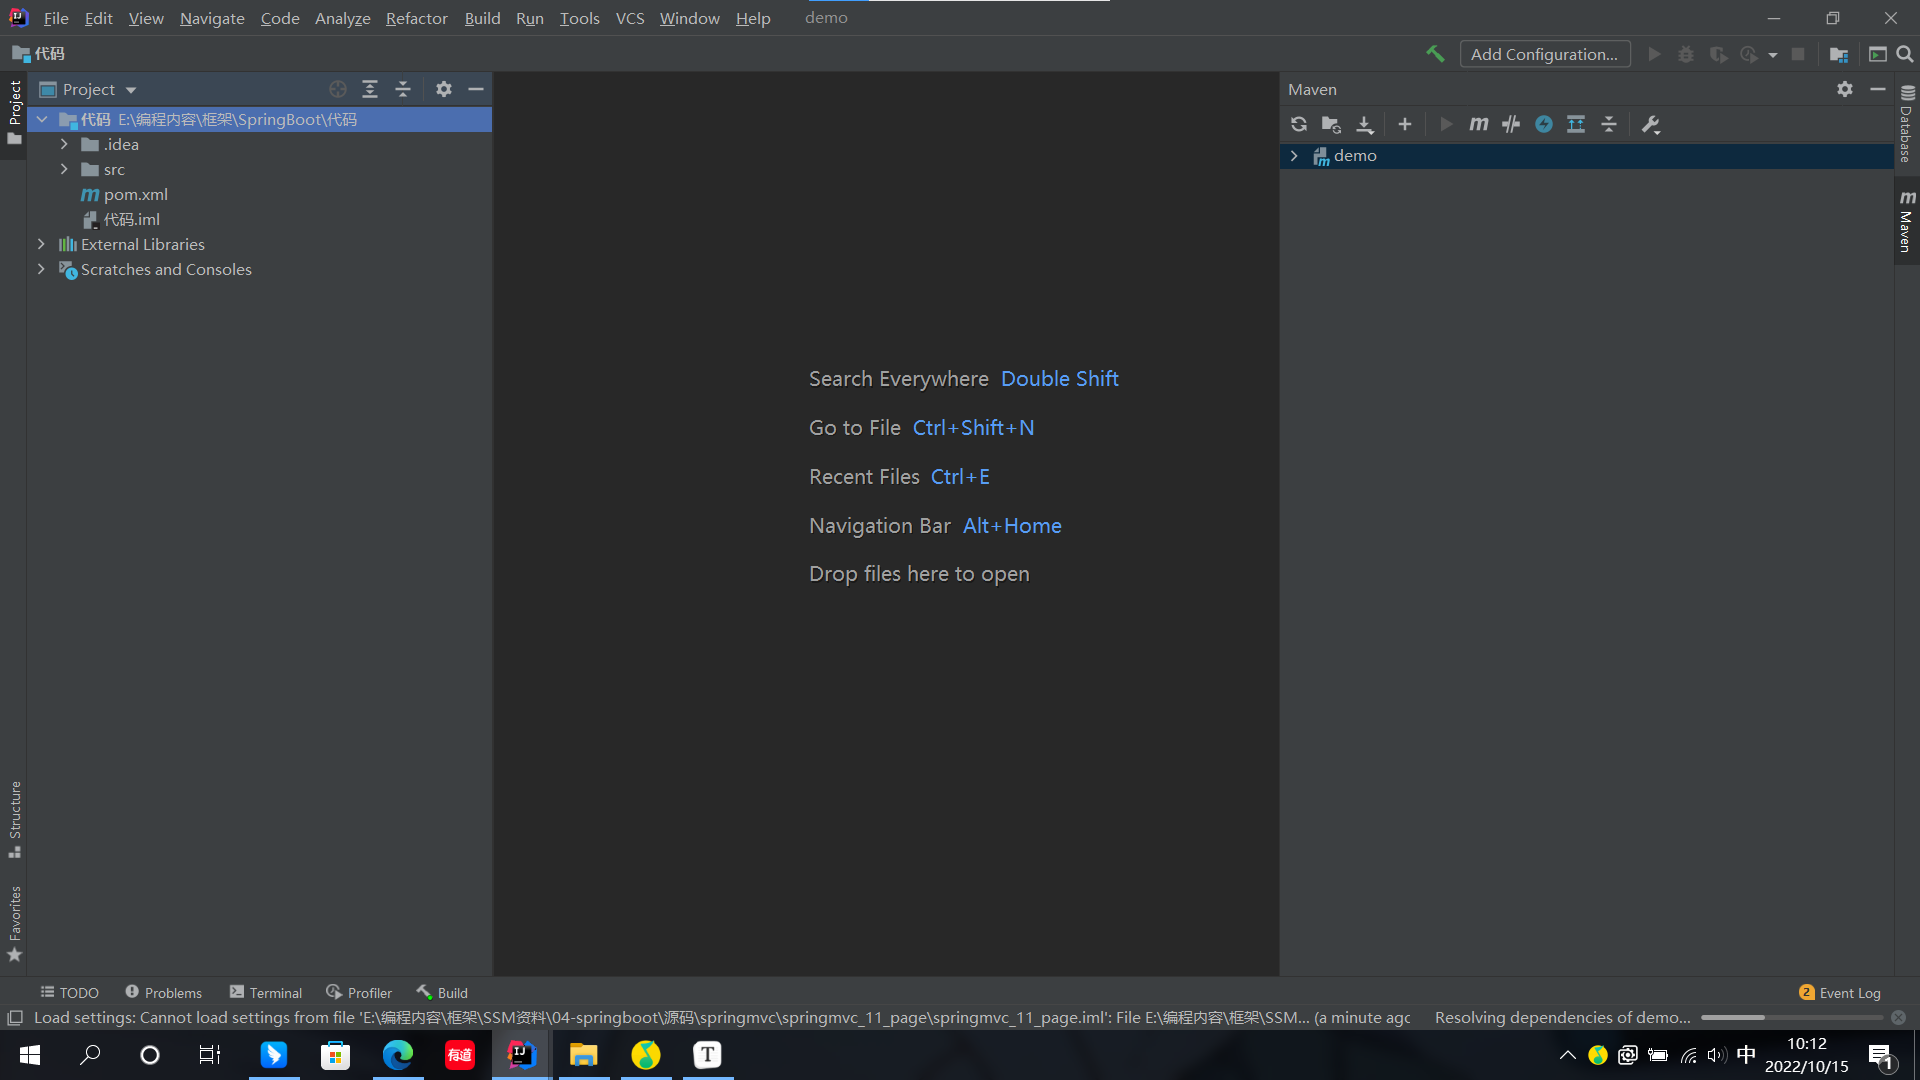
- 我們僅需書寫一個Collector相關類即可
package com.itheima.controller;

import org.springframework.web.bind.annotation.GetMapping;
import org.springframework.web.bind.annotation.PathVariable;
import org.springframework.web.bind.annotation.RequestMapping;
import org.springframework.web.bind.annotation.RestController;

@RestController
@RequestMapping("/books")
public class BookController {

    @GetMapping("/{id}")
    public String getById(@PathVariable Integer id){
        System.out.println("id ==> "+id);
        return "hello , spring boot!";
    }

}
- 點擊啟動Application.java文件即可(由系統自動創建)
package com.itheima;

import org.springframework.boot.SpringApplication;
import org.springframework.boot.autoconfigure.SpringBootApplication;

@SpringBootApplication
public class Application {

    public static void main(String[] args) {
        SpringApplication.run(Application.class, args);
    }

}
以上至此,我們的SpringBoot項目就開發完畢了
除此之外,我們的SpringBoot的核心內容實際上存在於pom.xml中,我們會在下述內容中進行介紹
<?xml version="1.0" encoding="UTF-8"?>
<project xmlns="http://maven.apache.org/POM/4.0.0" xmlns:xsi="http://www.w3.org/2001/XMLSchema-instance"
         xsi:schemaLocation="http://maven.apache.org/POM/4.0.0 https://maven.apache.org/xsd/maven-4.0.0.xsd">
    <modelVersion>4.0.0</modelVersion>
    <parent>
        <groupId>org.springframework.boot</groupId>
        <artifactId>spring-boot-starter-parent</artifactId>
        <version>2.5.0</version>
    </parent>

    <groupId>com.itheima</groupId>
    <artifactId>springboot_01_quickstart</artifactId>
    <version>0.0.1-SNAPSHOT</version>

    <properties>
        <java.version>1.8</java.version>
    </properties>

    <dependencies>
        <dependency>
            <groupId>org.springframework.boot</groupId>
            <artifactId>spring-boot-starter-web</artifactId>
        </dependency>

        <dependency>
            <groupId>org.springframework.boot</groupId>
            <artifactId>spring-boot-starter-test</artifactId>
            <scope>test</scope>
        </dependency>
    </dependencies>

    <build>
        <plugins>
            <plugin>
                <groupId>org.springframework.boot</groupId>
                <artifactId>spring-boot-maven-plugin</artifactId>
            </plugin>
        </plugins>
    </build>

</project>
我們會發現需要我們書寫代碼的部分僅僅只有Collector這一部分,相比於SSM框架簡化了並非一點點
SSM框架與SpringBoot框架比較
我們將SSM框架與SpringBoot框架進行簡單的對比:
| 類/配置文件 | Spring | SpringBoot |
|---|---|---|
| pom文件中的坐標 | 手工添加 | 勾選添加 |
| web3.0配置類 | 手工添加 | 無 |
| Spring/SpringMvc配置類 | 手工添加 | 無 |
| 控制器 | 手工添加 | 手工添加 |
我們可以明顯比較出兩者的顯著差距!
註意:基於IDEA開發的SpringBoot框架需要聯網到SpringBoot官網載入程式框架結構
非IDEA進行SpringBoot開發
我們在實際工作中,可能使用的開發工具並非只有IDEA
那麼IDEA中存在有SpringBoot的開發架構,其他不包含SpringBoot開發架構選項的軟體就無法開發了嗎?
我們可以選擇到官網進行jar包下載直接導入開發即可:
- 打開官網(官網地址:Spring Boot)
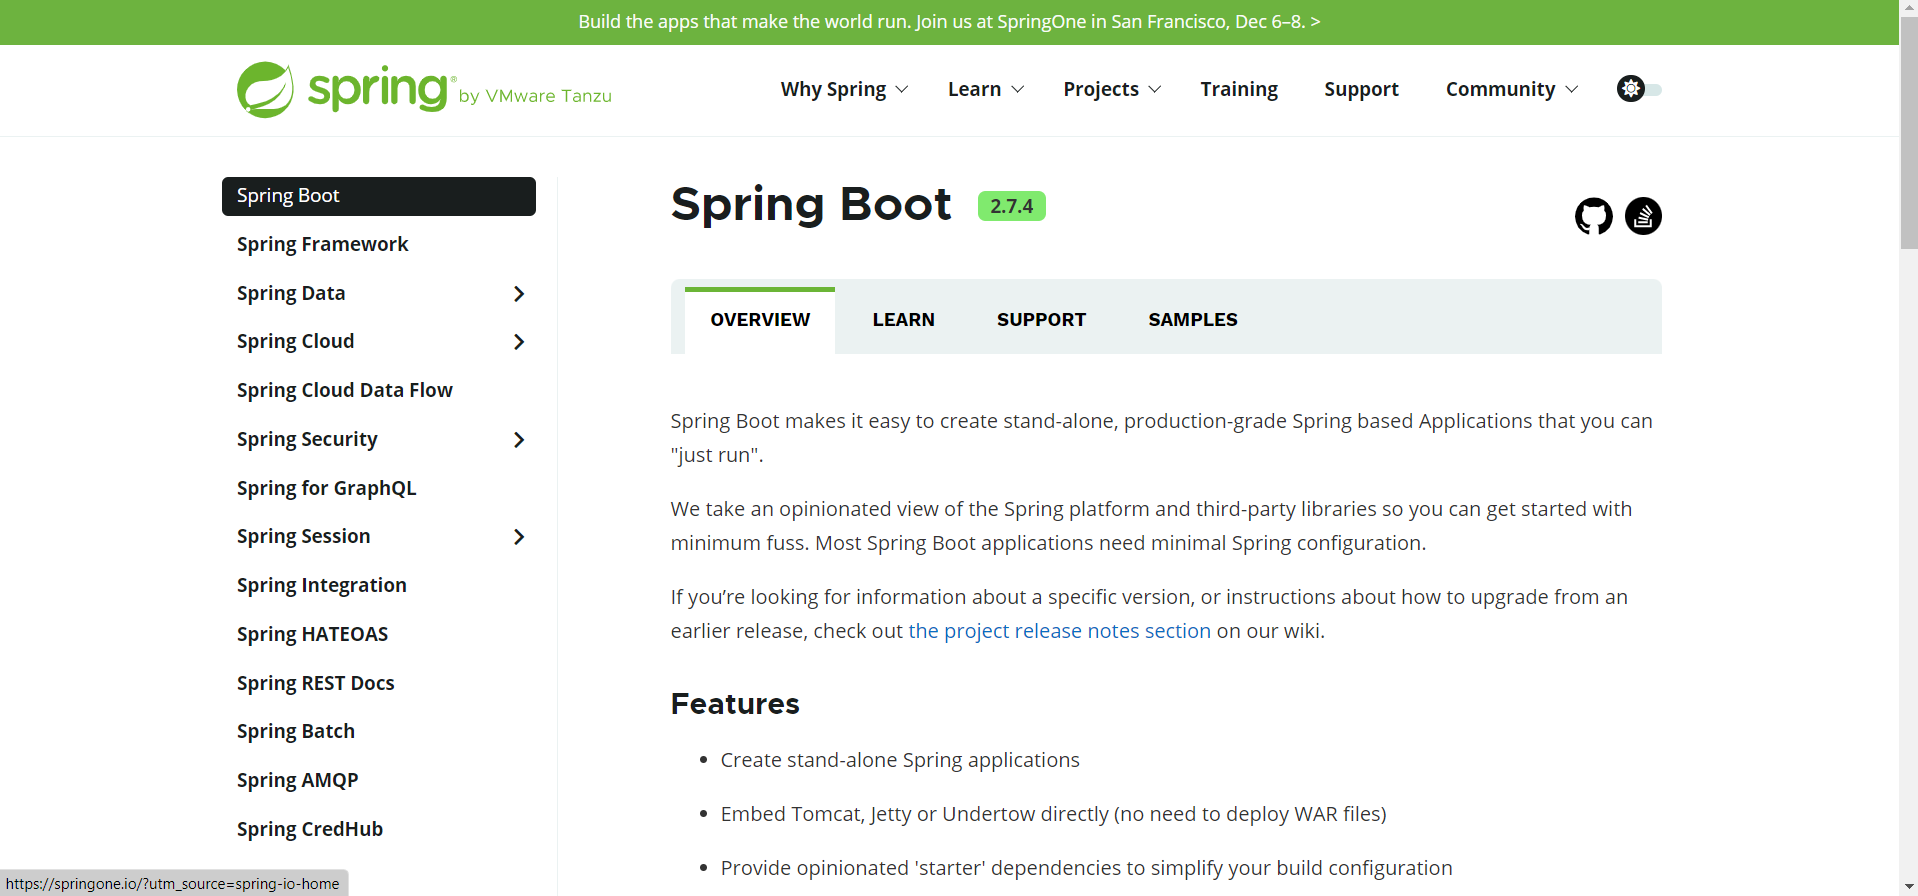
- 拉至頁面底部,找到快速開發標誌,點擊進入創建界面

- 勾選相對應圖標,點擊創建即可
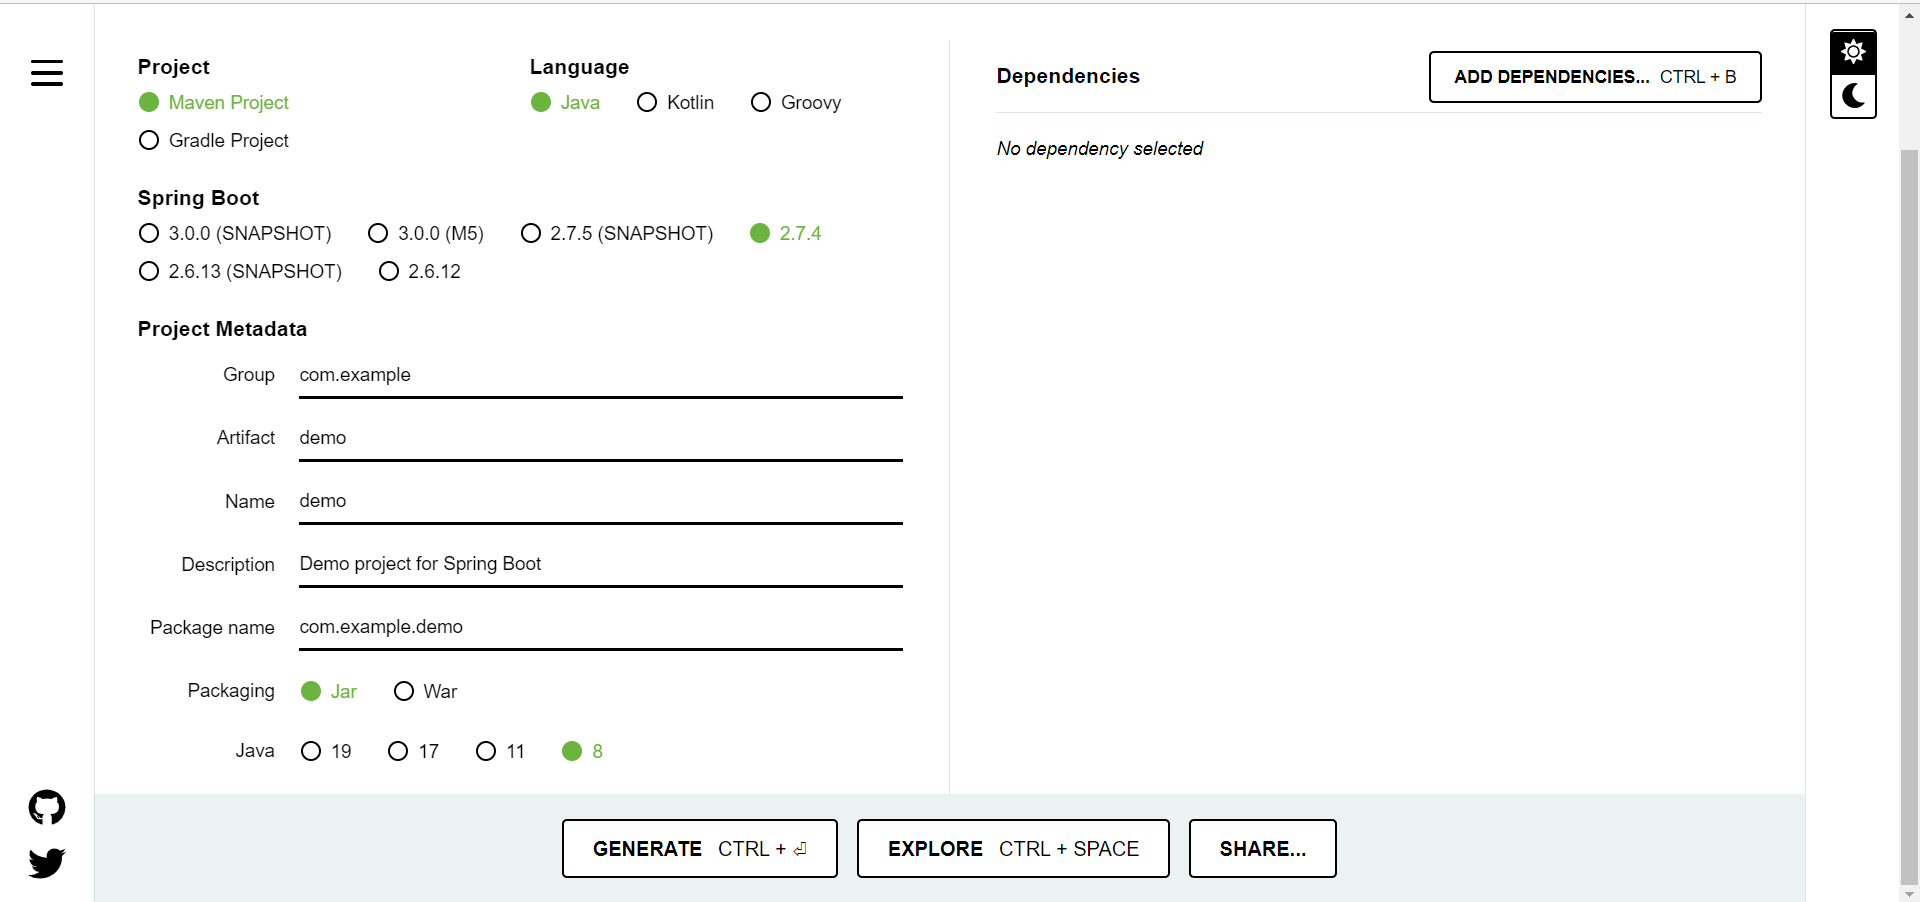
- 創建後會自動下載jar包,直接導入所用軟體即可

SpringBoot快速啟動
我們在實際開發中,常常會做到前後端分離開發
那麼我們的SpringBoot中所使用的伺服器或開發軟體等是否還需要交付給前端呢
SpringBoot為我們提供了一種全新的伺服器開啟方法,我們只需要將SpringBoot打包後交付給前端,前端就可直接進行開啟
- 項目打包
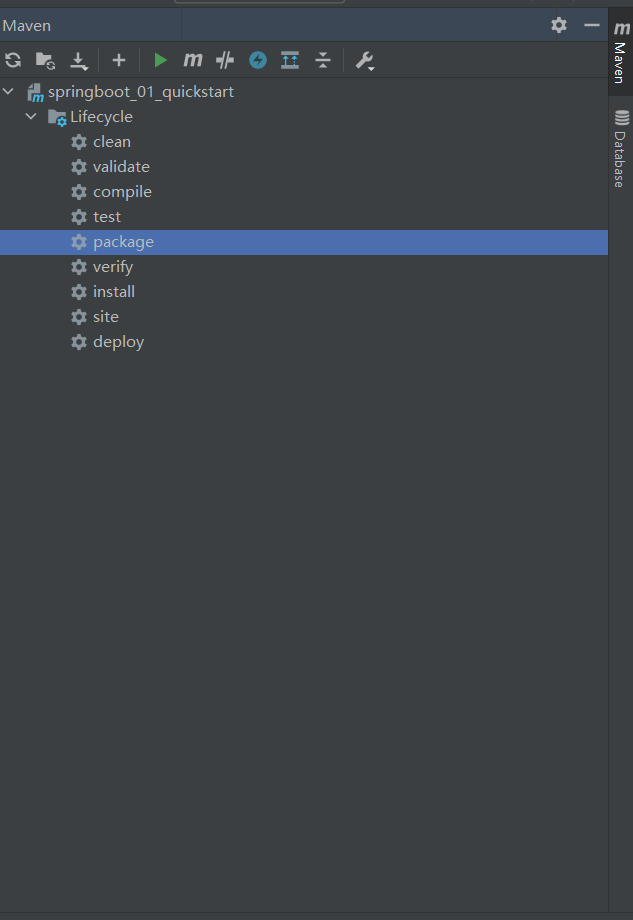
- 打包後在當前頁面採用cmd命令行輸入以下指令即可直接開啟伺服器(註意需要在該jar包的文件夾目錄下)
java -jar SpringBoot文件包名.jar(可tab鍵補全)
註意點:
我們需要將所需的資料庫信息交付給前端,因為SpringBoot只負責項目的開啟,與資料庫無關
該方法是由一種pom.xml中的插件支持的,請確保存在該插件(SpringBoot自動創建)
    <build>
        <plugins>
            <plugin>
                <groupId>org.springframework.boot</groupId>
                <artifactId>spring-boot-maven-plugin</artifactId>
            </plugin>
        </plugins>
    </build>
SpringBoot起步依賴
在簡單介紹SpringBoot的項目開發之後,你是否有疑惑為什麼SpringBoot能夠省略如此多的信息來直接開發
其實這一切都是源於SpringBoot的依賴的直接創建,我們稱之為起步依賴:
- parent起步依賴繼承
- starter起步依賴繼承
我們給出部分pom.xml配置文件內部進行分析:
<?xml version="1.0" encoding="UTF-8"?>
<project xmlns="http://maven.apache.org/POM/4.0.0" xmlns:xsi="http://www.w3.org/2001/XMLSchema-instance"
         xsi:schemaLocation="http://maven.apache.org/POM/4.0.0 https://maven.apache.org/xsd/maven-4.0.0.xsd">
    <modelVersion>4.0.0</modelVersion>

    <!----ctrl+左鍵 可以查看源碼>

    <!--Maven的繼承機制,繼承了spring-boot-starter-parent配置文件,再點開查看父類spring-boot-dependencies-->
    <!--spring-boot-dependencies里包含了大量的properties,dependencyManagement,build可供選擇使用-->
    <parent>
        <groupId>org.springframework.boot</groupId>
        <artifactId>spring-boot-starter-parent</artifactId>
        <version>2.5.0</version>
    </parent>

    <groupId>com.itheima</groupId>
    <artifactId>springboot_01_quickstart</artifactId>
    <version>0.0.1-SNAPSHOT</version>

    <!--固定使用1.8JDK-->
    <properties>
        <java.version>1.8</java.version>
    </properties>

    <!--起步依賴,查看源碼可以查看到關於SpringMvc的相關依賴,包括SpringMVC和Tomcat-->
    <dependencies>
        <dependency>
            <groupId>org.springframework.boot</groupId>
            <artifactId>spring-boot-starter-web</artifactId>
        </dependency>

    <!--起步依賴,查看源碼可以查看到test的相關依賴-->
        <dependency>
            <groupId>org.springframework.boot</groupId>
            <artifactId>spring-boot-starter-test</artifactId>
            <scope>test</scope>
        </dependency>
    </dependencies>

    <!--打包插件,直接運行伺服器-->
    <build>
        <plugins>
            <plugin>
                <groupId>org.springframework.boot</groupId>
                <artifactId>spring-boot-maven-plugin</artifactId>
            </plugin>
        </plugins>
    </build>

</project>
總而言之,SpringBoot創建時自帶的一系列起步依賴幫助我們簡化了大量SSM的繁瑣操作
我們再來詳細介紹幾個詞語:
Starter:
- SpringBoot中常見項目名稱,定義了當前項目使用的所有項目坐標,以達到減少依賴配置的目的
Parent:
- 所有SpringBoot項目要繼承的項目,定義了若幹個坐標版本號(依賴管理,並非依賴),以達到減少衝突的目的
實際開發:
- 使用任意坐標時,僅書寫GAV中的G和A,不需要書寫V
- 如若發生坐標錯誤,再指定Version(小心版本衝突)
SpringBoot程式啟動
SpringBoot程式啟動方法就是開啟Application.java文件即可
package com.itheima;

import org.springframework.boot.SpringApplication;
import org.springframework.boot.autoconfigure.SpringBootApplication;

@SpringBootApplication
public class Application {

    public static void main(String[] args) {
        SpringApplication.run(Application.class, args);
    }

}
我們給出兩個註意點:
- SpringBoot在創建項目時,採用jar的打包方式
- SpringBoot的引導類是項目的入口,運行main方法就可以啟動項目
SpringBoot切換伺服器
我們最後給出一個Maven使用技巧來切換伺服器
SpringBoot中預設使用Tomcat伺服器並安裝了對應插件,
那麼我們如果想切換伺服器,只需要排除掉Tomcat插件,並添加新的插件即可
<?xml version="1.0" encoding="UTF-8"?>
<project xmlns="http://maven.apache.org/POM/4.0.0" xmlns:xsi="http://www.w3.org/2001/XMLSchema-instance"
         xsi:schemaLocation="http://maven.apache.org/POM/4.0.0 https://maven.apache.org/xsd/maven-4.0.0.xsd">
    <modelVersion>4.0.0</modelVersion>
    <parent>
        <groupId>org.springframework.boot</groupId>
        <artifactId>spring-boot-starter-parent</artifactId>
        <version>2.5.0</version>
    </parent>

    <groupId>com.itheima</groupId>
    <artifactId>springboot_01_quickstart</artifactId>
    <version>0.0.1-SNAPSHOT</version>

    <properties>
        <java.version>1.8</java.version>
    </properties>

    <!--我們採用排除依賴的方法去除tomcat伺服器-->
    <dependencies>
        <dependency>
            <groupId>org.springframework.boot</groupId>
            <artifactId>spring-boot-starter-web</artifactId>
            <exclusions>
                <exclusion>
                    <groupId>org.springframework.boot</groupId>
                    <artifactId>spring-boot-starter-tomcat</artifactId>
                </exclusion>
            </exclusions>
        </dependency>

        <!--我們新添新的jetty伺服器坐標即可-->
        <dependency>
            <groupId>org.springframework.boot</groupId>
            <artifactId>spring-boot-starter-jetty</artifactId>
        </dependency>

        <dependency>
            <groupId>org.springframework.boot</groupId>
            <artifactId>spring-boot-starter-test</artifactId>
            <scope>test</scope>
        </dependency>
    </dependencies>

    <build>
        <plugins>
            <plugin>
                <groupId>org.springframework.boot</groupId>
                <artifactId>spring-boot-maven-plugin</artifactId>
            </plugin>
        </plugins>
    </build>

</project>
SpringBoot基礎配置
我們在Spring中能夠實現的技術,在SpringBoot中同樣可以實現
接下來我們依次來介紹一些SpringBoot基本配置的方法和多環境開發的問題
SpringBoot配置格式
SpringBoot為我們提供了三種配置格式來管理SpringBoot的配置(註意:以下配置均存在於resources文件夾中):
- application.properties
# 修改伺服器埠號為80
server.port=80
- application.yml (主流)
# 修改伺服器埠號為81(註意:存在空格)
server:
 port: 81
- application.yaml
# 修改伺服器埠號為82(註意:存在空格)
server:
 port: 82
當三者均存在時,其優先順序為:application.properties>application.yml >application.yaml
以上三種配置格式均在resources文件夾下創建相對應名稱以及尾碼的文件下書寫:
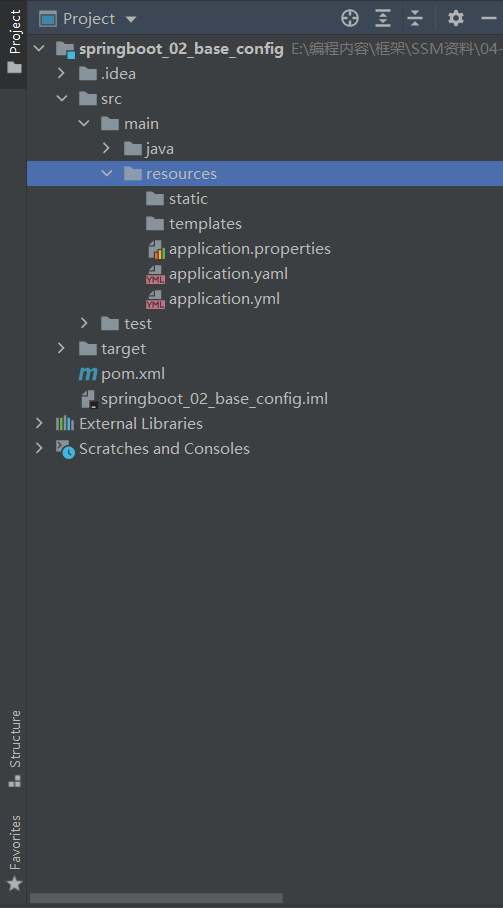
註意:
application.properties屬於SpringBoot自帶,不需要創建
application.yml,application.yaml需要自我創建,因而不被標記為配置文件
如果我們希望該文件被標記為配置文件並包含有補全功能,我們需要手動設置為配置文件
yaml文件詳細介紹
我們在這裡詳細介紹一下yaml文件:
- YAML,一種數據序列化格式
優點:
- 容易閱讀
- 容易與腳本語言交互
- 以數據為核心,重數據輕格式
YAML文件擴展名:
- .yml(主流)
- .yaml
YAML語法規則:
-
大小寫敏感
-
屬性層級關係
-
使用縮進表示層級關係,同層級左側對齊,只允許使用空格(不能使用tab)
-
屬性值前面添加空格(屬性名與屬性值之間使用冒號+空格作為分隔)
-
# 表示註釋
-
使用 - 來表示數據開始符號(數組)
YAML語法使用規範示例:
server:
  port: 82

logging:
  level:
    root: info

likes:
  - music
  - game
  - PE
YAML的數據讀取方法:
首先我們先給出我們在yml文件中所列出的屬性:
lesson: SpringBoot

server:
  port: 80

enterprise:
  name: itcast
  age: 16
  tel: 4006184000
  subject:
    - Java
    - 前端
    - 大數據
下麵我們來介紹yaml數據讀取的三種方法:
- ${屬性名},${屬性名.屬性名},${屬性名.屬性名[數組下標]}
package com.itheima.controller;

import com.itheima.domain.Enterprise;
import org.springframework.beans.factory.annotation.Autowired;
import org.springframework.beans.factory.annotation.Value;
import org.springframework.core.env.Environment;
import org.springframework.web.bind.annotation.GetMapping;
import org.springframework.web.bind.annotation.PathVariable;
import org.springframework.web.bind.annotation.RequestMapping;
import org.springframework.web.bind.annotation.RestController;

@RestController
@RequestMapping("/books")
public class BookController {
    //使用@Value讀取單一屬性數據
    @Value("${lesson}")
    private String lesson;
    @Value("${server.port}")
    private Integer port;
    @Value("${enterprise.subject[0]}")
    private String subject_00;

    @GetMapping("/{id}")
    public String getById(@PathVariable Integer id){
        System.out.println(lesson);
        System.out.println(port);
        System.out.println(subject_00);
        return "hello , spring boot!";
    }

}
- Environment對象匹配方法
package com.itheima.controller;

import com.itheima.domain.Enterprise;
import org.springframework.beans.factory.annotation.Autowired;
import org.springframework.beans.factory.annotation.Value;
import org.springframework.core.env.Environment;
import org.springframework.web.bind.annotation.GetMapping;
import org.springframework.web.bind.annotation.PathVariable;
import org.springframework.web.bind.annotation.RequestMapping;
import org.springframework.web.bind.annotation.RestController;

@RestController
@RequestMapping("/books")
public class BookController {

    //使用Environment封裝全配置數據(自動裝配封裝Environment,裡面會包含yaml中所有屬性和屬性值)
    @Autowired
    private Environment environment;

    @GetMapping("/{id}")
    public String getById(@PathVariable Integer id){
        // 我們採用environment的getProperty方法,根據屬性名,獲得屬性值
        System.out.println(environment.getProperty("lesson"));
        System.out.println(environment.getProperty("server.port"));
        System.out.println(environment.getProperty("enterprise.age"));
        System.out.println(environment.getProperty("enterprise.subject[1]"));
        return "hello , spring boot!";
    }

}
- 自定義對象封裝指定數據
// 自定義對象Enterprise實現類(屬於Domain)

package com.itheima.domain;

import org.springframework.boot.context.properties.ConfigurationProperties;
import org.springframework.stereotype.Component;

import java.util.Arrays;

//封裝yaml對象格式數據必須先聲明當前實體類受Spring管控
@Component
//使用@ConfigurationProperties註解定義當前實體類讀取配置屬性信息,通過prefix屬性設置讀取哪個數據
@ConfigurationProperties(prefix = "enterprise")
public class Enterprise {
    private String name;
    private Integer age;
    private String tel;
    private String[] subject;

    @Override
    public String toString() {
        return "Enterprise{" +
                "name='" + name + '\'' +
                ", age=" + age +
                ", tel='" + tel + '\'' +
                ", subject=" + Arrays.toString(subject) +
                '}';
    }

    public String getName() {
        return name;
    }

    public void setName(String name) {
        this.name = name;
    }

    public Integer getAge() {
        return age;
    }

    public void setAge(Integer age) {
        this.age = age;
    }

    public String getTel() {
        return tel;
    }

    public void setTel(String tel) {
        this.tel = tel;
    }

    public String[] getSubject() {
        return subject;
    }

    public void setSubject(String[] subject) {
        this.subject = subject;
    }
}
// 服務層Controller

package com.itheima.controller;

import com.itheima.domain.Enterprise;
import org.springframework.beans.factory.annotation.Autowired;
import org.springframework.beans.factory.annotation.Value;
import org.springframework.core.env.Environment;
import org.springframework.web.bind.annotation.GetMapping;
import org.springframework.web.bind.annotation.PathVariable;
import org.springframework.web.bind.annotation.RequestMapping;
import org.springframework.web.bind.annotation.RestController;

@RestController
@RequestMapping("/books")
public class BookController {

    // 自動裝配實現類即可
    @Autowired
    private Enterprise enterprise;


    @GetMapping("/{id}")
    public String getById(@PathVariable Integer id){
        System.out.println(enterprise);
        return "hello , spring boot!";
    }

}
<!--實現自定義對象封裝時會產生警告,我們需要添加以下依賴-->

        <dependency>
            <groupId>org.springframework.boot</groupId>
            <artifactId>spring-boot-configuration-processor</artifactId>
            <optional>true</optional>
        </dependency>
SpringBoot多環境啟動
我們在開發過程中可能會採用不同的環境,頻繁的轉換環境當然不是一個好辦法
SpringBoot選擇配置多環境來控制環境選擇啟動
我們從兩種不同的配置文件方向來講解多環境:
- yaml多環境啟動:
# yaml採用 --- 來表示環境層級更換

# yaml採用 spring:profiles:active: 環境id 設置啟用的環境
spring:
  profiles:
    active: dev

---
#開發環境
#yaml採用 spring:config:activate:on-profile: 環境id 來定義當前環境id(規範寫法)
spring:
  config:
    activate:
      on-profile: dev
#以下屬於環境配置
server:
  port: 80
---
#生產
#yaml採用 spring:profiles: 環境id 來定義當前環境id(舊版寫法,同樣適用)
spring:
  profiles: pro
#以下屬於環境配置
server:
  port: 81
---
#測試
#yaml採用 spring:profiles: 環境id 來定義當前環境id(舊版寫法,同樣適用)
spring:
  profiles: test
#以下屬於環境配置
server:
  port: 82
---
- properties多環境啟動:
# application.properties文件(環境主文件)

#設置啟用的環境
spring.profiles.active=pro
# application-dev.properties文件(環境配置文件)

# 設置相關資源配置
server.port=8080
# application-pro.properties文件(環境配置文件)

# 設置相關資源配置
server.port=8081
# application-test.properties文件(環境配置文件)

# 設置相關資源配置
server.port=8082
SpringBoot前端多環境啟動
我們前面提及過SpringBoot的快速啟動直接將jar包打包後發給前端就可以採用命令行啟動伺服器
但是我們的配置可能會導致更多的細節問題:
- 當我們的yaml出現中文註釋時,需要將IDEA的encoding均設置為UTF-8
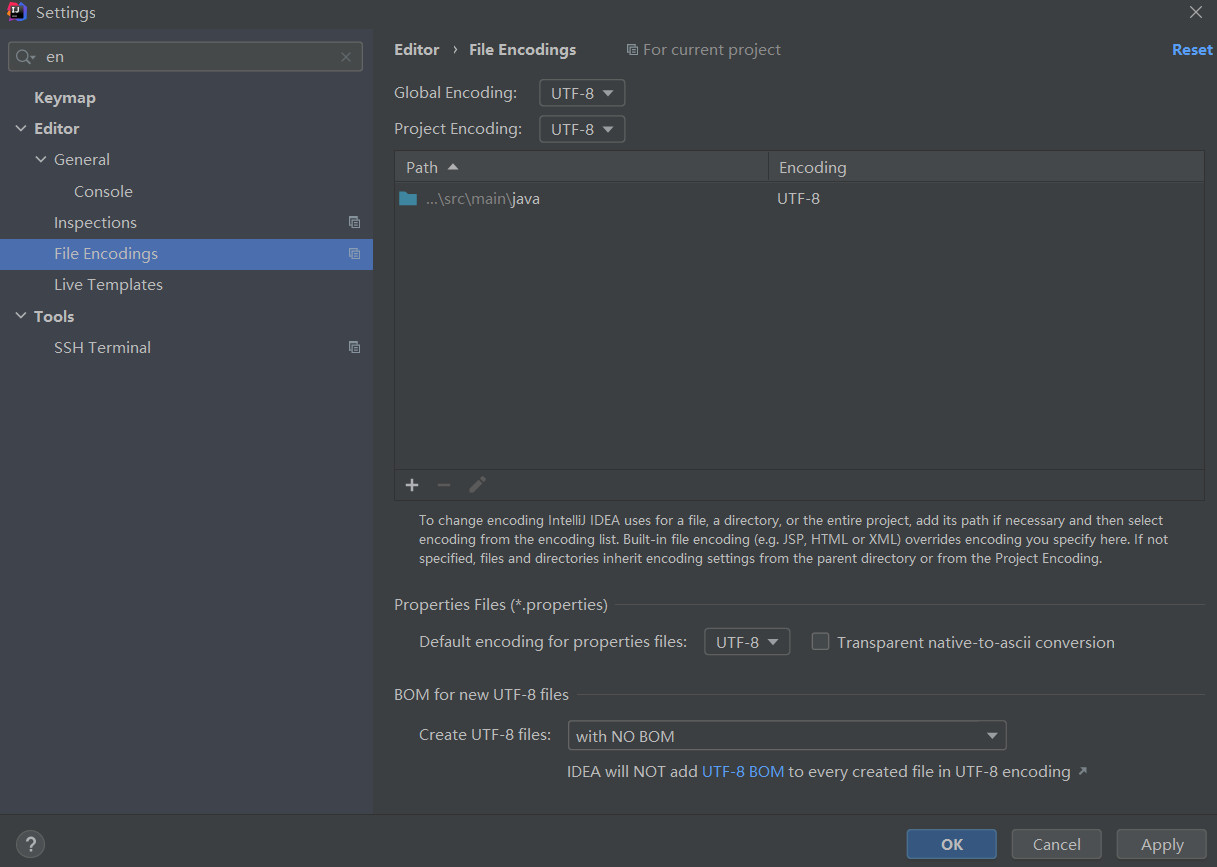
- 當我們的前端需要不同的環境配置時,我們不能在後臺手動設置預設環境,因而需要採用指令設置
前端在調用時,可以採用指令來更改預設環境

預設開啟伺服器
java -jar jar包名稱.jar

更換預設條件開啟伺服器樣板
java -jar jar包名稱.jar --配置屬性=配置值

更換預設環境開啟伺服器
java -jar jar包名稱.jar --spring.profiles.active=test

更換預設埠號開啟伺服器
java -jar jar包名稱.jar --server.port=88

更換條件可以疊加使用
java -jar jar包名稱.jar --spring.profiles.active=test --server.port=88
SpringBoot多環境相容問題
SpringBoot中存在有很多的環境設置,不僅如此,包括有Maven也存在有多環境配置
那麼Maven的多環境配置優先順序和SpringBoot的多環境配置優先順序誰的更高呢?
- 我們的package操作是由Maven來完成的
- 多環境優先順序:Maven > SpringBoot
我們通過一個簡單的案例來證明:
- Maven中配置多環境屬性
<?xml version="1.0" encoding="UTF-8"?>
<project xmlns="http://maven.apache.org/POM/4.0.0" xmlns:xsi="http://www.w3.org/2001/XMLSchema-instance"
         xsi:schemaLocation="http://maven.apache.org/POM/4.0.0 https://maven.apache.org/xsd/maven-4.0.0.xsd">
    <modelVersion>4.0.0</modelVersion>
    <parent>
        <groupId>org.springframework.boot</groupId>
        <artifactId>spring-boot-starter-parent</artifactId>
        <version>2.5.0</version>
    </parent>
    <groupId>com.itheima</groupId>
    <artifactId>springboot_05_maven_and_boot_profile</artifactId>
    <version>0.0.1-SNAPSHOT</version>
    <properties>
        <java.version>1.8</java.version>
    </properties>
    <dependencies>
        <dependency>
            <groupId>org.springframework.boot</groupId>
            <artifactId>spring-boot-starter-web</artifactId>
        </dependency>

        <dependency>
            <groupId>org.springframework.boot</groupId>
            <artifactId>spring-boot-starter-test</artifactId>
            <scope>test</scope>
        </dependency>
    </dependencies>

    <build>
        <plugins>
            <plugin>
                <groupId>org.springframework.boot</groupId>
                <artifactId>spring-boot-maven-plugin</artifactId>
            </plugin>
            <!--開啟${}占位符作用於yaml文件中的解析-->
            <plugin>
                <groupId>org.apache.maven.plugins</groupId>
                <artifactId>maven-resources-plugin</artifactId>
                <version>3.2.0</version>
                <configuration>
                    <encoding>UTF-8</encoding>
                    <useDefaultDelimiters>true</useDefaultDelimiters>
                </configuration>
            </plugin>
        </plugins>
    </build>

    <!--配置多個環境-->
    <profiles>
        <!--開發環境-->
        <profile>
            <id>dev</id>
            <!--給出屬性值-->
            <properties>
                <profile.active>dev</profile.active>
            </properties>
        </profile>
        <!--生產環境-->
        <profile>
            <id>pro</id>
            <!--給出屬性值-->
            <properties>
                <profile.active>pro</profile.active>
            </properties>
            <!--預設為生產環境-->
            <activation>
                <activeByDefault>true</activeByDefault>
            </activation>
        </profile>
        <!--測試環境-->
        <profile>
            <id>test</id>
            <!--給出屬性值-->
            <properties>
                <profile.active>test</profile.active>
            </properties>
        </profile>
    </profiles>

</project>
- SpringBoot配置文件中引入Maven屬性
# 設置啟用的環境
# 採用${}引用Maven中的屬性
spring:
  profiles:
    active: ${profile.active}

---
#開發
spring:
  profiles: dev
server:
  port: 80
---
#生產
spring:
  profiles: pro
server:
  port: 81
---
#測試
spring:
  profiles: test
server:
  port: 82
---
- 打包並開啟伺服器後,查看埠號
埠號為81
那麼關於Maven的測試就到這裡結束
SpringBoot配置文件分類
我們的環境配置可以寫於許多位置,由此我們大致分為四類:
- classpath:application.yml[最低](Resources的一層配置中)
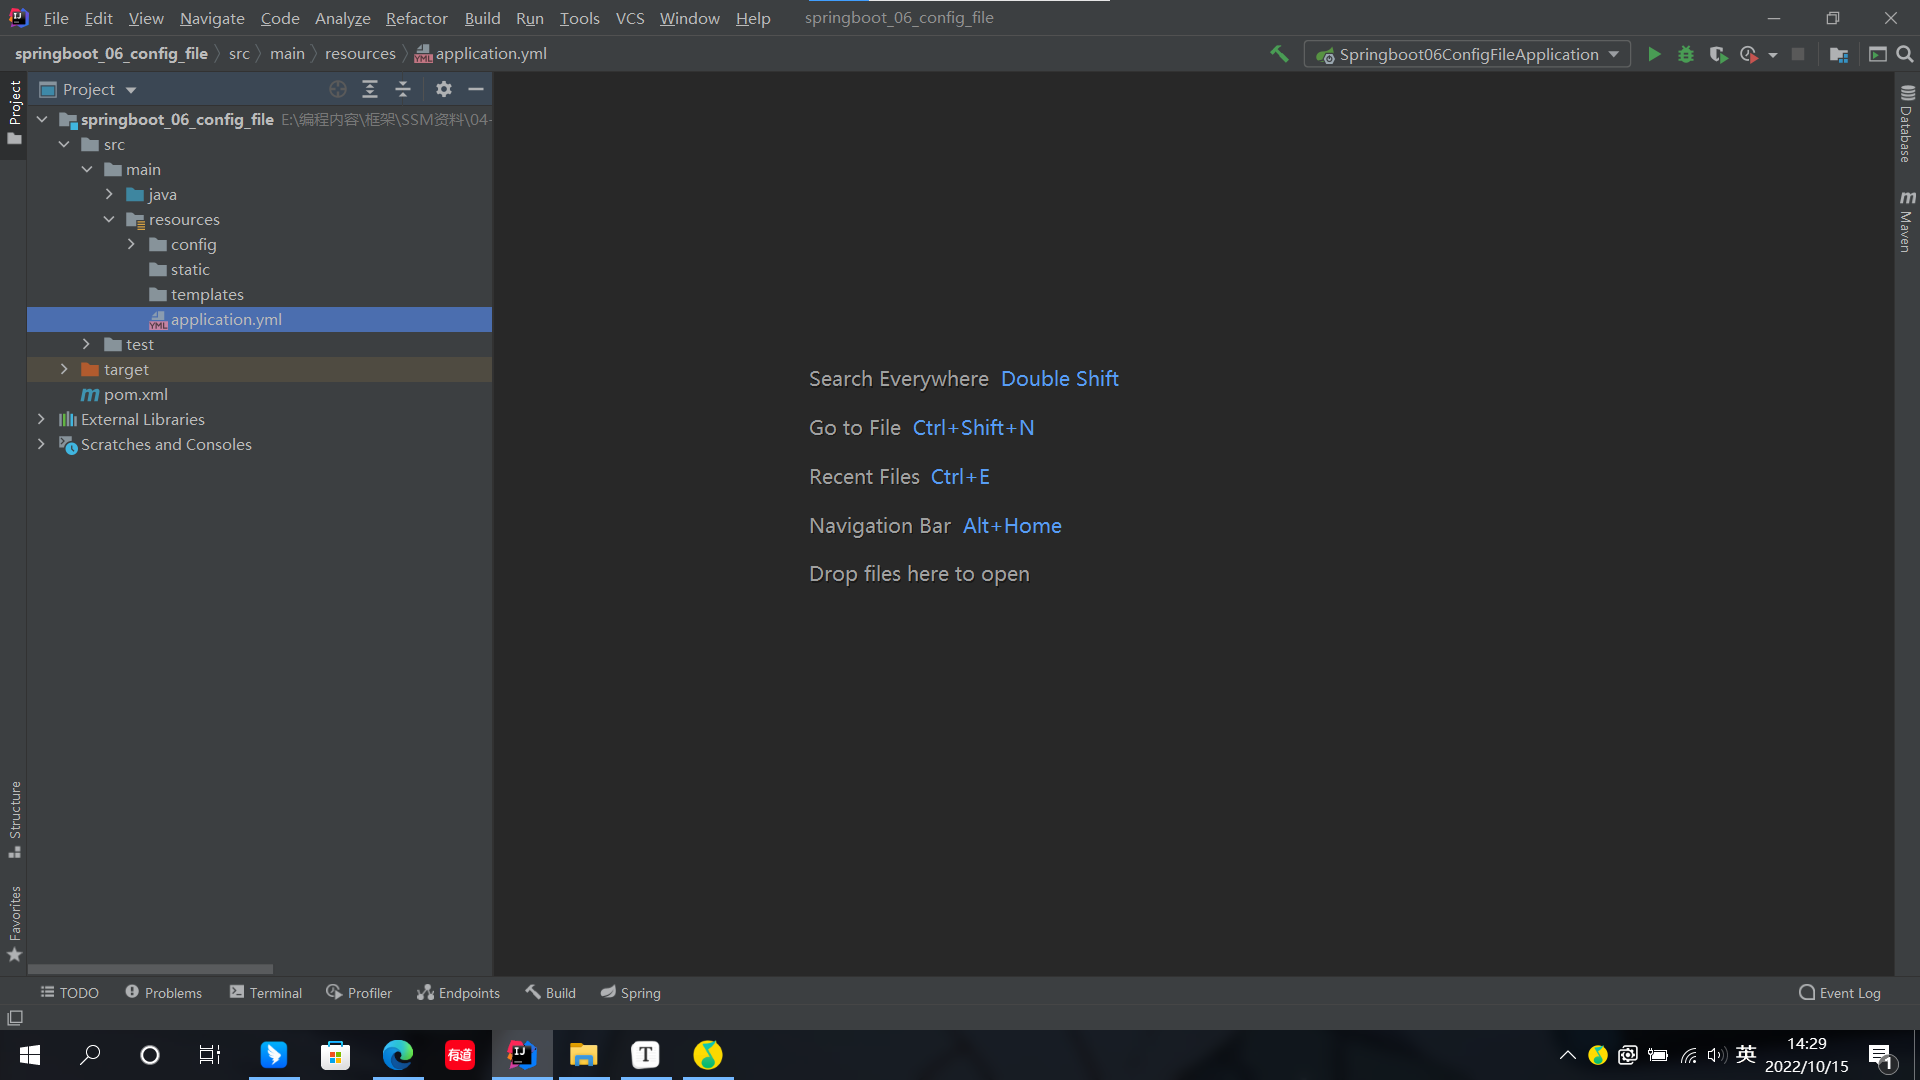
- classpath:config/application.yml(Resources的二層配置中)
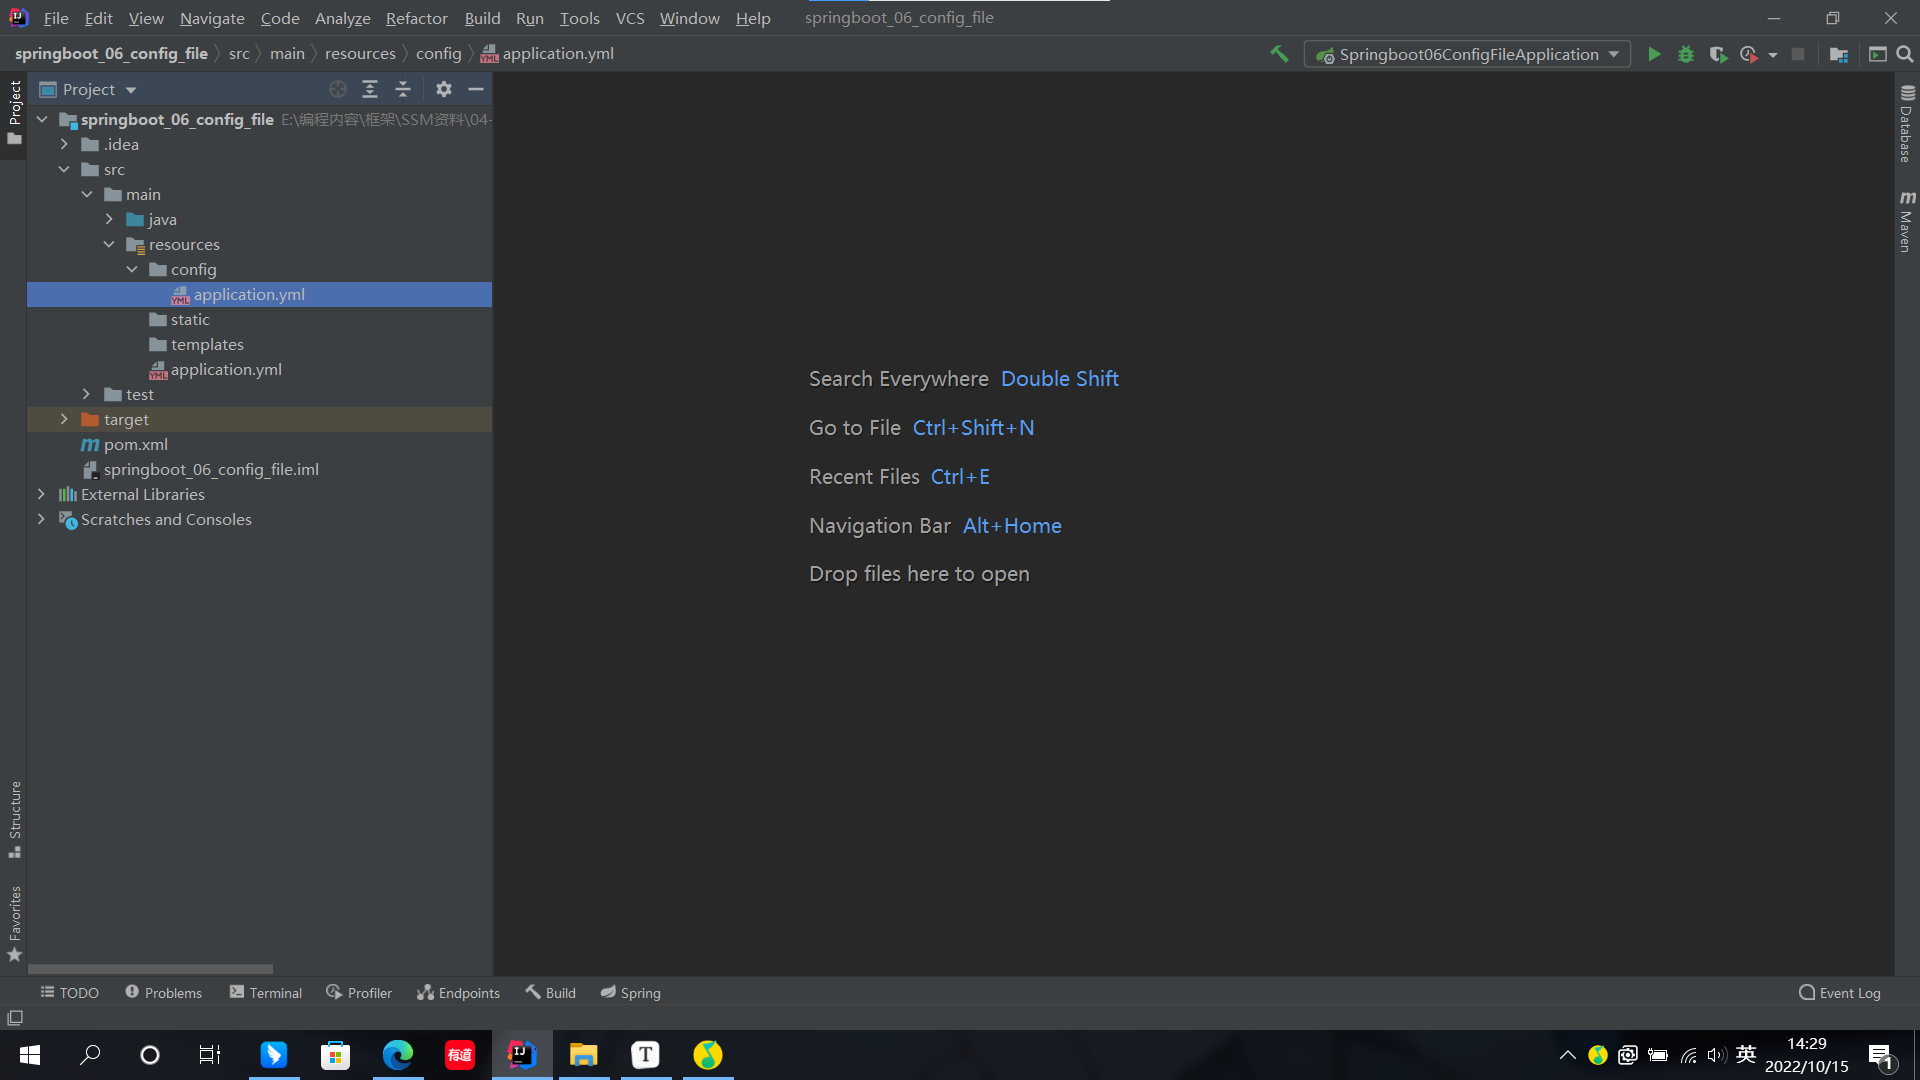
- classpath:config/application.yml(package後jar包同目錄下的配置文件)
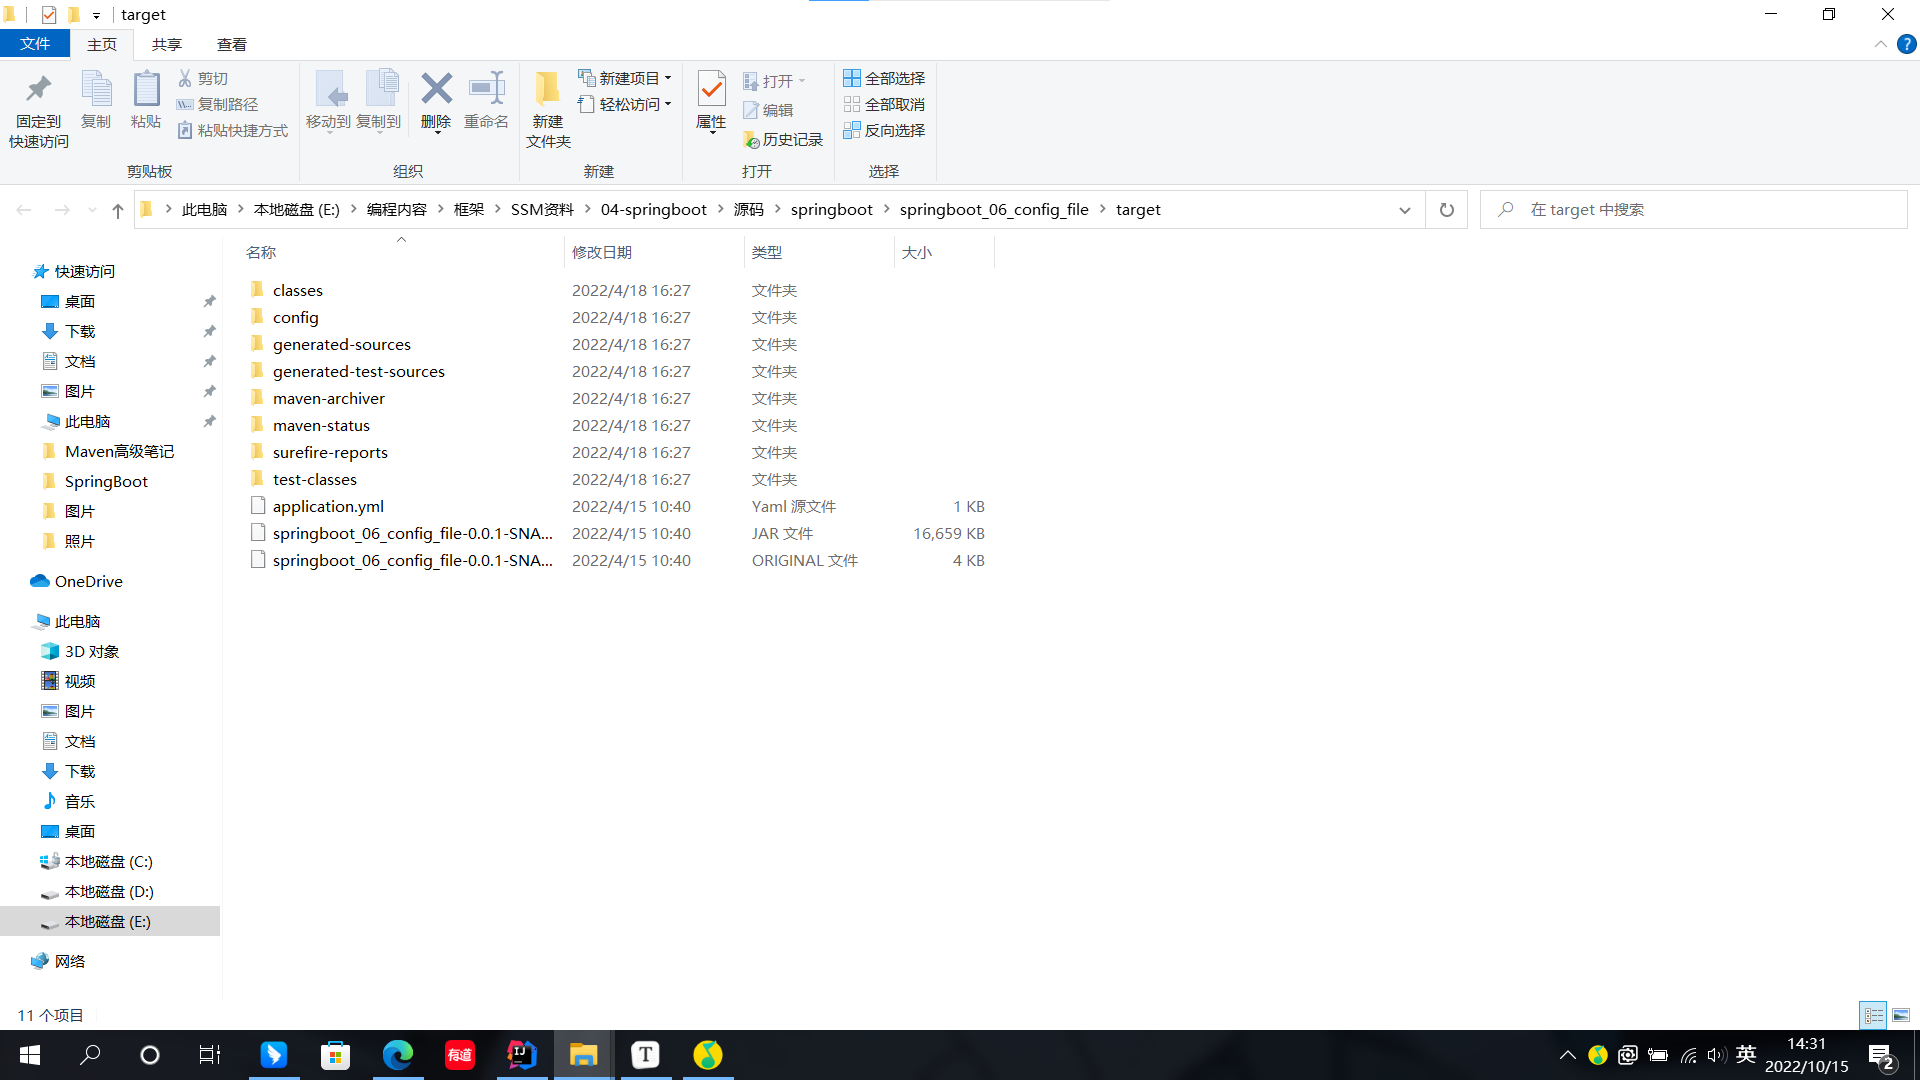
- file:config/application.yml[最高]
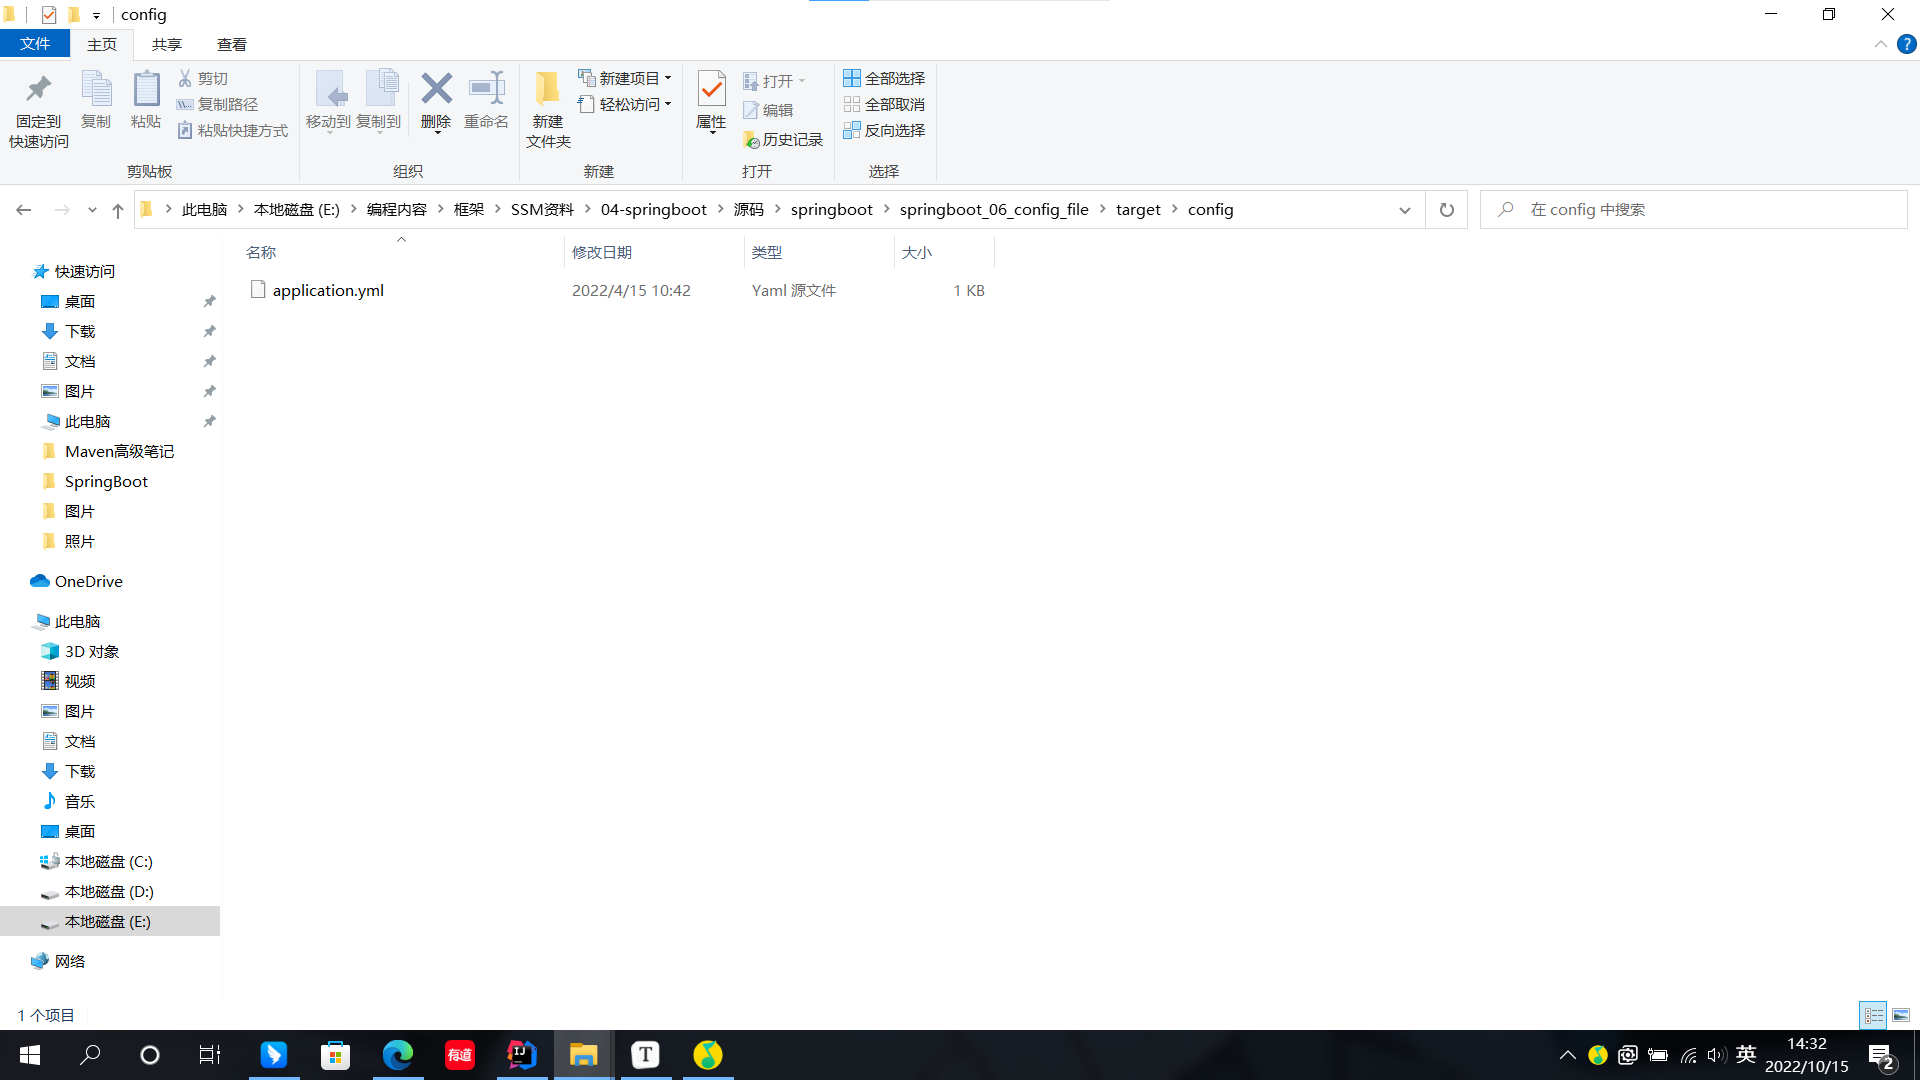
我們將這些位置進行分類併排出優先順序:
- 1級:file:config/application.yml[最高]
- 2級:file:application.yml
- 3級:classpath:config/application.yml
- 4級:classpath:application.yml[最低]
不同位置環境配置作用:
- 1級與2級留作系統打包後設置通用屬性
- 3級與4級用於系統開發階段設置通用屬性
SpringBoot整合第三方技術
在基本介紹了SpringBoot之後,我們介紹最重要的一部分——整合第三方技術
下麵我們以三個小案例來展現SpringBoot的整合
整合JUnit
SpringBoot是用於簡化Spring的工具,所以我們分別從Spring和SpringBoot的視角進行整合
Spring整合JUnit
我們先給出Spring整合JUnit的代碼:
// 設置運行器
@RunWith(SpringJUnit4ClassRunner.class)
// 載入環境
@ContextConfiguration(classes = SpringConfig.class)
public class UserServiceTesst{

    // 自動裝配測試對象
    @Autowired
    private BookService bookService;

    // 測試方法
    @Test
    public void testSave(){
		bookService.save();
    }
}
SpringBoot整合JUnit
我們從頭說起:
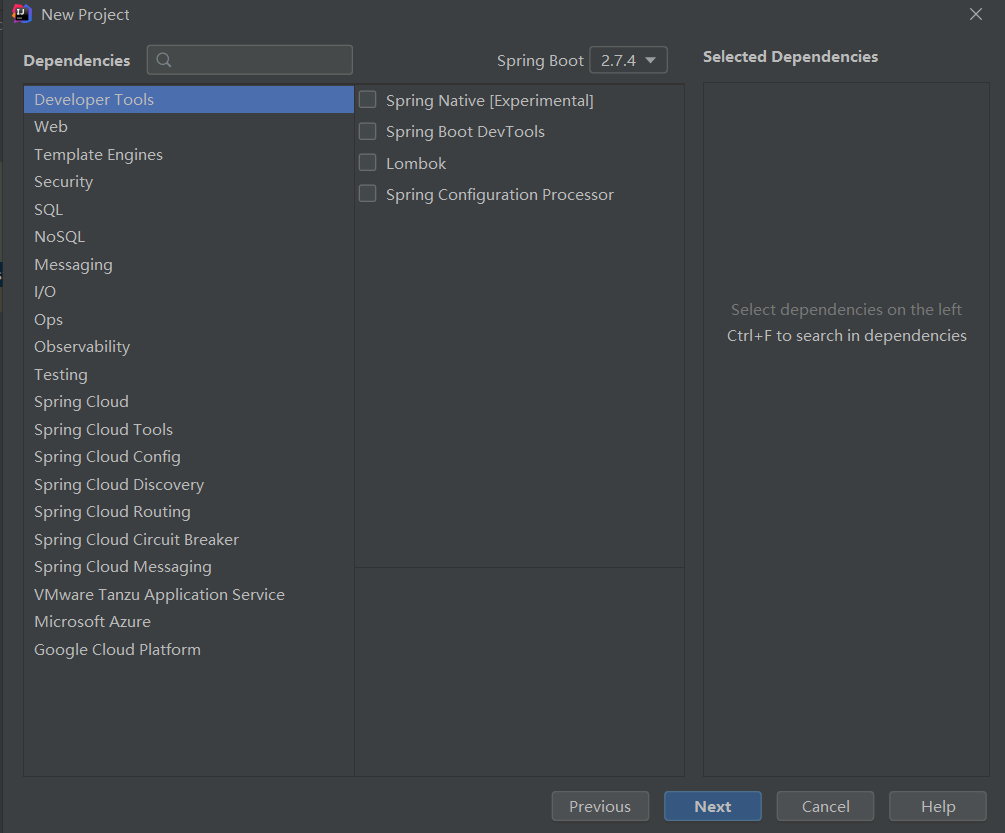
- 創建新項目(這次我們只整合JUnit,所以我們的技術選擇選擇空白)
- 我們首先查看pom.xml併進行部分講解
<?xml version="1.0" encoding="UTF-8"?>
<project xmlns="http://maven.apache.org/POM/4.0.0" xmlns:xsi="http://www.w3.org/2001/XMLSchema-instance"
         xsi:schemaLocation="http://maven.apache.org/POM/4.0.0 https://maven.apache.org/xsd/maven-4.0.0.xsd">
    <modelVersion>4.0.0</modelVersion>
    <parent>
        <groupId>org.springframework.boot</groupId>
        <artifactId>spring-boot-starter-parent</artifactId>
        <version>2.5.0</version>
        <relativePath/> <!-- lookup parent from repository -->
    </parent>
    <groupId>com.itheima</groupId>
    <artifactId>springboot_07_test</artifactId>
    <version>0.0.1-SNAPSHOT</version>
    <properties>
        <java.version>1.8</java.version>
    </properties>
    <dependencies>
        <!--我們提供了spring-boot-starter來做依賴傳遞(web時用的是spring-boot-starter-web)-->
        <dependency>
            <groupId>org.springframework.boot</groupId>
            <artifactId>spring-boot-starter</artifactId>
        </dependency>

        <!--用來做測試的相關依賴坐標導入-->
        <dependency>
            <groupId>org.springframework.boot</groupId>
            <artifactId>spring-boot-starter-test</artifactId>
            <scope>test</scope>
        </dependency>
    </dependencies>

    <build>
        <plugins>
            <plugin>
                <groupId>org.springframework.boot</groupId>
                <artifactId>spring-boot-maven-plugin</artifactId>
            </plugin>
        </plugins>
    </build>

</project>
- 項目自帶有一個測試Java類
// 這裡就是包,倘若為com.itheima1,classes需要設置為啟動類.class
package com.itheima;

import com.itheima.Springboot07TestApplication;
import com.itheima.service.BookService;
import org.junit.jupiter.api.Test;
import org.springframework.beans.factory.annotation.Autowired;
import org.springframework.boot.test.context.SpringBootTest;

// 設置JUnit載入的SpringBoot啟動類(類似於@RunWith和@ContextConfiguration的整合)
@SpringBootTest
class Springboot07TestApplicationTests {

    // 自動裝配測試對象(未發生變化)
    @Autowired
    private BookService bookService;

    // 測試方法(未發生變化)
    @Test
    public void save() {
        bookService.save();
    }

}
/*
名稱:@SpringBootTest
類型:測試類註解
位置:測試類定義上方
作用:設置JUnit載入的SpringBoot啟動類
相關屬性:
	classes:設置SpringBoot啟動類
註意點:
	如果該測試類在SpringBoot啟動類的包或子包中,可以省略啟動類的設置,也就是省略classes的設定
	當該測試類與啟動主Java類不屬於同一目錄名稱下時,需要設置classes屬性為啟動類
	@SpringBootTest(classes = Springboot07TestApplication.class)
*/
整合MyBatis
我們如果想要採用SpringBoot整合SSM,那麼就需要同時整合以下三門技術:
- Spring
- SpringMVC
- MyBatis
但SpringBoot本身就是為了簡化Spring,SpringMVC而存在,所以這兩部分整合實際上我們已經完成了
所以我們將MyBatis單列出來提前進行整合學習,為後續的SSM整合打下基礎##
Spring整合MyBatis
Spring對MyBatis的整合主要從三部分進行:
- SpringConfig
- 導入JdbcConfig
- 導入MyBatisConfig
- JdbcConfig
- 定義數據源(載入properties項:driver,url,username,password)
- MyBatisConfig
- 定義sqlSessionFactoryBean
- 定義映射配置
我們在這裡就不做贅述了,如果遺忘可以查看之前的MyBatis文章
SpringBoot整合MyBatis
我們同樣從頭開始整合:
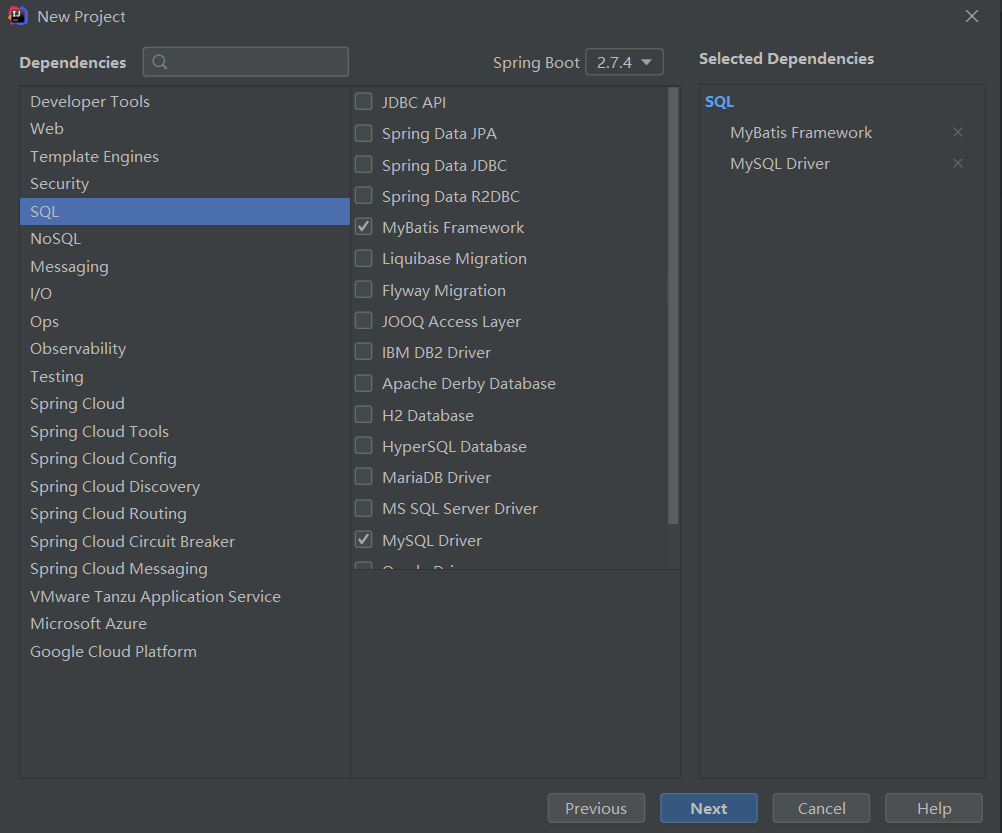
- 創建項目(這次我們需要MyBatis和Mysql兩門技術棧)
- 查看pom.xml並稍作講解
<?xml version="1.0" encoding="UTF-8"?>
<project xmlns="http://maven.apache.org/POM/4.0.0" xmlns:xsi="http://www.w3.org/2001/XMLSchema-instance"
	xsi:schemaLocation="http://maven.apache.org/POM/4.0.0 https://maven.apache.org/xsd/maven-4.0.0.xsd">
	<modelVersion>4.0.0</modelVersion>
	<parent>
		<groupId>org.springframework.boot</groupId>
		<artifactId>spring-boot-starter-parent</artifactId>
		<version>2.5.0</version>
	</parent>
	<groupId>com.itheima</groupId>
	<artifactId>springboot_08_mybatis</artifactId>
	<version>0.0.1-SNAPSHOT</version>
	<properties>
		<java.version>1.8</java.version>
	</properties>
	<dependencies>
        <!--自動添加MyBatis相關依賴-->
		<dependency>
			<groupId>org.mybatis.spring.boot</groupId>
			<artifactId>mybatis-spring-boot-starter</artifactId>
			<version>2.2.0</version>
		</dependency>

        <!--自動添加mysql相關依賴-->
		<dependency>
			<groupId>mysql</groupId>
			<artifactId>mysql-connector-java</artifactId>
			<scope>runtime</scope>
		</dependency>

		<dependency>
			<groupId>org.springframework.boot</groupId>
			<artifactId>spring-boot-starter-test</artifactId>
			<scope>test</scope>
		</dependency>

        <!--手動添加druid-->
		<dependency>
			<groupId>com.alibaba</groupId>
			<artifactId>druid</artifactId>
			<version>1.1.16</version>
		</dependency>
	</dependencies>

	<build>
		<plugins>
			<plugin>
				<groupId>org.springframework.boot</groupId>
				<artifactId>spring-boot-maven-plugin</artifactId>
			</plugin>
		</plugins>
	</build>

</project>
- 創建與資料庫相同的實體類
package com.itheima.domain;

public class Book {
    private Integer id;
    private String name;
    private String type;
    private String description;

    @Override
    public String toString() {
        return "Book{" +
                "id=" + id +
                ", name='" + name + '\'' +
                ", type='" + type + '\'' +
                ", description='" + description + '\'' +
                '}';
    }

    public Integer getId() {
        return id;
    }

    public void setId(Integer id) {
        this.id = id;
    }

    public String getName() {
        return name;
    }

    public void setName(String name) {
        this.name = name;
    }

    public String getType() {
        return type;
    }

    public void setType(String type) {
        this.type = type;
    }

    public String getDescription() {
        return description;
    }

    public void setDescription(String description) {
        this.description = description;
    }
}
- 數據層實現
package com.itheima.dao;

import com.itheima.domain.Book;
import org.apache.ibatis.annotations.Mapper;
import org.apache.ibatis.annotations.Select;

// 註意:我們SpringBoot整合中的SpringConfig已經被省略,所以我們的JdbcConfig和MyBatisConfig配置類不用配置
// JdbcConfig主要用於配置DataSource,我們將會在yaml配置文件中配置
// MyBatisConfig配置sqlSessionFactoryBean,大部分屬於固定代碼,唯一的變數setTypeAliasesPackage我們選擇設置整個代碼包
// MyBatisConfig配置MapperScannerConfigurer映射地址,我們選擇在dao數據層採用@Mapper來代替操作
@Mapper
public interface BookDao {
    @Select("select * from tbl_book where id = #{id}")
    public Book getById(Integer id);
}
- 配置資料庫關聯
# 直接配置datasource即可
spring:
  datasource:
    driver-class-name: com.mysql.cj.jdbc.Driver
    url: jdbc:mysql://localhost:3306/ssm_db?serverTimezone=UTC
    username: root
    password: root
    type: com.alibaba.druid.pool.DruidDataSource
- 啟動伺服器即可
package com.itheima;

import org.springframework.boot.SpringApplication;
import org.springframework.boot.autoconfigure.SpringBootApplication;

@SpringBootApplication
public class Springboot08MybatisApplication {

	public static void main(String[] args) {
		SpringApplication.run(Springboot08MybatisApplication.class, args);
	}

}
- 簡單測試
package com.itheima;

import com.itheima.dao.BookDao;
import com.itheima.domain.Book;
import org.junit.jupiter.api.Test;
import org.springframework.beans.factory.annotation.Autowired;
import org.springframework.boot.test.context.SpringBootTest;

@SpringBootTest
class Springboot08MybatisApplicationTests {

	@Autowired
	private BookDao bookDao;

	@Test
	void testGetById() {
		Book book = bookDao.getById(1);
		System.out.println(book);
	}

}
整合SSM
我們SpringBoot的最後課程就是用來整合SSM
我們同樣採用和之前SSM案例整合的代碼對比來介紹SpringBoot的SSM整合
Spring整合SSM
我們先給出之前SSM整合的大致框架:
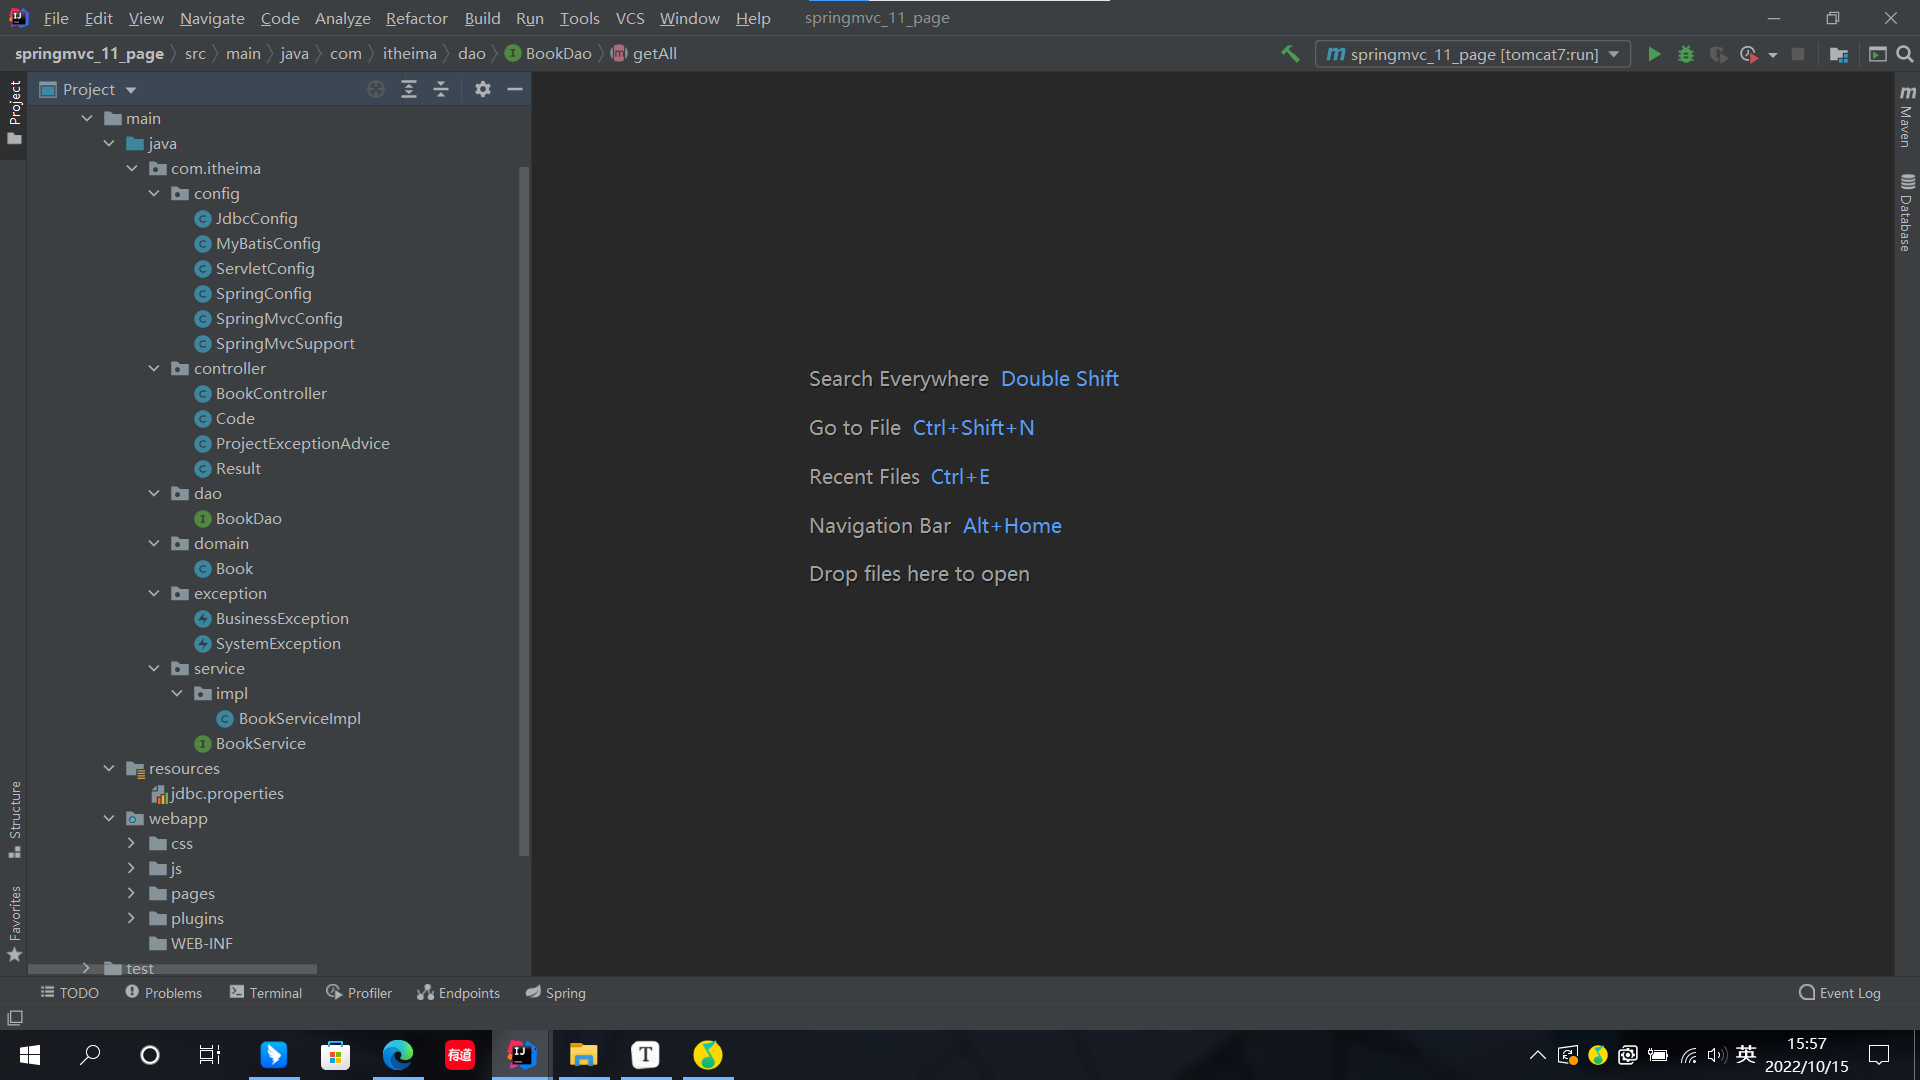
我們來簡單介紹上述代碼的作用不做具體代碼展示了(如有需要可以查看之前文章SSM整合):
- Config文件夾:各種技術的Java配置類
- SpringMvcSupport:攔截器,用來控制相關頁面展示
- controller文件夾:服務層
- Code:狀態碼集合
- ProjectExceptionAdvice:異常處理類
- Result:返回內容集合
- dao文件夾:數據層
- domain文件夾:實現類
- exception文件夾:異常類
- service文件夾:業務層介面以及實現類
- resources文件夾:相關配置文件(jdbc配置文件內容)
- webapp文件夾:前端代碼
- pom.xml:各種依靠坐標
SpringBoot整合SSM
由於我們的SSM內容過多,我們針對上次的SSM案例進行整合,部分內容不做修改,我們僅介紹更改部分
下麵讓我們開始運行SpringBoot開始整合:
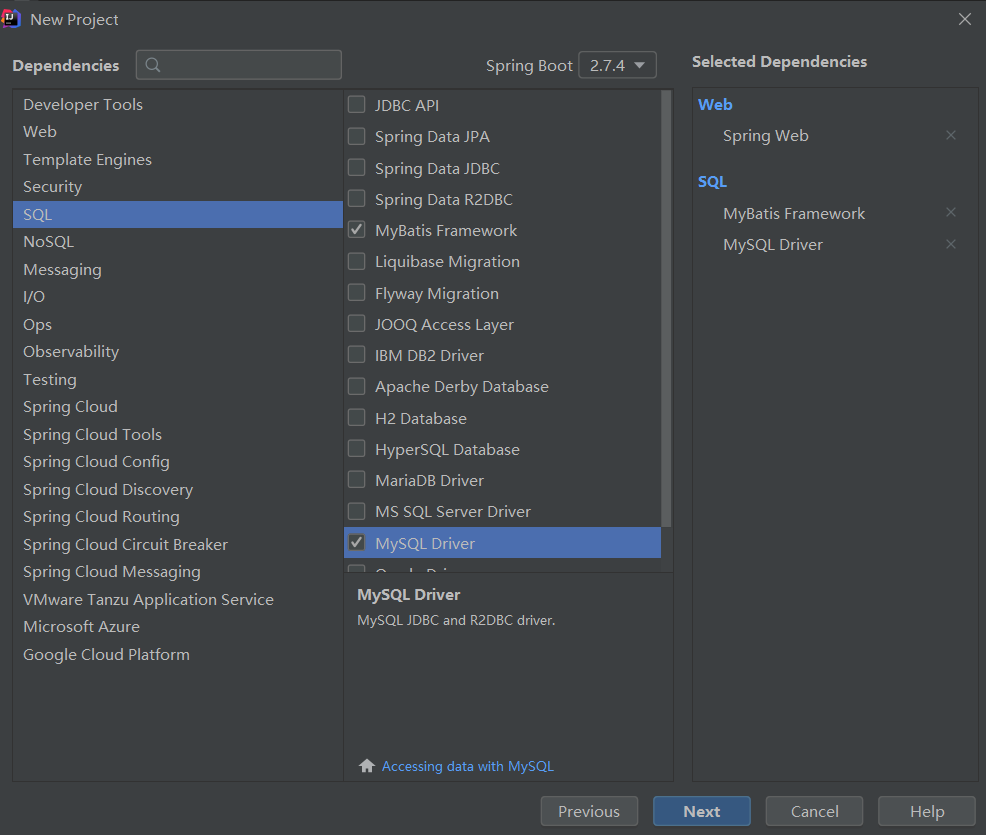
- 創建項目(運用了web,Mybatis,mysql技術棧)
- 查看pom.xml
<?xml version="1.0" encoding="UTF-8"?>
<project xmlns="http://maven.apache.org/POM/4.0.0" xmlns:xsi="http://www.w3.org/2001/XMLSchema-instance"
	xsi:schemaLocation="http://maven.apache.org/POM/4.0.0 https://maven.apache.org/xsd/maven-4.0.0.xsd">
	<modelVersion>4.0.0</modelVersion>
	<parent>
		<groupId>org.springframework.boot</groupId>
		<artifactId>spring-boot-starter-parent</artifactId>
		<version>2.5.0</version>
		<relativePath/> <!-- lookup parent from repository -->
	</parent>
	<groupId>com.itheima</groupId>
	<artifactId>springboot_09_ssm</artifactId>
	<version>0.0.1-SNAPSHOT</version>
	<name>springboot_09_ssm</name>
	<description>Demo project for Spring Boot</description>
	<properties>
		<java.version>1.8</java.version>
	</properties>
	<dependencies>
		<dependency>
			<groupId>org.springframework.boot</groupId>
			<artifactId>spring-boot-starter-web</artifactId>
		</dependency>
		<dependency>
			<groupId>org.mybatis.spring.boot</groupId>
			<artifactId>mybatis-spring-boot-starter</artifactId>
			<version>2.2.0</version>
		</dependency>

		<dependency>
			<groupId>mysql</groupId>
			<artifactId>mysql-connector-java</artifactId>
			<scope>runtime</scope>
		</dependency>
		<dependency>
			<groupId>org.springframework.boot</groupId>
			<artifactId>spring-boot-starter-test</artifactId>
			<scope>test</scope>
		</dependency>
		<!--TODO 添加必要的依賴坐標-->
		<dependency>
			<groupId>com.alibaba</groupId>
			<artifactId>druid</artifactId>
			<version>1.1.16</version>
		</dependency>
	</dependencies>

	<build>
		<plugins>
			<plugin>
				<groupId>org.springframework.boot</groupId>
				<artifactId>spring-boot-maven-plugin</artifactId>
			</plugin>
		</plugins>
	</build>

</project>
- 設置相關數據源,埠等(yaml)
# TODO 配置數據源相關信息

server:
  port: 80

spring:
  datasource:
    type: com.alibaba.druid.pool.DruidDataSource
    driver-class-name: com.mysql.cj.jdbc.Driver
    url: jdbc:mysql://localhost:3306/ssm_db
    username: root
    password: root
- 對dao數據層進行簡單修改(添加@Mapper)
// 我們前面有提起Config文件夾全部刪除,導致我們需要手動配置dao的數據層映射

package com.itheima.dao;

import com.itheima.domain.Book;
import org.apache.ibatis.annotations.*;

import java.util.List;

// TODO 添加@Mapper
@Mapper
public interface BookDao {
    @Insert("insert into tbl_book (type,name,description) values(#{type},#{name},#{description})")
    public int save(Book book);

    @Update("update tbl_book set type = #{type}, name = #{name}, description = #{description} where id = #{id}")
    public int update(Book book);

    @Delete("delete from tbl_book where id = #{id}")
    public int delete(Integer id);

    @Select("select * from tbl_book where id = #{id}")
    public Book getById(Integer id);

    @Select("select * from tbl_book")
    public List<Book> getAll();
}
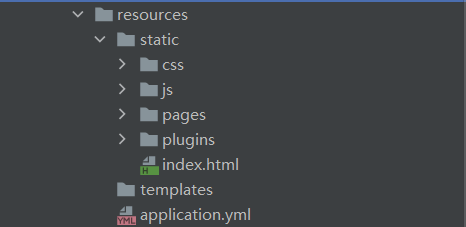
- 我們將頁面相關內容移至Sources文件夾下的static文件夾下
- 基本修改完畢,採用測試類測試
package com.itheima.service;

import com.itheima.domain.Book;
import org.junit.jupiter.api.Test;
import org.springframework.beans.factory.annotation.Autowired;
import org.springframework.boot.test.context.SpringBootTest;

import java.util.List;

@SpringBootTest
public class BookServiceTest {

    @Autowired
    private BookService bookService;

    @Test
    public void testGetById(){
        Book book = bookService.getById(2);
        System.out.println(book);
    }

    @Test
    public void testGetAll(){
        List<Book> all = bookService.getAll();
        System.out.println(all);
    }

}
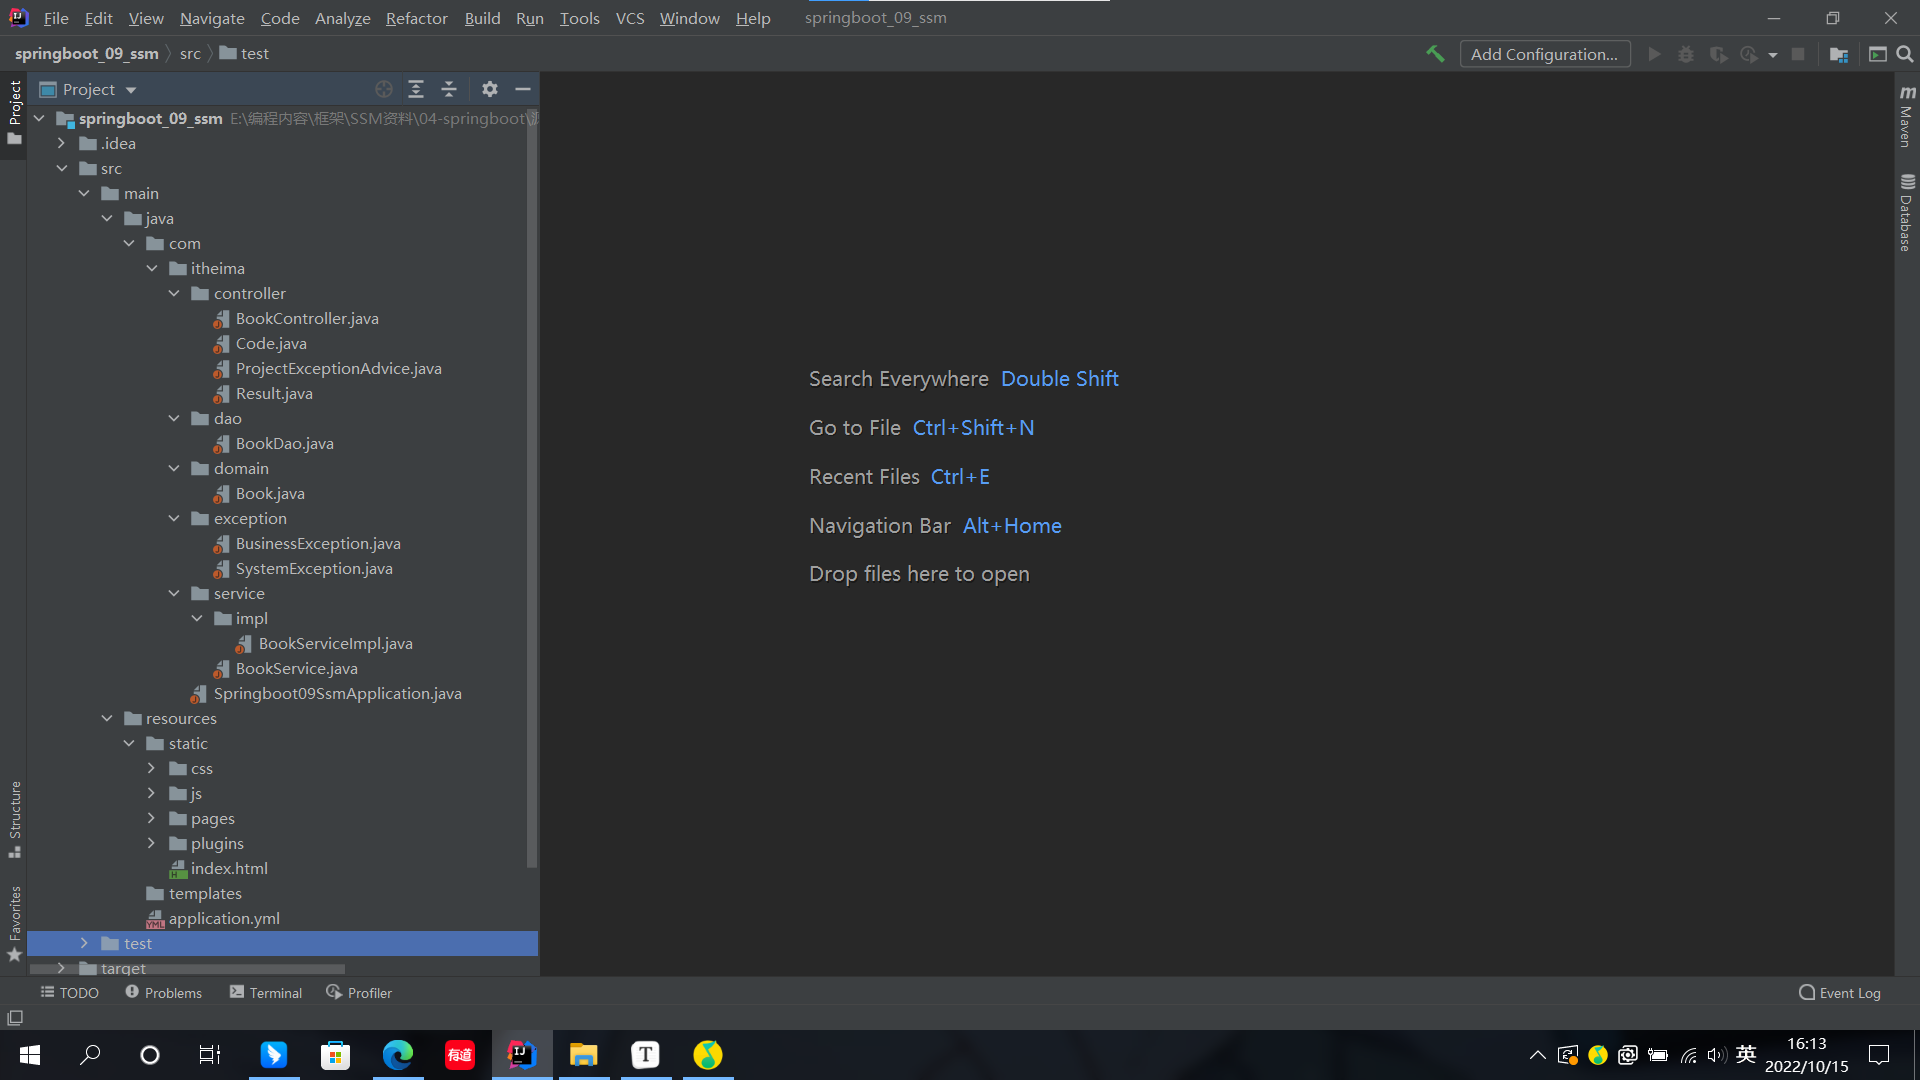
最後為大家展示一下SpringBoot整合後的整體框架:
結束語
好的,關於SpringBoot的內容就介紹到這裡,希望能為你帶來幫助!
附錄
該文章屬於學習內容,具體參考B站黑馬程式員李老師的SSM框架課程
這裡附上鏈接:SpringBoot-01-SpringBoot工程入門案例開發步驟_嗶哩嗶哩_bilibili


